![]()
USER GUIDEkogan.com

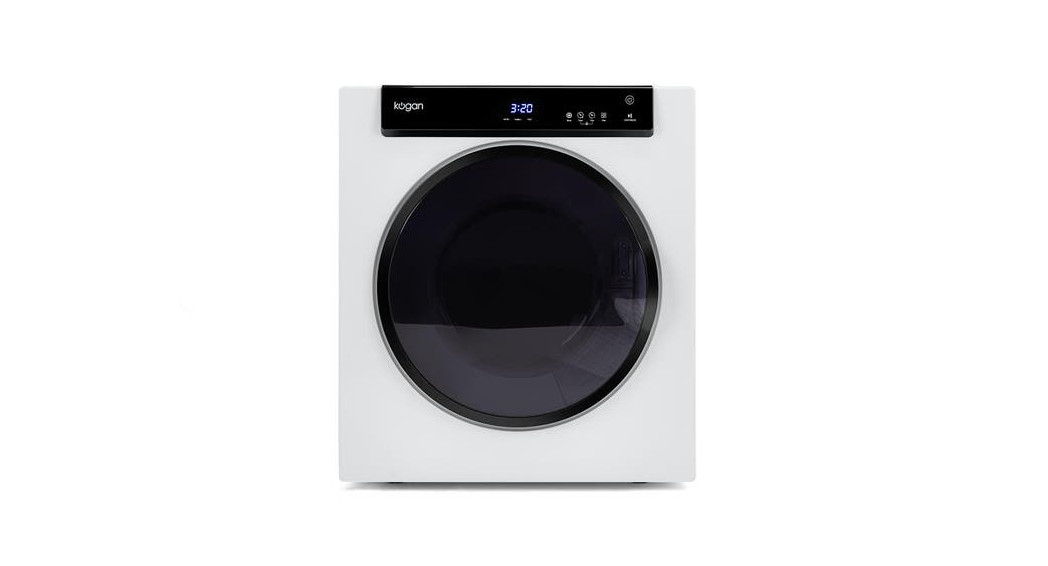
4.5KG VERTED DRYERKAJDRYVT45A
SAFETY & WARNINGS
Read this manual thoroughly before first use, the safety precautions enclosed herein reduce the risk of fire, electric shock and injury when correctly adhered to. Retain this user guide for future reference. If applicable, pass these instructions on to the next owner.
- Do not attempt to repair this product yourself. If the product or its power supply experiences any malfunction or damage, cease use immediately and contact Kogan.com for support.
- This appliance is not intended for use by persons (including children) with reduced physical. sensory or mental capabilities or lack of experience and knowledge, unless they have been given supervision or instruction concerning use of the appliance by a person responsible for their safety.
- Ensure children are supervised so that they do not ploy with the appliance.
- Ensure the lint filter is cleaned after every cycle and whenever prompted by the dryer.
- The lint filter and air intake filter should be washed frequently.
- Lint must not to be allowed to accumulate around the tumble dryer.
- WARNING: The appliance must not be supplied through an external switching device, such as a timer or connected to a circuit that is regularly switched on and off by o utility.
- WARNING: This dryer cannot be installed upside down.
- This appliance is not intended for outdoor use.
- Do not place any open flames, such as candles or lit cigarettes, on the appliance.
- Do not locate the appliance or cord near heat sources such os radiators, heaters, air ducts or direct sunlight.
- The dryer must not be installed behind a lockable door, a sliding door or a door with a hinge on the opposite side to that of the tumble dryer, in such o way that the operation of the dryer door is restricted.
- Avoid stopping the dryer before the end of the drying cycle. If this cannot be avoided ensure all items are removed quickly and spread out to allow the heat to dissipate.
- The final part of a tumble dryer cycle occurs without heat (cool down cycle) to ensure that the items are left at a temperature to reduce wrinkling and ensure that the user will not be exposed to remaining heat that could cause injury.
- Do not block any of the ventilation openings or allow them to be blocked by newspapers, tablecloths, curtains, etc. Do not install inside a narrow cabinet.
- For appliances with ventilation openings in the base, ensure that the floor covering does not obstruct the openings.
- That exhaust air must not be discharged into a flue which is also used for exhausting fumes from appliances burning gas or other fuels.
- Do not run the cord under floor coverings. Instead, arrange the cord away from traffic areas where it will not become o trip hazard.
- To disconnect the appliance, turn the appliance off, switch off the power outlet and remove the plug from the power outlet.
- Never carry the appliance by the cord or pull to disconnect it from the outlet. Instead, grasp the plug and pull to disconnect.
- This appliance is only to be serviced by a qualified person. There are no user-serviceable parts inside
- Do not bend, stretch, twist or bend the power cord or place heavy objects on it.
- Do not use an extension cord with this appliance.
- Do not overload the dryer.
- Keep the drum clear of foreign objects and always remove items from pockets before placing them in the dryer.
- The door window may be hot after a long drying cycle. Please ensure children are kept away from the machine.
- If the dryer is not wall-mounted, place it in o flat, firm, and dry location. Use the adjustable front legs to assist in leveling the dryer if need be. Do not place it on any soft material such as foam or plastic
- After turning off the power supply to the dryer, woit at least 2 minutes before turning it bock on again.
- Remove all packaging from the dryer, prior to first use.
- Should the appliance need to be moved, it must be transported vertically.
- Delicate items should be placed into a nylon net bog prior to drying. It is not recommended to dry underwire bras in this unit
- Do not add items into the dryer whilst it is running.
Electrical Safety and Cord Handling Always follow basic safety precautions and accident prevention measures when using an electrical appliance, including the following:
- Voltage: Ensure your outlet voltage and circuit frequency correspond to the voltage indicated on the appliance’s rating label and your outlet socket is properly earthed. If this is not the case, do not use the dryer.
- Separate circuit We strongly recommend you connect the appliance to a separate circuit serving only this appliance. This provides the best performance and prevents overloading the house wiring circuits that could cause a fire hazard from overheating.
- No extension cord: Do not use this appliance with a power adaptor or extensionWARNING: If such a device must be used, the cord or outlet must be positioned so that it is not subject to splashing or liquid ingress.
- Protect the power cord. Do not kink or damage the power cord. Position the cord out of the way so no one steps on or places anything on the cord or against it Do not run the cord under floor coverings. Position the cord away from high traffic areas where it will not become a tripping hazard.
- Disconnect Unplug the clothes dryer from the power supply after use, before cleaning, servicing or moving the appliance. To disconnect, turn the appliance off, switch off the power outlet and remove the plug from the power outlet. Grip the plug when disconnecting; do not pull on the cord. After disconnection, wait at least 2 minutes before turning the appliance back on again.
- RCD: Unless your home is already fitted with a residual current device (safety switch), we recommend installing an RCD with a rated residual operating current not exceeding 30mA to provide additional safety protection when using electrical appliances. Consultant an electrician for professional advice.
Usage conditions and restrictionsThis appliance is intended for indoor household use only. It is not intended for industrial. commercial or trade use. Do not use it outdoors. Do not use it for anything other than its intended purpose (drying domestic quantities of washing) and only use it as described in this manual.
Unsuitable Items:The items listed below are unsuitable for tumble drying. They can cause fire in the clothes dryer or extensive damage. Do not place the following items into the clothes dryer.
- Items containing foam rubber (also known as latex foam) or similarly textured rubber-like materials – when heated, these materials can spontaneously combust and cause a fire.
- Items that have been spotted or soaked with cooking oil or with highly flammable substances – these substances constitute a fire hazard. Highly flammable substances used in domestic environments include acetone, alcohol, petrol, kerosene, some stain removers, dry-cleaning solvents, turpentine, waxes, wax removers, and some hair care products. (This also includes items that have previously been cleaned or spotted with dry-cleaning solvents or other flammable or explosive substances.)
- Washing these items thoroughly beforehand in hot water with an extra amount of detergent will reduce, but not necessarily eliminate the hazard. The ‘cool down’ cycle of o clothes dryer should be used to reduce the temperature of the items. They should not be removed from the clothes dryer or piled or stacked while hot.
- Undergarments that contain metal reinforcements (such as underwire bras) – these parts can come loose during drying and damage the clothes dryer.
- Plastic articles such as shower caps or waterproof baby bibs.
- Rubber-backed articles, clothes fitted with foam rubber pads, pillows, galoshes, and rubber-coated tennis shoes.
 Oil-affected items can ignite spontaneously, especially when exposed to heat sources such as in a tumble dryer. The items become warm, causing an oxidation reaction in the oiL Oxidation creates heat. If the heat cannot escape, the items can become hot enough to catch fire. Piling, stacking, or storing oil-affected items can prevent heat from escaping and so create a fire hazard.
 - Do not dry unwashed items in the tumble dryer.
- This dryer is not to be used if industrial chemicals have been used for cleaning.
 Oil-affected items can ignite spontaneously, especially when exposed to heat sources such as in a tumble dryer. The items become warm, causing an oxidation reaction in the oiL Oxidation creates heat. If the heat cannot escape, the items can become hot enough to catch fire. Piling, stacking, or storing oil-affected items can prevent heat from escaping and so create a fire hazard.
OVERVIEW
INSTALLATION
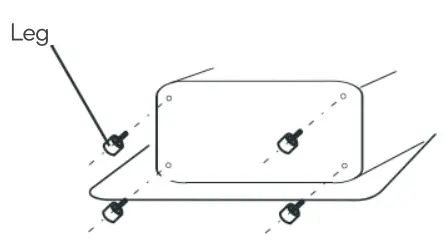
The dryer comes with fixed legs that need to be assembled to ensure stability.
Place the dryer in a dry well-ventilated area.It should be positioned away from heat and direct sunlight. If the dryer is not wall-mounted, it must be placed on firm horizontal ground. Do not place the dryer on the carpet as this will block the intake. There should be at least 15cm between the dryer and the walls.
WARNING: This dryer cannot be mounted upside down.
If the dryer is rack-mounted. A secure bracket (not included) is required to ensure stability and prevent vibration. At least 15cm between the dryer and walls is required (The bracket is not included).

WALL MOUNTING

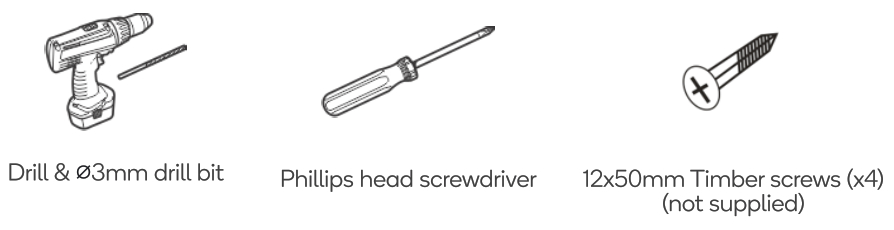
Tools Required
Note: It is highly recommended to seek the assistance of a second person to help lift the dryer onto the wall bracket.
Mounting the Dryer
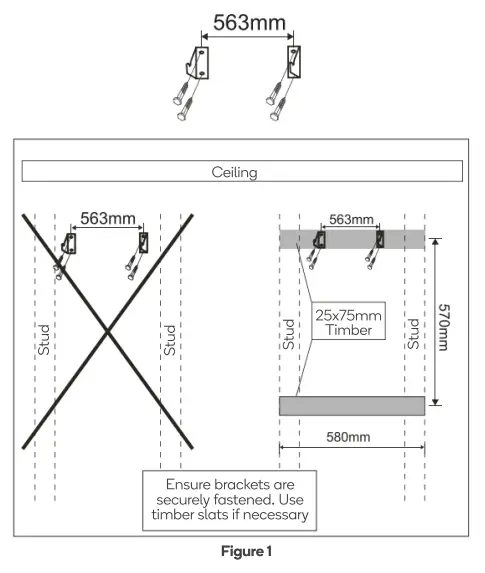
- Determine the location for installation and mark the wall. If installing above a top loader washing machine, leave sufficient space to open the lid. A minimum of 50mm is needed between the top of the dryer and the ceilingWARNING: The dryer must be mounted to the wall studs and not the plaster. Ensure you are not drilling into any electrical wiring. If you are unsure, consult a trade professional.
- Securely attach the wall brackets (included) to the wall 563mm apart, ensuring yot are mounting into the wall studs (Figure 1).Note: If the position of the wall studs is too far apart, a timber slat (not included) can be attached to the studs to provide a suitable mounting surface for the wall brackets.
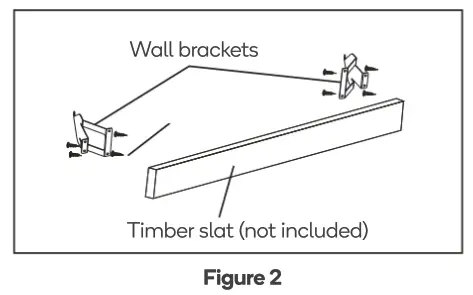
- Optional: Use the x4 25mm screws to attach the x2 wall brackets to the timber slat (Figure 2).
- Attach the exhaust connector to the connector base by rotating it in a clockwise direction (Figure 3).
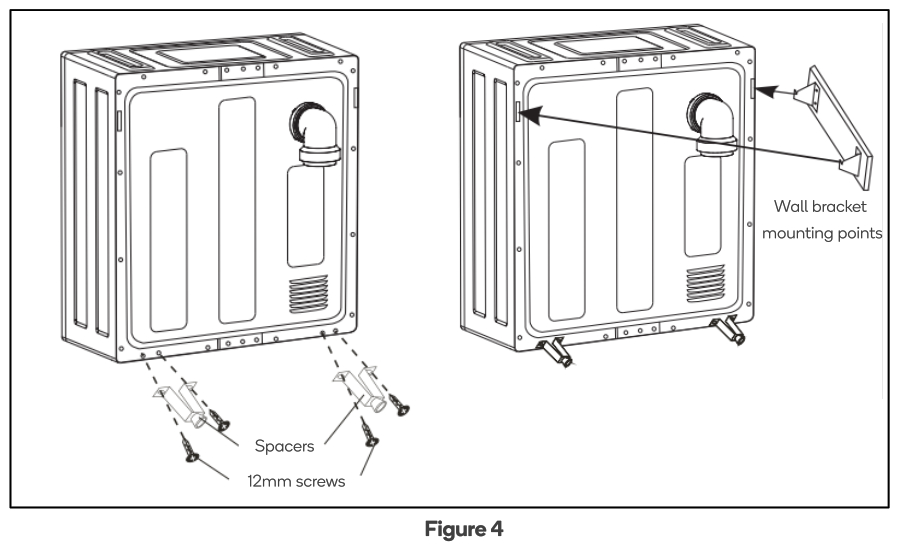
- Using the x4 12mm screws, attach the x2 spacers to the dryer (Figure 4).
- With assistance, carefully mount the dryer onto the wall brackets.

OPERATION
LoadingIt is recommended to place items in the dryer one at a time. This ensures they do not become tangled, which results in uneven drying. When closing the dryer door, ensure items are not jammed.
Tips Before Drying
Do not use this appliance to dry garments if they have one of the following warning labels:

- Turn items with zippers inside out, fasten buckles, and remove all objects such as lighters, coins, etc.
- Dryer heat may permanently set stains. Ensure stains are removed prior to drying.
- Separate dark and light-colored clothing.
- For best results, dry similar materials together and place small, delicate items into mesh a mesh bag and take care, not to overload.
- The maximum capacity is 4.5 kg of dry textile material for the dryer. Do not overload.
Drying guide:
| Drying Capacity | Approximate Drying Times | |
| High | Medium | |
| 1.0 kg | 40Minutes | 60Minutes |
| 2.0 kg | 70Minutes | 110Minutes |
| 3.0 kg | 120Minutes | 200Minutes |
| 4.5 kg | 200Minutes | – |
Drying times can be affected by many factors, such as material, bulkiness, how full the dryer is, etc. The above list is a guide only.
Control Panel

PowerPress the power button to turn the dryer on and off.ModePress the Mode button to cycle through the options:
- IHS mode: The display shows “MS”, approximately 3 minutes later, the display shows the remaining drying time. In this mode, the dryer automatically identifies the drying time needed. The dryer will stop when the clothes are dry.
- TIME +/- mode: The display shows “03:20”. The user is able to adjust the drying time using the “Time +” and “Time -” buttons.
Heat ButtonPress this button to cycle through the temperature options:o High: Full powero Medium: Hall powero Air Dry: This function uses cool air to for items that require freshening.Time+ & Time- ButtonsAdjust the drying time in 10-minute increments. The maximum drying time is 200 minutes. Nate: Drying time only be adjusted in “Time +/-” mode.Start / PausePress this button to start or pause the dryer program. If the door is opened during operation, close the door and push this button to restart the dryer.Press the “Pause” button to make adjustments to the program, then push “Start” to restart the dryer.
Child LockPress and hold the “Time+ & Time-” buttons at the same time for 3 seconds until the “Child Lock” light comes on. All other buttons will be locked. Press and hold the “Mode” and “Temperature” buttons at the same time for 3 seconds to disable the child lock.Operation PrecautionsIf drying large items such as a blanket, it is recommended that from time to time you open the dryer door, shake the item, place the item back in the dryer and close the door. This will ensure even drying.

CLEANING & CARE
Disconnect the appliance from the power outlet before you perform any cleaning or maintenance.
Cleaning Interior & Exterior of Dryer
- Do not clean the dryer by directly spraying water onto it.
- Do not clean using benzene, thinner, alcohol, or acetone as this may cause discoloration, deformation, damage, electric shock, or fire.
- Clean the external surfaces of the dryer using a soft cloth with a solution of soap and water and then dry thoroughly.
- Do not use any type of spray cleaner when cleaning the interior. The drum can be cleaned with a damp cloth.
- Thoroughly dry and remove any residue before the next operation
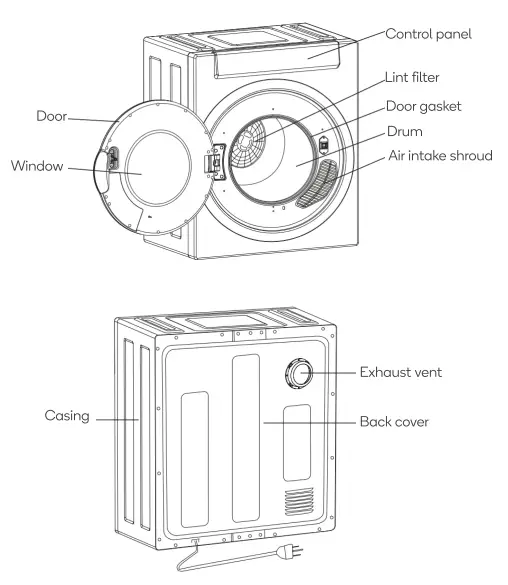
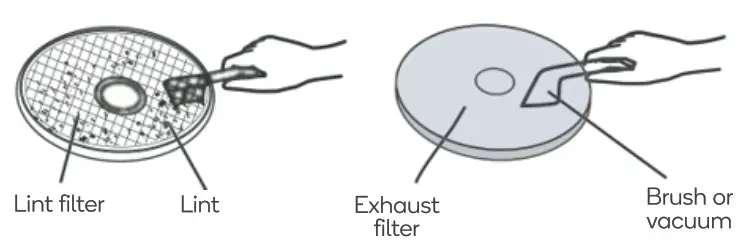
Cleaning the FilterNote: Ensure the lint filter is cleaned after every cycle and whenever prompted by the dryer.Step 1: Removing filter Remove the filter by pulling in an outward direction.
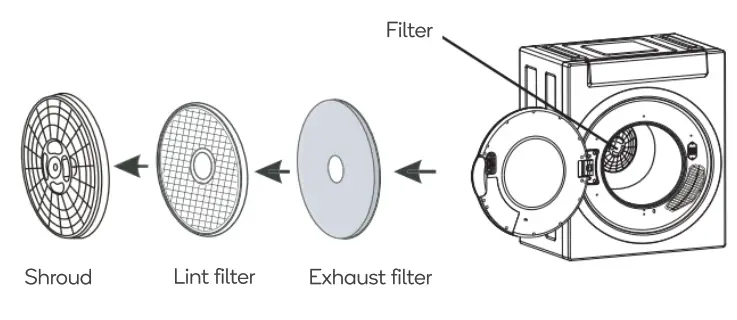
Step 2: Cleaning filter• Separate the shroud, lint filter, and exhaust filter.• Clean using a soft brush or vacuum cleaner, taking care not to damage any of the components.
 Step 3: Reinstalling• Reassemble the filter, aligning recesses in the center with the center of the drum.• Ensure the filter it is firmly inserted.

WARNING: Never operate the appliance without the filter installed.
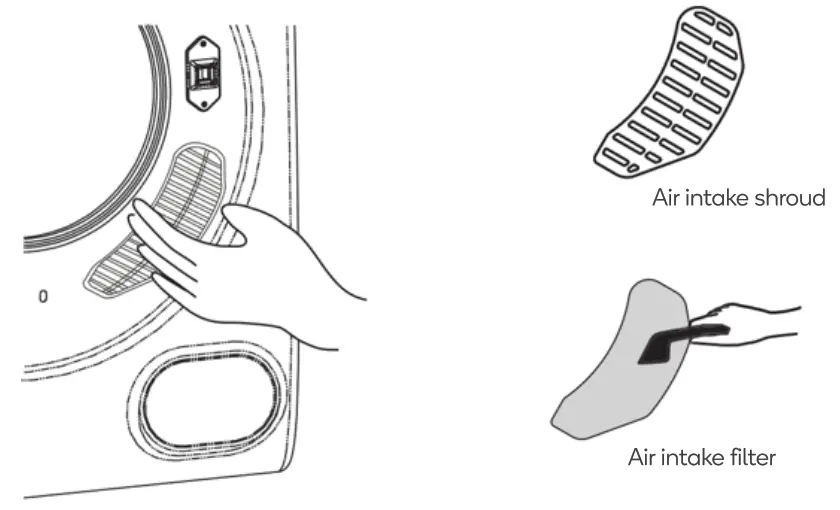
Cleaning the Air Intake FilterNote: Ensure the air intake filter is cleaned at least once a month.
- Remove the air intake filter shroud by pulling it in an outward direction
- Carefully separate the filter from the shroud and clean using a soft brush before reassembling.
- Replace the air intake filter shroud back into the dryer.
SPECIFICATIONS
| Drying Capacity | 4.5kg |
| Power | 230V- 50Hz |
| Rated Input | 1450W |
| Dimension (W x D x H) | 600 x 545 x 680mm |
| Net Weight | 21kg |
TROUBLESHOOTING
Most common problems are due to a lack of simple maintenance or oversights, which can be solved easily. Before contacting support, please carry out the checks listed below. If after all checks, the problem persists, contact help.Kogan.com for support.
|
Problem |
Possible Cause |
Solution |
| Drum does not turn. |
|
|
| Hot air is not blowing out. |
|
|
| The laundry is not thoroughly dried. |
|
|
| Dryer does not start. |
|
|
Notes
Need more information?We hope that this user guide has given you the assistance needed for a simple setup.For the most up-to-date guide for your product, as well as any additional assistance you may require, head online to help.kogan.comKogan.com
[xyz-ips snippet=”download-snippet”]