
QUICK START GUIDEKogan.com50″ 4K SMART UHD HDR LED TVSERIES 8 NU8030(KALED5ONU8030SVA)

COMPONENTS
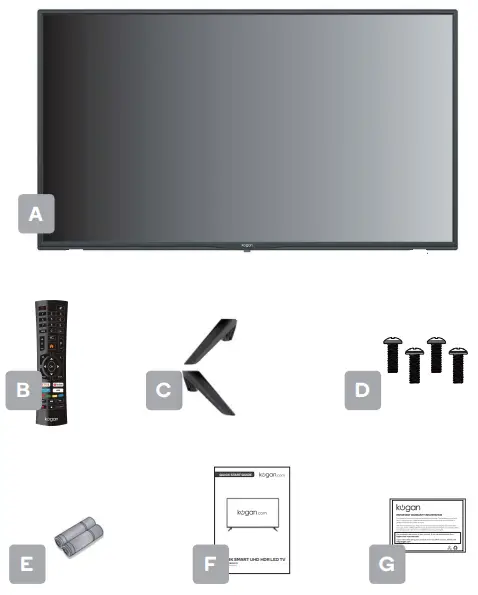
A Kogan 50″ 4K Smart UHD HDR LED TVB Remote controlC Stand (x2)D BB4 x 25mm screw (x4)E AAA battery (x2)F Quick-start guideG Warranty card
NOT INCLUDEDPhillips head screwdriver, antenna cable, broadband internet connection.
REMOTE CONTROL OVERVIEW
| 1 |
8 V+ : Increase the volume9 V- : Decrease the volume10 P∧ : Increase the program11 P∨ : Decrease the program12 |
REMOTE CONTROL OVERVIEW
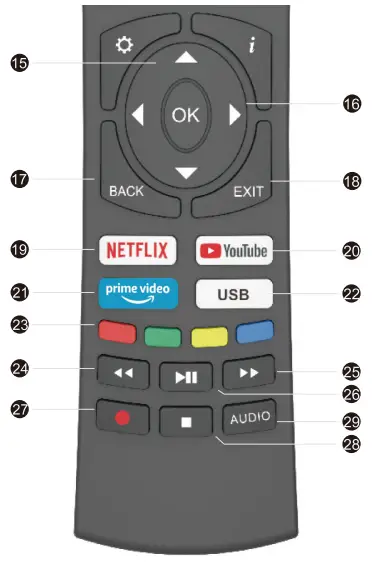
| 15 |
23 Colour Buttons : Press these buttons according to different prompts24 |
ASSEMBLY AND INSTALLATION
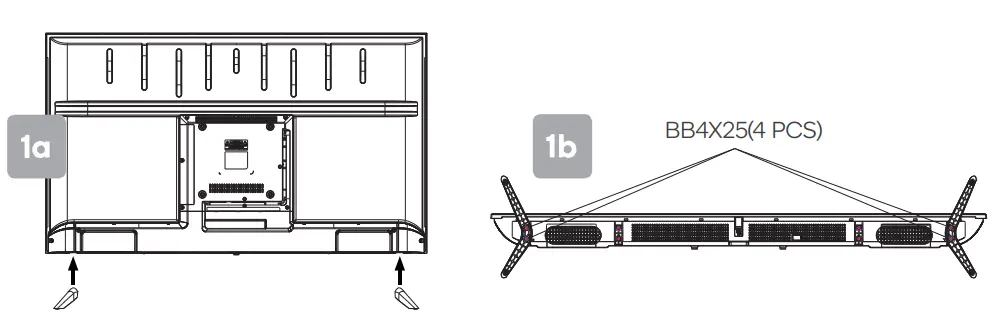
BEFORE YOU GET STARTED Spread cushioning flat to lay the TV on. This will help to prevent damage.
- Stand assemblya. Attach stands to the base of the TV.b. Insert two 25 mm screws for each stand, and use a Phillips head screwdriver (not supplied) to tighten.

- Remote control assemblya. Open the battery compartment cover on the backside.b. Insert two 1.5V AAA size batteries, making sure to match the polarity markings (+ / -) of the batteries with the diagram inside the compartment.c. Replace battery compartment cover.
- Connect to antennaa. Connect an antenna cable (not supplied) via the ‘ANT’ input port at the back of the TV.b. Ensure the antenna cable is also connected to a working antenna, either via an antenna wall socket in your home or directly.
- Turning TV on Plug the power cord into a suitable power outlet, then press the POWER (0) button on the remote control, making sure to aim it at the sensor at the front of the TV. Alternatively, you can press the power button on the bottom of the panel on the TV.

TURNING TV OFFPress the POWER (![]() ) button on the remote control to enter standby mode. To power down the TV completely, unplug the power cord from the power outlet. Do not leave your set in standby mode for long periods of time. If you will not use the TV for a long time, it is recommended to unplug the set from both the power outlet and aerial.
) button on the remote control to enter standby mode. To power down the TV completely, unplug the power cord from the power outlet. Do not leave your set in standby mode for long periods of time. If you will not use the TV for a long time, it is recommended to unplug the set from both the power outlet and aerial.
FIRST TIME SETUP
The first time you switch your TV on, it will automatically be in the initial setup mode. This will guide you through the whole setup process of selecting your desired language, connecting to the Internet. signing in to your account and tuning in TV channels.
Choosing Your OSD Language
- Press the buttons to highlight your desired OSD language then press the OK button.
- Data Collection and Firmware Updates Notice page will appear. Press the buttons to select the menu option.VIEW ADDITIONAL DETAILSGo to view more detailed firmware/software network download update instructions.ACCEPTAccept all agreements and agree to the firmware/software network to automatically download updates
- If you select VIEW ADDITIONAL DETAILS, the detailed firmware/software network download update instructions will display. Initially, the default focus will be on the text description section. Press the buttons will drop the text to the bottom. Press the ”buttons, ACCEPT ALL will highlight. Press the buttons then the OK button to confirm the selection.ACCEPT ALLAccept all protocol sections and agree to the firmware/software network to automatically download updates.ACCEPT AUTOMATIC UPDATESAccept all protocol parts and manually select whether to agree to the firmware/software network download update if there is a firmware/software update.ACCEPT ALLAccept all protocol sections and agree to the firmware/software network to automatically download updates. ACCEPT AUTOMATIC UPDATESAccept all protocol parts and manually select whether to agree to the firmware/software network download update if there is a firmware/software update.ACCEPT USAGE INFORMATION COLLECTIONSuppliers accepting the agreement section collect some non-personal user information.DECLINE ALLReject all protocols to disable firmware/software network updates.
- Press the buttons to select the country where you will operate the TV. Press the OK button to confirm.

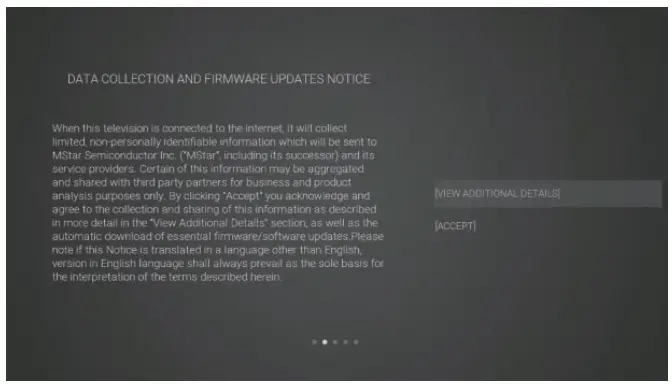 VIEW ADDITIONAL DETAILSGo to view more detailed firmware/software network download update instructions.ACCEPTAccept all agreements and agree to the firmware/software network to automatically download updates
 ACCEPT ALLAccept all protocol sections and agree to the firmware/software network to automatically download updates. ACCEPT AUTOMATIC UPDATESAccept all protocol parts and manually select whether to agree to the firmware/software network download update if there is a firmware/software update.ACCEPT USAGE INFORMATION COLLECTIONSuppliers accepting the agreement section collect some non-personal user information.DECLINE ALLReject all protocols to disable firmware/software network updates.
CONNECTING TO THE INTERNET
You have 2 options when connecting your TV to the internet. You can connect wirelessly via Wi-Fi or connect your TV to your router directly by connecting a LAN cable (wired connection). Choose your connection method and follow these instructions.
Wi-Fi Network
- Press the buttons to highlight Wi-Fi Network then press the OK button. Your TV will automatically scan for your wireless network, then show you a list of networks that it’s found. Highlight your network and press the OK button.
- Use the buttons to navigate the keypad on the screen to enter your Wi-Fi password, then press the OK button to select the characters. Finally, select the and press the OK button. In a second or two, your TV will show Success after connection successful.
WIRED ConnectionIf you have connected your ethernet cable to the LAN socket on the back of your TV, select Wired Network and press the OK button. Then select Connect to start connecting to the internet.
SKIP Connection
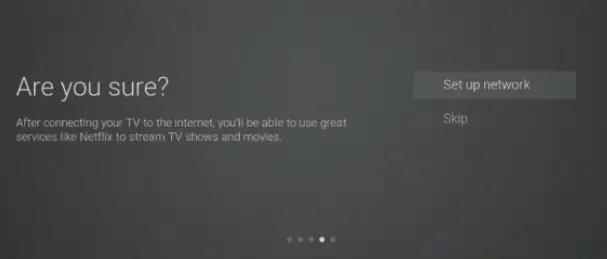
- If you do not need to connect to the network, select Skip and press the OK button to confirm.
- A pop-up menu will be displayed. If you want to go back to the network setting page, select Set up Network. If you want to confirm to skip the network setting, select Skip. Then will enter to Input Source menu and start TV Tuning.
SIGNING IN TO YOUR NETFLIX ACCOUNT
Press the ![]() buttons to select Start Netflix then press the OK button. You will now be asked to sign in to your Netflix account. If you don’t already have an account you can set one up on your TV go to the ‘Join Now’ section.
buttons to select Start Netflix then press the OK button. You will now be asked to sign in to your Netflix account. If you don’t already have an account you can set one up on your TV go to the ‘Join Now’ section.

- If you want to temporary skip the Netflix setting, select Skip to enter to Input Source menu and start TV Tuning.If you complete the Netflix setting, press the EXIT button to leave and press the button, and select Programme, then select Auto-Tuning for TV tuning.
- TUNING
- If you select the Skip option on Netflix setting page, then you now need to tune in to your TV so you can watch LIVE TV (broadcast TV). If you watch TV via a Set-Top Box you can skip this section by selecting the correct HDMI input source.
DVB-T
- Input Source page shown on the TV, use the buttons to select TV. then press the OK button.
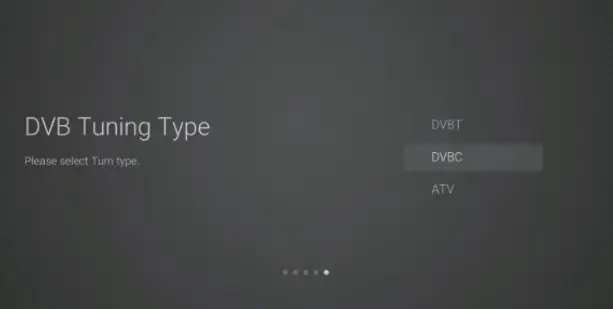
- In the DVB Tuning Type page, use the buttons to select DVBT.
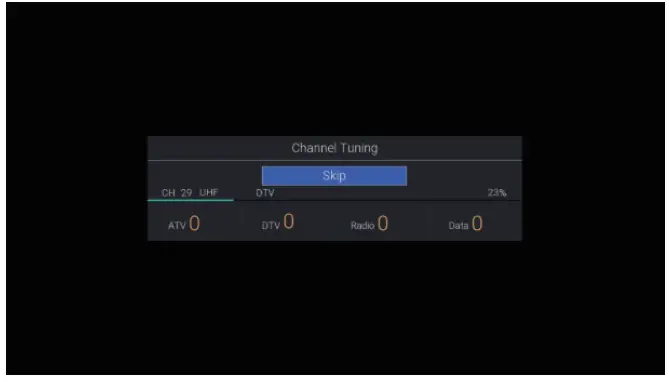
- Your TV will now start scanning for all the available TV channels. This operation may take a few minutes. The display will show the progress of the tuning and the number of channels found.
- If you want to skip the DTV tuning, press the OK button to interrupt the tuning halfway. A pop-up screen will be displayed, press the button to select YES to confirm.e. Your TV is now set up and ready to watch.


DVB-C
- Input Source page shown on the TV, use the buttons to select TV. then press the OK button.
- In the DVB Tuning Type page, use the buttons to select DVBC.
- Your TV will now start scanning for all the available TV channels. This operation may take a few minutes. The display will show the progress of the tuning and the number of channels found.
- If you want to skip the tuning, press the OK button to interrupt the tuning halfway. A pop-up screen will be displayed, press the
- button to select YES to confirm.
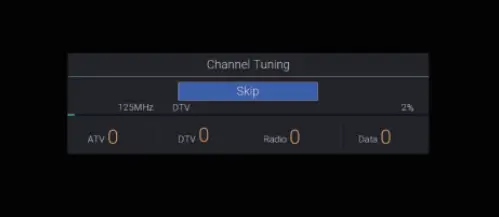
e. Your TV is now set up and ready to watch.
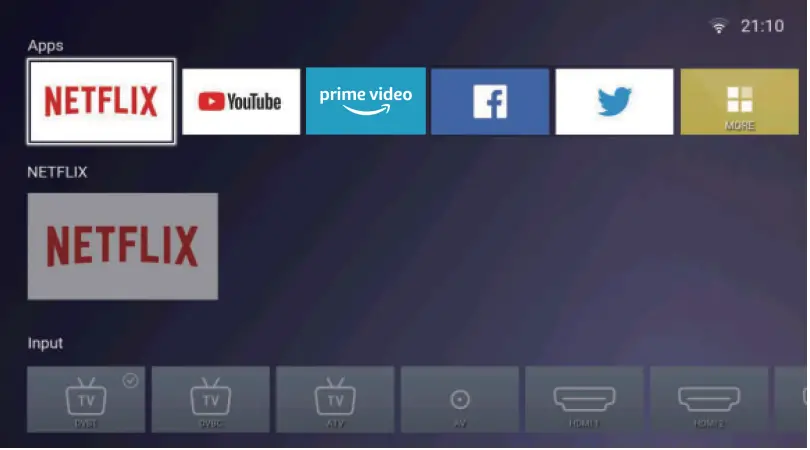
HOME Menu
- Press the button to display the home menu.
- Use the buttons to switch between the Apps, NETFLIX, Input, and Settings sections of the Home page.
- Use the ► buttos to select the desired App, input source or setting, then press the OK button to confirm.
HOW TO TURN OFF AUTO-SLEEP FUNCTION
Menu -> Settings – > Time -> Auto Sleep -> Off

BASIC TROUBLESHOOTING
Poor picture and sound quality
- Try a different channel
- Adjust the antenna
- Check all connections
No picture or sound in TV status
- Try another channel
- Press the TV/AV button
- Make sure TV is plugged in
- Check the antenna connection
No sound or sound is too low at maximum volume
- Check the volume settings on any external speakers connected to your television
- Adjust the TV volume accordingly
- Check another channel or input
- Check that MUTE hasn’t been turned on
No color, wrong color or tints
- Make sure the program itself is broadcast in color
- Select the picture menu, then adjust the color and tint submenus
Picture rolls vertically
- Check all connections
Blurred or snowy picture, distorted sound
- Check direction, location, and connections to your antenna
- Issues may be caused by the use of an indoor antenna (poor signal)
 report this ad
Remote control malfunctions
- Replace remote control batteries
- Check battery terminals
- Remote is out of range, move closer to TV
- Remove any obstructions between remote and IR sensor of the TV
- Make sure the power cord to your TV is plugged in and turned on
Image is not centered on the screen
- Adjust the horizontal and vertical position
“No Signal” on HDMI source
- Test the device with a different HDMI cable
- Plug the device into another HDMI port
- Try a different device connected to some cable and port
- Perform a factory reset on your TV
For our full TV troubleshooting guide and extended User Manual for this TV, head online to help.kogan.com
NOTES_____________________________________
Need more information? This is a Quick Start Guide, and while we hope that this has given you the assistance needed for a simple set-up, a full user guide outlining all of this product’s instructions and features can be found online at help.kogan.com
[xyz-ips snippet=”download-snippet”]