![]()

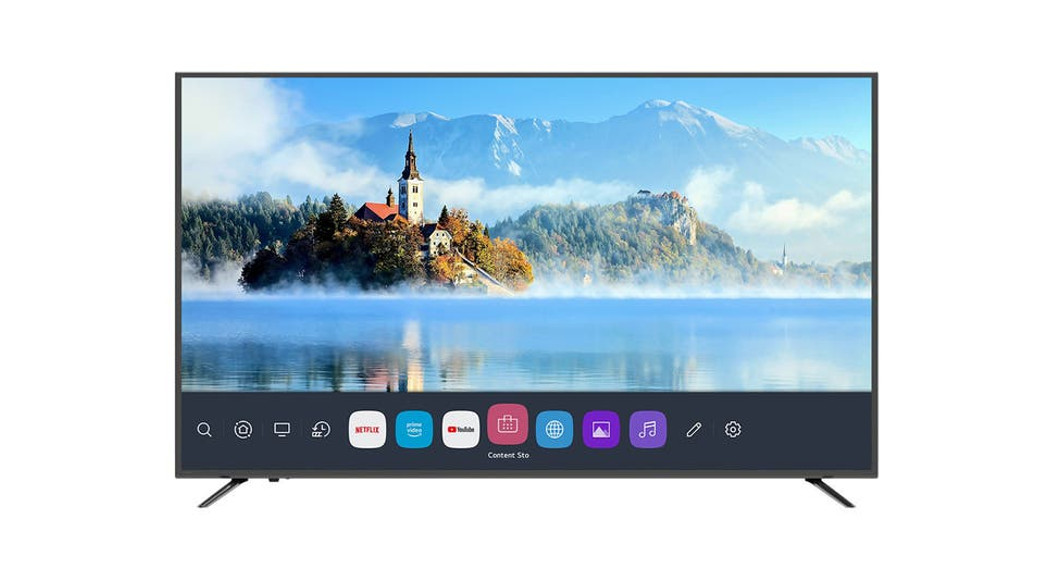
QUICK START GUIDE70” 4K UHD HDR LEDSMART TVSERIES 8 UN8910(KALED70UN8910SGA)

COMPONENTS
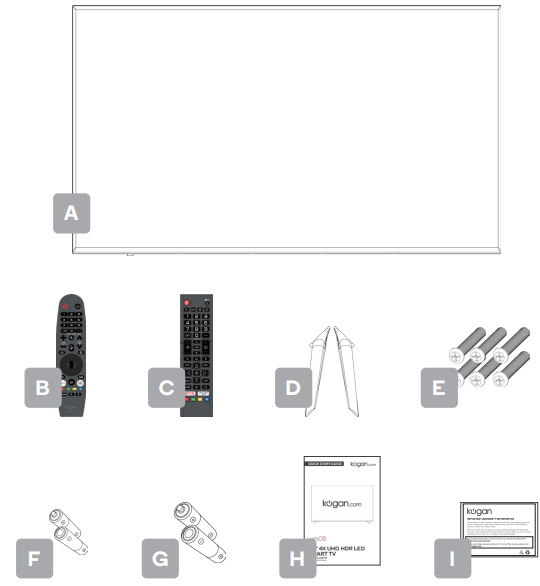
| A Kogan 70” 4K UHD HDRLED Smart TVB Magic remote controlC Standard remote controlD Stand (x2) | E M4 x 23mm screw (x6)F AAA battery (x2)G AA battery (x2)H Quick start guideI Warranty card |
NOT INCLUDEDPhillips head screwdriver, antenna cable, broadband internet connection.
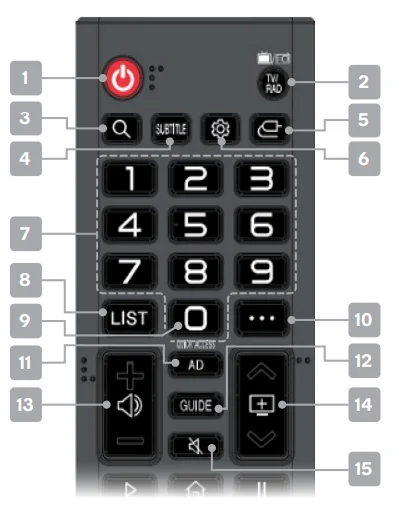
MAGIC REMOTE CONTROL
This TV comes with two remote controls:
- Magic remote control with additional features such as Bluetooth connectivity, voice recognition, motion sensing cursor and scroll wheel
- Standard remote control for the classic, no-frills experience
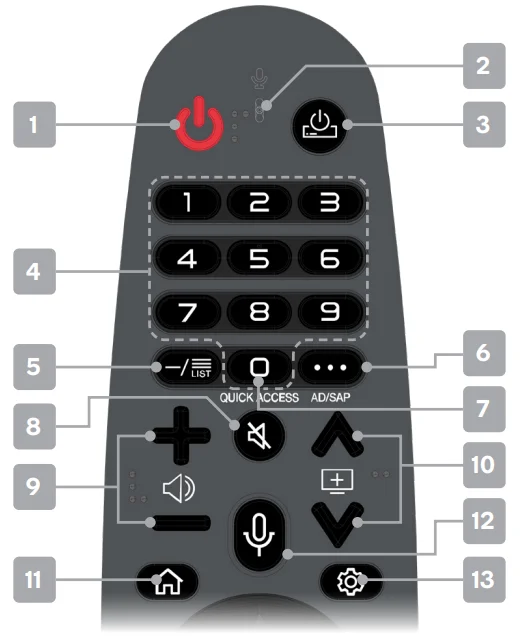
 Power: Press to enter or exit standby mode
- Voice Command microphone
- Set-Top Box Power: Press to turn connected Set-Top Box on or off
- Number buttons: Press to select channels or input passwords
- List: Check saved programs
- • • •: Displays additional functions, for example, Sports modeAD/SAP: Press and hold to turn audio the description on or off
- quick access: Long-press 0 to add Quick Access
- Mute: Toggle sound on/off
- +–: Adjust the volume up or down
- to scroll channels
- Home: Jump to the home page
- Voice command button: Hold and speak into the microphone for voice recognition. Short press to open recommended content.
- Settings: Open the Quick Settings menu
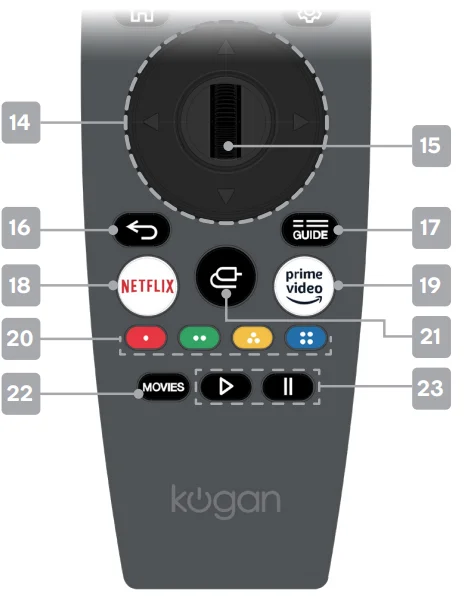
- Direction buttons for navigating menus and settings
- Wheel (OK): Scroll to navigate menus. Press to select the current item or confirm the selection.
- Back to the previous menu
- guide: Opens the Electronic Program Guide in DTV mode
- NETFLIX: Open app homepage
- : Open app homepage
- Colour buttons for navigational use within apps
- Source: Displays the list of input source channels.
- movies: Search movies
- Media playback controls: Play and pause media, Live Playback function, and recorded content.
STANDARD REMOTE CONTROL
- Power: Press to enter or exit standby mode
- tv/rad: Press to switch between TV and Radio
- Search: Open recommended content or search
- subtitle: Turn on/off subtitles
- Source: Displays the list of input source channels
- Settings: Open the Quick Settings menu
- Number buttons: Press to select channels or input passwords
- List: Check saved programs
- quick access: Long-press 0 to add Quick Access
- • • •: Displays additional functions, for example Sports mode
- ad: Press to turn audio description on or off
- guide: Opens the Electronic Program Guide in DTV mode
- + –: Adjust the volume up or down
- to scroll channels
- Mute: Toggle sound on/off
- Play: Play media and recorded content, resume Live Playback
- Pause: Pause media and recorded content, pause Live Playback
- Home: Jump to the home page
- back to the previous menu
- exit out of the current program
- Direction buttons for navigating menus and settings
- OK button: Press to select the current item or confirm selection
- text: Teletext on/off*
- t.opt: Teletext options*
- movies: Search movies
- Stop: Press to stop recording, stop media playback, and start the Live Playback function
- rec: Initiate recording
- NETFLIX: Open app homepage
- : Open app homepage
- Colour buttons for navigational use within apps
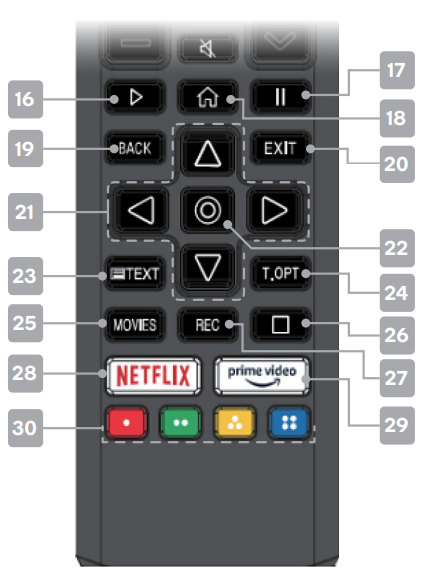
*Note: Teletext is no longer available in Australia. Depending on your region, this function may or may not be applicable.
ASSEMBLY AND INSTALLATION
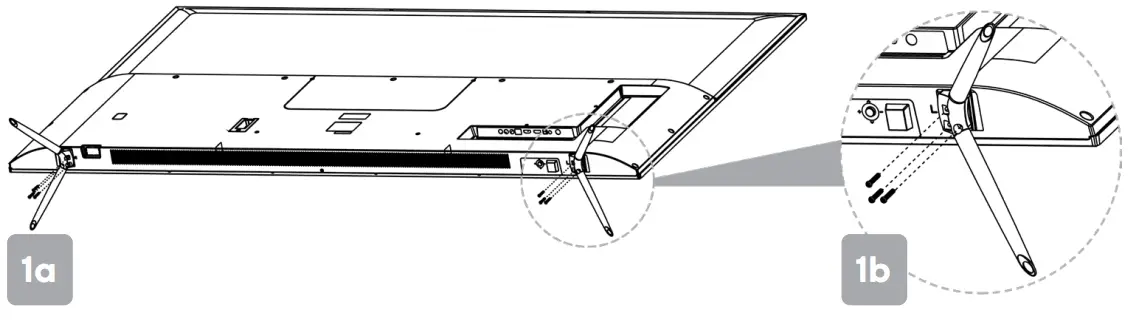
BEFORE YOU GET STARTEDSpread cushioning flat to lay the TV on. This will help to prevent damage.
- Stand assemblya. Attach stands to the base of the TV, ensuring ‘L’ and ‘R’ markings on the TV and stand match.b. Insert three M4 x 23mm screws and use a Phillips head screwdriver (not supplied) to tighten.
- Remote control assemblya. Open the battery compartment cover on the backside.b. Insert batteries (x2 1.5V AAA size for the standard remote, x2 1.5V AA size for the magic remote) making sure to match the polarity markings (+ / -) of the batteries with the diagram inside the compartment.c. Replace battery compartment cover.
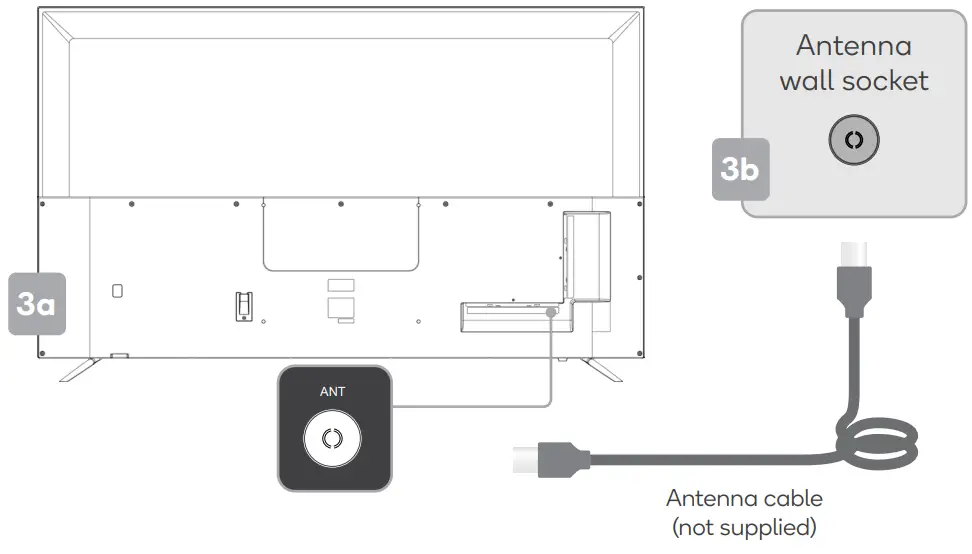
- Connect to antennaa. Connect an antenna cable (not supplied) via the ‘ANT’ input port at the back of the TV.b. Ensure the antenna cable is also connected to a working antenna, either via an antenna wall socket in your home or directly.
- Turning TV onPlug the power cord into a suitable power outlet, then press the POWER ( ) button on the remote control, making sure to aim it at the sensor at the front of the TV. Alternatively, you can press the power button on the lower side of the back panel on the TV.

TURNING TV OFFPress the POWER (![]() ) button on the remote control to enter standby mode.To power down the TV completely, unplug the power cord from the power outlet.Do not leave your set in standby mode for long periods of time. If you will not use the TV for a long time, it is recommended to unplug the set from both the power outlet and aerial.
) button on the remote control to enter standby mode.To power down the TV completely, unplug the power cord from the power outlet.Do not leave your set in standby mode for long periods of time. If you will not use the TV for a long time, it is recommended to unplug the set from both the power outlet and aerial.
PAIRING THE MAGIC REMOTE
After the TV has been on for at least 20 seconds, point the remote toward the TV and then long-press the wheel. The remote control will automatically be registered. A notification will confirm, and the pointer will appear on the screen.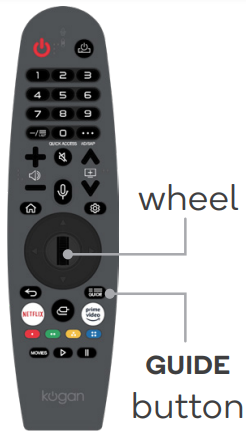 If the Magic Remote’s pointer does not appear on the screen, you must re-register it. Point the remote control towards the TV and long press the guide button until the notification appears.
INPUTS AND PORTS
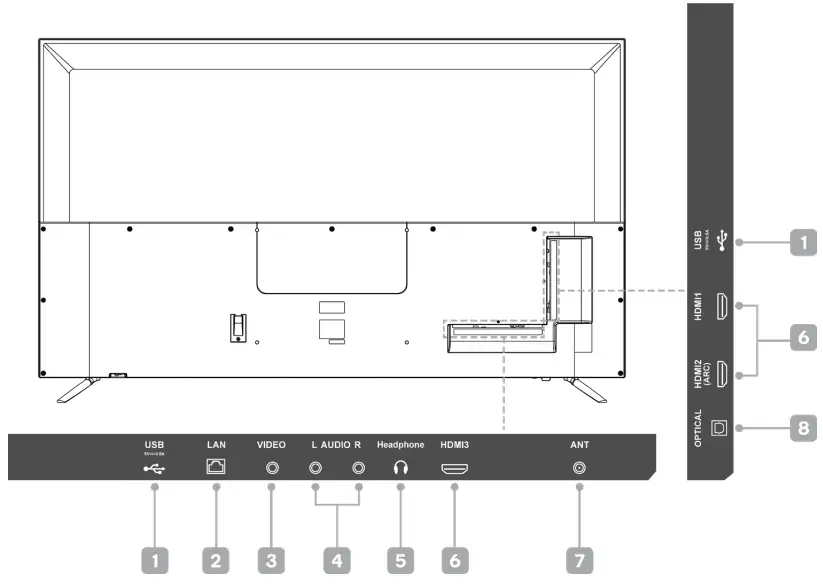
| 1 USB 2.0 (x2; 5v 500mA)2 Ethernet port (LAN)3 Composite video (RCA)4 Composite audio (RCA, left and right) | 5 Headphone jack (3.5mm line out)6 HDMI (x3; ARC support on HDMI 2)7 Antenna8 Digital audio (Optical out) |
FIRST TIME SETUP
When turning the TV on for the first time, the Welcome screen will appear. Press the OK button (Wheel) to commenceUse the ![]() Direction buttons and Wheel to navigate the following options:Language and Location SettingsSelect the on-screen display (OSD) language, your country, and time zone from the drop-down lists.Internet and Device ConnectionConnect all of your devices (set-top boxes, blu ray players, soundbars, gaming devices, etc.) to the TV. If using a wired internet connection,connect an Ethernet cable to the ‘LAN’ port at the back.Select Wi-Fi networkIf you have connected an ethernet cable for wired internet, your TV will automatically connect to the network and skip this step.If you want to use a wireless (Wi-Fi) network, the TV will now scan for nearby networks. Ensure the TV is within range of your wireless modem or router, and have your password handy. Follow the prompts to input your password and connect your TV to your selected network.If using an LG Mobile smartphone connected to the desired WiFi network, you can select “via LG Mobile” to connect to the same network.Terms & ConditionsAccept terms and conditions, or select to view additional details. You can select “Agree All” agree to all User Agreements.
Direction buttons and Wheel to navigate the following options:Language and Location SettingsSelect the on-screen display (OSD) language, your country, and time zone from the drop-down lists.Internet and Device ConnectionConnect all of your devices (set-top boxes, blu ray players, soundbars, gaming devices, etc.) to the TV. If using a wired internet connection,connect an Ethernet cable to the ‘LAN’ port at the back.Select Wi-Fi networkIf you have connected an ethernet cable for wired internet, your TV will automatically connect to the network and skip this step.If you want to use a wireless (Wi-Fi) network, the TV will now scan for nearby networks. Ensure the TV is within range of your wireless modem or router, and have your password handy. Follow the prompts to input your password and connect your TV to your selected network.If using an LG Mobile smartphone connected to the desired WiFi network, you can select “via LG Mobile” to connect to the same network.Terms & ConditionsAccept terms and conditions, or select to view additional details. You can select “Agree All” agree to all User Agreements.
Paired DevicesThe TV will now scan for external devices which can be linked to the Universal Control settings (such as set-top boxes or blu ray players). This will allow services such as Foxtel or Fetch boxes (sold separately) to be linked to your TV’s remote control.Set-Top Box SetupIf not using a set-top box, select “TV Only”. If using a set-top box and not wishing to use free-to-air channels, select “Set-Top Box Only”.If wishing to use both, select “TV & Set-Top Box”.Service Area PostcodeEnter your location’s postcode.Program TuningThe TV will automatically search and save all available free-to-air channels. The option is provided to search for digital channels only (recommended for most regions), skipping analog channels.
NOTE:If “Set-Top Box Only” was selected earlier, this stage will be skipped.Connect to LG ThinQYour TV is compatible with LG smart home devices, and can also play content from your smartphone or personal devices. To connect your TV with LG ThinQ, scan the Android or iOS (iPhone) QR code with your smartphone, and follow the prompts to set up.NOTE:Service availability may differ depending on the country or region.First Time Setup CompletedPress Close to finalize the setup and go to the Home Dashboard.
HOME DASHBOARD
The Home Dashboard is the central hub for your TV’s connections and settings. Use your remote’s directional buttons or the Magic cursor and wheel to navigate the dashboard, and press the OK button (wheel) to open a selected menu and view options.
| 1 View and select mobile device currently connected with the LG ThinQ app2 Sound Share: Play audio from a smart device connected via Bluetooth3 Select from Live TV or external devices connected via HDMI channels, AV, or network4 View currently selected output speaker, select to open speaker settings5 View and select any connected storage devices | 6 View and control any devices connectedvia the Home IoT dashboard7 Routines: Set pre-programmed deviceoperations8 Account settings: Sign in/out of your LGThinQ account, or edit the name andsettings for connected devices.9 Refresh the connected device list10 Exit the Home Dashboard |
NOTE:The Home Dashboard is set to automatically launch each time the TV is turned on. To turn this feature off, go to General > HomeSettings in the settings menu and disable “Auto Home Launch”.
Press the Home (![]() ) button on the remote to bring up the home menu.Use your remote’s directional buttons or the Magic cursor and wheel to navigate through the pages, and press the OK button (wheel) to launch the selected app. For Netflix and Prime Video, you can launch the apps directly using the remote control hotkeys. Hovering over (“Focusing” on) options in the home menu will present a Preview in a new bar of options above the home menu.
) button on the remote to bring up the home menu.Use your remote’s directional buttons or the Magic cursor and wheel to navigate through the pages, and press the OK button (wheel) to launch the selected app. For Netflix and Prime Video, you can launch the apps directly using the remote control hotkeys. Hovering over (“Focusing” on) options in the home menu will present a Preview in a new bar of options above the home menu.
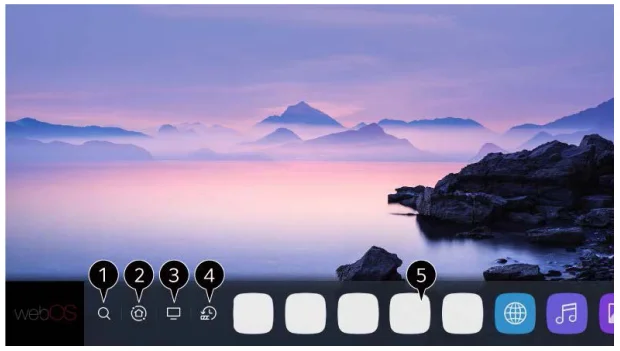
- Content search: This allows you to search the content store, all installed apps, and web browser in one go
- Open the Home Dashboard
- Recent input: Switch back to the previously used input channel
- Recent apps: View a list of most recently used apps. To jump straight to the Recents list from any screen, press and hold the Home ( ) button.
- Apps list: Launch, move and delete the apps installed on your TV. When focused upon, most apps will provide a Preview of content or features which can be launched straight from the home menu.
Editing the Home MenuThe apps in the list can be reordered or deleted manually, or set to automatically update based on the frequency of use (“Intelligent Edit”).


Quick SettingsPress the![]() Settings button on the remote control to open the Quick Settings menu, a customizable light-weight list of quick options:
Settings button on the remote control to open the Quick Settings menu, a customizable light-weight list of quick options:
| 1. Picture mode2. Sound mode3. Sound out (speaker output)4. Sleep timer | 5. Network options6. Full settings menu7. Edit Quick Settings list |
The “Edit Quick Settings list” option allows users to customize the order of the above items, as well as add additional quick settings options (such as aspect ratio, high contrast mode, screen off, and more) to be added to the list.
Full Settings MenuSelect the “ ” option (6. Full settings menu) from the Quick Settings menu to open the complete settings menu.PictureAdjust settings for picture mode, contrast, brightness, color, sharpness, tint, color temperature, aspect ratio, energy saving, eye comfort, etc.SoundAdjust audio settings, including sound modes, speaker output selection, sync adjustment, 5-band EQ, Ultra Surround configuration, and more.ProgramsTuning settings for DTV and ATV (ATV is no longer supported in Australia), including subtitle options, additional audio settings (such asdual mono), and HbbTV configuration.ConnectionInternet and connectivity options, including TV name, current network settings, and device management.GeneralThe general settings menu contains many items, such as AI service management, language options, time and location settings, safety(parental guidance and password protection options), account management, home dashboard settings, menu transparency, screensaver, eco mode, and more.AccessibilityOptions to adjust the image and audio for accessibility requirements can be found here. Configure audio description settings, subtitles, hard of hearing, and color settings (high contrast, grayscale) from this menu.SupportView system and app information, the end-user license agreement, and install software updates (via USB). To reset the TV back to the factory settings and access the First Time Setup options again, select “Reset to Initial Settings” from this menu.
BASIC TROUBLESHOOTING
Many minor issues can be resolved by hard resetting, or power cycling the unit, or upgrading the firmware.To perform a hard reset, or power cycle, please use the following steps.
- Unplug it from the main power socket and leave it for 10-15 minutes.
- Press and hold the power button on the TV for 5 seconds.
- Connect the TV back to the power and turn it on.
The USB device is not recognized
- This TV requires a minimum of 64GB of storage for Live Playback and Recording functions.
- Ensure the drive is formatted for FAT32 before using this TV.Use a computer to format the drive beforehand.
Poor picture and sound quality
- Try a different channel
- Adjust the antenna
- Check all connections
No picture or sound in TV status
- Try another channel
- Press the TV/AV button
- Make sure TV is plugged in
- Check the antenna connection
No sound or sound is too low at maximum volume
- Check the volume settings on any external speakers connected to your television
- Check another channel or input
- Check that MUTE hasn’t been turned on
No color, wrong color, or tints
- Make sure the program itself is broadcast in color
- Select the picture menu, then adjustthe color and tint submenus
Picture rolls vertically
- Check all connections
Blurred or snowy picture, distorted sound
- Check the direction, location, and connections to your antenna
- Issues may be caused by the use of an indoor antenna (poor signal)
Remote control malfunctions
- Replace remote control batteries
- Check battery polarity (+/-)
- Remote is out of range, move closer to TV
- Remove any obstructions between the remote and IR sensor of the TV
- Make sure the power cord to your TV is plugged in and turned on
Image is not centered on the screen
- Adjust the horizontal and vertical position
“No Signal” on HDMI source
- Test the device with a different HDMI cable or port
- Try a different device connected to the same cable and port
- Perform a factory reset on your TV
For our full TV troubleshooting guide and extended User Manual for this TV, head online to help.kogan.com
SPECIFICATIONS
DimensionsDistance Between Legs: 1453.6mmWithout Stand: 1567.5 x 64.9 x 907.1mmWith Stand: 1567.5 x 268.9 x 968.4mmVESA Wall Mount Pattern: 400 x 300Wall Mount Screw Size: M8x20mm (x4)Weight :32.8kg
AudioSpeakers: 2 x 8W
ConnectivityEthernet (RJ45): YesHDMI: 2.0 (x3)HDMI-ARC: Yes | HDMI 2HDMI-CEC: Yes | HDMI 1, HDMI 2, HDMI 3USB: 2.0 (x2)
This is a quick specifications list. For a complete guide, refer to the full User Guide for this model at help.kogan.com
Note:
- Design and specifications are subject to change without notice.
- The weight and dimension shown are approximate.
NOTES
Need more information?This is a Quick Start Guide, and while we hopethat this has given you the assistance needed fora simple set-up, a full user guide outlining all of thisproduct’s instructions and features canbe found online at help.kogan.com
![]()
[xyz-ips snippet=”download-snippet”]