
kogan KAMN15TFULA 15.6″ Touchscreen Full HD IPS LED Portable USB-C Monitor (1920 x 1080)
SAFETY & WARNINGS
- Read all instructions before using the monitor and retain this user guide for future reference.
- Unplug the monitor before cleaning it.
- Use a clean, slightly dampened cloth to wipe the main monitor body.
- To clean the screen: Turn it off, unplug it and wait for it to cool completely, then wipe it with a dry micro-fibre cloth.
- Do not use cleaning alcohol, ammonia-based liquids or other harsh cleaners.
- This monitor is designed with ventilation holes on the back of the casing. Do not cover or block them.
- Do not insert any object or spray any liquid into the vents.
- Avoid placing the monitor near heaters, stoves, fireplaces or other sources of heat, as well as in rooms lacking adequate ventilation.
- Do not position the monitor in unsafe locations. If the monitor falls, it may be damaged and may injure nearby people.
- Unplug the monitor if it is not going to be used for an extended period.
- Do not place heavy objects on the monitor, its power cord or any connected cable.
- Do not open the back panel of the monitor, as it contains a high-voltage current even when not plugged in.
WARNING: To reduce the risk of fire or electric shock, do not expose this device to rain or moisture. The device must not be exposed to dripping or splashing, and objects filled with liquids, such as vases, must not be placed on the device.
The terms HDMI and HDMI High-Definition Multimedia Interface and the HDMI Logos are trademarks or registered trademarks of HDMI Licensing Administrator, Inc. in the United States and other countries.
COMPONENTS
PRODUCT OVERVIEW

A 15.6” Touchscreen LED Portable MonitorB Up buttonC Down buttonD Power buttonE LED indicatorF Mini HDMI portG Primary USB-C port (full function)H Secondary USB-C port (charging only)I 3.5mm headphone jackJ Left and Right speakers
BASE ADJUSTMENT
The portable monitor comes equipped with an adjustable base featuring a full 180° range, allowing it to be completely flat (180°), upright (90°), and any other configuration between 0-180°.

CONNECTION OPTIONS
Computer (via USB-C)The portable monitor can be connected to a compatible computer using the supplied USB-C to USB-C cable. This must be connected to the monitor’s primary USB-C port. The computer will provide power and signal to the monitor and can be used for extended display or duplicated display use.
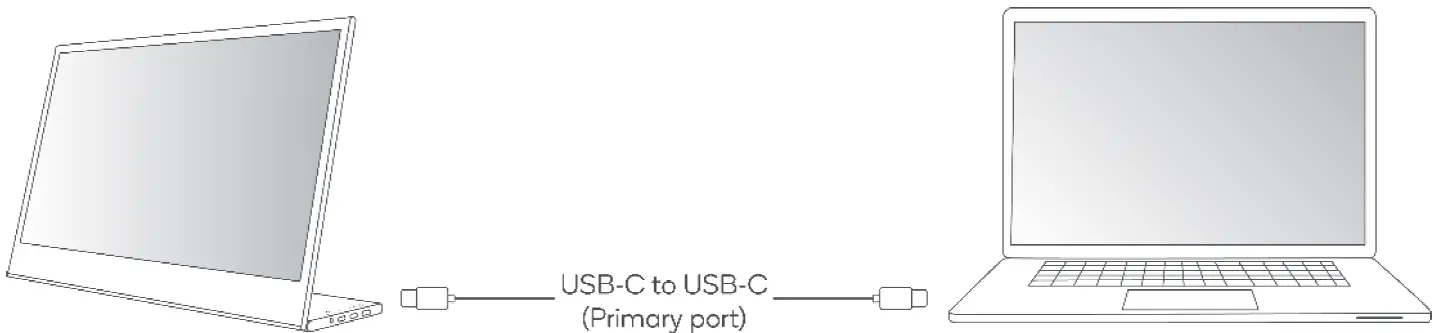
Note:When connecting the monitor and laptop through full-function USB-C port (one cable solution), the brightness of the monitor will be automatically set low to ensure it can be sufficiently powered by one cable. You can adjust the brightness higher, but the maximum brightness may be limited to a certain amount.Ensure the laptop’s USB-C port provides over 5V 1A power.
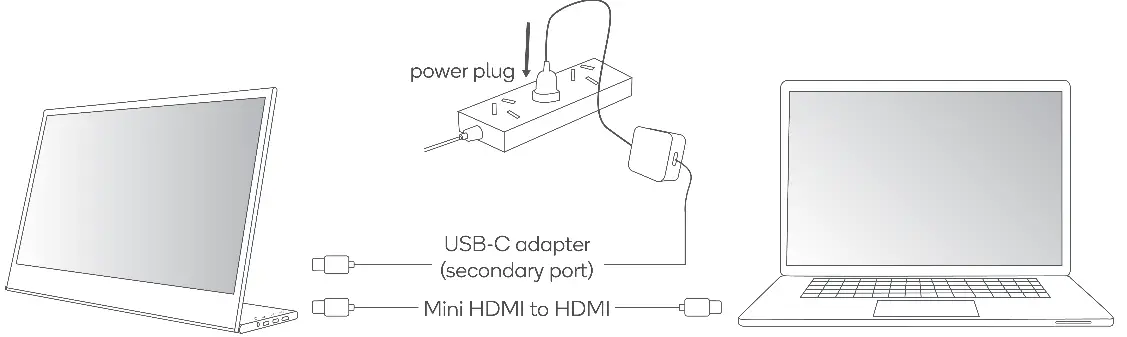
Computer (via HDMI with external power)The second option for HDMI connection is to connect the supplied HDMI-to-Mini HDMI cable between the computer and the portable monitor, while also connecting the monitor directly to an external power adapter (supplied) via USB. For this, you can use either the primary or secondary USB-C ports.
Mobile phone (via USB-C)If there is no external power supply connected to the secondary USB-C port, the mobile phone battery will supply power to the display. The mobile phone’s USB-C output must be larger than 5V 1A to provide power without external power. To reduce power usage, the energy-saving mode will be activated and the display brightness will be automatically set low. You can adjust the brightness and volume of the monitor according to the output powerof the mobile phone.When connected to an external power supply through the secondary USB-C port, the display will provide power to the mobile phone through the external power supply. The brightness of the monitor will automatically adjusted when connecting with external power.
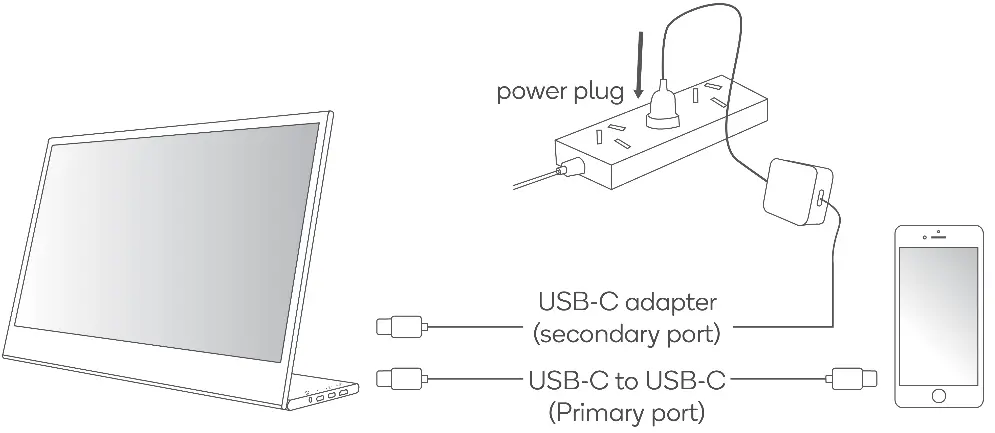
Note: If using a power bank (not supplied) as an external power source, it must be larger than 18W. Power banks can be used as external power for every connection shown here, not just mobile phones.
Other devices (via HDMI & USB or power adapter)If connecting to a device without a USB-C port, you can utilise HDMI as long as you also provide a power supply. Connect the supplied HDMI-to-Mini HDMI cable between the device and the portable monitor, while also connecting the monitor directly to an external power adapter (supplied) via USB. For this, you can use either the primary or secondary USBC ports.
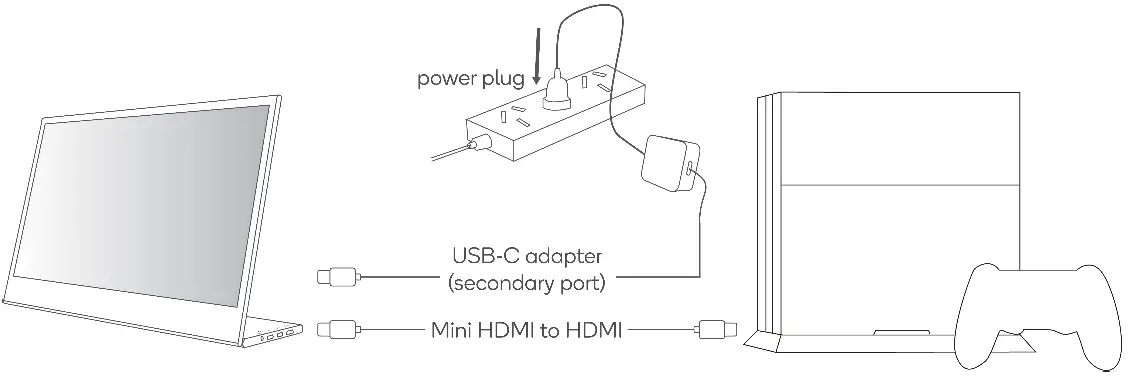
Note:
- When connecting a device using HDMI, to ensure the smooth transmission of the signal be sure to connect the power cable first, then connect the HDMI.
- The touchscreen can only be achieved through USB-C port. The HDMI port cannot support touchscreen.
- The touchscreen function may vary across different devices dependant on their compatibility and operation systems.
- Touchscreen function on MacBook may be limited.
GUIDE TO CONNECTIONS
| External device | External device port | Monitor port | Power supply | Touchscreen function |
| Laptop | USB-C | Primary USB-C | Laptop | Yes |
| Laptop | USB-C | Primary USB-C | Yes | |
| Charging USB-C port to adapter | Adapter | |||
| Laptop | HDMI | Mini HDMI | No | |
| Charging USB-C port to adapter | Adapter | |||
| Smartphone | USB-C | Primary USB-C | Yes | |
| Charging USB-C port to adapter | Adapter | |||
| USB-C
compatible gaming console |
USB-C | Primary USB-C | No | |
| Charging USB-C port to adapter | Adapter | |||
| Other gaming consoles | HDMI | Mini HDMI | No | |
| Charging USB-C port to adapter | Adapter |
EXTERNAL CONTROLS

|
1 |
|
Up button |
Press to open Quick Menu. |
| Press to open Brightness menu from Quick Menu. | |||
| Press this button to navigate OSD menu. | |||
| When in an adjustment screen, use both up and down buttons to adjust the amounts. | |||
| Long-press this button to enter the volume adjustment screen. | |||
|
2 |
|
Down button |
Press to open Quick Menu. |
| Press to open OSD menu from Quick Menu. | |||
| Press this button to navigate OSD menu. | |||
| When in an adjustment screen, use both up and down buttons to adjust the amounts. | |||
|
3 |
|
Power button |
Long-press to turn on / off. |
| Press to open Quick Menu. | |||
| Press to open Input Source list from Quick Menu. | |||
| Press to Confirm when in an OSD menu. | |||
|
4 |
|
LED Indicator |
Solid blue indicates power on. |
| Flashing blue indicates standby mode. | |||
| Solid red indicates Power Saving mode. |
OPERATION
Powering On / OffPress and hold the power button for 3 seconds to turn the monitor ON and OFF. The monitor will enter power saving mode when turned on unless there is a suitable device connected.
Volume Up / DownPress and hold the Up button to enter Volume Adjustment. Then adjust the volume with the Up button (volume increase) and Down button (volume decrease).
Quick Menu Brightness

- Press any key to enter the quick menu.
- Using the Up button, select Brightness from the menu.
- Use the Up and Down buttons to adjust the brightness between 0-100.
- Press Power button to confirm and exit the menu, or wait 3 seconds without pressing any button.
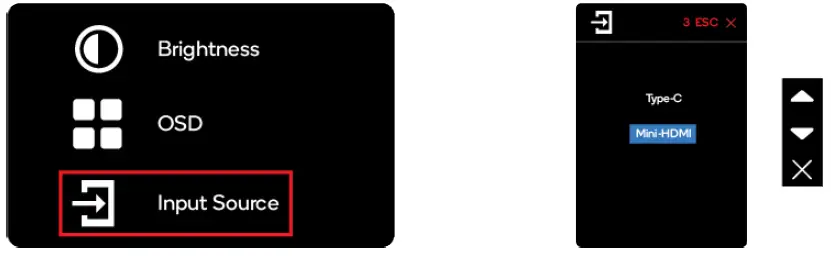
Input source
- Press any key to enter the quick menu.
- Using the power button open Input Source from quick menu, to select a USB-C or Mini-HDMI input source.
- When you are done, use the Power button to confirm and exit.
OSDThe following content is for general reference only. The actual product specifications may vary. The on-screen display (OSD) can be used for adjusting the settings of your monitor.Press any button to open the Navigation OSD. You can use the OSD to adjust the picture quality, OSD setting and general settings.Press Up and Down buttons to navigate the OSD menus, and Power button to confirm selection.
Scene Setting
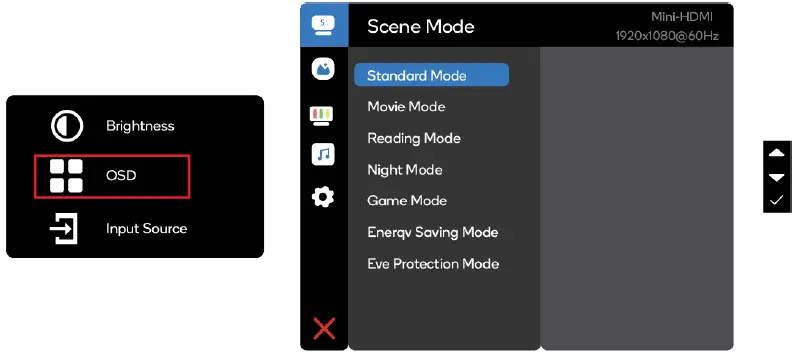
Select the appropriate preset scene for your usage, and use power button to confirm.
Picture Setting

The Picture setting menu includes many options to adjust the colour and picture quality.
Colour Temperature SettingThe colour temperature adjustment Warm-Normal-Cool corresponds to the colour temperature of 6500K, 7500K, 9300K and the User mode has a three-level menu.
Audio Setting

Adjust the volume manually, or select Audio Mute to disable the audio.
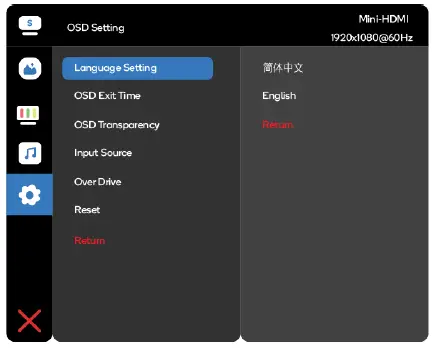
OSD Setting
- Language Setting: Set the OSD menu language.
- OSD Exit Time: Adjust the delay before turning the off the OSD menu.
- OSD Transparency: Select the transparency when using gaming mode. The transparency can be 20%, 40%, 60%, 80% or Off
- Input source: select USB-C or Mini-HDMI input source.
- Reset: Reset all settings to the factory defaults.
POWER SAVING
The monitor will be switched to Power Saving mode by the control signal from the display controller, as indicated by the red-coloured LED indicator.The power-saving mode will be kept until a control signal has been detected or the keyboard or mouse is activated (if connected to a computer). The recovery time from Power Saving mode back to standard Power On is around 3 seconds.
DISPLAY DATA CHANNEL (DDC)
To make installation easier, if your system supports the DDC protocol the monitor is able to plug & play.The DDC is a communication protocol through which the monitor automatically informs the host system about its capabilities; for example, supported resolutions and corresponding timing. The monitor supports the DDC2B standard.
SPECIFICATIONS
AudioSpeaker 1W (x2)
DimensionsSize 362 (W) x 240 (H) x 15.6 (D) mmNet Weight 1.34 kg
DisplayBrightness 250 cd/m2Colours 16.7MContrast Ratio 800:1Native Aspect Ratio 16:9Panel Manufacturer BOEPanel Type IPSRefresh Rate 60HzResolution 1920 x 1080Size 15.6”Viewing Angle 178°(H) x 178° (V)
FeaturesLow Blue Light Yes
InputsHDMI (1.4) 1USB Type-C 2
OutputsHeadphone Jack Yes
PowerPower Consumption Typical 8WStandby Consumption <0.5W
TROUBLESHOOTING
| Problem | Troubleshooting advice | |
| No video / picture | Blue LED | Using the OSD, adjust brightness and contrast to maximum or reset to their default.
Make sure the correct input source is selected through the input source menu. When connected via USB-C to USB-C cable, the blue light flashing indicates the output power of the external device is too low to power the monitor. Please connect the external power to the monitor. |
| No LED | Make sure the video cable between the monitor and computer is connected properly and securely.
Use other electrical equipment to confirm that the power outlet is working properly. Make sure the correct input source is selected through the input source menu. Check the power switch. Long press 5 seconds to start the monitor. Check if the power cord is properly connected to the monitor. |
|
| Red LED | Check if the video signal cable is properly connected at the back of the monitor.
Check if the video cable connector pins are bent or broken. Check if the computer system is switched on. |
|
| Missing pixels/ spots and light leaks on the screen | Turn off and on again.
Restore the monitor to factory settings. Use OSD to adjust brightness and contrast. Pixels that are permanently off are an inherent defect in LED technology. Contact help.kogan.com about monitor quality and pixel issues. |
|
| Display fails when switching | Make sure that the video cables of the monitor and HDMI output device are properly connected.
Reset the monitor to factory settings. |
| Problem | Troubleshooting advice |
| Picture is missing colours | Make sure the video cable connecting the monitor and the computer is properly connected.
Adjust custom R/G/B values. Colour in the colour menu of OSD. |
| Screen image is too small | Restore the monitor to factory settings. |
| OSD does not appear on the screen | Turn off the monitor, disconnect and reconnect the power cord, and turn on the monitor. |
| No picture, indicator light is blue | Check the signal source. Make sure the computer or phone is not in sleep mode.
Check that the signal cable is properly inserted. Reconnect the signal cable if necessary. Restart your computer or phone. |
| The picture does not fill the entire screen. | Since the resolution of the same screen of the mobile phone can be re-scaled (aspect ratio), the display can be displayed in full screen.
Computer equipment can be set to 16:9 resolution, the display can be full screen display Play a video source with a 16:9 video sources, and the monitor can display full screen. |
Still need help? Head online to help.kogan.com
CLEANING & MAINTENANCE
- Before cleaning the monitor, unplug the monitor power cord from the electrical outlet.
- When cleaning the antistatic screen, slightly dampen a clean, soft cloth with water. If possible, use a dedicated screen-cleaning tissue or solvent for electrostatic coating. Do not use benzene, thinner, ammonia, abrasives, or compressed air.
- If you find white powder when you unpack your monitor, wipe it off with a cloth.
- Be careful when operating the monitor, as dark monitors are easier to scratch and leave visible scratches than light monitors.
Need more information?We hope that this user guide has given you the assistance needed for a simple set-up.For the most up-to-date guide for your product, as well as any additional assistance you may require,head online to help.kogan.com
 report this ad
![]()
[xyz-ips snippet=”download-snippet”]