
kogan KAMN24F75LB 24″ Full HD IPS 75Hz Frameless Monitor User Guide

KAMN24F75LB
Safety and warnings
Read all instructions before using the appliance and retain for reference.
- Unplug the monitor before cleaning it with a slightly damp, clean cloth.
- Wiping the screen once it has been turned off with a dry microfibre cloth is recommended.
- Do not use cleaning alcohol, ammonia-based liquids or other harsh cleaners.
- This monitor is designed with ventilation holes on the back of the casing. Do not cover or block them.
- Avoid placing the monitor near heaters, stoves, fireplaces or other sources of heat, as well as in rooms lacking in adequate ventilation.
- Do not insert any objects or spray any liquids into the vents.
- Do not position the monitor in unsafe locations. If the monitor falls, it may be damaged and may injure nearby people.
- Unplug the monitor if it is not going to be used for an extended period.
- Do not place heavy objects on the monitor, its power cord or any connected cables.
- Do not open the back panel of the monitor, as it contains a high-voltage current even when not plugged in.
![]() The terms HDMI and HDMI High-Definition Multimedia Interface, and the HDMI Logo are trademarks or registered trademarks of HDMI Licensing Administrator, Inc. in the United States and other countries.
The terms HDMI and HDMI High-Definition Multimedia Interface, and the HDMI Logo are trademarks or registered trademarks of HDMI Licensing Administrator, Inc. in the United States and other countries.
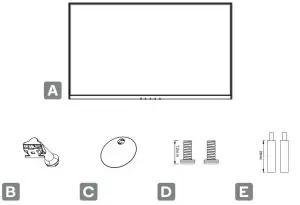
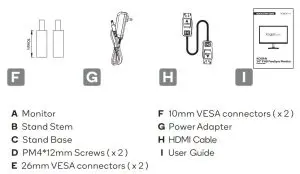
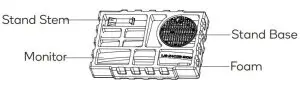
Components
Overview
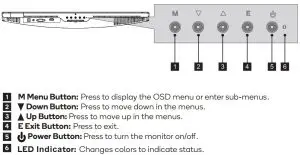
Monitor Controls
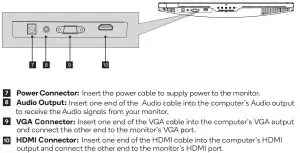
Monitor Ports
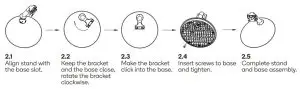
Stand Assembly
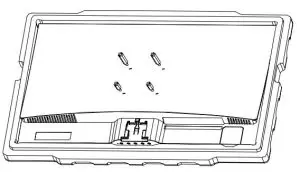
![]() Keep the foam underneath the monitor before attaching the stand.
Keep the foam underneath the monitor before attaching the stand.
- Open the package, take out the product with foam still attached, and gently place it on a desktop or table.

- Turn the bracket on a slight angle and align it with the circular slot of the base. Insert the bracket into the base, and then rotate clockwise to clamp the bracket into the base to complete the installation of the base.
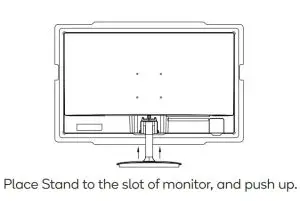
- Align the stand with the slot at the rear of the monitor, and insert the stand into the monitor. To prevent damage during assembly, ensure the monitor is still in the original foam. Note 1: To prevent pinching, please do not place your hand within the gap between the stand and the monitor.Note 2: To prevent falling, please avoid holding monitor by the base or inverting the monitor. To avoid damage, do not touch the screen when moving the monitor.
- Complete overall assembly.
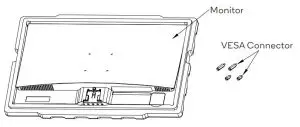
Wall Mounting
- Take out 4 pieces VESA connector from accessory bag.
- Lock the two 26mm VESA connectors in the upper two holes on the rear of the monitor, and the two 10mm connectors in the lower two holes.
- Your monitor is now ready to be attached to a wall-mounting bracket. To avoid damage, please do not pinch the screen during bracket installation.

Connectivity
Power CableConnect the included power cable to the power connector, and then plug the other end into an wall outlet.

EarphonesPlug in your earphones to receive audio signals from your monitor. If your earphones are connected to the monitor and audio devices are connected to your computer at the same time, the audio devices will not produce sound. Earphones and other audio devices not included.

VGAIn order for the monitor to receive VGA signals from the computer, use a VGA cable to connect the monitor to the computer.
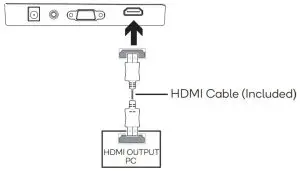
HDMIIn order for the monitor to receive HDMI signals from the computer, use the HDMI cable to connect t he monitor to the computer.
Basic Operation
![]() Insert one end of the HDMI cable into your PC’s graphics card. A VGA cable may also be used. A VGA cables is not included.
Insert one end of the HDMI cable into your PC’s graphics card. A VGA cable may also be used. A VGA cables is not included.
- Connect the other end of the cable to the corresponding connector on your monitor.
- Connect the power cable to your monitor then connect the other end to your powersource. It is recommended that you use a surge protector with adequate voltage if a walloutlet cannot be reached directly.
- Locate the power button on the monitor and press it to turn the monitor on.

Indicator Light

Solid blue light indicates power is on and the monitor is operating normally. Flashing blue lightindicates no video source has been detected. Red light indicates that no horizontal or vertical signal has been detected or voltage is low. Please ensure your computer is on and all video cables are fully inserted and/or connected.
Operation
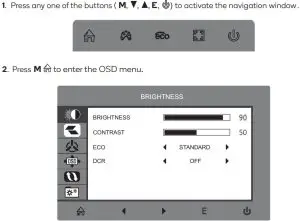
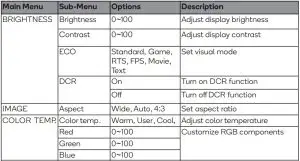
The On-Screen Display (OSD) Menu may be used to adjust your monitor’s settings and appears on screen after turning on the monitor and pressing the M button.
![]() When using the monitor for the first time, settings will automatically adjust to optimal settings according to your computer’s configuration and parts etc.
When using the monitor for the first time, settings will automatically adjust to optimal settings according to your computer’s configuration and parts etc.
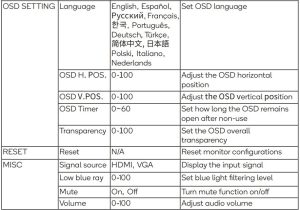
List of Functions
ECO Modes and Gameplus Switching
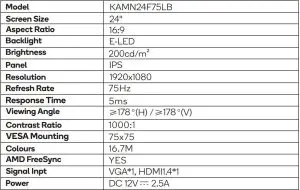
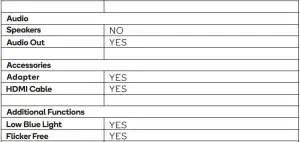
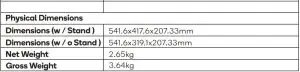
Specifications
Need more information?For full product support and troubleshooting help, head online to help.kogan.com
[xyz-ips snippet=”download-snippet”]