Kogan KAMN27QUCMA 27 inch QHD IPS USB-C
Freesync 75Hz Monitor User Guide
SAFETY & WARNINGS
- Read all instructions before using the appliance and retain for reference.
- Unplug the monitor before cleaning it.
- Use a clean, slightly-dampened cloth to wipe the main monitor body.
- To clean the screen: turn it off, unplug it and wait for it to cool completely, then wipe it with a dry microfiber cloth.
- Do not use cleaning alcohol, ammonia-based liquids or other harsh cleaners.
- This monitor is designed with ventilation holes on the back of the casing. Do not cover or block them.
- Do not insert any object or spray any liquid into the vents.
- Avoid placing the monitor near heaters, stoves, fireplaces or other sources of heat, as well as in rooms lacking adequate ventilation.
- Do not position the monitor in unsafe locations. If the monitor falls, it may be damaged and may injure nearby people.
- Unplug the monitor if it is not going to be used for an extended period.
- Do not place heavy objects on the monitor, its power cord or any connected cable.
- Do not open the back panel of the monitor, as it contains a high-voltage current even when not plugged in.
COMPONENTS
OVERVIEW
- Menu/Enter
- Volume/Down
- Brightness/Up
- Input select/Exit –
- Power On/Off
- LED indicator
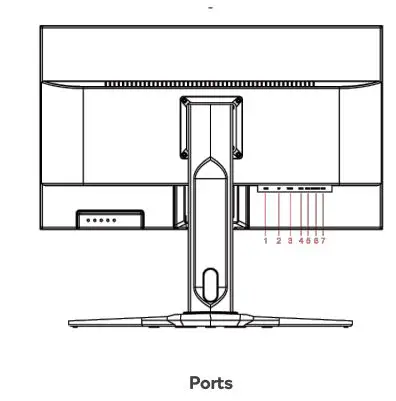
- HDMI
- Display Port
- USB-C
- USB1
- USB2
- EARPHONE
- Power input (DC 24V)
STAND ASSEMBLY
Installing the Stand Base
- Clear a table and place a piece of soft cloth on it to prevent the LED monitor from being scratched.
- Lay the LED monitor flat on the table with the LED screen facing down.
- Insert stand into the monitor, then secure the base by tighten the screw.
- Stand the LED monitor up.
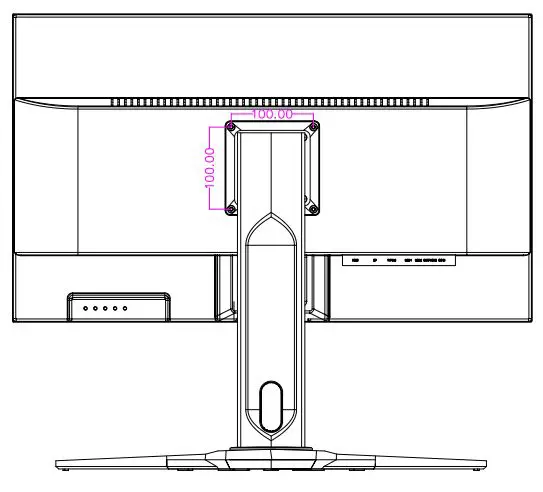
VESA MOUNT
Follow the steps below to install onto a monitor arm or wall mount (not included)
- Place the mounting plate onto the back of the LED monitor, lining up the holes of the plate with the holes in the back of the monitor.
- Insert the 4 screws into the holes and tighten.
- Assemble the mount as per the instructions provided with the mount.
- Connect the power and display cables to the monitor.
Note:
100 x 100mm VESA high hole (n=4), M4, pitch=0.7mm, screw mounting kit not included.
OPERATION
Before using the LED monitor
- Connect external equipment as per Setup below.
- Insert the power plug: the power LED indicator will glow orange, with no display input.
Setup
- Connect an HDMI, DisplayPort or USB Type-C cable from your monitor to the computer.
- Connect the adapter to a properly grounded AC outlet, then to the monitor.
- Power the computer on and then power the monitor on.
- Adjust the display settings on your computer if necessary.Recommended resolution and refresh rate are 2560 x 1440 @60Hz.
USB-C Setup
This monitor supports the following simultaneous connections via USB Type-C:
- Display via DisplayPort™ 1.2 alternate mode
- Data via USB 3.1
- Power delivery (5.0V /3.0A, 9.0V /3.0A, 12.0V /3.0A, 15.0V /3.0A, 20.0V /2.25A, 20.0V /3.25A).
NOTE: Type-C is not supported on versions of Windows prior to Windows 10.
- Connect the USB Type-C cable from your monitor to the computer.
- Connect the adapter to a properly grounded AC outlet, then to the monitor.
- Power the computer on and then power the monitor on.
- Adjust the display settings on your computer if necessary.Recommended resolution and refresh rate are 2560 x 1440 @60Hz.
Power On/Off
- Press the power button on the front of the monitor: the power LED indicator light will be blue when the LED monitor is on.
Using the OSD menu
- Use OSD menus to adjust settings by using the menu button on the front of the LED monitor.

Picture
Parameter
BrightnessContrastSharpnessAspect RatioUltra VividDCR (Dynamic Contrast Ratio
Range/Options
0-1000-1000-4Between Full /16:9 / 4:3 / 5:4 / 1:1Off/ Low/ Middle/ HighOn / Off
Color
ParameterColor EffectSaturationGammaTemperatureUser mode color adjustments
Range/OptionsStandard / FPS / RAC / RTS / Movie0-100Off I 1.8 / 2.0 / 2.2 / 2.46500 / 5400 I User/ 9300R: 0-255G: 0-255B: 0-255
Advanced
ParameterVolumeMuteOverdriveAdaptive SyncBlue Light Reduction
Range/Options0-100On/ OffOn/ OffOn/ OffOff I Low/ Middle / High
OSD
ParameterLanguageMenu TimeoutOSD HIV PositionTransparencyReset
Range/Options
English / French / Deutsch / Italian / Spanish /Russian / Dutch / Portuguese10-60 seconds0-100 (H = horizontal, V = vertical)0-100 (0 = solid, 100 = transparent)Restore factory defaults
SPECIFICATIONS
Panel — 27″Power management — Normal, <30W (Typical), <110W (Maximum)Standby mode: <0.5WOff Mode: <0.5WDisplayable resolution — 2560×1440Pixel dimension — 0.2331 (H) x 0.2331 (V)mmDisplay color — 1.07B colorsTilt — -5° – 37 ° Stand can up & down, 100mm, Swivel -45° – 45°Active display area — 596.74(H) x 335.66(V)mmTemperature — Operating: 5° – 40°Storage: -20° – 60°Power — DC24V5A
Need more information?We hope that this user guide has given youthe assistance needed for a simple set-up.For the most up-to-date guide for your product,as well as any additional assistance you may require,head on line to help.kogan.com
 report this ad
[xyz-ips snippet=”download-snippet”]