
kogan KAMN29UHWLA 29″ Curved Ultrawide 100Hz Freesync Gaming Monitor User Guide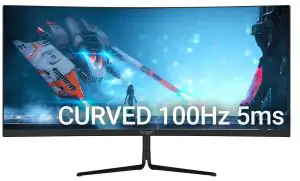
SAFETY & WARNINGS
- Read all instructions before using the appliance and retain for reference.
- Unplug the monitor before cleaning it.
- Use a clean, slightly-dampened cloth to wipe the main monitor body.
- To clean the screen: turn it off, unplug it and wait for it to cool completely, then wipe it with a dry microfibre cloth.
- Do not use cleaning alcohol, ammonia-based liquids or other harsh cleaners.
- This monitor is designed with ventilation holes on the back of the casing. Do not cover or block them.
- Do not insert any object or spray any liquid into the vents.
- Avoid placing the monitor near heaters, stoves, fireplaces or other sources of heat, as well as in rooms lacking adequate ventilation.
- Do not position the monitor in unsafe locations. If the monitor falls, it may be damaged and may injure nearby people.
- Unplug the monitor if it is not going to be used for an extended period.
- Do not place heavy objects on the monitor, its power cord or any connected cable.
- Do not open the back panel of the monitor, as it contains a high voltage current even when not plugged in.
- This monitor is designed with ventilation holes on the back of the casing. Do not cover or block them.
COMPONENTS
- Monitor

- Stand Stream
- Stand base
- Stand trim cover
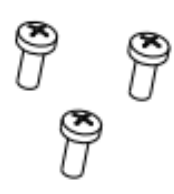
- M4x12mm Screws (x3)
- VESA screws (x4)
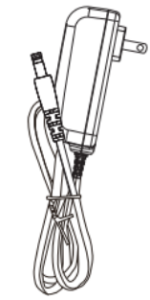
- Power adapter
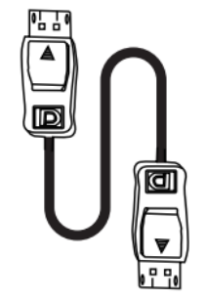
- DP cable
- User guide


OVERVIEW
- Controls
- Menu button
- Down button
- Up button
- Exit button
- Power button
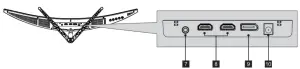
- LED indicatorPorts
- Audio out (3.5mm jack)
- HDMI input (x2)
- DisplayPort
- Power input

ASSEMBLY
Monitor stand
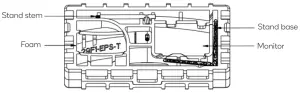
Note: Keep the foam underneath the monitor before attaching the stand
- Open the package, remove the monitor with the foam still attached and gently place it on a soft, clean surface.
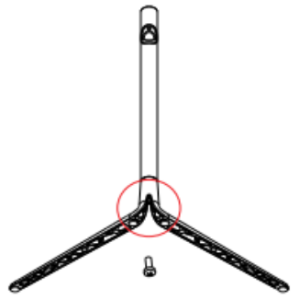
- . Attach the stand stem to the stand base and secure it in place using an M4x12 screw.
- Remove the upper foam and attach the assembled stand to the rearof the monitor using an M4x12 screw.
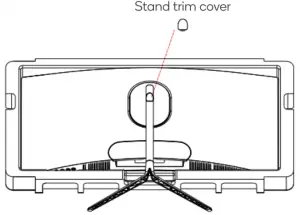
- Attach the stand trim cover to the assembled stand.
- Using both hands, carefully remove the monitor from the foam and place it on a flat surface.Note: To avoid damaging the monitor, do not press on or hold the LCD screen during assembly.

 Note: To avoid damaging the monitor, do not press on or hold the LCD screen during assembly.
VESA MOUNT
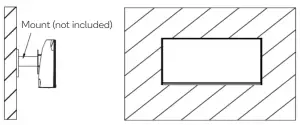
Note: VESA mount or mounting accessories are not included.
To ensure sufficient ventilation, install the monitor at least 10 cm away from the wall and leave approximately 10 cm of space at either side of the monitor
- Open the box, remove the monitor keeping the protection foam attached and gently place it on a desktop or table.
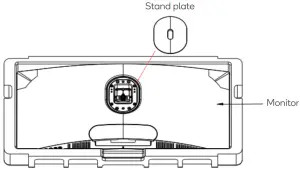
- Remove the foam covering the rear of the monitor. Remove the stand plate. If the monitor is already attached to the stand, remove the stand.
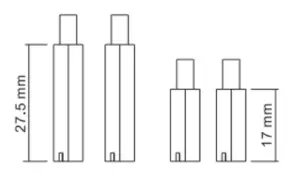
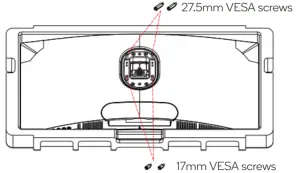
- Insert the x2 27.5mm VESA screws into the upper holes on the rear of the monitor and the x2 17mm VESA screws into the lower holes.
- Assemble the monitor mount following the instructions provided with the mount.
CONNECTIVITY
PowerConnect the included power adapter to the power connector and then plug the other end into a power outlet.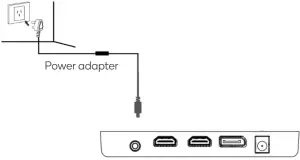
Audio
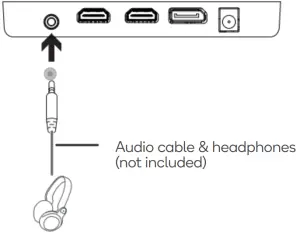
- Connect a 3.5mm audio cable to the audio out on the monitor.
- Connect the audio cable to the 3.5mm port on your headphones or speakers.Note: The monitor may need to be set as the PC’s default sound output device.
HDMIUse an HDMI cable (not included) to connect the monitor to your computer.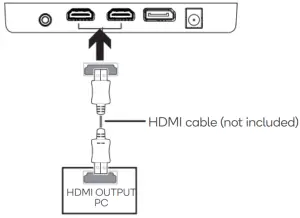
DisplayPortUse the included DisplayPort cable to connect the monitor to your computer.
OPERATION
- Connect the monitor to the input device via HDMI or DisplayPort.
- Use the power button to turn the monitor on.
Monitor Controls
- Menu button: Press to display the OSD menu or enter sub menus.
- Down button ▼: Press to move down in the menus.
- Up button ▲: Press to move up in the menus.
- Exit button: Press to exit menus.
- Power button: Press to turn the monitor on/off.
- LED indicator Changes colors to indicate status, see table below
|
LED Indicator |
Monitor status |
| Solid blue |
Power on |
|
Flashing blue |
No input signal |
| Off |
Power off |
FreeSync
- In order to use this feature, ensure your hardware has FreeSync capability and the graphics drivers are fully up to date.
- Connect your monitor using HDMI. You may receive a prompt to enable the feature on your computer. If you do not receive the prompt, you may need to enable the function in your graphics card menu.
- See your graphics card manufacturer’s documentation for instructions on how to turn on and/or enable FreeSync.
OSD MenuWhen first using this monitor it will automatically configure the optimal display settings.The On-Screen Display (OSD) menu can be used to adjust your monitor’s display settings to your liking. To access the OSD.
- Press any one of the buttons (M, , , E, ) to activate the navigation window .
- Press the Menu button to select and enter the OSD menu.
- Press “▼ ▲” button to browse the functions.
- With the desired function highlighted, press the Menu button to enter the submenu.
- After making adjustments, press the Exit button to save the changes and return to the OSD menu.
- Press the Exit button to exit the OSD menu.

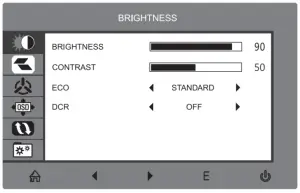
Refer to the following pages for a detailed list of the OSD menu functions.
|
Main Menu |
Sub-Menu | Options |
Description |
| Brightness | Brightness | 0~100 | Adjust display brightness |
| Contrast | 0~100 | Adjust display contrast | |
| ECO | Standard, Game, RTS, FPS, Movie,
Text |
Set visual mode | |
| DCR | On | Turn on DCR function | |
| Off | Turn off DCR function | ||
| Image | Aspect | Wide, Auto, 4:3 | Set aspect ratio |
| Colour | Colour temp. | Warm, User, Cool | Adjust colour temperature |
| Red | 0~100 | Customize RGB components | |
| Green | 0~100 | ||
| Blue | 0~100 | ||
| OSD settings | Language | English | Set OSD language |
| OSD H. POS. | 0~100 | Adjust the OSD horizontal position | |
| OSD V.POS. | 0~100 | Adjust the OSD vertical position | |
| OSD Timer | 0~60 | Set how long the OSD remains open after last input | |
| Transparency | 0~100 | Set the OSD overall transparency | |
| Reset | Reset | N/A | Restore factory defaults |
| Misc. | Signal source | HDMI, DP | Display the input signal |
| Volume | 0~100 | Adjust audio volume | |
| Low blue ray | 0~100 | Blue light reduction adjustment | |
| Over driver | High, Middle, Low, Off | Set overdrive function | |
| LED effect | Off, Normal, Flicker | Set LED rear display modes | |
| Free Sync | On, Off | Turn on/off Free Sync |
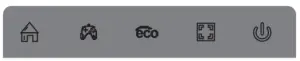
Game Plus & Display Mode
- Press any one of the buttons (M, , , E, ) to activate the navigation window.
- Press to switch Game plus modes. According to the needs of your game, choose the corresponding game icon. These overlay icons are primarily designed to assist aim during first person shooter games.
- Press to switch display modes. These modes include: Standard, Text, Movie, Game, FPS and RTS. These modes are designed to optimise settings according to your activity. Standard mode is suitable for most activities.


SPECIFICATIONS
| Screen Size | 29″ |
| Aspect Ratio | 21:9 |
| Backlight | E-LED |
| Brightness | 300cd/m2 |
| Panel | VA |
| Resolution | 2560 x 1080 |
| Refresh Rate | 100Hz |
| Response Time | 5ms (GTG) |
| Viewing Angle | ≥178°(H) / 178°(V) |
| Contrast Ratio | 3000:1 |
| VESA Mounting | 75x75mm |
| Colors | 16.7M |
| Free Sync | Yes |
| Signal Input | DP x1, HDMI 1.4 x2 |
| Power | DC 12V-4. 0A |
| Audio | |
| Speakers | No |
| Audio Out | Yes |
| Accessories | |
| Power Adapter | Yes |
| DP Cable | Yes |
| Additional Functions | |
| Low Blue Light | Yes |
| Physical Dimensions | |
| Dimensions (w Stand) | 693.26 x 186.58 x 410.52 (mm) |
| Dimensions (w/o Stand) | 693.26 x 115.66 x 318.82 (mm) |
| Net Weight | 4.17kg |
| Net Weight | 4.17kg |
| Gross Weight | 6.15kg |
Need more information? We hope that this user guide has given you the assistance needed for a simple set-up.For the most up-to-date guide for your product, as well as any additional assistance you may require, head online to help.kogan.com

[xyz-ips snippet=”download-snippet”]