KAMN34RXUSA 34″ WQHD Curved Ultrawide Freesync HDR Gaming Monitor
34″ WQHD CURVED ULTRAWIDE FREESYNC HDR GAMING MONITOR(21:9 144Hz 3440 x 1440)KAMN34RXUSA
SAFETY & WARNINGS
- Read all instructions before using the appliance and retain for reference.
- Unplug the monitor before cleaning it.
- Use a clean, slightly dampened cloth to wipe the main monitor body.
- To clean the screen, turn it off unplug it and wait for it to cool completely, then wipe it with a dry micro-fibre cloth.
- Do not use cleaning alcohol, ammonia-based liquids or other harsh cleaners.
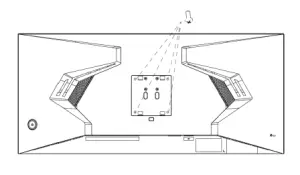
- This monitor is designed with ventilation holes on the back of the casing. Do not cover or block them.
- Do not insert any object or spray any liquid into the vents.
- Avoid placing the monitor near heaters, stoves, fireplaces or other sources of heat, as well as in rooms lacking adequate ventilation.
- Do not position the monitor in unsafe locations. If the monitor falls, it may be damaged and may injure nearby people.
- Unplug the monitor if it is not going to be used for an extended period.
- Do not place heavy objects on the monitor, its power cord or any connected cable.
- Do not open the back panel of the monitor, as it contains a high-voltage currenteven when not plugged in.
The terms HDMI and HDMI High-Definition Multimedia Interface and the HDMI Logos are trademarks or registered trademarks of HDMI Licensing Administrator, Inc. in the United States and other countries.
COMPONENTS


OVERVIEW
Monitor Controls

The control stick functions as directional input and power/OK when pressed.
- Press and hold for 6 seconds to turn on and off.
- With the display turned on, press to wake up the main menu for one second.
- In the menu, press up and down to highlight an item and OK to confirm. Press OK again to save and return to the upper menu.
Monitor Ports
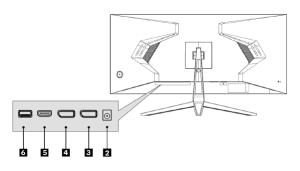
2 AUDIO OUT (3.5mm)3 DP 1.44 DP 1.45 HDMI 2.06 USBNote: The USB port is for firmware update installation only and does not provide the monitor or a connected device with USB connectivity.
STAND ASSEMBLY
WARNING: The panel of the monitor is fragile. Keep the foam underneath the monitor screen while assembling the stand.
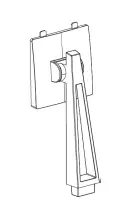
- Carefully remove the monitor, stand connector and stand base from the box.

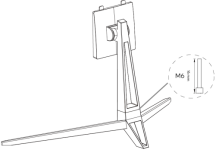
- Attach the stand base to the stand connector using the M6 screw provided.

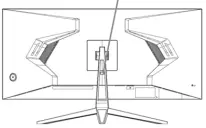
- Insert the connection block into the back cabinet and push down until firmly connected. Open

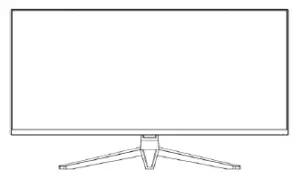
- Lift monitor up straight and remove the bottom foam. Stand the monitor up on the installed base.

VESA MOUNT
![]() VESA mounting pattern 100 x 100mm, screw size M4.
VESA mounting pattern 100 x 100mm, screw size M4.
Note: VESA mount and mounting accessories are NOT included.
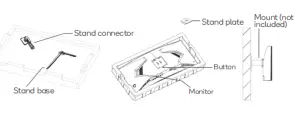
- Open the box, take out the monitor with protection form attached and gently placeit on a desktop or table. Remove the extra parts and the foam covering the back of the monitor. Press the release button to remove the stand plate. If the monitor wasalready attached to the stand, remove the stand.

- Assemble the mount as per the instructions provided with the mount.

CONNECTIVITY
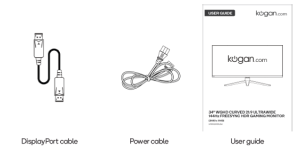
Power cableConnect the included power cable to the monitor power port and then connect the other end to a power outlet.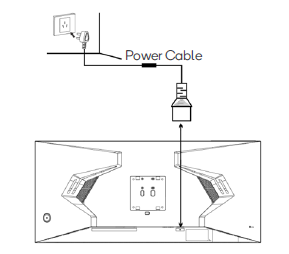 Audio out (3.5mm)Headphones, speakers or other audio devices can be connected to the 3.5mm output on the monitor. The monitor may need to be set as the PC’s default sound output device.
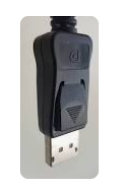
HDMIFor the monitor to receive HDMI signals from the computer, use the HDMI cable to connect the monitor to the computer.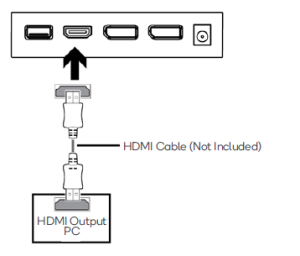 DisplayPortFor the monitor to receive DisplayPort signals from the computer, use the DisplayPort cable to connect the monitor to the computer.
 Note: The DisplayPort connector has a locking mechanism to prevent accidental disconnection. To remove, press down on the tab near the flat end of the connector.
OPERATION
- Connect the monitor to the input device via HDMI or DisplayPort.
- Connect the power cable to the monitor and then connect the other end directly to a power socket.
- Use the power button to turn the monitor on.
FreeSync
- To use this feature, ensure your hardware has FreeSync capability and the graphics drivers are fully up to date.
- After connecting, you may receive a prompt to enable the feature on your computer. If you do not receive the prompt, you may need to enable the function in your graphics card menu.
- See your graphics card manufacturer’s documentation for instructions on how to turn on and/or enable FreeSync.
The On-Screen Display (OSD) menu may be used to adjust your monitor’s settings and appears on the screen after turning on the monitor and pressing OK. When using the monitor for the first time, it will configure optimal settings automatically.
1. Press move the control stick to the right to activate the navigation window.
 2. Press OK to enter the OSD menu.
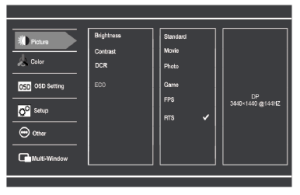
3. Use the control stick to highlight the item to be adjusted in the main menu. After selecting the items, press OK to adjust. Press OK again to save and return to the upper menu.
Refer to the following pages for a detailed list of the OSD menu functions.
|
Menu |
Sub-Menu |
Options |
Description |
|
Picture |
Brightness |
~0-100 |
Adjust display brightness |
|
Contrast |
~0-100 |
Adjust display contrast |
|
|
DCR |
On |
Turns dynamic contrast ratio on/off |
|
|
Off |
|||
|
ECO |
Standard/Photo/Game/Movie/FPS/RTS |
Preset colour modes |
|
|
Colour |
Colour Temperature |
Normal |
Select colour temperature mode or allow manual colour configuration (USER) |
|
Warm |
|||
|
Cool |
|||
|
USER |
|||
|
Red |
~0-100 |
Adjust red value(USER mode only) |
|
|
Green |
~0-100 |
Adjust green value(USER mode only) |
|
|
Blue |
~0-100 |
Adjust blue value(USER mode only) |
|
|
OSD Setting |
Language |
English |
Set OSD language |
|
OSD H-Position |
0~100 |
Adjust OSD horizontal position |
|
|
OSD V-Position |
0~100 |
Adjust OSD vertical position |
|
|
OSD Transparency |
0~100 |
Set OSD overall transparency |
|
|
OSD Time Out |
0-100 |
Set how long the OSD remains open after last input |
|
Setup |
Input Source |
DP1/DP2/HDMI1 |
Select video input source |
|
Mute |
on |
Enable or disable monitor speaker output |
|
|
off |
|||
|
Volume |
0-100 |
Adjust monitor speaker volume |
|
|
Audio Source |
DP1/DP2/HDMI |
Select sound input source |
|
|
Reset |
N/A |
Restore all settings to factory default |
|
|
Firmware Update |
Update |
Update monitor firmware via USB flash drive |
|
|
Other |
Aspect Ratio |
Wide Screen |
Select the display’s aspect ratio |
|
4:3 |
|||
|
1:1 |
|||
|
Auto |
|||
|
Low blue Light |
Off |
Blue light reduction adjustment |
|
|
Low |
|||
|
Medium |
|||
|
High |
|||
|
Max. High |
|||
|
Response Time |
On |
Enable or disable overdrivefor faster response time |
|
|
Off |
|||
|
FreeSync |
On |
Enable or disable FreeSync |
|
|
Off |
|||
|
HDR |
On |
Enable or disable HDR |
|
|
Off |
|||
|
LED Mode |
On |
Enable or disable back LED control |
|
|
Off |
|
Multi Window |
Multi-Window |
OFF |
Select multi-window mode |
|
PiP Mode |
|||
|
PBP 2Win |
|||
|
PBP 3Win |
|||
|
Sub Win2 Input |
DP1 |
Select source to be displayed in the second window |
|
|
DP2 |
|||
|
HDMI |
|||
|
Sub Win3 Input |
DP1 |
Select source to be displayed in the third window |
|
|
DP2 |
|||
|
HDMI |
|||
|
PiP Size |
Small |
Change the size of the sub window in PIP mode |
|
|
Medium |
|||
|
Large |
|||
|
PiP Position |
TopRight |
Change the position of the sub window in PIP mode |
|
|
TopLeft |
|||
|
BottomRight |
|||
|
BottomLelt |
|||
|
Swap |
Main Window |
Swap between the main and sub window |
ECO MODES & GAMEPLUS SWITCHING
- Move the control stick down to switch Gameplus modes. These overlay icons are primarily designed to assist aim during FPS games, though they can be used for other scenarios.Game Cursor

- Move the control stick left to switch ECO modes. These modes include Standard, Text, Movie, Game, FPS and RTS and can be used to optimise settings according to your activity. Standard mode is suitable for most activities.

SPECIFICATIONS
Screen size 34”Aspect ratio 21:9Brightness 300cd/m² (typical)Panel VAResolution 3440 x 1440Refresh rate 144HzResponse time 7ms with Overdrive enabled (14ms typical)Viewing angle ≥178°(H) / 178°(V)Contrast ratio 3000:1VESA mounting 100 x 100mmColours 16.7MSignal input HDMI 2.0 DP1 1.4 DP 2 1.4Power AC 100-240V ~50/60Hz 1.1AAudioSpeakers YESAudio out YESAccessoriesPower cable YESDisplayPort Cable YESAdditional functionsLow Blue Light YESFlicker Free YESPhysical dimensionsDimensions (w. Stand) 807.5 x 463.4 x 249.2mm (mm)Dimensions (w/o Stand) 807.5 x 364.0 x 130.2mm (mm)Net weight 7.65kgGross weight 10.5kg
NOTES
Need more information?We hope that this user guide has given you the assistance needed for a simple set-up. For the most up-to-date guide for your product, as well as any additional assistance you may require,head online to help.kogan.com
[xyz-ips snippet=”download-snippet”]


