![]() User Guide
User Guide
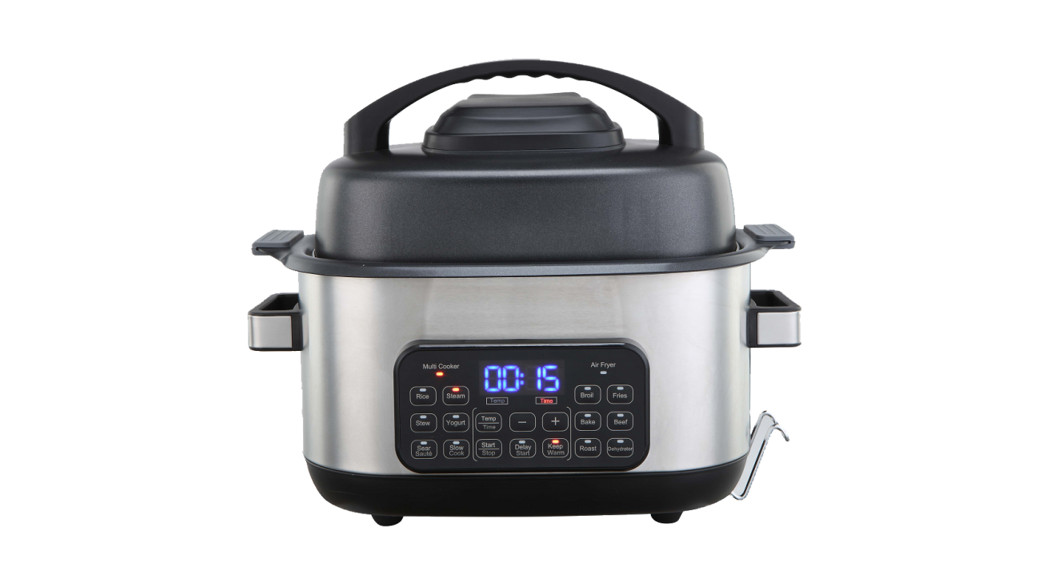
 14-IN-1 AIR FRYER & MULTI-COOKERKAMTARICOKA
SAFETY AND WARNINGS
Please handle this product with care and inspect it regularly to ensure it is in good working order.
If the product, power supply cord, or plug shows any signs of damage: stop use, unplug, and contact Kogan.com support.
- Read all instructions before using the appliance and retain this guide for reference.
- Be sure to use it on a heat-resistant and even surface, such as a heatproof mat. Do not place directly on a benchtop. Keep the appliance at least 20cm away from the wall, furniture or other flammables.
- Do not touch hot surfaces. The temperature of the outer surface can get very hot while the appliance is in operation. Always use oven gloves when handling hot materials and allow metal parts to cool before cleaning. Allow the appliance to cool thoroughly before removing parts. Always use the handles when moving the appliance.
- Do not use the appliance for other than its intended indoor household use.
- To protect against the risk of electric shock, do not immerse this appliance, cord set, or plug in water or any other liquid.
- The appliance is not intended to be operated by means of an external timer or any type of separate remote control system.
- The use of accessories that are not recommended or supplied by Kogan may cause fire, electric shock or injury.
- Do not use an extension cord unless completely necessary with this product. If an extension cord is used please ensure that it has a rating equal or exceeding the rating of this appliance.
- Do not pull or carry by cord, use cord as a handle, close a door on the cord or pull cord around sharp edges or comers. Keep cord from heated surfaces.
- Do not bend or damage the power cord.
- Always unplug the appliance when not in use. To disconnect from the power supply, grip the plug and pull from wall outlet. Never pull by the cord. The plug must be removed from wall outlet before cleaning, servicing, maintenance or moving the appliance.
- Never force the plug into an outlet.
- Do not place the appliance near a hot gas or electric burner.
- Do not cover the appliance while in use. If it is covered, there is a risk of fire.
- Improper installation may result in the risk of fire, electric shock or injury to persons.
- If the power cord or plug is damaged, do not use the appliance.
- The appliance has no user-serviceable parts contained within. Do not attempt to repair, disassemble or modify the appliance.
- Always operate on a dry-level surface. Operating on sinks or uneven surfaces must be avoided.
- Do not clean with metal scouring pads.
- Remove all packaging materials before operating this appliance.
- Extreme caution must be used when moving an appliance containing hot oil or other hot liquids.
- Do not move or lift the appliance while the power cord is still connected to the wall outlet.
- This appliance is not intended for use by persons (including children) with reduced physical, sensory or mental capabilities, or lack of experience and knowledge unless they have been given supervision or instruction concerning the use of the appliance by a person responsible for their safety. Children should be supervised to ensure that they do not play with the appliance.
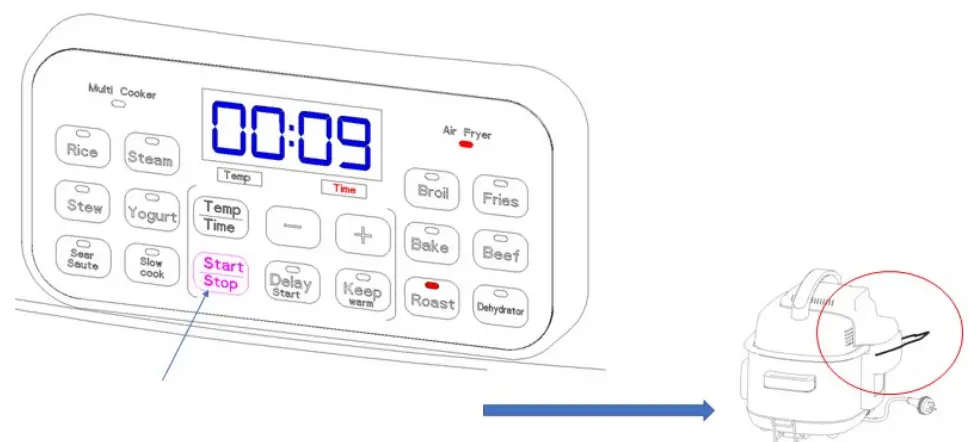
OVERVIEW
Multi-cooker Function
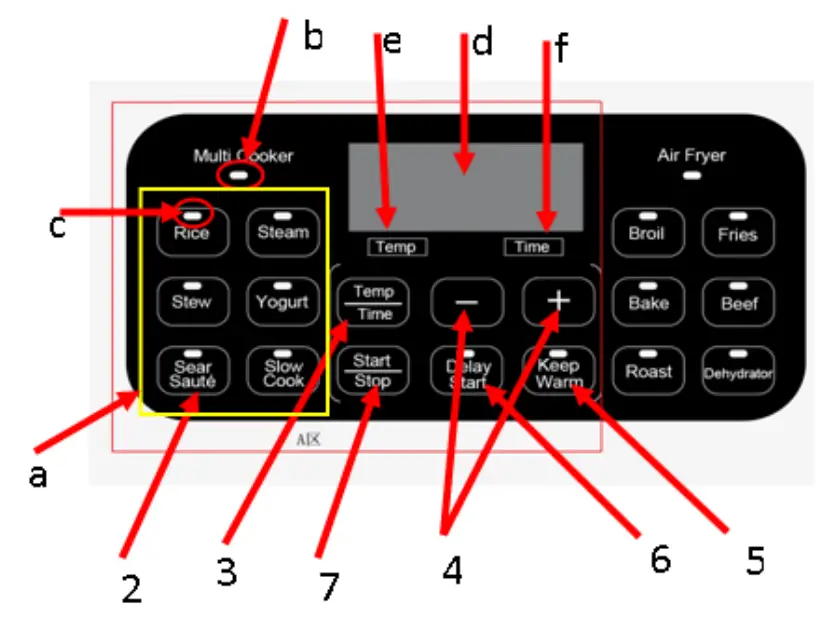
| a | Multi cooker function controls |
| b | Multi cooker indicator |
| c | Individual function indicators |
| d | Display |
| e | Temperature indicator |
| f | Time indicator |
Steps for Usage
- Connect power.
- Press a function button to select it.
- Toggle between temperature and time.
- Adjust either temperature or time as selected.
- Press to put the multi-function cooker in Keep Warm mode.
- Press to set a delay before cooking starts (e.g. for Rice\Steam\Stew\Slow cook).
- Press to begin operation. Press during operation to pause/resume. Long press (3 seconds) to quit the program and return to standby mode.
When in standby mode, press and hold temperature/time for 5 seconds to switch between Celsius and Fahrenheit.
Air Fryer Function

| a | Air fryer function controls |
| b | Air fryer indicator |
| c | Individual function indicators |
| d | Display |
| e | Temperature indicator |
| f | Time indicator |
Steps for Usage
- Connect power and place the cover on top
- Press a function button to select it.
- Toggle between temperature and time.
- Adjust either temperature or time as selected.
- Press to begin operation. Press during operation to pause/resume – here you can remove the lid to check or turn food before replacing the lid and resuming. Long press (3 seconds) to quit the program and return to standby mode.
When in standby mode, press and hold temperature/time for 5 seconds to switch between Celsius and Fahrenheit.
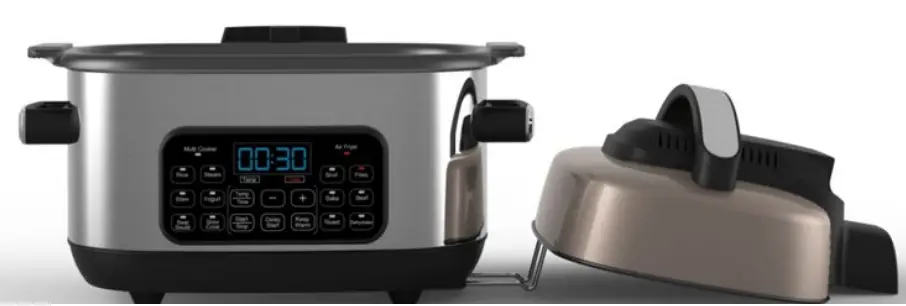
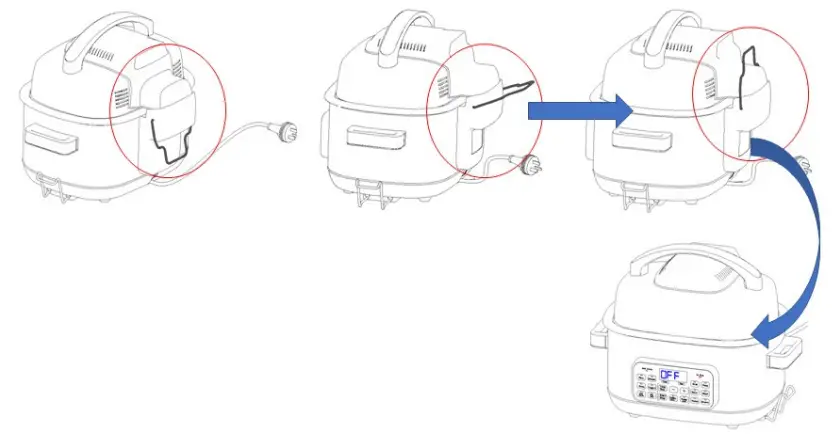
Air Fryer Assembly
Before using air fryer functions, fit the air cover on the pot inside the body and use the latch to close the appliance firmly as per the images below.
OPERATION
Multi-cook Function
In this cooking mode, only the bottom heating plate H2 (220-240V 1250W) is heated and the bottom NTC T2 is sensitive to the temperature of the bottom outside of the inner pot.The glass cover can be used for the multicooker function. For the Sear/Saute function, the glass cover is not required.
| Function | Default | Temp. Range | Time Range | Keep Warm | Delay Start |
| Rice | — — : — — | N/A | N/A | Default 2h | Y |
| — — : — — | |||||
| Steam | 0:15 | N/A | 0:01-2:00 | Default 2h | Y |
| Stew | 2:00 | N/A | 0:15-4:00 | 10h | Y |
| Yogurt | Step 1: HeatStep 2: 8:00 | N/A | Step 1: N/AStep 2: 3:00-24:00 | N/A | N |
| Sear/Saute | 200°C, 0:30 | 120-220°C | 0:05-1:00 | N/A | N |
| Slow Cook | 4:00 | N/A | 0:30-24:00 | Default 10h | Y |
| Keep Warm | 10:00 | N/A | 1:00-10:00 | — | Y |
| Delay Start | 1:00 | N/A | 1:00-24:00 | — | — |
Rice:
- Select the Rice function and the screen will display “—— :——”.
- Press the Start/Stop button and the machine will beep and run the program.The display will show a countdown in the last 10 minutes of the program.
- When the program is finished, the machine will beep and enter Keep Warm for 2hours before beeping again and entering standby.
Steam:
- Select the Steam function and the screen will display the default time: adjust as required.
- Press the Start/Stop button and the machine will beep and begin to preheat. Once preheating is complete, it will beep again and show the time remaining.
- When the program is finished, the machine will beep and enter Keep Warm for 2 hours before beeping again and entering standby.
Stew:
- Select the Stew function and the screen will display the default time: adjust the time as required.
- Press the Start/Stop button and the machine will beep and begin to preheat. Once preheating is complete, it will beep again and show the time remaining.
- When the program is finished, the machine will beep and enter Keep Warm for 10 hours before beeping again and entering standby.
Yogurt:
- Select the Yogurt function and the screen will display “HEAT”.
- Press the Start/Stop button and the machine will begin sterilization, heating to 82°C.
- When the temperature reaches 82°C, the screen will flash “HEAT” while beeping. At this time, the milk temperature is very high and the milk should be cooled before yogurt, probiotics or lactic acid bacteria are added.
- Press the Start/Stop button and the screen will display the default time of 8:00, counting down as it enters the yogurt fermentation state.
- When the program is finished, the machine will beep and enter standby.
To run the program for extra time, you can press the Yogurt twice and adjust the default time as required.
Sear/Saute:
- Select the Yogurt function and the screen will display the default temperature and start flashing: adjust as required.
- Press Temp/Time to switch to Time: adjust as required.
- Press the Start/Stop button and the machine will beep and begin to preheat. Once preheating is complete, it will beep again and show the time remaining.
- When the program is finished, the machine will beep and enter standby.
Slow cook:
- Select the Slow Cook function and the screen will display the default time and start flashing: adjust as required.
- Press the Start/Stop button and the machine will beep and begin to preheat. Once preheating is complete, it will beep again and show the time remaining.
- When the program is finished, the machine will beep and enter Keep Warm for 10 hours before beeping again and entering standby.
Keep Warm:
- Select the Slow Cook function and the screen will display the default time and start flashing: adjust as required.
- Press the Start/Stop button and the machine will beep and begin to preheat. Once preheating is complete, it will beep again and show the time remaining.
- When the program is finished, the machine will beep and enter standby.
Delay Start:
- After setting the temperature and time of the selected function, press Delay Start and the screen will display a default pre-set time and start flashing. (The function indicator and “Delay Start” indicator will remain on).
- Adjust the time as required and press Start/Stop: the machine will beep and count down to the set time. When the set time is reached, the machine will continue with the programmed function.
Air Fryer Function
During this cooking mode, the heating pipe H1 (220-240V 1300W) at the top and the heating plate H2 (220-240V 1250W) at the bottom is heated alternately. The motor at the top (220-240V 30W) works according to the requirements of each function. The top NTC T1 is responsible for sensing the air temperature at the top and the bottom NTC T2 is responsible for sensing the temperature at the bottom of the inner pot and the outside.
| Function | Default | Temp. Range | Time Range |
| Broil | 0:10 | – | 0:10–1:00 |
| Fries | 200°C 00:20 | 150-200°C | 0:01–0:30 |
| Bake | 170°C 01:00 | 120-220°C | 0:10–4:00 |
| Beef | 200°C 00:20 | 120-220°C | 0:05–1:00 |
| Roast | 200°C 00:45 | 120-220°C | 0:10–3:00 |
| Dehydrate | 65°C 02:00 | 40-90°C | 0:15–24:00 |
Broil:
- Select the Broil function and the screen will display the default time: adjust as required.
- Press the Start/Stop button and the machine will beep and begin to preheat. Once preheating is complete, it will beep again and show the time remaining.
- When the program is finished, the machine will display “DONE” for 2 minutes before entering standby.
Fries:
- Select the Fries function and the screen will display the default temperature and start flashing: adjust as required.
- Press Temp/Time to switch to Time: adjust as required.
- Press the Start/Stop button and the machine will beep and begin to preheat. Once preheating is complete, it will beep again and show the time remaining.
- When the program is finished, the machine will display “DONE” for 2 minutes before entering standby.
Bake:
- Select the Bake function and the screen will display the default temperature and start flashing: adjust as required.
- Press Temp/Time to switch to Time: adjust as required.
- Press the Start/Stop button and the machine will beep and begin to preheat. Once preheating is complete, it will beep again and show the time remaining.
- When the program is finished, the machine will display “DONE” for 2 minutes before entering standby.
Beef:
- Select the Beef function and the screen will display the default temperature and start flashing: adjust as required.
- Press Temp/Time to switch to Time: adjust as required.
- Press the Start/Stop button and the machine will beep and begin to preheat. Once preheating is complete, it will beep again and show the time remaining.
- When the program is finished, the machine will display “DONE” for 2 minutes before entering standby.
Roast:
- Select the Roast function and the screen will display the default temperature and start flashing: adjust as required.
- Press Temp/Time to switch to Time: adjust as required.
- Press the Start/Stop button and the machine will beep and begin to preheat. Once preheating is complete, it will beep again and show the time remaining.
- When the program is finished, the machine will display “DONE” for 2 minutes before entering standby.
Dehydrate:
- Select the Dehydrate function and the screen will display the default temperature and start flashing: adjust as required.
- Press Temp/Time to switch to Time: adjust as required.
- Press the Start/Stop button and the machine will beep and begin to preheat. Once preheating is complete, it will beep again and show the time remaining.
- When the program is finished, the machine will display “DONE” for 2 minutes before entering standby.
Multi-cooker Function
- Remove all packaging material and place the machine on the flat table.
- Ensure the inner pot, accessories, and glass lid are clean.

- Cover the glass lid, then connect the cooker to power: the Multi-Cooker indicator will illuminate when it is ready to use.
- To select a function, press the relevant button (“Sear/Saute” in the below example)Once the function has been selected, the LED will display the default temperature and the Temp indicator will turn on.Press + / – to adjust temperature and press the Temp/Time button to confirm: the Time indicator will turn on.Press + / – to adjust time and press the Temp/Time button to confirm.
- Press Start/Stop to begin.To delay start, press “Delay Start” after setting the time and temperature, then press + and – to set the desired delay and then press Start/Stop to begin. The countdown will be displayed on the screen and the function will begin after the countdown has finished.
- For the Rice, Steam, Stew, and Slow cook functions, the unit will automatically enter the “Keep Warm” state. To disable, press “Keep Warm” to toggle the setting off after selecting the function.


Note:The air fryer lid cannot be used while using the multicooker function.
| Function | Default | TEMPrange | Time range | Keep Warm | StartStart |
| RICE | N/A | 10m | 2H | Y | |
| STEAM | 0:15 | N/A | lm-2h (1m intervals)short press: lmlong press: 5m | 2HY | |
| STEW | 2:00 | N/A | 15n-4h (5m intervals) | 10H | Y |
| Yogurt | 1st stage: HEAT:2nd stage: 08:00 | N/A | 1st stage: N/A2nd stage:3-24h(30m intervals) | N | |
| Sear/Saute | 200°C | 200°C 120-200°C | 5m-lh (5m intervals) | N | |
| 0:30 | 10°C | ||||
| SLOWCOOK | 4:00 | N/A | 30m-24h (30m intervals)Short press: 30mlong press: lh | 10H | Y |
| KEEPWARM | 10:00 | N/A | 1-10h (30m intervals) | / | Y |
| Delay Start | 10:00 | N/A | 1-24h (30m intervals) | / | N |
Air fryer function
Add the rack and any food to be fried, then shut the lid and lock in place with the latch as shown below:
- Select one of the following functions: Broil, Fries, Bake, Beef, Roast and Dehydrator.
- Set the time and temperature and press the Start/Stop button: the unit will begin preheating with a countdown. To check the food while preheating:• Press Start/Stop button to pause• Undo the latch and open the lid• Shut the lid and close the latch tightly, then press Start/Stop again to resume countdown

Program overview
| Function | Default | Temp range | Time range | Keep Warm | Delay Start |
| Broil | / ; 00:10 | / | 10min-1h | N/A | N/A |
| Fries | 200°C 00:20 | 150-200°C | 1-30min | ||
| Bake | 170°C 01:00 | 120-200°C | 10min-2h | ||
| Beef | 200°C 00:20 | 120-200°C | 1-30min | ||
| Roast | 200°C 00:45 | 120-200°C | 10min-1h | ||
| Dehydrator | 65°C 02:00 | 40-90°C | 15min-24h |
NOTES
 report this ad
![]()
Need more information?We hope that this user guide has given you the assistance needed for a simple set-up.For the most up-to-date guide for your product, as well as any additional assistance you may require,head online to help.kogan.com
[xyz-ips snippet=”download-snippet”]