MULTIGRINDER PROKAMTGRNDPRB
SAFETY & WARNINGS
Important Safeguards Read all instructions in this user guide before use and retain for future reference. Before using the electrical appliance, the following basic precautions should always be followed including the following:
- Read all instructions.
- Before use check that the voltage of the wall outlet corresponds to the one shown on the rating plate.
- Do not operate any appliance with a damaged cord or plug or after the appliance malfunctions or is dropped or damaged in any manner. Return appliance to the nearest authorized service facility for examination, repair, or electrical or mechanical adjustment.
- If the supply cord is damaged it must be replaced by the manufacturer or an authorized service agent or a qualified technician in order to avoid a hazard.
- Unplug from outlet when not in use, before putting on or taking off parts, and before cleaning.
- Do not let the cord hang over the edge of a table or hot surface.
- Do not immerse the motorized base in liquid, or place it in the dishwasher. Damage to the unit will occur if submerged in the liquid or filling liquid into the container. Only the top cover may be immersed.
- Close supervision is necessary when your appliance is being used near children or infirm persons.
- Ensure fingers are kept well away from moving parts.
- Do not remove the cover until the blade has completely stopped.
- Do not attempt operation without the cover being in place.
- The use of accessories not recommended by the manufacturer may cause injuries to persons.
- Check the grinding chamber for the presence of foreign objects before using.
- This appliance is not intended for use by persons (including children) with reduced physical, sensory or mental capabilities, or lack of experience and knowledge unless they have been given supervision or instruction concerning the use of the appliances by a person responsible for their safety.
- Children should be supervised to ensure that they do not play with the appliance.
- Do not operate the appliance for other than its intended use.
- This appliance is intended to be used in household and similar applications such as:a. staff kitchen areas in shops, offices, and other working environments;b. farmhouses;c. by clients in hotels, motels, and other residential type environments;d. Bed and breakfast type environments.
- Do not use outdoors.
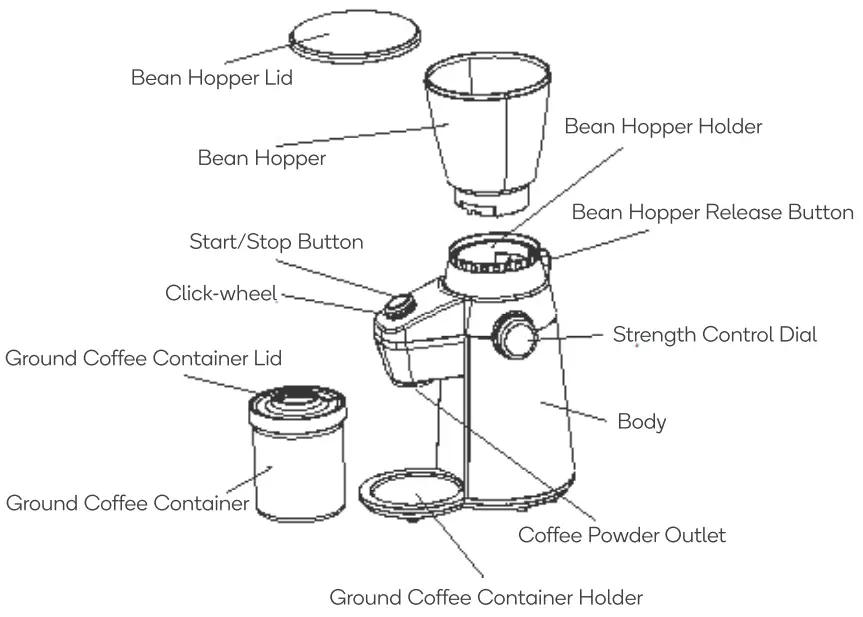
OVERVIEW
GETTING STARTED
Before the First Use
- Carefully unpack your coffee grinder and remove all packing materials.
- Be sure to remove any dust that may have accumulated during packaging.
- To detach the Bean Hopper, press down the Bean Hopper Release Button while simultaneously turning the Bean Hopper anticlockwise. This will allow you to remove the Bean Hopper from the Beon Hopper Holder for cleaning.
- Rinse the Bean Hopper, Bean Hopper Lid, Ground Coffee Container Lid, and Ground Coffee Container with water, then dry thoroughly.
WARNING: Never fully immerse the body in water for cleaning, and do not fill the bean hopper with water for cleaning. S.
OPERATION
Using Your Coffee Grinder
- Place the coffee grinder on a flat surface.
- To attach the Bean Hopper to the Bean Hopper Holder, align the Bean Hopper’s tab with the Groove on the Beon Hopper Holder. Turn the Bean Hopper clockwise until it is tightly locked into the Bean Hopper Holder.
 To detach the Bean Hopper, press down the Bean Hopper Release Button while simultaneously turning the Bean Hopper anticlockwise. This will allow you to remove the Bean Hopper from the Bean Hopper Holder for cleaning.Note:The bean hopper is equipped with a microswitch so that it must be assembled in correct before operating or the appliance will not work. If it is not working, disassemble and re-assemble.
 - Pour the appropriate amount of coffee beans into the bean hopper, and close the lid. The number of coffee beans shall not exceed 360g.Note:If you run the appliance without coffee beans, the appliance will stop working after running for about 5 minutes. The appliance must rest for 30 minutes if it is operated for 5 minutes continuously.
- Put the ground coffee container (with lid in position) on the ground coffee container Ensure that the opening of the ground coffee container aligns with the coffee powder outlet
- Turn the strength control dial to select your desired coffee strength. Turn it to the right, the coffee strength will be increased while it will be decreased when turning the strength control dial to the left.
- The coffee-dispensing amount is determined by grinding time; you can turn the click-wheel to select your desired grinding time. When select, the corresponding indicator of your selected grinding time will light at 100% brightness. If you do not want to adjust the grinding time, the appliance will work under the default grinding time.
Illuminated indicator light (from Left to right) 1 (default setting) 2 3 4 5 6 Grinding time 5 minutes 10 mins 20 mins 30 mins 40 mins 50 mins Note:The first indicator light at 100% brightness means manual mode, please use another container. Powder cup grinding 50 seconds at most the Coarse grind.
- Connect the appliance with the power source, the first indicator (the default grinding time Setting) lights at 100% brightness while the other indicators and the indicator of Start/Stop button light at 50% brightness. Select your desired grinding time by following the previous step and the table.
- Press the Start/Stop button, the appliance starts to grind coffee beans under the selected grinding time. The coffee powder dispenses from the coffee powder outlet. The indicator of the Start/Stop button keeps blinking during the grinding process.Note: The appliance will enter into the sleep state if no operation within 90 seconds after the plugin. The appliance must rest for 30 minutes if it is operated for 5 minutes continuously. And it is suggested to operate this appliance for less than 90s per time and a minimum of 90 seconds rest time must be maintained between continuous two cycles. You can press the Start/Stop button to make the appliance stop running at any time during the grinding process.
- When desired grinding time has reached, the coffee grinder will stop working automatically and go back to standby condition, at that time, the first indicator (the default grinding time setting) lights at 100% brightness while the other indicators and the indicator of Start/Stop button light at 50% brightness.Note:The maximum amount of ground coffee container is 150g, make sure ground shall not overflow.
- Unplug the appliance, remove the ground coffee container lid and pour out the coffee ground directly.Note:If there is resistance while adjusting, the grind size should be adjusted while the motor is running to prevent jamming.
 To detach the Bean Hopper, press down the Bean Hopper Release Button while simultaneously turning the Bean Hopper anticlockwise. This will allow you to remove the Bean Hopper from the Bean Hopper Holder for cleaning.Note:The bean hopper is equipped with a microswitch so that it must be assembled in correct before operating or the appliance will not work. If it is not working, disassemble and re-assemble.
Grinding Tips
- The coarse ground coffee is generally used for percolators and coffee urns. Medium ground coffee is used for drip coffee makers and steam-type espresso machines. Fine ground coffee is used for espresso machines with an electric pump.
- For the freshest, most flavorful coffee, grind only enough for the pot you are making. Coffee beans keep up to 2 months in the freezer in an airtight container and can be ground while still frozen. Coffee grounds left in your grinder can become stale and affect the flavor of freshly ground coffee. Be sure to clean the grinding chamber, blades, and grinding wheel after each use.
- This grinder can only grind dry, brittle foods. It will not grind anything moist, extremely hard, or gummy such as whole ginger, chocolate, sesame seeds, or oily spices such as cinnamon, cloves, or nutmeg. Do not grind peanuts or grains such as wheat, rice, barley, or dried corn. Attempting to grind any of these foods may damage the unit. Never use it to chop ice cubes.
- Freshly ground peppercorns have a strong aroma and taste that may affect the flavor of coffee beans ground afterward. You may want to purchase a separate grinder if you plan to grind peppercorns.
CLEANING & CARE
CAUTION: Be sure to unplug this appliance and let it cool down completely before cleaning. To protect against electrical shock, do not immerse the cord, plug, or body in water or liquid, and do not fill the bean hopper with water for cleaning. After each use, always make sure the plug is first removed from the wall outlet.
- Wipe the body with a wet cloth and then dry it completely.
- When do not use the appliance, store it in a dry and cool environment.
- To detach the Bean Hopper, press down the Bean Hopper Release Button while simultaneously turning the Bean Hopper anticlockwise. This will allow you to remove the Bean Hopper from the Bean Hopper Holder for cleaning.
- Rinse the Bean Hopper, Bean Hopper Lid, Ground Coffee Container Lid, and Ground Coffee Container with water, then dry thoroughly.
WARNING: Never fully immerse the body in water for cleaning, and do not fill the bean hopper with water for cleaning.
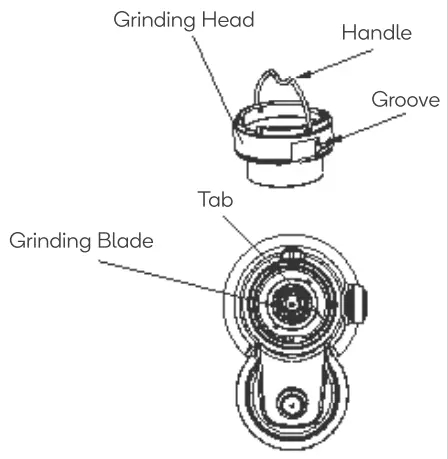
- Lift the handle of the grinding wheel and then rotate it anticlockwise to remove the grinding wheel, then clean the grinding blade with a brush and rinse the grinding wheel with water and then dry it thoroughly.
- To replace the grinding wheel back in position, place the grinding wheel into the grinding chamber by making the groove on the grinding wheel align with the tab on the grinding chamber, and then rotate the grinding wheel clockwise until it is fixed well in the position.
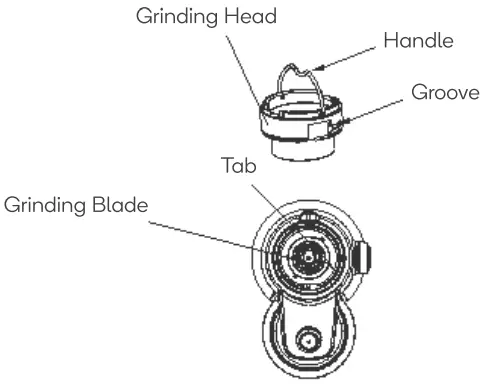
Note: Please operate carefully os the grinding wheel & grinding blade are sharp.
Disposal
![]() This marking indicates that this appliance should not be disposed of with other household wastes. To prevent possible harm to the environment or human health from uncontrolled waste disposal, recycle it responsibly to promote the sustainable reuse of material resources.
This marking indicates that this appliance should not be disposed of with other household wastes. To prevent possible harm to the environment or human health from uncontrolled waste disposal, recycle it responsibly to promote the sustainable reuse of material resources.
NOTES
Need more information?We hope that this user guide has given you the assistance needed for a simple setup.For the most up-to-date guide for your product,as well as any additional assistance you may require,head online to help.kogan.com
 report this ad
[xyz-ips snippet=”download-snippet”]