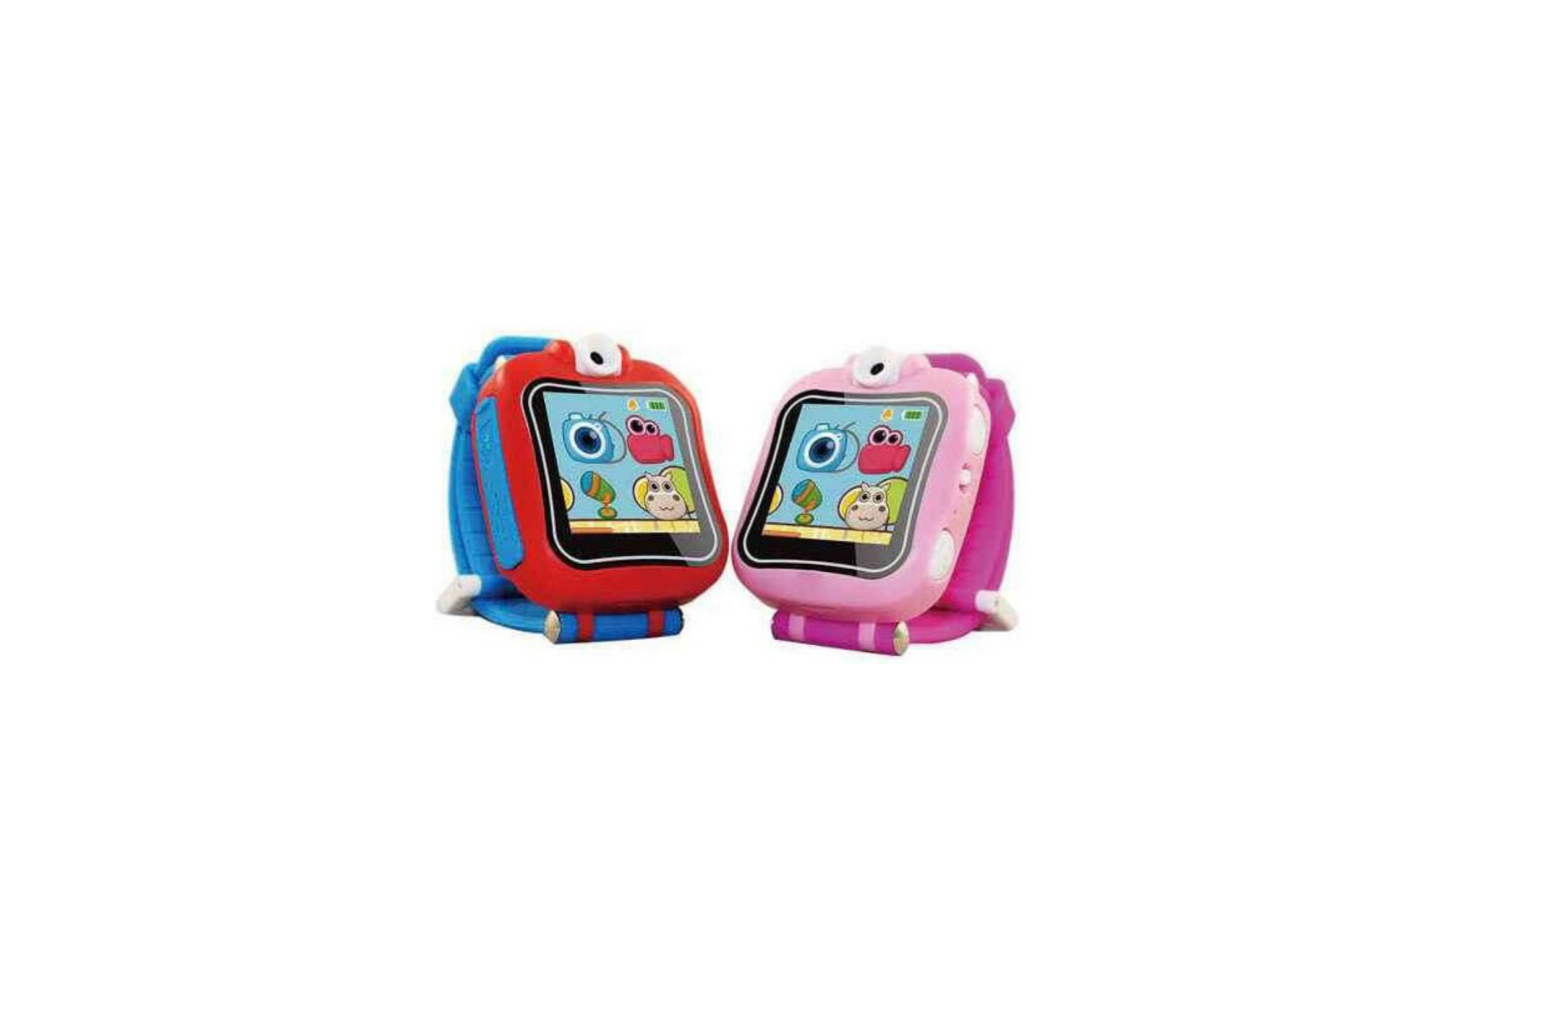
kogan KASMRWTCRDA Kids Smartwatch
SAFETY AND WARNINGS
Misuse of batteries can lead to them bursting, causing a fire or chemical burns. Please read the below precautions:
- Do not disassemble.
- Do not crush and do not expose the battery to any shock or force such as hammering, dropping or stepping on it.
- Do not short circuit. · Do not expose to high temperatures or place near a heat source. Do not leave in direct sunlight for any length of time.
- Do not dispose of in fire. · Do not handle damaged or leaking battery. Keep the battery out of the reach of children. Keep the battery dry.
- If you ever notice any signs of damage, cease use, and contact Kogan support.
- If you find the time between charges is considerably shortened with no change in usage, the battery could be nearing the end of its life.
- Dispose of the item at a suitable waste station, as the battery cannot be added to normal waste.
- Keep the rubber cover of the micro USB port closed lightly while it is not in use in order to prevent dust or water from getting into the micro USB port.
- Keep the watch clean by wiping it with a slightly damp cloth.
- Keep the watch out of direct sunlight and away from any direct heat source.
- Do not drop the watch on a hard surface and do no expose it to moisture or immerse it in water
- Keep the lens clean. If the pictures taken are blurry, it could be because there is dust or dirt on the lens. You can clean the lens by: o Blowing on the lens. o Gently wiping the lens with a dry cloth.
- Charging should only be completed by an adult.
OVERVIEW
Introduction
This smart watch is a great wearable gadget for children! In addition to showing the time, you can also take photos, shoot videos, record your voice and play games!When the watch’s switch is off, it will not be possible to charge the watch or use any of the activities. Please note, it is not necessary to turn off the power switch during daily use.The watch may come with a small amount of charge, but we recommend a full charge before use. A full charge will take
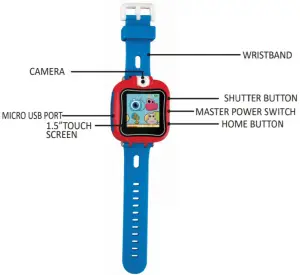
Components
OPERATION
Getting Started
When you use the Smart watch for the first time, you will need to turn the power switch on. Locate the power switch ![]() on the right side of the watch, then move it to the “I” position.
on the right side of the watch, then move it to the “I” position.
Charging the Battery
Connect the Smart watch to a computer with the included micro USB cable to charge the battery.
Lift up the rubber cover of the micro USB port on the side of your watch. Insert the micro USB cable (small end) into the micro USB port on the watch. Insert the larger end of the micro USB cable into a spare USB port on the computer. A USB port is usually marked with this symbol ![]() .
.
Once the connection is successful, you will see the battery charging symbol displayed on the watch screen for one second, and then the data transfer symbol. The battery will continuously charge whilst connected, but you can open PC to find folder smart watch to transfer data at the same time.
Monitor the watch regularly throughout the charging process.
When the battery is fully charged. A full battery symbol displays on the screen. Disconnect the watch from the computer.
Note: It will take approximately 3 hours to fully charge the battery. The actual charging time depends on the power supply, the remaining charge and the ambient temperature of the charging environment. The optimum ambient temperature is 0° C – 40° C (32° F – 104° F). If your watch needs longer than 3 hours to fully charge, please try charging from a different USB power source.
Battery Life
The time the battery lasts between charges depends on usage. Like other electronic devices, more frequent usage will mean the battery will drain more quickly. Some activities will be more demanding on the battery, such as taking photos and videos. The expected battery life is shown below. This is based on the assumption that the screen is turned off when not in use.
| Condition | Battery Time |
| Low Usage | 2 weeks |
| Typical Usage | 2-3 days |
| Heavy Usage | 1 day |
How to Operate Your Watch
Make sure the power switch ![]() is in the on position and the battery is charged before use.
is in the on position and the battery is charged before use.
Press the home button ![]() or shutter button
or shutter button ![]() to wake the watch up. Press home for 3 seconds to wake up the watch from standby.
to wake the watch up. Press home for 3 seconds to wake up the watch from standby.
When turning the watch on for the first time, the date and time setting screen will display first. Swipe up and down over the months, days, years, hours and minutes to change the current date and time.When the clock is displayed on screen, press the home button ![]() to go to the home menu. Press the shutter button
to go to the home menu. Press the shutter button ![]() to take photos and videos.
to take photos and videos. If the battery level is too low and cannot keep the clock running, you will need to enter the time and date again after recharging.
When the battery level is low, only the clock display function is available. We recommend recharging the battery as soon as possible before further use.
Automatic Screen Off
To preserve battery life, the screen will automatically shut off after a short period of time when in clock mode.
The auto screen off time can be set in Settings / Advanced / Auto Screen Off. Please refer to the Settings section in this manual.
In other activities, it will return to clock mode automatically if there is no input for 1 minute. When in camera mode, it will auto exit after 3 minutes. When in slideshow, the auto exit time is 15 minutes.
If you have a timer running, it will return to the timer screen instead of returning to watch mode. The watch will not shut off automatically when the timer is running.
Clock Display
When the home button is pressed, the clock will be displayed.Tap the center of the screen to switch the clock face between analog and digital. Swipe left or right on the screen to see more clock faces.Press the home button
 ![]() to display the home menu for selecting other activities.Press the shutter button
to display the home menu for selecting other activities.Press the shutter button ![]() to enter camera mode.
to enter camera mode.
Home Menu 
Press the home button ![]() to display the home menu. There are 12 different activities to choose from:
to display the home menu. There are 12 different activities to choose from:
- Camera
- Video
- Voice Recorder
- Talking Hippo
- Timer
- Time Master
- Stopwatch
- Alarm
- Playback
- Menu Layout
- Games
- Settings
Tap the icon to enter the activity.Swipe left or right to scroll through the menu pages. To change the menu layout to large icons, go to Settings/Menu Layout.
Camera
The camera can be moved 90 degrees up and down. Move the camera with your fingers up and down to take selfie photos and videos.
Press the shutter button ![]() here. to enter camera mode. You can also switch to video mode
here. to enter camera mode. You can also switch to video mode Press the shutter button
 ![]() or shutter icon
or shutter icon ![]() on the screen to take a photo. Swipe the screen (from down to up) to invert the focusTap the mode icon
on the screen to take a photo. Swipe the screen (from down to up) to invert the focusTap the mode icon ![]() on screen to change to video mode.Tap the magic icon
on screen to change to video mode.Tap the magic icon ![]() on screen to preview with a photo effect, then press the left or right arrow icons
on screen to preview with a photo effect, then press the left or right arrow icons ![]() or swipe the screen to go through different photo effects.Tap the playback icon on screen to view the taken photos or videos.Press the shutter button
or swipe the screen to go through different photo effects.Tap the playback icon on screen to view the taken photos or videos.Press the shutter button ![]() or tap the screen to exit and return to camera mode.
or tap the screen to exit and return to camera mode.
Video
Tap the mode icon ![]() on screen in camera mode at any time to go to video mode. The time limit per video file is 1 minute.Press the shutter button
on screen in camera mode at any time to go to video mode. The time limit per video file is 1 minute.Press the shutter button ![]() or record icon
or record icon ![]() on screen to start recording. While recording, press the shutter button
on screen to start recording. While recording, press the shutter button ![]() again or the stop icon
again or the stop icon ![]() on screen to stop.Tap the mode icon on screen to change to camera mode.
on screen to stop.Tap the mode icon on screen to change to camera mode.![]() Tap the magic icon on screen to preview with a video effect, then Press the left or right arrow icons or swipe the screen to go through different video effects. Tap the playback icon
Tap the magic icon on screen to preview with a video effect, then Press the left or right arrow icons or swipe the screen to go through different video effects. Tap the playback icon ![]() on screen to view videos.When you finish recording a video, the playback screen will be shown. Tap the play icon
on screen to view videos.When you finish recording a video, the playback screen will be shown. Tap the play icon ![]() on screen to play the last recorded video.Tap the trash can
on screen to play the last recorded video.Tap the trash can ![]() on screen to display the delete menu.
on screen to display the delete menu.
Voice Recorder
Tap the record icon ![]() on screen to start the voice recording. While recording, tap the stop icon
on screen to start the voice recording. While recording, tap the stop icon ![]() on screen to stop. Swipe the screen to see the previous or next file.
on screen to stop. Swipe the screen to see the previous or next file.
Talking Hippo
- Tap the upper part if the hippo’s head, and it will become happy and move.
- Tap the lower part of the hippo’s head, and it will be angry and move.
- If you tap the hippo’s tummy, it will be sad move.
- Tap the hippo’s hands, it claps its hands.
- Tap hippo’s feet, it loses balance.The hippo will go sleep when it does not receive a touch for 50 seconds.

 The hippo will go sleep when it does not receive a touch for 50 seconds.
Imitation
Speak to the hippo, it will put its hand beside its ear, this is to show that the hippo is listening. After that, the hippo will try and repeat what it heard.
Timer
Set a countdown timer here.Tap the play icon ![]() on screen to start the timer immediately.Tap the style icon
on screen to start the timer immediately.Tap the style icon ![]() or swipe the screen left or right to change the timer style. There are 5 different timers for you to try out.
or swipe the screen left or right to change the timer style. There are 5 different timers for you to try out.
Tap the time to enter the timer settings. Swipe up or down on the minutes and seconds to change the time. Once set, press home button ![]() to go back and save.
to go back and save.
While the timer is running, tap ![]() to pause the countdown, tap it again to resume. Tap to stop the countdown and reset the timer.
to pause the countdown, tap it again to resume. Tap to stop the countdown and reset the timer.
Time Master
Here you can make the penguin character tell the set analog or digital time. Tap the hour icon or minute icon to select the time you want the penguin to say. Tap
Tap ![]() to increase by an hour / minute. Tap to
to increase by an hour / minute. Tap to ![]() decrease by an hour / minute. Tap the clock or the owl to tell the time.Stopwatch Access the stopwatch here. Tap the play icon on screen to start the
decrease by an hour / minute. Tap the clock or the owl to tell the time.Stopwatch Access the stopwatch here. Tap the play icon on screen to start the
stopwatch
Access the stopwatch here.Tap the play ![]() icon on screen to start the stopwatch
icon on screen to start the stopwatch
Tap the style icon ![]() or swipe the screen left or right to change the stopwatch style. There are 5 fun stopwatch styles to select!
or swipe the screen left or right to change the stopwatch style. There are 5 fun stopwatch styles to select!
While the stopwatch is running, tap ![]() to pause the timer, tap it again to resume.Tap
to pause the timer, tap it again to resume.Tap ![]() to stop the timer and reset the stopwatch to zero.
to stop the timer and reset the stopwatch to zero.
Alarm
You can set an alarm, choosing from a selection of alarm tones and animations. Tap the time or alarm icon to change the alarm time. Tap the bell icon on screen to toggle the alarm on or off.To change the alarm time, select the hour and minute by swiping up or down on the hours, minutes or AM/PM. Tap the tone
 ![]() icon on screen to display the alarm tone selection menu. There are 5 built-in alarms. Swipe left or right to preview the different tones and animations.Tap
icon on screen to display the alarm tone selection menu. There are 5 built-in alarms. Swipe left or right to preview the different tones and animations.Tap ![]() to confirm the selection.Once you’ve chosen your alarm, tap the icon
to confirm the selection.Once you’ve chosen your alarm, tap the icon ![]() to confirm. Note: If the battery level is too low, the alarm will need to be set again.
to confirm. Note: If the battery level is too low, the alarm will need to be set again.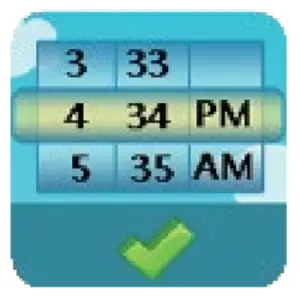
Playback
Here you can browse the captured photos or play the recorded videos. The latest file will be shown first, tap the arrow icons or swipe the screen to see the previous or next file.Tap the slideshow icon ![]() to view the photo in slideshow. Tap the play icon
to view the photo in slideshow. Tap the play icon ![]() on screen to play the video.Tap the trash can
on screen to play the video.Tap the trash can ![]() on screen to display the delete menu.
on screen to display the delete menu.
Tap ![]() to change the color scheme of menu.Tap
to change the color scheme of menu.Tap ![]() or
or ![]() to select a menu layout option.
to select a menu layout option.
Games
There are 3 built-in games on the smart watch. Hit mouse, Memory Testing, and Percussion. Swipe the screen to see the game icons, then tap one to play.
Hit mouse
Tap the mouse that comes out from the holes, if tapped enough before the end of game, the user successfully passes the game. This game requires a quick tap, otherwise he will go back into his hole.
Memory Testing
Remember all the cards quickly while they are showing. After they are hidden, turn over matching cards one by one. When two cards are the same, you will win points. If enough points are obtained before the end of game, you win.
Percussion
Tap the icon in the middle to select any of the 6 tones in all. Tap any of the instruments and play with the songs, tones and rhythms!
Settings
In settings, swipe left or right on the screen to scroll through different setting items. Here you can adjust the following items:
Volume
Tap ![]() to increase or the volume. Tap to decrease the volume.
to increase or the volume. Tap to decrease the volume.
Brightness
Tap ![]() to increase the LCD brightness. Tap to decrease the LCD brightness.
to increase the LCD brightness. Tap to decrease the LCD brightness.
Date
Tap screen to enter the date setup screen. On the date setup screen, swipe up or down on the month, day and year to scroll through the options. Tap the date format icon on screen to change the date format (DD/ MM/YYYY or MM/DD/YYYY).
Time
Tap screen to enter the time setup screen.On the time setup screen, swipe up or down on the hours, minutes, or AM/PM to scroll through the options.After the time has been selected, click the home button to set
Advanced
MemoryHere you can see the free memory remaining or choose to format the memory. Follow the instructions on screen if you would like to format the memory.Note: Formatting will erase all data in the memory, including all taken photos, videos and voice files.
Image Display
As the saved photos and videos are in 4:3 ratios, here you can select 2 options for displaying the image in the preview screen and playback screen:Mode 1: Image displayed to actual scale with the left and right side of the image unseen.Mode 2: Image scaled to fit the screen, whole image displayed, but not to actual scale.
Video Resolution
There are 2 options here:160 X 120: The video size is smaller and you can record and save more videos.320 X 240: The video quality is better and takes up more memory so less videos can be recorded and saved.
Auto Screen Off
Here you can set the time for auto screen off.There are 5 options: 5 seconds, 10 seconds, 1 minute, 3 minutes and disable to turn it off.(The auto screen off will be disabled after selecting this option. The clock will always be displayed, but the screen will become dim if there is no input for 10 seconds in clock display mode).Tips: If the auto screen off time is set to one of the longer times, the battery consumption will increase and the time the battery lasts will become shorter.
Factory Reset
Factory reset will erase the contents stored in the memory and reset all system settings to factory default. For example: file index, frequency, video resolution, game level and clock face. Follow the instructions on screen to confirm the action.
Language
Tap ![]() to select language, and tap the
to select language, and tap the ![]() icon to confirm.
icon to confirm.
Clock Face
Tap screen to choose your favorite clock display: analog or digital clock face. Swipe the screen left or right to look at the different clock faces.
Tips
- When you touch the screen, ensure your entire finger is pressing the screen and hold for a second. Do not use your fingernails.
- When playing the game “Hit Mouse”, aim to tap the mouse on the upper-right hand corner of its head.
- To view images/videos on your laptop/computer, connect the watch to your laptop/computer using the included cable. Photos and videos can be found in the “Photo” folder, while voice recordings can be found in the “Record” folder.
How to find icons on your watch:
- Advanced – Tap the settings icon , slide the volume icon to the right
- Memory – The first icon after entering the advanced icon
- Timer – The pink clock after the hippo icon
- Auto Screen off – The fourth icon after entering the advanced icon
- Alarm – The blue clock next to the stopwatch
- Factory reset – The fifth icon after entering the advanced icon
- Language – The sixth icon after entering the advanced icon
- Menu Layout – The flower icon
TROUBLESHOOTING
| Problem | Solution |
| The watch is not turning on |
|
| The watch is not charging |
|
| Screen display is abnormal |
|
| Cannot connect to computer |
|
| Image taken is not clear |
|
SPECIFICATIONS
| Display | 1.5” Sensitive Colour Touch Screen |
| Photo Resolution | 640 X 480 (0.3 MP) |
| Photo Resolution | 640 X 480 (0.3 MP) |
| Focus Range | 1.5 feet – Infinite |
| Internal Memory | 128 MB built-in memory (shared with program data, actual memory available for user storage will be less) |
| Storage capacity | Photos: approx. 800 Videos: approx. 6 minutes at 320 x 240 pixels, approx. 15 minutes at 160 x 120 pixels Note: The above amounts are approximations. The actual amount depends on the shooting environments. The video length limit is 1 minute per connection |
| File Format | Photos: Standard Baseline JPEG Video: AVI (Motion JPEG) |
| Connectivity | Micro USB 2.0 cable (included) for with computer |
| Battery | Li-ion Polymer battery (Battery is not replaceable) |
| Optimum Operating and Charging Temperature | 0° C – 40° C (32° F – 104° F) |
Need more information?This is a Quick Start Guide, if you require any further assistance, please contact Kogan support at help.kogan.com.
 report this ad
[xyz-ips snippet=”download-snippet”]