
QUICK START GUIDE
9-IN-1 STEAM STICK
KASTKSTM09A
SAFETY AND WARNINGS
- To provide continuous protection against the risk of electric shock, connect the device to properly grounded outlets only.
- Check that the mains voltage corresponds to the voltage indicated on the rating label. See specifications as below: ~220-240V, 50/60Hz, 1300W.
- This product is designed for domestic use only.
- Do not use at outdoors.
- Do not leave the Steam Stick unattended while switched on. Turn OFF the switch and unplug the electrical cord when not in use and before servicing.
- Do not allow to be used as a toy. Close attention is required when used near children, pets or plants.
- The appliance is not intended for use by persons (including children) with reduced physical, sensory or mental capabilities or lack of experience and knowledge unless they have been given supervision or instruction concerning use of the appliance by a person responsible for their safety. Children should be supervised to ensure that they do not play with the appliance.
- Never direct steam towards people, animals, plants or equipment containing electrical components, such as the interior of the ovens.
- Do not immerse the Steam Stick into water or other liquids.
- Do not use with damaged cord or plug. If the supply cord is damaged, it must be replaced by the manufacturer or a similarly qualified person to avoid a hazard.
- If the Steam Stick is not working as it should or has been dropped, damaged, left outdoors or immersed into water, cease use and contact Kogan.com Support.
- Do not pull or carry the device by a cord, use cord as a handle, close the door when the cord is obstructing or pull the cord around sharp edges or corners. Keep the cord away from heated surfaces.
- Never force the plug into an outlet.
- Do not use extension cords or outlets with inadequate current carrying capacity.
- Unplug the appliance after use and before carrying out user maintenance.
- Do not unplug by pulling the cord. To unplug, grasp the plug, not the cord.
- Do not handle plug or Steam Stick with wet hands or operate without shoes.
- Do not insert any objects into openings. Do not use with blocked openings.
- Do not use without floor cloth in place. Do not use without water in the water tank.
- When using on stairs, be extra cautious.
- Store your Steam Stick indoors in a cool, dry area.
- Keep your work area well lit.
- Never put any cleaning detergents into the Steam Stick. This will make the operation unsafe and may damage the unit.
- Never block the steam openings of the product or place it on a soft surface, where the steam openings may be blocked. Keep the steam openings free of lint, hair and other particles.
- Use only as described in this manual. Use only with manufacturers recommended accessories.
- Do not use in swimming pools containing water.
- This appliance can be used by children aged 8 years and above and persons with reduced physical, sensory or mental capabilities or lack of experience and knowledge if they have been given supervision or instruction concerning use of the appliance in a safe way and understand the hazards involved.
PRODUCT OVERVIEW
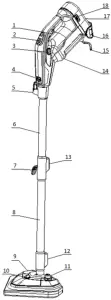
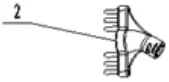
1 Steam switch 8 Aluminium tube 2 15 Power cord2 Steam regulator 9 Mop head 16 Wall holder3 Power switch 10 Detergent tank cover 17 Water tank4 Aluminium tube button 11 Detergent release button 18 Lock button of water tank5 Upper cord wrap 12 Lock button 19 Measuring cup6 Aluminium tube 1 13 Lock push button 20 Cloth pad7 Lower cord wrap 14 Main body 21 Carpet glider
ASSEMBLY
1. Aluminium tube assemblyInsert aluminium tube 2 into the aluminium tube 1.
![]()
Figure 1
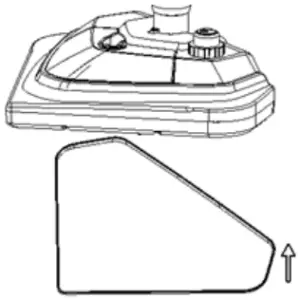
2. Mop head assemblyInsert the mop head into the assembled aluminium tube and attach the cloth pad to the bottom of mop head.

Figure 2
3. Assemble main bodyConnect the main body to the aluminium tube.
Figure 3
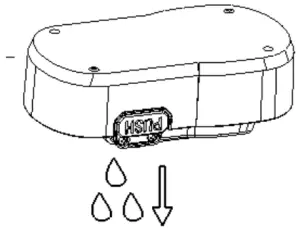
4. Add water in the water tankAdd the water in the water tank.
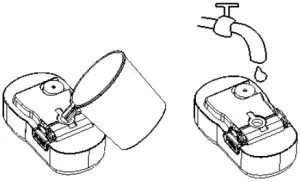
Figure 4
5. Assemble the water tankAttach the water tank filled with the water to the main body. The buttons on both of sides must lock with the main body.
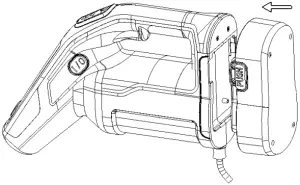
Figure 5
6. Use the mopPlug in the Power cord to a grounded electrical outlet, turn ON the power switch, after 20 seconds approximately, the light on the steam regulating mask will change from red to green, then choose steam volume position, finally turn ON the steam switch for use.

Figure 6
OPERATION
1. How to use the carpet gliderInsert the mop head into the tube, stick the cloth pad on the mop head as per below picture. Then install the carpet glider on the mop head and clean the carpet.
2. How to use the accessories
![]()
| 1 | Big round brush | 5 | Angle nozzle |
| 2 | Long brush | 6 | Window squeegee |
| 3 | Small round brush | 7 | Accessory adaptor |
| 4 | Scraping tool | 8 | Garment steamer cloth |
Insert the attachment connection head into the main body as per above picture. Then insert the other accessories by counter clock wise rotation.
If need longer handle, you can insert the aluminium tube into the main body and then link the attachment.
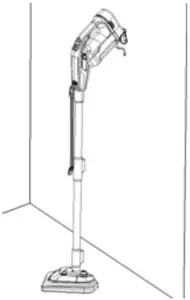
3. How to use the wall mount1. Stick the wall mount on the position which user want and then fix the steam mop main body to the wall mount as shown below;
CLEANING AND CARE
- Drain the remaining water in the tank after use.
- Take off the used cloth pad, wash it and dry it in an airy place.
- Put the power cord on the cord wrap and fix the main body onto the wall holder.
TROUBLESHOOTING
| Problem | Reason | Solution |
| The appliance is not turning ON. The power indicating light does not light up. | The appliance is not plugged in or household power system problem/fuse is blown. | Plug the power cord to the electrical outlet or check the power or ask a qualified electrician for help. |
| The appliance fails to steam. The power indicating light is on. | The water tank is empty. | Refill the water tank. |
| The appliance needs more time to warm up. | Wait for 45 seconds to warm-up. | |
| During operation, the appliance will automatic shut off if water tank is empty. | Wait for the appliance to cool down and refill the water tank. |
NOTES
Need more information?
This is a Quick Start Guide, and we hope that this has given you the assistance needed for a simple set-up.For the most up-to-date guide for your product, as well as any additional assistance you may require, head online to help.kogan.com
report this ad
[xyz-ips snippet=”download-snippet”]