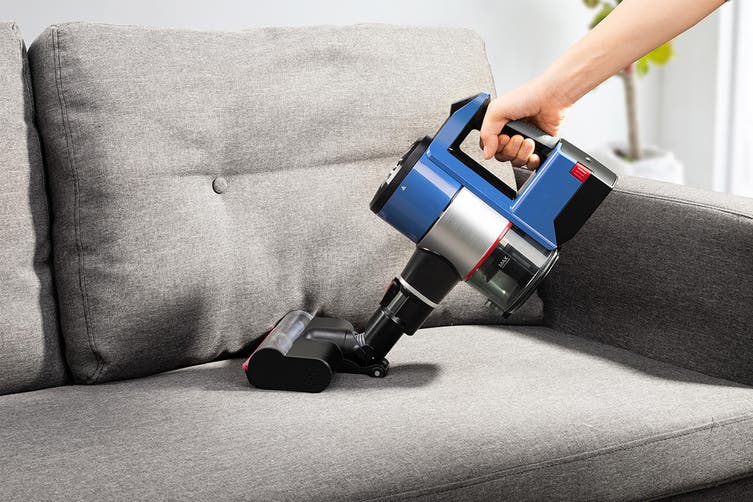
kogan KAVACSTM08A M8 Pro Cordless 22.2V Stick Vacuum Cleaner and MOP

SAFETY & WARNINGS
When using an electrical appliance basic safety precautions should always be followed including the following:
- Read all instructions.
- Do not use near stairs or on balconies. This appliance does not have a “no avoidance” sensor.
- Children aged 8 years and above or persons with reduced physical, sensory or mental capabilities should only use this appliance while under supervision or instruction from an adult or carer.
- Children aged 8 and above should not clean or perform user maintenance on this appliance unless under supervision or instruction from an adult or carer.
- This appliance is intended for domestic use only.
- This appliance is suitable for low to medium felt back carpets. It is not suitable for uneven floors or mixed carpets.
- Do not operate any appliance with a damaged or abnormal cord or plug. If the main cord is damaged, it must be replaced by Kogan.com or a service agent on Kogan.com’s behalf.
- Recharge the battery using only with the charger supplied with the appliance.
- Do not use this appliance with any other battery other than the one supplied. The use of any other battery could cause an explosion or fire.
- Do not use on wet or greasy surfaces.
- Before use, remove any objects that could entangle the brushes (long hair, plastic bags, rope, wire, etc.).
- Do not sit on the appliance or place heavy objects on it.
- Ensure there is no obstacles in the room which the vacuum may tip and create a hazard (such as lit candles or a vase filled with water).
- Regularly clean the machine.
- Empty the dust tank after every use.
- When not in use for more than two months the vacuum cleaner should be disconnected from the power supply. Ensure the battery is charged prior to disconnecting the power. To ensure a longer service life, the vacuum cleaner must be charged once every two months.
- Only recharge the vacuum when alerted by the low power alarm or when the power is turned off. The appliance will be ready for use after it is fully charged.
- The battery must be removed from the vacuum prior to its disposal. The appliance must first be disconnected from the power outlet before removing the battery.
- Do not dispose of batteries with household waste. Dispose of them in accordance with your local regulations.
- The cable on the Power adapter cannot be replaced if damaged. Instead the Power adapter must be replaced by Kogan.com or a service agent on Kogan.com‘s behalf.
- This appliance contains a non-replaceable battery.
Power adapter
WARNING: The Power adapter must be removed from the power outlet before cleaning or performing any maintaining on this appliance.
IMPORTANT:
- Do not attempt to replace the power cable by yourself if damage. The Power adapter must be replaced by Kogan.com or a service agent on Kogan.com’s behalf.
- If the device is dropped, please contact Kogan.com to check it before using it again. Internal damage could cause accidents. For any kind of problems or repairs, please contact Kogan.com.
Disposal and environmental responsibilityContact your local authorities or recycling centres for more information.
OVERVIEW
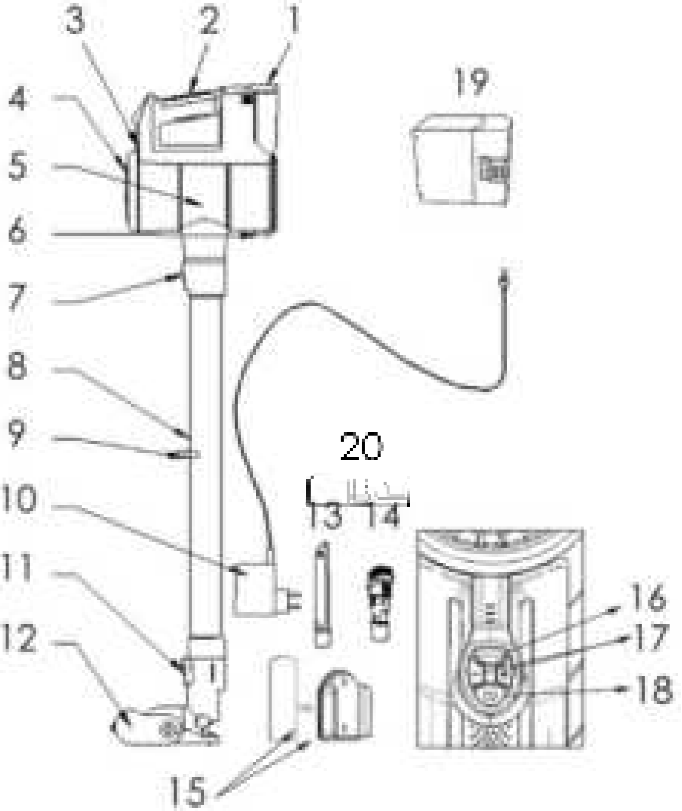
- Detachable battery pack
- Ergonomic handle
- Indicator lights
- Outlet filter cover
- Dust tank
- Dust tank release button
- Metal tube release button
- Metal tube
- Accessory support
- Power adapter
- Floor brush release button
- Floor brush
- Crevice head
- 2 in 1 brush head
- Wall mount with removable sticker
- Floor brush switch
- Power level buttons (3 levels)
- Power button
- Battery
- Water tank
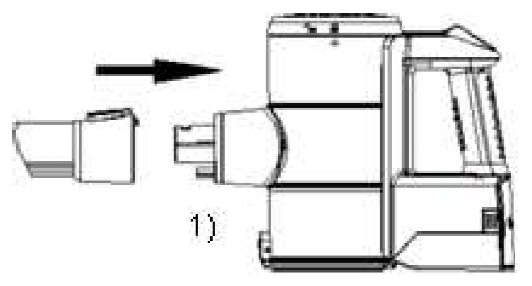
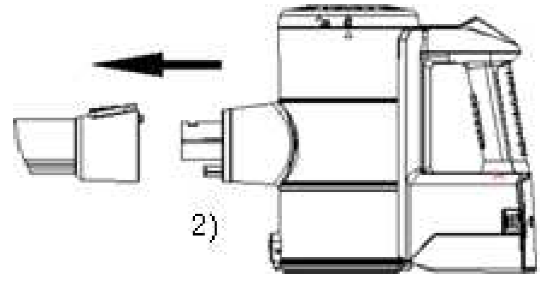
INSTALLATION
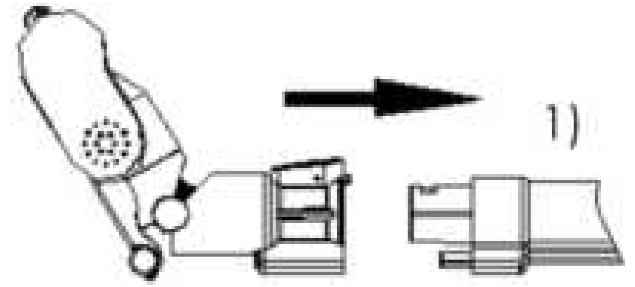
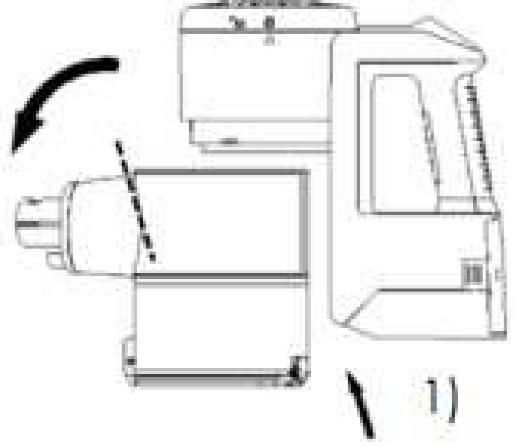
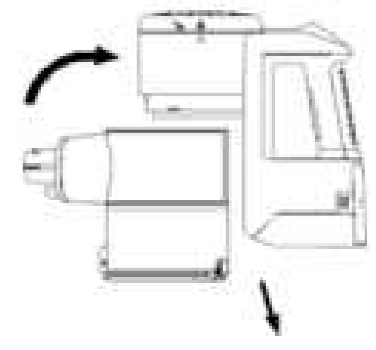
Metal Tube
- Insert the metal tube into the main body until a ‘click’ sound is heard.

- Press the metal tube release button and remove the tube.
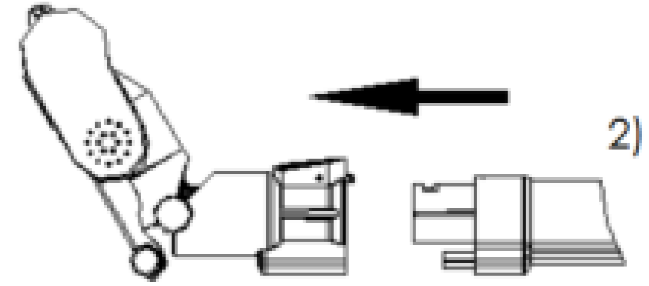
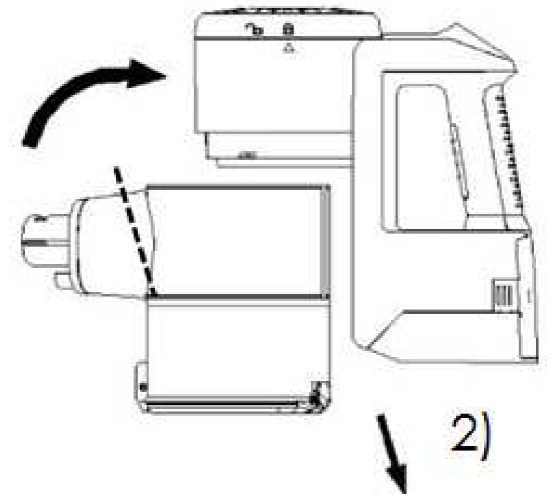
Floor Brush Installation
- Insert the floor brush on the end of the metal tube until a ‘click’ sound is heard.
- Press the floor brush release button to remove the floor brush.
Water Tank Installation
- Position the cloth to the base of the water tank.
- Attach the water tank with floor nozzle, keep the magnetic cells both on nozzle base and water tank together.
- Fill the water tank with water.

Note: The floor brush, crevice head and 2 in 1 head can be directly connected to the main body or metal tube.
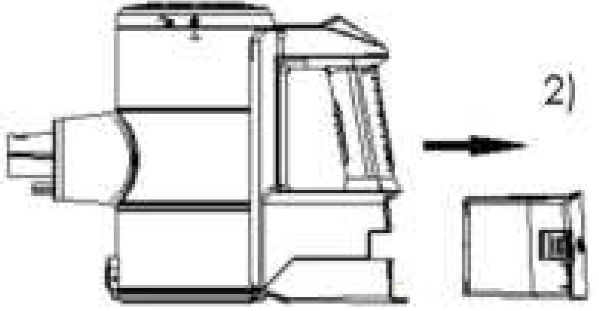
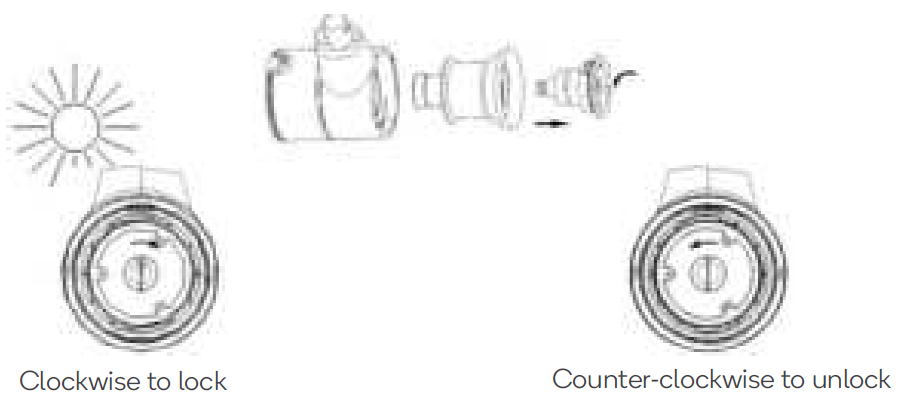
Dust Tank Installation
- Insert dust tank into the main body and twist counter-clockwise until a ‘click’ sound is heard.
- Holding the opening part connected to the tube, twist clockwise to remove it.
Battery Installation
- Install the battery into the bottom of the main body until a ‘click’ sound is heard.
- Press the battery release button to remove it.

OPERATION
Before First UseUnpack the appliance and any accessories. Dispose of the packing materials.
Ensure all packing material around the appliance and the protective elements inside the appliance compartments are removed prior to first use.
- Carton board and the sheets of paper included are recyclable. They must be disposed of in the appropriate recycle bin.
- Materials bearing the symbol are recyclable: PE = Polyethylene; PS = Polystyrene; PP = Polypropylene
- They must be disposed of in the appropriate recycle bin.
- Any other packaging material (adhesive, fasteners, etc.) must be disposed of with regular household waste.
Charging
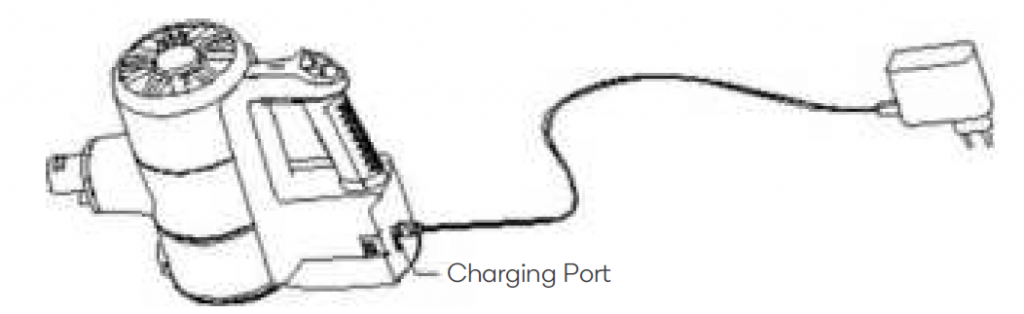
Plug the power adapter into the charging port on the Vacuum main body and then plug the adapter into the power outlet.
Note:
- Charge the battery before the first use.
- It is recommended to fully charge the battery for the first 3 uses.
- Do not charge the battery for extended periods, as this may damage the battery.
Indicator Lights (all green colour)
| Status | Sequence | Indicator Lights |
| During charging | Charging from low to high: Lights will flash sequentially until all three lights are on (fully charged). | |
| Fault | All three lights flashing at the same time, check if the brush roller is stuck or contact Kogan.com. | |
| During discharging or use | Discharging from high to low, lights flash sequentially until last light flashing. |
|
| Out of power | Last light flashing until power off, charging is required. |
Cleaning Accessories
- Floor brush: Suitable for rugs and hard floors. Turn it on/off by pressing the floor brush switch.
- Crevice head: for cleaning corners, gaps, baseboard edges and other hard-to-reach places.
- 2 in 1 brush head: Use this brush to clean upholstered surfaces, keyboards, lamps, curtain, blinds, vents, etc. Perfect for cleaning hair and dust on fabric. Use the crevice portion for the normal cleaning tasks. To switch between brush and crevice portion, press the button on the accessory and slide brush head up or down.
Setting the Power Level
- Select the appropriate accessory for your cleaning task.
- Press the power button, the vacuum will switch on. Press the power button again to switch it off.
- Press the ‘+’ or ‘-’ power level button to adjust between the three suction power levels.
Emptying the Dust Tank
- Press the dust tank release button to empty the dust when finished cleaning.
- Close the dust tank cover when it is empty.
Magnetic wall mount

This appliance features a magnetic wall mount and does not require the bracket to be screwed to the wall.
- Ensure the bottom line of removable gel sticker is 940mm from to the floor, stick it to a clean vertical surface (wooden, ceramic etc.) (the gel sticker is washable).
- Adhere the magnetic wall mount to the gel sticker.
- Place the appliance on to the magnetic holder.
CLEANING & CARE
Cleaning the Dust Tank and Filters
Note: Clean the dust tank and filters monthly to maintain the performance.
- Holding the opening part connected to the tube, twist clockwise to remove it.
- Lift out the filter cover and separate the H11 filter from the filter cover by twisting counter-clockwise and pulling out.
- Clean the dust cup and filters under running water.
- Ensure the filters are completely dry before reassembling.


Post-Motor Filter Cleaning
Note: Clean the post-motor filter every 6 months.
- Rotate the filter cover counter-clockwise to remove it.
- Lift out the post-motor sponge filter.
- Shake to remove dust. Wash the filter under cold running water.
- Ensure the filter is completely dry before reassembling.

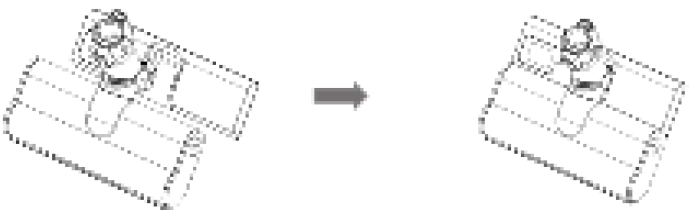
Floor Brush Cleaning
- Using a coin press down and turn the fastener counter-clockwise to unlock.
- Remove any hair and debris around the brush roller.
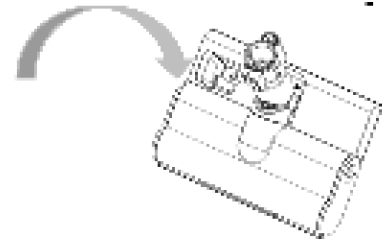
- Wash the brush roller under running water.
- Ensure the brush roller is completely dry before reassembling.
- To reassemble, install the brush roller inside the original place. Using a coin press down and turn the fastener clockwise to lock.
Water Tank Cloth Cleaning
- Wash the cloth under running water.
- Ensure the cloth is completely dry before assembling.
- Keep water tank separate from the nozzle after scrubbing the floor to avoid dripping of water.
Disposal
This marking indicates that this appliance should not be disposed with other house-hold wastes. To prevent possible harm to the environment or human health from uncontrolled waste disposal, recycle it responsibly to promote the sustainable reuse of material resources.
SPECIFICATIONS
Power supply Rechargeable batteryMotor max. power 200WBattery Li-ion DC 22.2V 2000mAhCharging time Max. 4-5 hoursCapacity of the dust tank 0.6LSpeed levels 3 speedsProduct Dimensions 240 x 220 x 1100mmNet weight 3.0kg
Battery charging signal:
- Charging the battery may take you longer than usual under the following circumstances:
- Room temperature is higher than 30°C
- Charging immediately after the vacuum cleaner has stopped operating.
- Always recharge the vacuum cleaner after each usage no matter how long it has been used.
- Unplug the power adapter when not charging.
- When not in use for more than two months the vacuum cleaner should be disconnected from the power supply. Ensure the battery is charged prior to disconnecting the power. To ensure a longer service life, the vacuum cleaner must be charged once every two months.
- The vacuum cleaner or power adapter may become hot during charging so take the necessary precautions to avoid contact.
TROUBLESHOOTING
If you encounter a problem with your device or if you suspect the device is not working properly, you can make a few simple checks before contacting our support team.
| Problem | Solution |
| No power | Before using the appliance, check that it is fully charged, empty the dust tank and clean the filters. |
| Loss of suction | Check to see if the openings are clogged. Unplug and clean if necessary.
Make sure the filters are correctly installed. Empty the dust tank and clean the filters. |
| The floor brush does not turn | Unplug the unit, check for clogged hair or dirt. If necessary, remove the rotating shaft from the floor brush by unlocking the latch, clean and reposition the shaft by performing the reverse procedure.
Make sure that the axle has been properly inserted into the floor brush and the latch is in the locked position. The appliance may need to be recharged. Connect the device to the charger. The battery indicator will turn GREEN when charging is complete. |
| The battery indicator lights flicker while in use | The floor brush is blocked. Turn off the vacuum and remove any object blocking the brush. |
If further assistance is required, contact help.kogan.com
CAUTION: The floor brush contains electrical connections, do not immerse in water for cleaning.
Need more information?We hope that this user guide has given you the assistance needed for a simple set-up.For the most up-to-date guide for your product, as well as any additional assistance you may require,head online to help.kogan.com
![]()
[xyz-ips snippet=”download-snippet”]