![]()
USER GUIDE
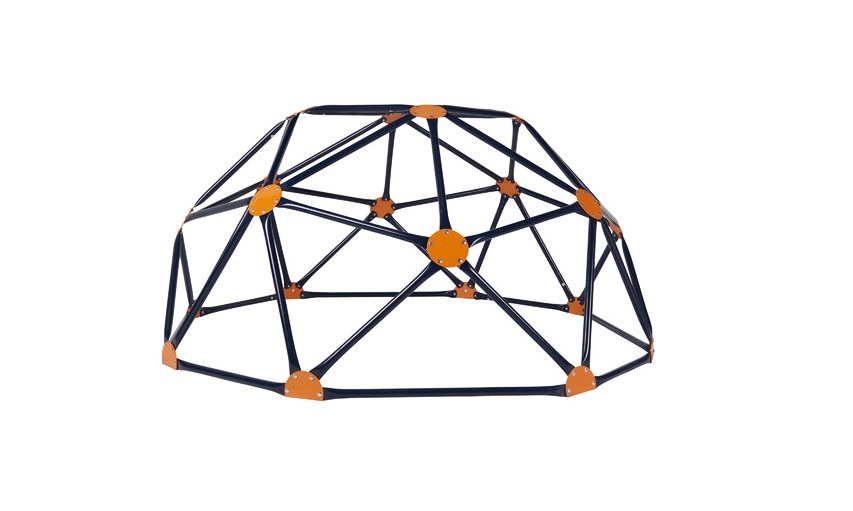
KIDS CLIMBING DOME
NBMCLMBDOMA
SAFETY & WARNINGS
Ensure to read all warnings and instructions in this user guide prior to first use. Failure to assemble and maintain this item as per instruction may cause injury to the user. Please keep the instructions in a safe place for future reference.
- WARNING! Not suitable for children under 3 years. Contains small parts.

- This dome is suitable for children aged 3-8 years.
- This dome is only suitable for domestic outdoor use. This dome has not been designed for commercial use.
- The dome should only be assembled by adults.
- Adult supervision is always required when children are playing with the dome.
- Ensure all bolts and nuts are fully tightened and secure. Failure to do so may result in injuries.
- Check all coverings for exposed bolts and sharp edges. Replace the protective covers when required.
- The maximum fall height for the dome is 90cm.
- A maximum of 5 children can use the dome at any given time.
- This product is suitable for children weighing up to 45kg.
- Children are not permitted to wear loosely fitted or hooded clothing as they may become tangled on the dome.
- Children are not permitted to wear helmets whilst on the climbing dome.
- Ensure the climbing dome is on a flat surface at least 2 metres from any structure or obstruction (for example, fence, garage, house, wall, overhanging branches).
- The dome should be installed over impact absorbing surfaces such as sand, wood-bark chips, rubber, and foam. It should not be installed over concrete, asphalt, or any other hard surfaces.
- Do not orientate the dome directly towards the sun.
- If the climbing dome is faulty, stop use immediately. Contact help.Kogan.com for assistance.
- Regularly check the climbing dome for wear and damage. If the climbing dome is damaged, contact help.Kogan.com for assistance.
- Ensure regular inspections and maintenance on the dome’s components are performed. If inspections are not performed, the dome could overturn or otherwise become a potential hazard.
- Do not fully tighten the nuts until assembly is complete.
- Do not modify the climbing dome yourself.
- For the user’s safety, sand rusted areas and tubular parts. Repaint using a non-lead based paint when required.

COMPONENTS
![]()
A Long tube (x5)
![]()
B Short tube (x20)
![]()
C Medium tube (x24)
Hardware

![]()
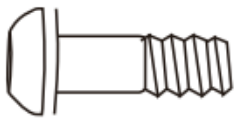
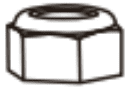
D 38mm M8 bolt (x20) E Gasket (x20) F M8 flat nut (x20) G Allen key (x1)
![]()


H Spanner (x1) I Small protective cover (x8) J Large protective cover (x12)
ASSEMBLY
Step 1: Making the octagonal base
Find a flat surface at least 2 metres away from any obstructions.
Connect a long tube (A) with a short tube (B). They can be connected by aligning the holes on one of the ends of each tube, placing a gasket (E) over top, then inserting a 38mm M8 bolt (D) through the gasket (E).
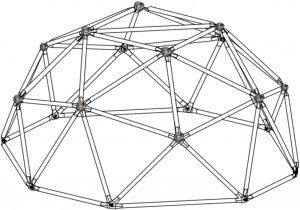
Continue connecting the tubes, alternating between the long tubes (A) and short tubes (B) until a total of eight tubes are used (four of each) and you form the octagonal base as shown below.
![]()
A Long tube (x4) D 38mm M8 bolt (x8)
![]()
B Short tube (x4) E Gasket (x8)
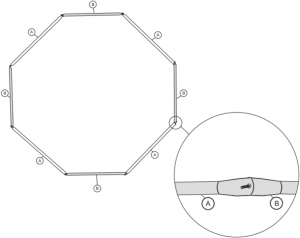
Note:
The bolts go through from the inside out. Ensure the convex side of the tube is facing inwards into the dome.
Step 2: Making the hexagon assemblies
Arrange six medium tubes (C) in a hexagonal pattern as shown below. One end of each tube will meet and overlap in the middle with the other tubes, whilst the other end flares out.
Align the holes in the middle. Place a gasket (E) over top, and screw through a 38mm M8 bolt (D). Place a M8 flat nut (F) on top of the 38mm M8 bolt (D) and tighten. This will connect the tubes together to form one hexagon.
Repeat this process three more times, creating four Hexagon assemblies.
![]()
C Medium tube (x24)
D 38mm M8 bolt (x4) E Gasket (x4) F M8 flat nut (x4)
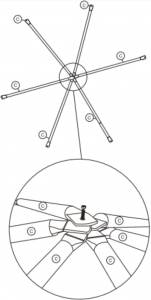
Note:
Do not fully tighten any nuts until assembly is complete.
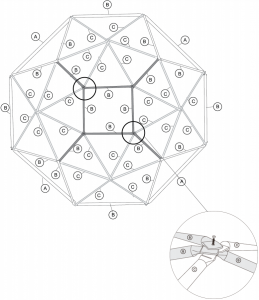
Step 3: Connecting the hexagon assemblies to the octagonal base
Locate the short tubes (B) on the octagonal base. With one hexagon, place the hole from one of the flared ends through one of the 38mm M8 bolts (D) secured in step 1 that connect one end of a short tube (B) to the octagonal base.
Put the hole of an adjacent tube of the hexagon through the 38mm M8 bolt (D) on the other end of the short tube (B).
Repeat this process three more times with the other hexagons until all four short tubes (B) are connected to a hexagon.

Step 4: Connecting the hexagon assemblies together
Locate the long tubes (A) on the octagonal base. With a short tube (B), attach one end to one of the 38mm M8 bolts secured in step 1 (D). With another short tube (B), repeat the step for the next 38mm M8 bolt along the same long tube (A). Refer to the below image for reference — the two new short tubes (B) should both be attached to each end of one existing long tube (A) on the octagonal base. Repeat this process three more times for each of the long tubes (A) of the octagonal base and secure the 38mm M8 bolts (D) on with one M8 flat nut (F) each.
Align the two ends of the short tubes (B) with two of the medium tubes (C) from the hexagon assemblies attached in step 3. There should be one on the left and one on the right of the two ends of the short tubes (B) (as indicated in light grey below). Align all their holes so they make the formation of an ‘X’.
Repeat this process three more times until you have four ‘X’ formations.
![]()
B Short tube (x8) F M8 flat nut (x8)

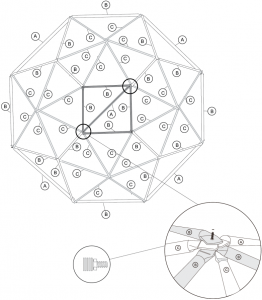
Step 5: Connecting the hexagon assemblies together continued
With another short tube (B), align one end with the ‘X’ formation, pointing the tube to the centre of the octagonal base. With five holes aligned, place a gasket (E) on top, followed by a 38mm M8 bolt (D) and M8 flat nut (F). Tighten.Repeat this process for all ‘X’ formations.
![]()
B Short tube (x4)
D 38mm M8 bolt (x4) E Gasket (x4) F M8 flat nut (x4)

Step 6: Connecting the top of the dome
Using four short tubes (B), create a square in the centre and connect the four tubes pointing to the centre of the octagonal base from step 4 to each of its corners.
Secure a corner by aligning the holes of a short tube (B) with one of the tubes pointing to the centre. Place a gasket (E) over top, followed by a 38mm M8 bolt (D) and M8 flat nut (F). Tighten.
Secure the M8 flat nuts (F) for the two corners circled in the image below. The two corners not circled will be secured in the following step.
![]()
B Short tube (x4)
D 38mm M8 bolt (x4) E Gasket (x4) F M8 flat nut (x2)
Step 7: Finishing the top of the dome
Place a long tube (A) onto the 38mm M8 bolts (D) placed in step 5 over the diagonal of the square across the two corners not secured by M8 flat nuts. Place one M8 flat nut (F) each over top both ends of the long tube (A) and tighten.
Fully tighten all nuts on the climbing dome until secure.
![]()
A Long tube (x1) F M8 flat nut (x2)
Step 8: Covering the bolts
Using the Allen key (G), cover the exposed 38mm M8 bolts (D) on the base of the dome with the small protective covers (I). Repeat by covering the remaining exposed 38mm M8 bolts with the large protective covers (J).
![]()
G Allen key (x1) I Small protective cover (x8) J Large protective cover (x12)

Note:
Ensure the notch of each protective cover is over the top of each bolt and the bolt is not visible.

Assembly complete!
Note:
If playground equipment is discarded, the equipment should be disassembled and disposed of without any unreasonable danger.
NOTES
Need more information?
We hope that this user guide has given you the assistance needed for a simple set-up.
For the most up-to-date guide for your product, as well as any additional assistance you may require, head online to help.kogan.com
![]()
[xyz-ips snippet=”download-snippet”]