
kogan Mini USB Turntable
BEFORE USE
- Choose a safe location and avoid placing the unit in direct sunlight or near any heat source.
- Avoid environments subject to vibration, excessive dust, cold or moisture.
- Due to the risk of electrical shock, do not open the casing. Should a foreign object accidentally find its way into the interior of the unit, contact the Kogan customer support team.
- Do not attempt to clean the unit with chemical solvents as this might damage the finishing, A clean, dry cloth is recommended for cleaning.
- Keep a copy of this manual handy for future reference.
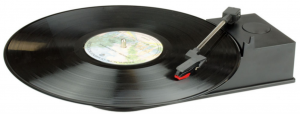
TURNTABLE PARTS

- TONE ARM REST: this rest is used to hold the tone arm while you are loading your record,
- RPM: 45RPM Adapter
- ARM CLIP: This specially designed arm clip secures the tone arm when nor in use at upright position. When the unit is in use, fold this tone arm down so as to not block your record.
- TONE ARM: The turntable comes with a ready to use, pre-balanced tone arm and cartridge. The tone arm is raised and lowered by hand, Please note that the tone arm needs to be moved away form its resting position on the arm clip for the turntable motor to start,
- CARTRIDGE PROTECTOR: Please remove the plastic cartridge protector before placing the cartridge on a record by sliding it forward, off of the cartridge.
- RUBBER MAT: Protects your records while playing.
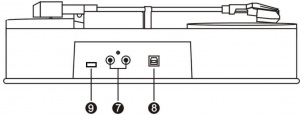
- RCA OUTPUT: Use to connect to external speakers (not included).
- USB JACK: for charging and connecting to PC for recording and editing by USB cable.
- 33/45: Alternate play speeds between 33/45 RPM.
LISTENING TO A RECORD
- Lower the ARM CLIP so you can place a record.
- Place a record on the turntable and set the player speed to match the record speed.NOTE: when playing a single (a 45 rpm record) and/or records with large center holes, use the 45 rpm adapter.
- Remove the needle arm from its rest, and gently move it to the desired position over the record. The turntable platter will begin when the arm is moved towards it. Gently let the needle arm descend onto the record to begin playing.
Hardware and Software Installation
NOTE: Connect your turntable to your computer with the USB cable.No extra driver is required.
Hardware Installation
The Audio Capture device doesn’t need any driver installation, as Windows OS will install the driver automatically. Please connect audio capture USB connector into one of your computer’s free USB2.0 ports.The system will note “Found new hardware.” Please wait for a moment until system reports “The device is ready to use”. Please check hardware installed correctly.Right click “My Computer” and select “Properties”, and select “Hardware” Option, please click “Device Manager” key.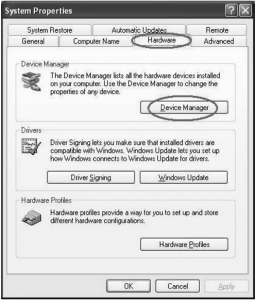
Then, please click “Sound, video and game controllers”, then you will find the Device name –“USB Audio Device”.
Software Installation
Insert the CD (supplied) into the CD drive and follow the onscreen instructions. Once the software is installed, you can connect the record to digital converter to your computer using the USB cable (supplied) to transfer your audio.Please insert software CD in your CD drive, and double click ”My Computer” And “USB Turntable” CD icon.Please double click “audacity” to install software, and click or select “Next” , ”I accept the agreement ” and/or “ finish” to finish the software Installation.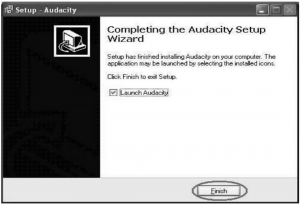
Operation
Double click “audacity” icon on your computer’s desktop, please select your Language first, then click ”OK”.
Please click “Edit” key on the software panel, and select “Preferences”
Please select recording device to be “USB Audio Device”, and channels to Be“2(Stereo)”.And select ”Play other tracks while recording new one” and “Software Play through (Play new track while Recording it)”,then click “OK”.
B, Now, we start to record analogue audio to be a digital MP3 file.Please click red record key to start recording audio that you want. When you are finished, please click the yellow stop key
For the first time, we need to do more steps if we want to export as MP3 file.Click “File”, and select “Export As MP3”.
You need to give one file name and location now.

Then you may wish to fill out any additional artist or album information.

Now you can transfer the mp3 music file(s) to your iPod, Smartphone or other digital music streaming device.

[xyz-ips snippet=”download-snippet”]