kogan Nano Drone User Guide
Important
- This product is only suitable for users over the age of The helicopter is difficult to pilot as first, so we recommend you are supervised by an experienced user if possible.
- This unit must never be flown near crowds, people or animals. com accepts no responsibility for injuries or damages caused by improper operation or usage.
- Check your surroundings before flying.
- Do not let the unit fly out of sight while flying.
- Do not let children play alone with the unit.
- Make sure no other units are being flown nearby using the same transmitting frequency.
- Do not operate near high-voltage power lines.
- Do not operate near crowds.
- Do not operate during a rainstorm or a thunderstorm.
- Do not operate near trains, cars, trucks, planes, roads or airports.
- Do not operate in high winds.
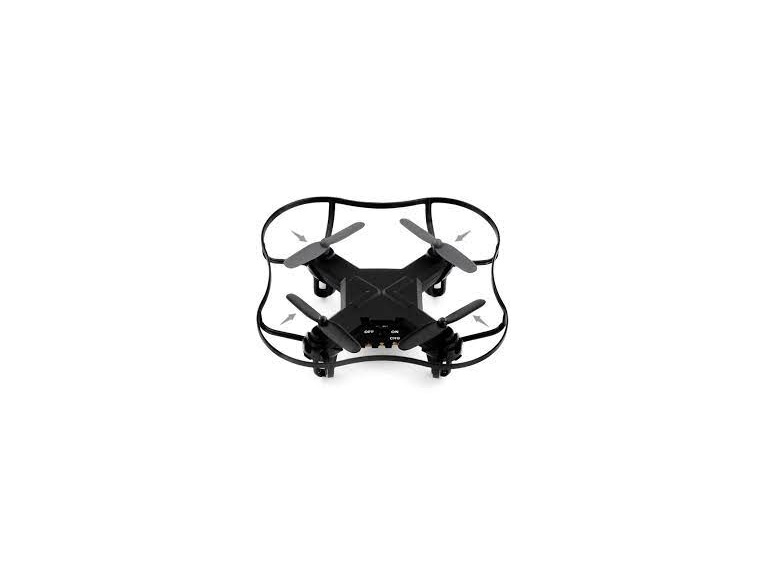
Overview
In the Box
- Drone

- Remote Control
- USB Charge Cable
- Replacement Rotors

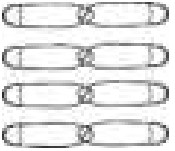
Propeller Placement
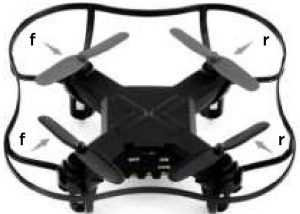
- The propellers are marked with “f” and “r”.
- They should be installed in the positions shown.
Attention
- Please handle this product with care and inspect it regulary to ensure it is in good working order.
- If the product, power supply cord or plug shows any signs of damage: stops use, unplug and contact kogan.com support.
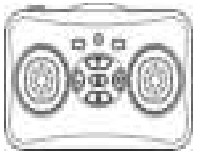
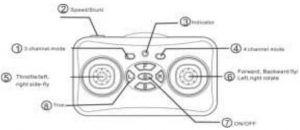
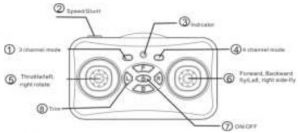
Controller Functions
- 3 Channel Mode
- 4 Channel Mode
Controller Instruction
- ON/OFFON: after inserting the battery, the remote will be in sleep mode (with no lights on). Press the ON/OFF button until it beeps, and the remote will turn on.Power OFF: Hold down the ON/OFF button until the remote beeps twice for the remote to enter sleep mode.
- UnlockingPress the throttle forward fully, then back fully to unlock the remote.
- TurningAs you press the turn joystick, the drone will rotate to match.
- Forwards/BackwardsMove the direction controller up and the drone will move forwards. Pull the direction controller back and the drone will move backwards.
- Left/RightPush the direction controller left and the drone will move left while facing the same direction. Push the direction controller right and the drone will move right while facing the same direction.
- TrimIf the drone is drifting or rotating in the air without input, you will need to adjust the trim. This should be done every time you fly the drone, after charging and as needed during a flight session. When pressing the trim pad, a short beep will be heard, indicating that the trim input was successful. A long beep tone will be heard if the trim input has reached it’s limit.
- Channel ModesPress and hold the 3 channel or 4 channel buttons to enter that mode. Three buzzes will signify 3 channel mode, or 4 buzzes for 4 channel mode. A short press of these buttons will have no effect.
- Speed StuntPress and hold to enter speed stunt adjustment, then use the right stick to perform stunts.
- IndicatorTurn on the drone and the remote control at the same time, and the units will flash. If they do not pair correctly, the indicator will continue to flash for 😯 seconds before stopping.
- Place the drone on a flat surface before turning onMove both joysticks all the way to the bottom right corners. The LED on the controller will stay lit and will stop beeping. Keep the drone on the flat surface while syncing, do not move it.
Battery Usage
Rechargeable Battery
The drone uses a Li-Poly rechargeable battery. If the battery will no longer hold charge, dispose of the battery according to the local disposal requirements. Please read the drone charging instructions below.
Insert the charging cable output jack to the power connector on the drone. The charger indicator lights will show red to show that charging is in progress. Always remember to unplug the charging cable when not in use.
Note: the average charging time is approximately 25-40 minutes. On a full charge, the drone will operate for approximately 6-8 minutes. When the drone battery is low, the LED will blink. Place land the drone as quickly as possible.
Controller Batteries
The remote control requires 2 x AAA batteries (not included). Please read the battery safety instructions below.
- Do not mix alkaline, standard (carbon-zinc} and rechargeable batteries.
- Do not mix old and new batteries.
- Non-rechargeable batteries must not be recharged.
- Do not short-circuit the supply terminals.
Syncing the Controller/ Drone
Place the drone on a flat surface, then turn it on as well as turning on the controller at the same time. The controller will start emitting short beeps. Push the left stick all the way forward, then pull it completely back to unlock the controller. Then move both sticks to the lower right corner for 5 seconds. The drone will flash for two seconds, then syncing will be complete.
Notes for beginners
- Check that the screws and blades are tightened.
- Check that the transmitter and drone are fully charged.
- Make sure there are no people or obstacles nearby.
- Before going on flights, please practice hovering and controlling the drone in one position.
- Once you are comfortable with hovering and landing, slowly progress to moving forwards and backwards, then from side to Finally practice rotating the drone during flight.
- Keep slowly practicing these methods until you are able to quickly and easily follow instructions being called out by someone else without hesitation.
Troubleshooting
|
Problem |
Cause |
Solution |
|
After turning drone on, LED indicators keep flashing. No response to controls. |
|
|
|
Main rotor keeps spinning after landing. |
Throttle stick is not at the lowest position. | Blake sure the throttle has been pushed down to the lowest position. |
|
Rotor blades spin but drone does not fly. |
Blades not assembled correctly. Drone battery depleted. |
|
User manual is subject to change without notice. For the latest version of your user manual, please visit https:/www.kogan.com/usermanuals/.
[xyz-ips snippet=”download-snippet”]