kogan.comUSER GUIDE
KIDS RIDE-ON CAR(JEEP-WRANGLER-INSPIRED)NBJEPWGCRDA & NBJEPWGCWHA
SAFETY & WARNINGS
Ensure you have read and fully understood all these instructions. Retain this user guide for future reference.
- The product should be assembled correctly by an adult before use.
- Ensure all packing materials are discarded and kept away from children.
- The car contains small components which are not suitable for children less than 3 years old.
- Check the car, the charger, the plug, all-electric wires, the outer casing, and other components regularly for any evidence of damage. Stop operating the car immediately if it is damaged.
- Ensure the battery is connected with the correct polarity.
- Ensure the battery is fully charged for 15 hours before using the car for the first time otherwise the battery may be damaged permanently.
- During use, if the driving speed of the car slows down significantly, charge the car immediately. It should be fully recharged in 8-10 hours (do not exceed 15 hours).
- Charging should only be performed by an adult. Do not let children play with the charger.
- When charging, insert the charger into the car charging port before plugging the charger into the power outlet. When the vehicle is charging, the car cannot be operated.
- Ensure all cable connections are secure before charging.
- Ensure the charger and connectors are dry before charging to avoid a short circuit.
- Do not modify the car’s structure or electrical system in any way.
- It is normal for chargers and batteries to heat up during charging.
- Do not use the car in dangerous places such as public roads, streets, and any place with obstacles.
- Keep the car and remote control away from water, fire, and other sources of heat.
- Do not operate the car if it is raining or snowing outside.
- Avoid driving on smooth surfaces such as marble, tiles, or glass.
- The maximum occupancy of the car is one child. The maximum load capacity is 30kg.
- Fasten the seat belt and ensure your child always sits in the car. Do not let your child stand or perform dangerous actions while driving.
- Ensure the seat belt is used while driving.
- Do not suddenly switch the forward/backward button while the car is in motion.
- Avoid driving in narrow spaces to prevent damage to the car and your property.
- Turn off the power supply and unplug the battery connector if you are not using the car for an extended time.
- Children should always be supervised and within 10 meters of an adult when driving the car.
- The remote control must be operated by an adult.
- When the power of the remote control is insufficient, the vehicle will be only able to move forward and backward and not turn left or right. Stop use immediately and replace the remote control batteries.
COMPONENTS
ASSEMBLY
WARNING:Do not use power tools to assemble the car and avoid overtightening the screws as this may damage the plastic components.During assembly be gentle with wheels, wheel covers, and bumpers to avoid cracking them.
Step 1: Wheels
- Remove the pin and washers from the axle.
- Install wheel onto the axle.
- Place the washers back on the axle and secure in place using the pin.
- Install the wheel cover on the wheel ensuring the clip on the wheel cover lines up with the holes on the wheel.
- Repeat for the remaining wheels.
Step 2: Steering wheel
- Attach the steering wheel connector to the mating connector on the car.
- Feed the wire into the car and push the steering wheel onto the steering rod until it is securely in place.
Step 3: Front bumper
- Attach the front bumper to the front of the car and fasten using the supplied screws.
Step 4: Windshield
- Lift the bonnet and attach the windshield to the car.
- Secure the windshield using the supplied screws
Step 5: Lightbar
- Connect the lightbar connector to the mating connector on the lightbar stand.
- Attach both lightbars stands to the lightbar.
- Attach the assembled lightbar to car.
- Connect the lightbar stand connector to the mating connector on the car.
Step 6: Side mirrors
- Attach the two side mirrors to the car body.
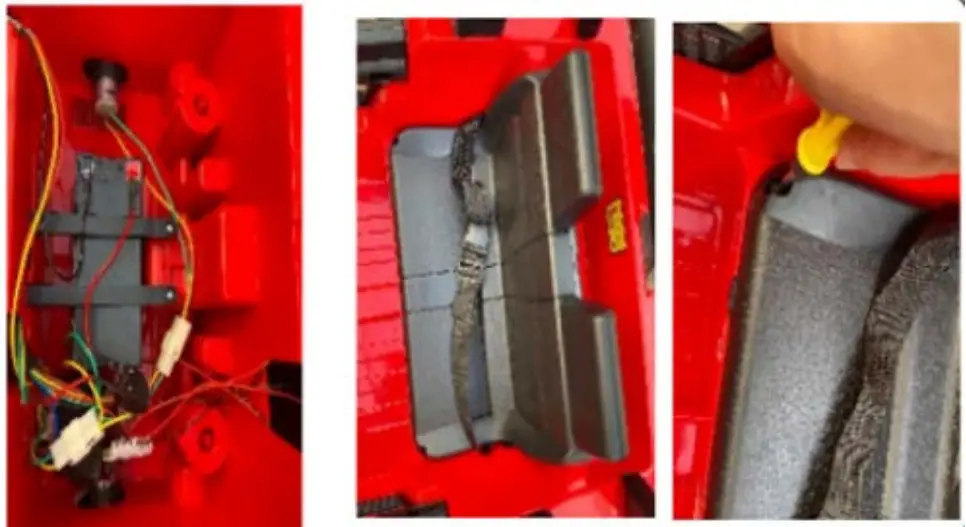
Step 7: Seat
- Remove the plastic cover from the battery and connect the battery wires to the battery.
- Ensure all the connectors are secure and install the seat into the car.
- Secure the seat in place using the supplied screws.
Step 8: Spare wheelAttach the spare wheel to the clip on the rear of the car.
Step 9: Remote control
- Remove the screw on the battery cover with a screwdriver and then remove the battery cover, insert the x2 AAA 1.5V batteries.
- Refer to the operation section of this user guide for pairing instructions.
Step 9: Remote control
- Remove the screw on the battery cover with a screwdriver and then remove the battery cover, insert the x2 AAA 1.5V batteries.
- Refer to the operation section of this user guide for pairing instructions.
OPERATION
- Insert the keys into the ignition and turn on the car’s power switch. The car will start and the lights will turn on.
- Ensure the seat belt is used while driving.
- Switch the Forward/Backward button to the forward position and step on the pedal to drive the car forward.
- Switch the Forward/Backward button to the backward position and step on the pedal to drive the car in reverse.
- Turn the power switches off when finished using the car.If the car is not being used for an extended period Disconnect the battery. Ensure the car is recharged at least once a month.
Remote controlWhen using the remote control for the first time, you must pair the remote with the car.
- Turn of the car’s power switch.
- Ensure the x2 AAA batteries have been installed. The remote control’s LED will flash slowly.
- Turn on the car’s power switch and the LED will turn solid when pairing is successful.
- Once pairing has is complete, there is no need to re-pair the remote control until the batteries are replaced.
- If the remote and car do not pair (the LED continues flashing), remove the batteries and repeat steps 1-3.
- The indicator LED will turn off 10 seconds after the last input to save power. It will wake when any button is pressed.
Audio playerThe car features an audio player with both AUX and USB ports for playing audio files. The audio player has buttons to control volume, play/pause and skip tracks. If nothing is connected to the ports the car will play preset music and sounds.
SPECIFICATIONS
| Battery | 12V 7Ah |
| Motor | 12V 380 (x4) |
| Suitable age | 3-6 years |
| Max load | 30kg |
| Speed | 0-6km/h |
| Use time | 1-2 hours |
| Charing time | 8-10 hours |
| Charger | 12V |
| Remote control battery | AAA 1.5V (x2) |
| Dimensions | 130x82x70cm |
report this adNOTES
Need more information?We hope that this user guide has given youthe assistance needed for a simple set-up.For the most up-to-date guide for your product,as well as any additional assistance you may require,head online to help.kogan.comkogan.com
[xyz-ips snippet=”download-snippet”]