
kogan Stick Vacuum and Accessories Kit

Attention
| Please handle this product with care and inspect it regularly to ensure it is in good working order.
If the product, power supply cord or plug shows any signs of damage: stop use, unplug and contact Kogan.com support. |
Important Safeguards
Read through the instructions carefully before using the appliance for the first time. Safeguard them for future reference.
- This appliance has been designed for domestic use only. It must only be used in accordance with these instructions. Kogan.com will not be held responsible for any damage caused by improper or misuse of the appliance.
- Connect the adaptor only to the voltage stated on the characteristics plate.
- Never leave the vacuum cleaner unattended while it is running.
- This appliance can be used by children aged from 8 years and above and persons with reduced physical, sensory or mental capabilities or lack of experience and knowledge if they have been given supervision or instruction concerning use of the appliance in a safe way and understand the hazards involved. Children shall not play with the appliance.Cleaning and user maintenance shall not be made by children without supervision.
- Do not attempt to charge the appliance at temperatures below 0QC or above 40QC.
- Do not dismantle the vacuum cleaner while the motor is still operating.
- Never use the vacuum without the filter.
- Always keep the openings clear and prevent dust or dirt from blocking the air passage.
- Never vacuum up toxic materials, solvents, acids or flammable liquids.
- Never use the vacuum cleaner to suck up anything that may be still burning such as cigarette butts or ash/cinders.
- Never vacuum up solid, sharp or piercing objects that may damage the filter.
- Do not use wet hands when handling the vacuum.
- Do not tug on the adapter’s cable in order to unplug it.
- Do not expose the vacuum cleaner to outdoor weather conditions, moisture or heat.
- Do not leave the appliance close to heat sources such as ovens, heaters and radiators nor allow the cord to come into contact with hot surfaces.
- DO NOT IMMERSE THE MOTOR HOUSING, CABLE OR TRANSFORMER IN WATER OR ANY OTHER LIQUIDS. o not take the batteries out of their compartment.Do not switch the appliance on if it can be detected that it is not operating correctly or if it has suffered any type of damage.
- Any type of repair work other than that stated in “Cleaning & Maintenance” must be done by a Kogan.com service technician or an authorised repair center.
- This product includes rechargeable Li-ion batteries. Do not incinerate batteries as they will explode.
- Do not disassemble, short circuit, heat, drop or strike the batteries, use in other equipment or charge in an adaptor not supplied with this product because all of these conditions could cause the battery cells to leak. If any liquid gets into the eyes, do not rub eyes, immediately flush them with clean water continuously for a minimum of 15 minutes. Seek medical attention immediately.
Additional Caution for Blower
- Avoid using the Blower near rocks, gravel, stones and similar materials which can become dangerous projectiles.
- Keep children, bystanders and animals outside a (Sm) radius surrounding the area of operation.
- If you are approached while operating the Blower, stop the power.
- Do not point the Handheld Blower nozzle in the direction of people or pets.
- Use the Handheld Blower only in daylight or adequate artificial lighting.
Suction Issues
See also Cleaning & Maintenance (Check down below) and Troubleshooting (Check down below).The leading cause of issues with any vacuum cleaner, including suction failure and apparent failure to power on is blockage in the vacuum head.See below the comparison photos of blocked (left) and unblocked (right) vacuum heads.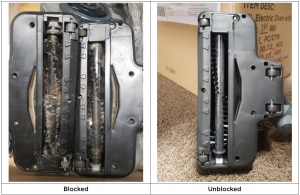
Parts
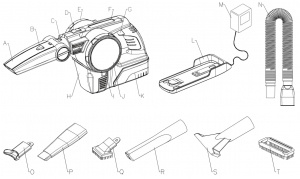

A. NozzleB. Tilting release buttonC. Rotate release buttonD. Nozzle lockE. Blower nozzleF. Charge indicatorG. ON/OFF buttonH. Dust binI. Dust bin release leverJ. Filter coverK. Battery packL. Charger baseM. ChargerN. HoseO. Crevice condenserP. CreviceQ. BrushR. Extendible creviceS. Floor nozzleT. Carpet/Fabric brushU. Long hoseV. Additional holderW. Floor brush
Installing Charger Base
This charger base is designed to be wall mounted.Note: care should be taken to ensure that there are no dangerous objects hidden beneath the wall surface (e.g. electrical wires, pipe, etc.)
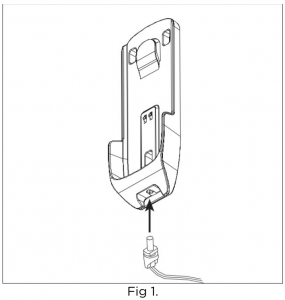
- Insert the jack of adaptor (M) into the socket of charger base (L). (Fig.1)

- Install the charger base to the wall within reach of an electrical outlet.
- Use a 5mm drill for drilling holes for the plastic anchors.
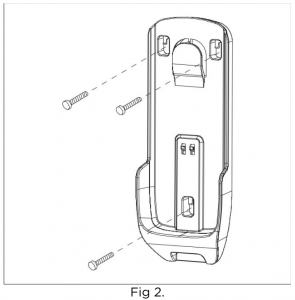
- Insert anchors and screw the charger base (L) onto the wall. (Fig.2)
Charging the Battery
This vacuum cleaner is supplied in a low charge condition. It should be charged for 6 hours prior to initial use.Note: Recharge your appliance after storing for a long time.Charge the appliance when the Charging indicator (F) is flashing red during operation. Only charge the vacuum cleaner with the charger (M) and charging base (L) supplied.
- Insert the small plug into the charging base (L), and you can let the charging base (L) stand on a table or fix it on a wall, and then inset the charger into the wall socket
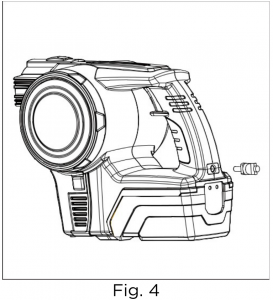
- Place the vacuum cleaner onto the charging base (L). (Fig.3) or insert the jack of the adaptor (M) into the socket of unit. (Fig.4)
- The charging light turns red to indicate that the appliance is charging.
- The charging light turns blue to indicate that the appliance is fully charged.

Important Note for Charging
When using your hand vac continuously with built-in battery pack, the batteries in your battery pack will become hot. You should let a hot battery pack cool down for approximately 30 minutes before attempting to recharge.
Indication Lights
During Operation:Full Battery – Blue (running)Battery Below 20% Capacity – Blue with flashing (warning)Low Battery – Red with flashing (Auto cut off)
During Charging:Charging – RedFully Charged – Blue
Basic Installation
This is a multi-function appliance supplied with full set of accessories. With different accessories, it will become a Vacuum cleaner, a Blower or a Power brush cleaner.
Vacuum Cleaner
Insert the long hose (U) and floor brush (W) into the main unit to become a stick vacuum cleaner. (Fig.5).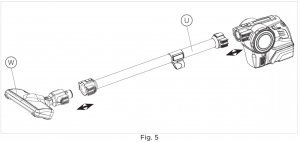
Insert the Nozzle unit into the main unit to become a handheld vacuum cleaner. (Fig.6) Rotate the Blower nozzle (E) opening backward before use.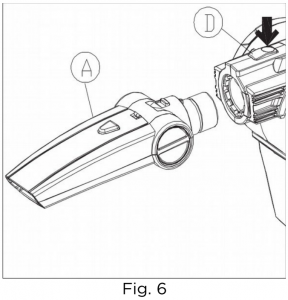
This nozzle unit can tilt and rotate in different angles to let you more comfortable and easier to finish the cleaning jobs.
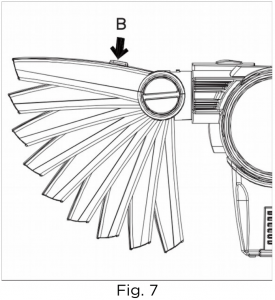
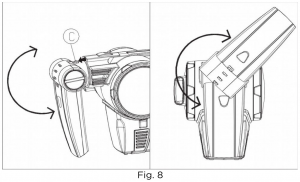
- This nozzle has 9 different tilting positions. Simply press the tilting release button(B) and pull the nozzle up and down. (Fig.7).
- This nozzle can rotate 360 degree. Pull the rotate release button (C) and rotate the nozzle. (Fig.8).
- Combine these two features, the nozzle can point to almost any direction. In front of it, it is very useful when the vacuum cleaner is used on the floor or on the table.
- To detach the nozzle, press the Nozzle lock (D) and pull it out.
Blower
Insert the Crevice (P) into the main unit Blower nozzle (E) to become a Blower. The Blower nozzle can rotate 360 degree so that you can turn it in suitable angle for blowing. (Fig.9)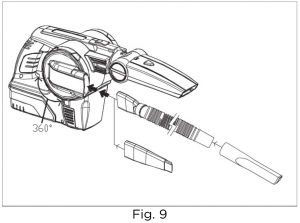
Operation Instructions
- Choose what feature you will use and fit the appropriate tools into the main unit.
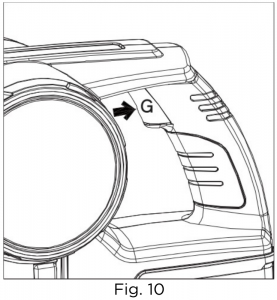
- To switch on the appliance, press the On/Off button (G) once. To stop, press the On/ Off button once again (Fig.10).
- If used as power brush vacuum cleaner, when turn on the unit, the roller brush in the power brush will rotate.
Note: This product is for dry pick-up only.
Accessories
This Vacuum cleaner comes equipped with a full set of accessories, each designed for different cleaning jobs.
Crevice set accessories
This set of accessories includes: Crevice (P), Brush (Q), Crevice condenser (0).
Simply insert the Crevice (P) into the inlet of the nozzle. The Brush (Q) and Crevice condenser (0) can be inserted on the Crevice (P) end. (Fig.11)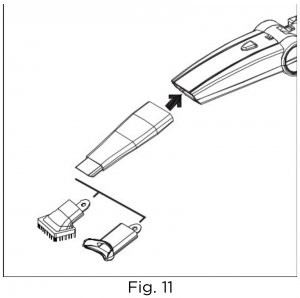
Hose set accessories
This set of accessories includes: Hose (N), Extendible crevice (R), Floor nozzle (S), Carpet/Fabric brush (T)
- Insert the hose (with flat adaptor side) into the nozzle.
- Insert the extendible crevice or floor nozzle into the hose round end. (Fig.12)
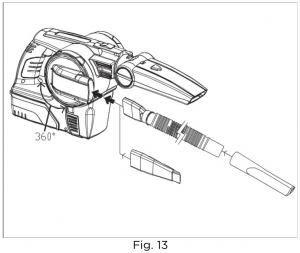
- Attach the carpet/fabric brush (T) on the floor nozzle for cleaning carpet or fabric surface.The hose (N) and extendible crevice (R) can be used for Blower. (Fig.13)

Cleaning and Maintenance
Filter and Filter Covers
Clean the filter cover (J) and both filters (V&W) after each use:
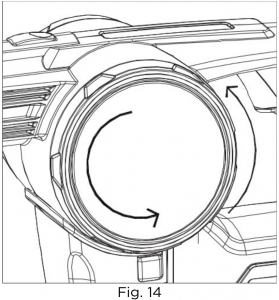
- Open the filter cover (J) by turning anti-clockwise.(Fig.14)
- Empty the contents out of the dust container.
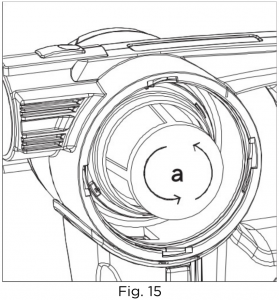
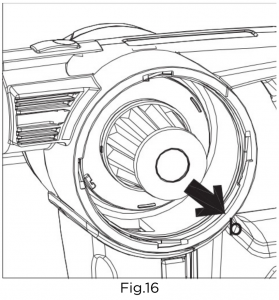
- Remove the outer filter (a) by turning in anti-clockwise. (Fig.15) Pull the inner HEA filter (b) out.(Fig.16)
- Clean both filters with a soft brush. If it is very dirty, it can be washed in soapy water, make sure to rinse it well and leave it to dry completely before refitting it
- Clean the container down with a damp cloth. Never use abrasive cleaning agents.
- NEVER USE THE VACUUM CLEANER WITHOUT THE FILTER.
- Reassemble the vacuum cleaner. Fit the inner HEPA filter back the container firmly into position and then turning the outer filter clockwise until click into position.
- Close the container door by turning clockwise until lock into position.
- Replace the filter when the airflow of the vacuum cleaner become very weak even when the filter was washed and the dust container was empty.
- Spare parts can be obtained from authorised technical service centres.
Dust Bin
Clean the dust bin (H) after each use:
- Remove the dust bin (H) by pressing the dust bin release button (I) on both side and pull the dust bin out.(Fig.17)
- Empty the contents out of the dust bin by pressing the dust bin cover (c) down. (Fig.18)
- To replace the dust bin, place it back onto the appliance and lock into place.


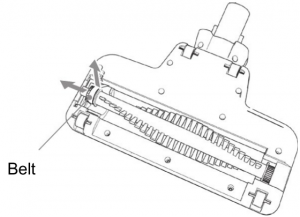
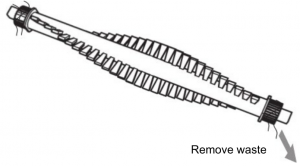
Floor Brush
Carry out maintenance if any waste threads or hair gets tangled in the brush.
Slowly rotate the brush manually and remove any foreign objects tangled around the brush.
Method when the rotating brush cannot be manually rotated
- Unscrew the left hand side, then lift and dislodge the brush cover.
- Lift the left side of the rotating brush up, then remove the belt pulley from the belt.
- Take out the rotating brush and then remove the blockage.
- Reinstall the rotating brush again.Check that the brush cover is securely fixed and that the brush rotates properly again.


Removing the Batteries
To protect the environment, never put this product in household rubbish at the end of its useful life. This appliance contains Li-ion batteries that must be taken out of the appliance for recycling.
Do the following to remove the batteries:
- Detached all accessories connected with vacuum cleaner.
- Remove all the screws in the vacuum cleaner unit.
- Remove one side of the housing.
- Remove all screws in the battery box.
- Cut all the wires connected to the battery.
- Deposit the batteries in the special battery collection containers provided by your local authorities.
Troubleshooting
IMPORTANT: If you are experiencing any issue with the appliance whatsoever, first inspect the filters and all parts of the brush head carefully and ensure there is no buildup of dust or dirt.
This is the most common cause of vacuum cleaner faults and problems, including powering on and suction strength.
If you experience any issues, contact Kogan Support.
User manual is subject to change without notice. For the latest version of your user manual, please visit https://www.kogan.com/usermanuals/

References
[xyz-ips snippet=”download-snippet”]