![]()
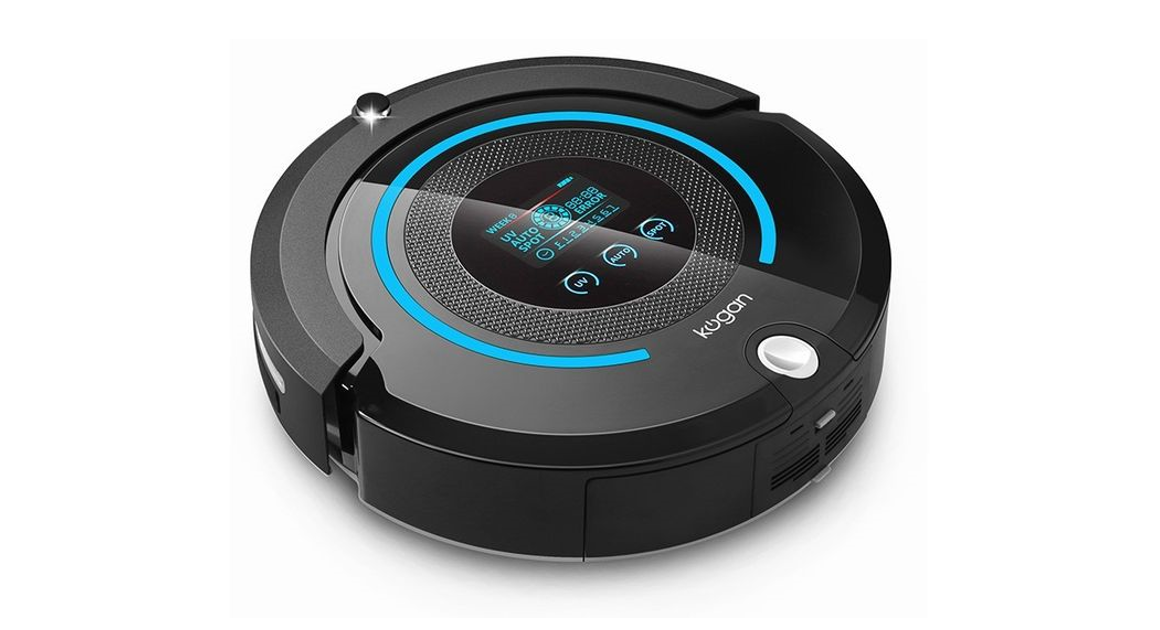
Ultimate Robot VacuumKAULTROBVCAQuick Start Guide
Please read this manual carefully before operation and follow all guidelines.Please keep a copy of this manual handy for future reference.
Safety Precautions
Caution
 No one else can disassemble, maintain or transform the product except the maintenance technicians designated by our company, or it may cause fire, electric shock or personal injury. No one else can disassemble, maintain or transform the product except the maintenance technicians designated by our company, or it may cause fire, electric shock or personal injury. |
 Don’t use another charger except for the one that comes with the cleaner, or it may cause damage to the product, electric shock or fire due to high voltage. Don’t use another charger except for the one that comes with the cleaner, or it may cause damage to the product, electric shock or fire due to high voltage. |
 Don’t touch high-voltage power cord of the electric appliance with wet hands, or it may cause electric shock. Don’t touch high-voltage power cord of the electric appliance with wet hands, or it may cause electric shock. |
 Don’t vigorously bend the power cord or place weight on it, or it may cause damage to the power cord, fire or electric shock. Don’t vigorously bend the power cord or place weight on it, or it may cause damage to the power cord, fire or electric shock. |
| Don’t twist your clothes or any part of your body into the brush or wheel of the cleaner, or it may cause personal injury. |
Don’t vacuum up cigarettes, lighters, matches or any other heat objects or combustible materials such as petrol or gasoline. |
Attention
| Check whether the charger and socket is connected well, or it may cause charging A failure or even fire. |
Inset the power cord of the charger well or it may cause electric shock, short circuit, smoking or fire. |
| Please use the cleaner cautiously in the presence of children to avoid frightening or harming then. |
Don’t forget to turn off the power while transporting or storing the cleaner for long, or the battery may be damaged. |
| Don’t allow the cleaner to suck up water or other liquids, or it may cause product damage. |
Don’t stand or sit o the n thl cleaner, or it may cause damage to the injury. |
| Don’t use the cleaner outdoors, or it may cause product damage. |
Don’t use the cleaner on small tables and chairs or other small spaces, otherwise, the cleaner may become damaged. |
| Don’t leave movable thread, wire and other objects longer than 150mm on the ground or the brush may become entangled. |
Don’t use the cleaner in commercial places, or the cleaner may become damaged by excessive use. |
| Remove all easily damaged objects(including lum’nous objects, fabrics, glass bottles, etc) before using, or it may cause damage to these objects or affect the using of the cleaner. |
|
| This appliance is not intended for use by persons(including children) with reduced physical, sensory or mental capabilities, or lack of experience and knowledge, unless they have been given supervision or instruction concerning use of the appliance by a person responsible for their safety. Children should be supervised to ensure that they do not play with the appliance. |
Attention
Please handle this product with care and inspect it regularly to ensure it is in good working order.If the product, power supply cord or plug shows any signs of damage: stop use, unplug and contact Kogan.com support.
Product Features
ApplicationThis vacuum is suitable for use in homes, hotel rooms or small offices. It is suitable for use on short carpet, wooden floors, hard floors and tiled floors.
Intelligent Cleaning FunctionsThere are five cleaning modes designed to meet your needs.
- AutoPress Auto, at which point the vacuum will clean using zigzags, spirals, follow the wall modes and will adjust the cleaning to suit the floor situation.
- SpotThe vacuum will go into a concentrated spiral cleaning mode for about 2-3 minutes to clean a specific section of the floor thoroughly.
- Edge CleaningWhen the vacuum detects obstacles (walls, tables, chairs etc..) it will start cleaning alongside the obstacle, making use of the side brushes.
- Full Go ModeThe vacuum will start cleaning automatically once the battery is fully charged. (3-4h charging)
- Schedule ModeWhen a certain time is scheduled, the robot will leave the charging dock station at that time and clean.

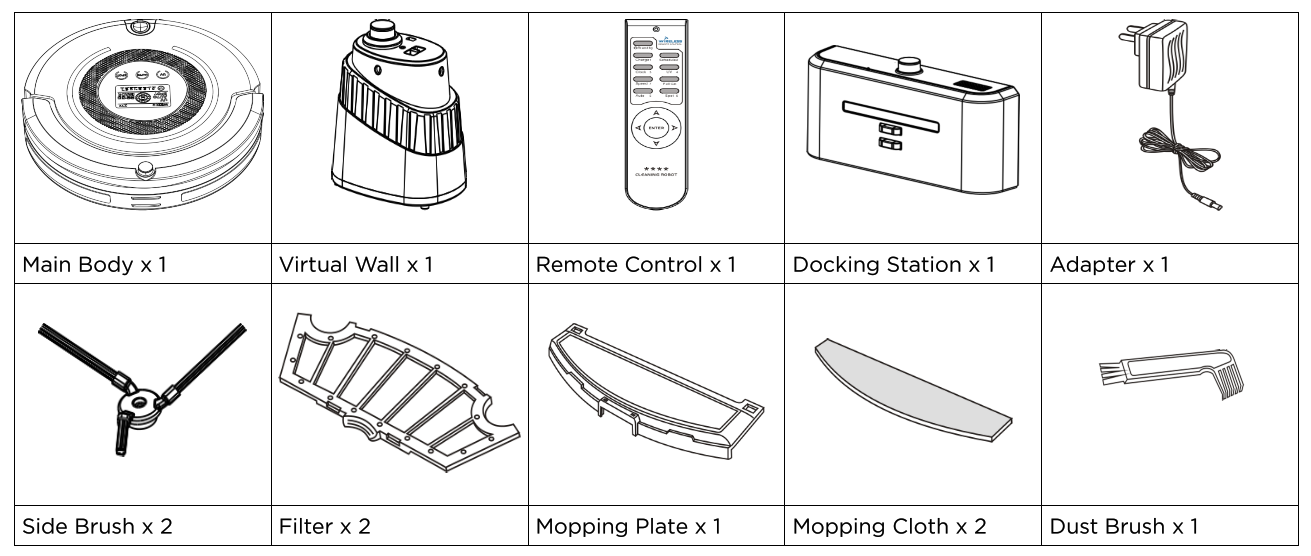
Parts and Accessories
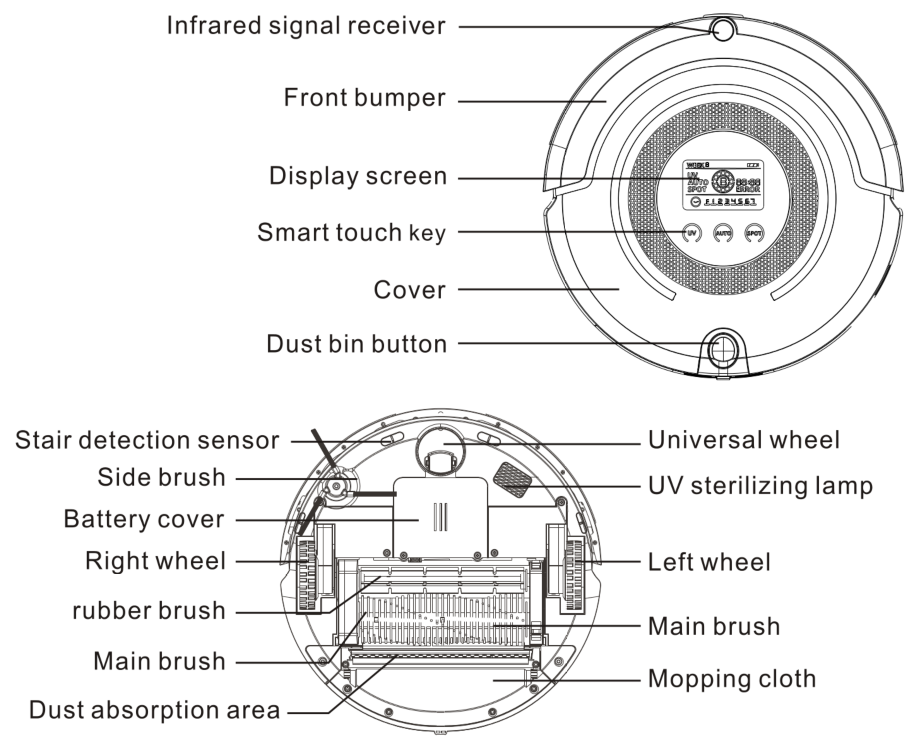
Robot Structure
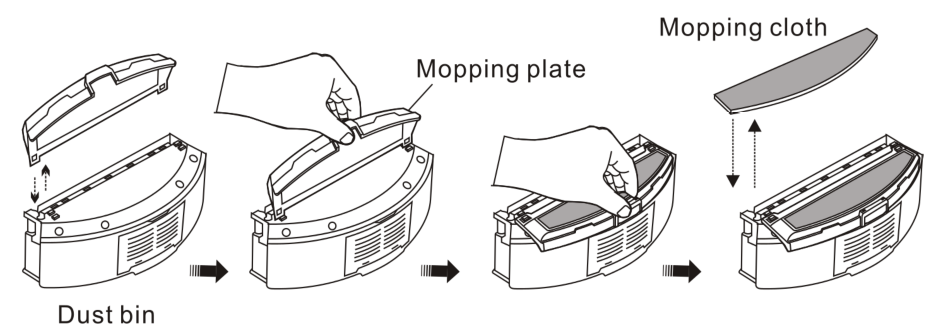
Note: the mopping plate and cloth are only to be used on hard floors.
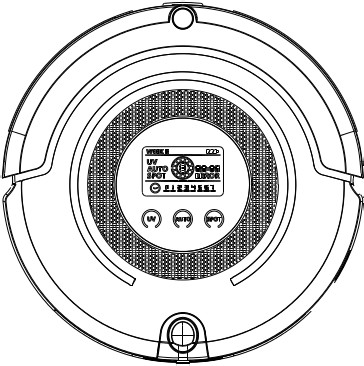
LCD Screen
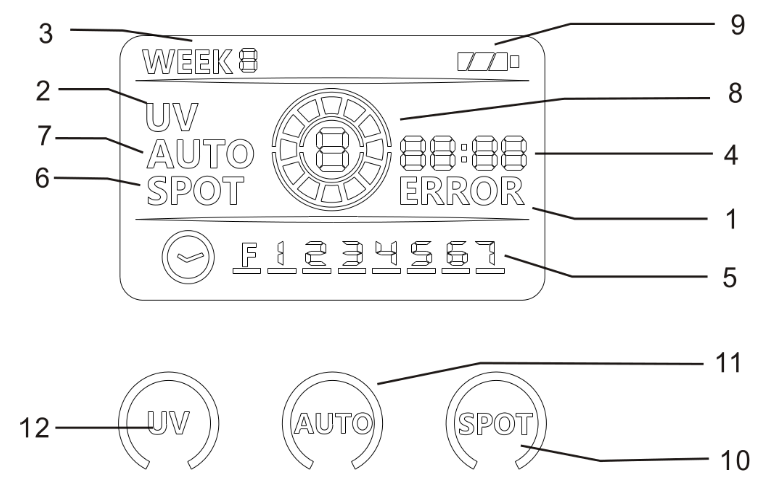
- ERROR displays in the case of Error codes from EOO1 to EOO5 will show.
- UV displays if the UV lamp is on when the cleaner is Use of the UV lamp can help sterilize as the vacuum cleans.
- “
 ” displays the current day of the week.
 - “” displays the current time of day (and also error codes).
- ” ” signifies whether full cleans have been selected for any days of the week. F means FULL 1 means Monday, 2 means Tuesday etc……. through to 7 meaning Sunday.
- SPOT displays the cleaner is in spot cleaning mode.
- AUTO displays that the cleaner is in auto cleaning mode.
- “” is the running 1 is fast running speed and 2 is slower running speed.
- “” displays the Four bars means full power.
- SPOT cleaning button.
- UTO cleaning button.
- UV Lamp button.
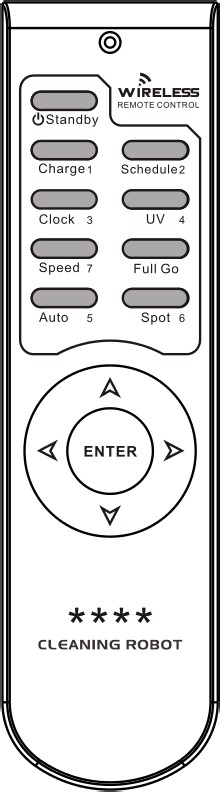
Remoee Control
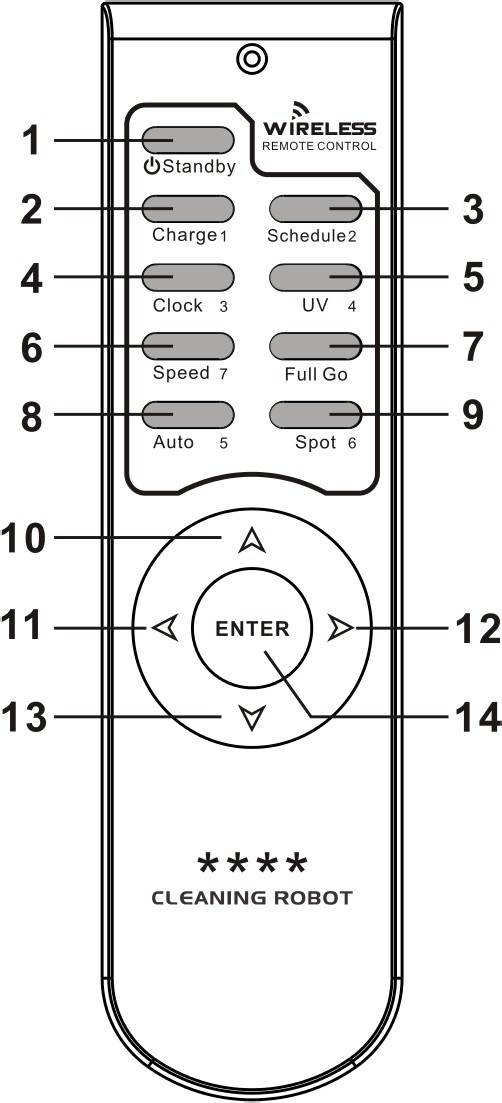
- Press this button to switch from sleep mode to active mode, or from active mode to sleep mode.
- Press this button to return the robot to the charging station (also means Monday when setting the cleaning time)
- Press this button to enter scheduling mode when active, including presetting the cleaning time and beginning to work when fully charged (also means Tuesday when setting the cleaning time)
- Press this button to enter current time setting (also means Wednesday when setting the cleaning time)
- Press this button to turn the UV light on or off (also means Thursday when setting the cleaning time)
- Press this button to select the speed (also means Sunday when setting the cleaning time)
- FULL GO button – when fully charged the vacuum will start working by (Please note that you should press Schedule mode first before pressing the full go button).
- Press this button to start auto cleaning mode (also means Friday when setting the cleaning time)
- Press this button to start spiral cleaning mode (also means Saturday when setting the cleaning time)
Directional Buttons
1O. Press this button to increase the number in scheduling mode and clock mode. When active, press this button to make the vacuum go forward.
- Press this button to decrease the number in scheduling mode and clock When active, press this button to make the vacuum go back.
- Press this button to switch from hour to minute in scheduling and clock When active, press this button to make the robot turn right.
- Press this button to switch from minute to hour in scheduling and clock When active, press this button to make the robot turn left.
- Press this button to confirm scheduling in scheduling mode.
Notes:
- Install two AAA batteries into the remote control.
- If not being used for a long time, please remove the batteries from the remote
- To function correctly, please use the remote control within 1O meters of the vacuum.
Docking Station

Virtual Wall

- Spin the pivot and lift the battery cover from the virtual wall.
- Install two D batteries into the virtual wall battery compartment as shown
Please remove batteries from the virtual wall if it is not being used for an extended period of time.
Battery Storage and Charging
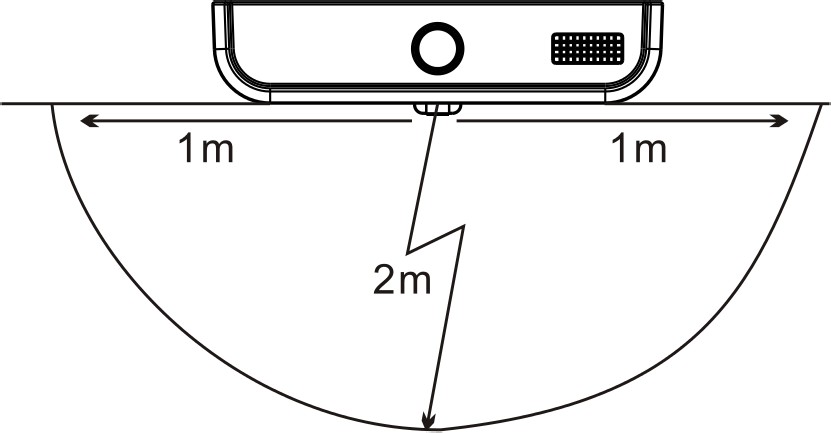
Place the Charging Docking Station
- Put the charging docking station against a wall, removing all obstacles from 1 meter either side and about 2 meters in front of the docking station
- Turn the power switch on and the display will flash.
Automatic Recharging
- The cleaning robot vacuum will return to the docking station for charging automatically if the battery gets too low during cleaning.
- If you want to manually charge the vacuum, you can press the docking button on the Remote Control.
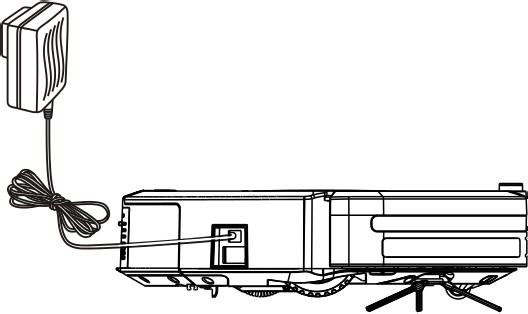
Manual Charging
- You can also use the adapter for the docking station to charge the robot vacuum directly.
- Connect the output terminal of the adaptor to the DC socket in the robot vacuum to charge it directly.
NOTES
- Before first use, ensure the battery has been fully charged for 12 hours to attain the best performance. After that, charging the vacuum for 3 to 4 hours will be sufficient.
- When the battery runs low, recharge the robot as soon as possible.
- If the robot is not being activated for an extended period, please turn the power switch off.
Product Usage
Starting UpMake sure the power switch is on; press the AUTO button on the main body or on the remote control to start the robot cleaning.
Note: if the robot is in sleep mode, press AUTO to wake the robot up from sleep mode. Then press AUTO again a second time to get the robot vacuum cleaning.
Pause/Sleep
- To put the robot from one mode to another mode, you can press AUTO or SPOT on the main body of the vacuum, or press Standby, SPOT or AUTO on the remote control.
- To put the robot into standby mode when it is cleaning, press Standby on the remote control
SpeedFor normal use, you can operate the robot vacuum at Speed 1 (Quick). However, if the ground is particularly dirty you should instead select Speed 2 (Slow} for a more thorough cleaning.
UVPress the UV button on the main body or the remote control to turn on the UV lamp in the robot vacuum. This will disinfect the floor, which will be especially useful for people with allergies, pets or crawling children.
If the remote control is note working, check that the remote control batteries are not flat and that the robot vacuum is fully charged. If this still doesn’t work, turn the vacuum off, then press and hold the ENTER button on the remote for 4 seconds. While still holding the button down, turn the vacuum back on and keep holding ENTER until the vacuum beeps twice.This re-pairs the connection link between the two.
Scheduling the Robot Vacuum
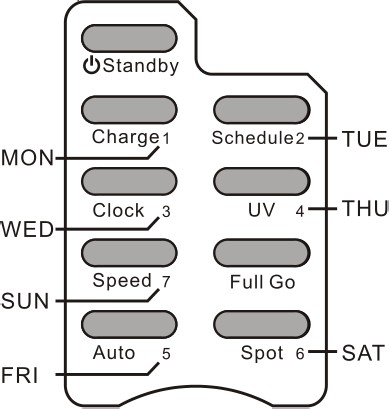
Weekday & Time Setting
- Press CLOCK on the remote control, and the WEEK icon on the LCD screen will Then press the day button that signifies the day you want to schedule. (refer to diagram to right for buttons and their corresponding days).
- Once you have set the day, you can set the time. (There is no need to press ENTER after pressing the button that represents the day).
- Press to enter time The LCD will display 88:–
- Press x ory to set the correct hour.
- Press again to enter the minute The LCD will display –:88
- Press x ory to set the correct minute.
- Once you are happy with the day and time setting, press ENTER to save it.
Time Cleaning Setting
- Press → to enter cleaning time setting. The LCD will display 88:–
- Press Δ or ∇ to set the desired cleaning hour.
- Press → again and the LCD will display –:88
- Press Δ or ∇ to set the desired cleaning minute.
- Once set, press ENTER to save.
Full Go Cleaning SettingPress SCHEDULE, then press FULL GO and press ENTER to save. The robot will start cleaning automatically when the battery is fully charged.When the robot vacuum is connected to the docking station, at the set time it will start cleaning automatically (once the battery is fully charged). When cleaning is finished or battery is low, the robot vacuum will return to the docking station.
Cleaning Modes
Auto CleaningThe robot will clean a room automatically and adjust the cleaning according to the floor situation. It will clean by spirals, linear movements, zigzags and follow the wall modes automatically.
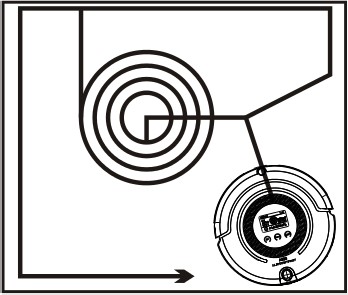
Note: Please clean up gadgets, obstacles, and other things from the floor prior to cleaning.
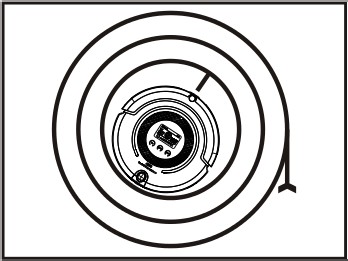
Spot CleaningIf you press the Spot cleaning button, the vacuum will concentrate it’s cleaning in a 1m x 1m area, cleaning in spiral mode. The vacuum will continue in this mode for approximately 2-3 minutes and then stop.
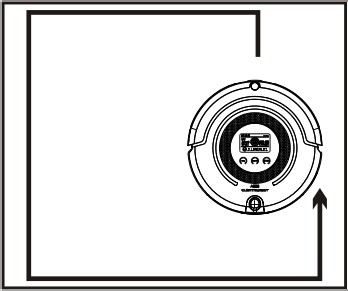
Edge CleaningWhen the robot detects obstacles (walls for example), it will start cleaning the edges and corners with its side brushes.
Virtual Wall

![]() High: Slide to high, you can select the distance within 5-6m as required by infrared wall.
High: Slide to high, you can select the distance within 5-6m as required by infrared wall.![]() Middie: Slide to middie, you can select the distance within 2-3m as required by infrared wall.
Middie: Slide to middie, you can select the distance within 2-3m as required by infrared wall.
Product Maintenance
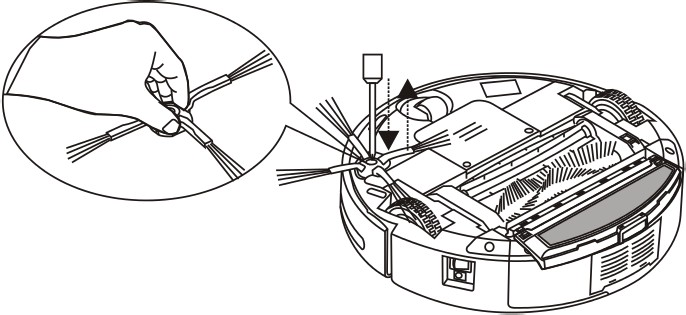
Assembly, Disassembly, and Cleaning of Side Brushes
- Release the screw in the main shaft of the side brush before changing the side brush.
- Clean the side brushes.
- Replace side brushes if they are damaged.
- Press the side brush against the main shaft, then refasten the screw.
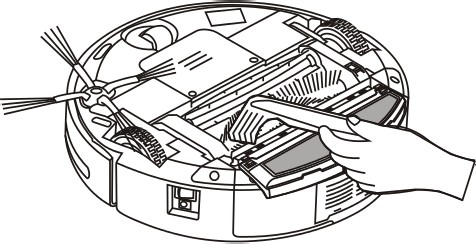
Cleaning MID-brush Assembly
- Clean any hair or large dust particles on the mid-brush and rubber brush regularly to improve the cleaning preformance.
- Clean any wastepaper or smaller particles by applying the dust brush directly, then rotating the mid-brush If hair, string, wool or similar objects are twisted around the brush, carefully cut them with scissors.
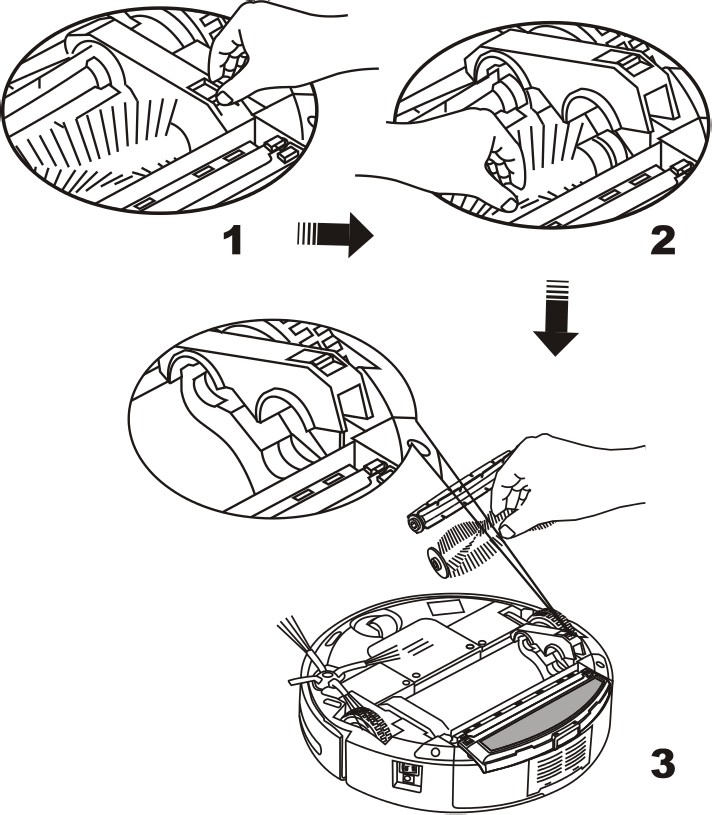
Assembly, Disassembly and Cleaning of Main Brush
- Force the locking bar forward and raise the cover with your thumb, then raise the mid- brush rod with your left hand. (Refer to Fig 1 and Fig 2}.
- Take the main brush and rubber brush out of the body. (Refer to Fig 3).
- Insert the main brush and rubber brush into the holes before closing the cover again.
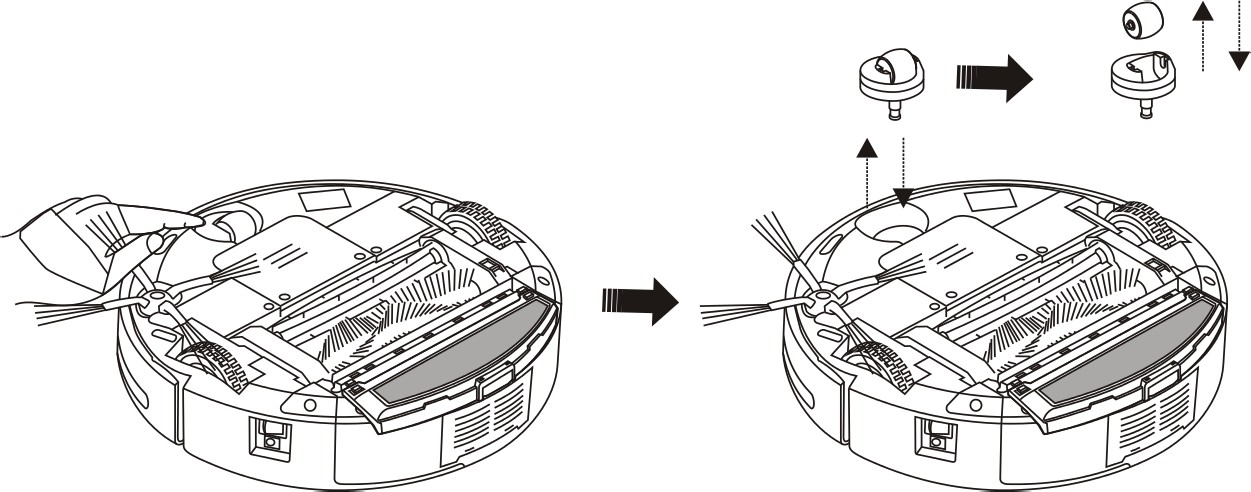
Assembly, Disassembly and Cleaning of Front Wheel
- Pull out the front wheel with your finger and tools, then clean it (refer to images below)
- Insert and press the front wheel into the right position while assembling.
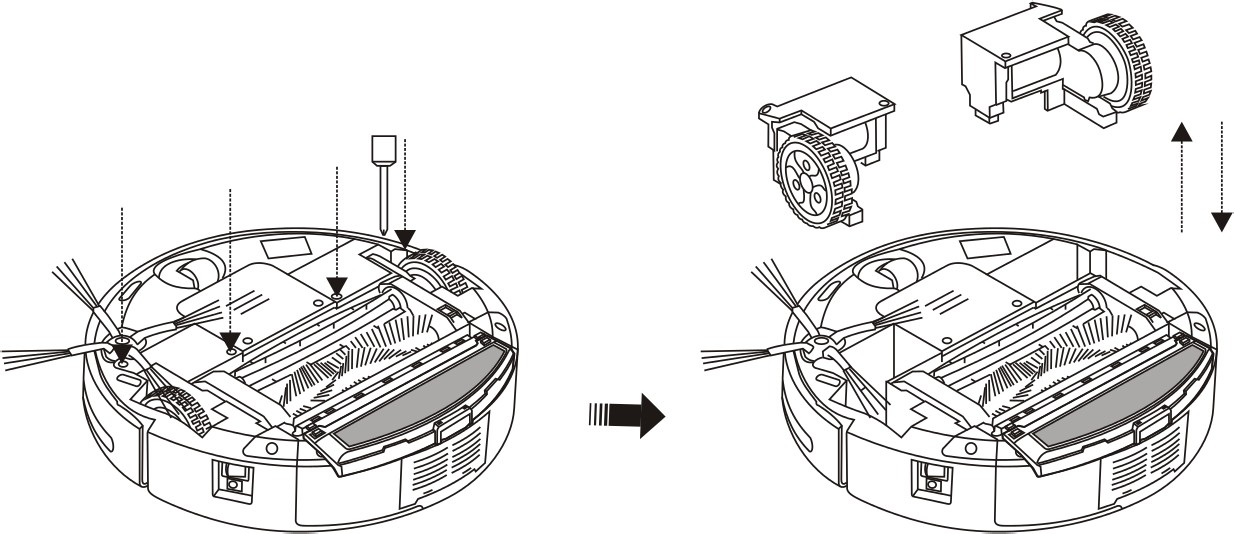
Assembly, Disassembly, and Cleaning of Side Wheels
- Unscrew the screw in either the left or right wheel with a screwdriver (refer to Fig 1)
- Remove the wheel and clean with a brush (refer to Fig 2)
- Place the wheel back into position, then tighten the screw while assembling.
Note: DO NOT wash the wheel in water!
Cleaning Dustbin and Filter
- Press the button the fan assembly, then the blower will pop up.
- Clean the with the dust brush.
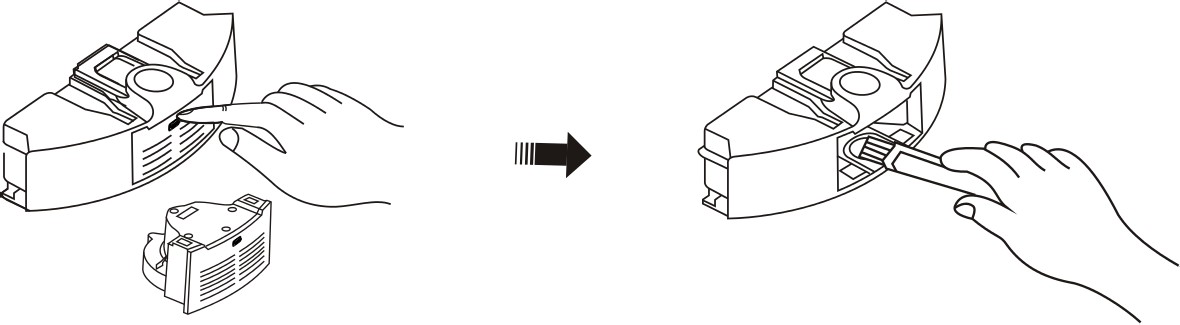
Note: When taking out the fan assembly, please put the dustbin on a 3O degree angle.
Cleaning the Filter
- Open the bracket and the filter will appear. Take out the filter, then wash the dustbin with water.
- Clean the filter with the dust brush or a hairdryer.
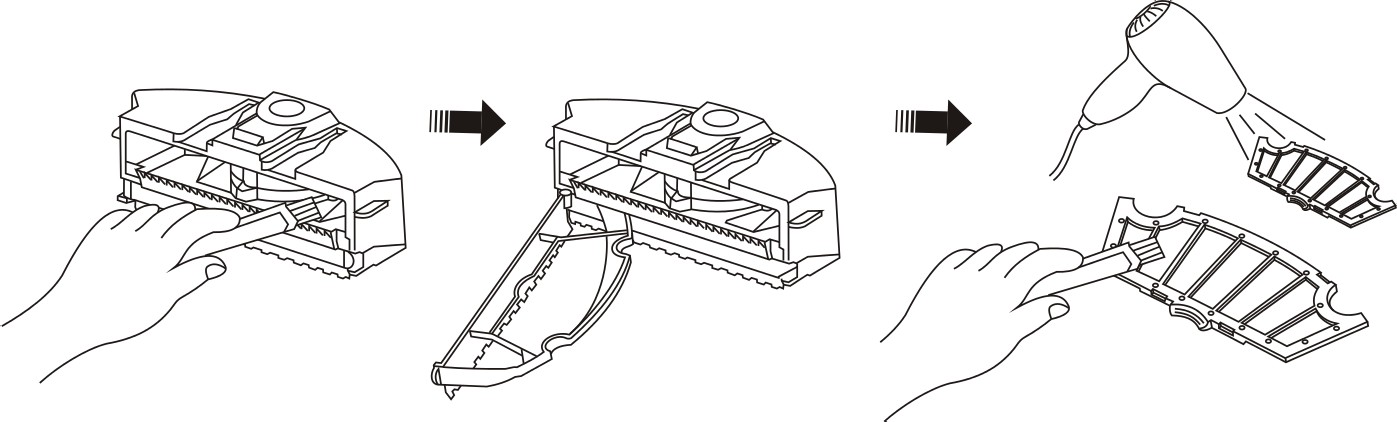
Replacing the FilterPress the semicircle bracket with one hand to release the fastener from the filter screen, then replace with a new filter.

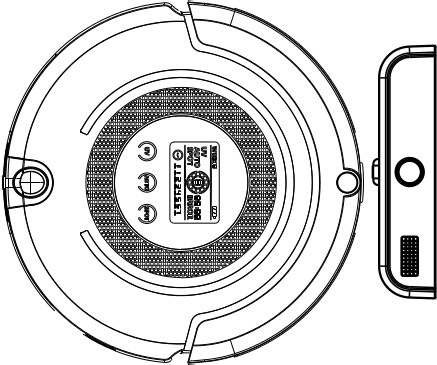
Cleaning Sensors
Clean the sensor and infrared transparent window with a cotton swab or soft cloth.
The wall detection sensor is at the front of the robot, while the ground detection sensor and infrared transparent window are at the bottom of the vacuum.
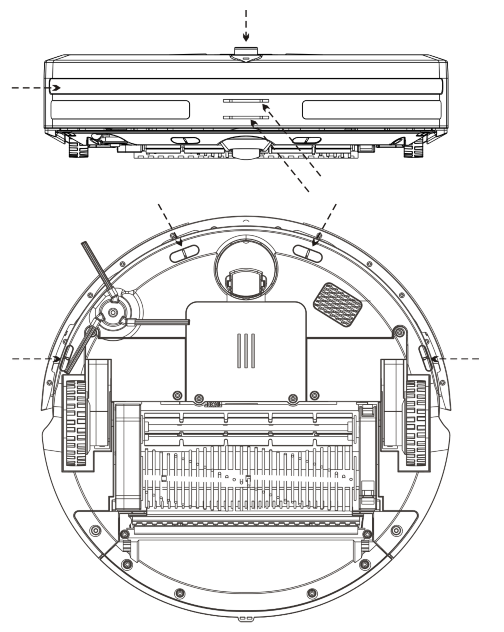
Note: the charging points will need to be cleaned if they get dirty. Never use water or thinners on the sensor window. If you need to pick the robot up while it is working, please use the remote control to make the vacuum roll backward at about 2Ocm. You can then pick it up after turning it off without danger of dust leakage.
Troubleshooting
Battery Removal
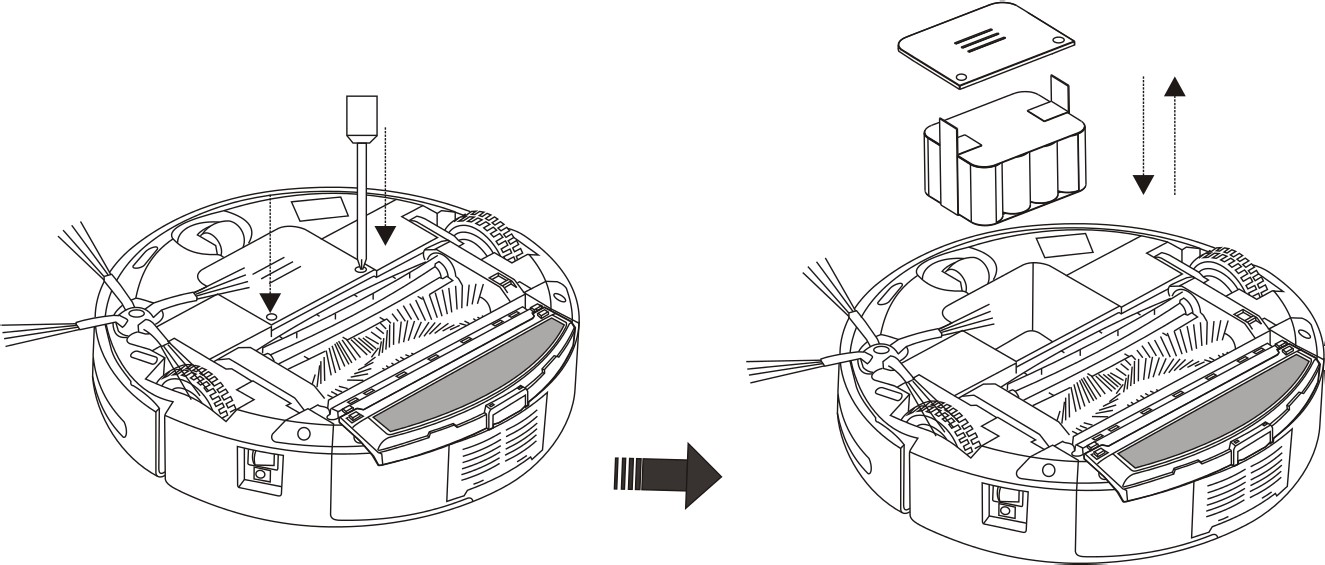
- Release the screw with a screwdriver, remove the baseplate and then take out the battery.
- Place the battery back in the right position to ensure the positive and negative electrodes are aligned correctly.
Notes
- Please do not forget to remove the battery before disposal of the
- Please remember to turn the switch off before removing the
- If the vacuum is not being used for an extended period of time, please recharge the battery once every three months to avoid damaging the
Error Codes
|
Failure Code |
Failure Cause |
How to Solve |
| EOO1 | Ground detection sensors | Clean the sensors on the front bottom of the robot. |
| EOO2 | Middle brush | Clean rubbish such as hair and string wrapped around the brush |
| EOO3 | Power off | Use the adapter to charge the battery, then use again |
| EOO4 | Ground detection sensors | Check the left and right wheels to see that they spin freely |
| EOO5 | Ground detection sensors | Please check to ensure the fan assembly is clean. If not, please clean it, then put it back into the dustbin and try again. |
Note: if the failures codes are still showing or you have any other problems, please contact the Kogan.com customer support team for more information.
[xyz-ips snippet=”download-snippet”]