

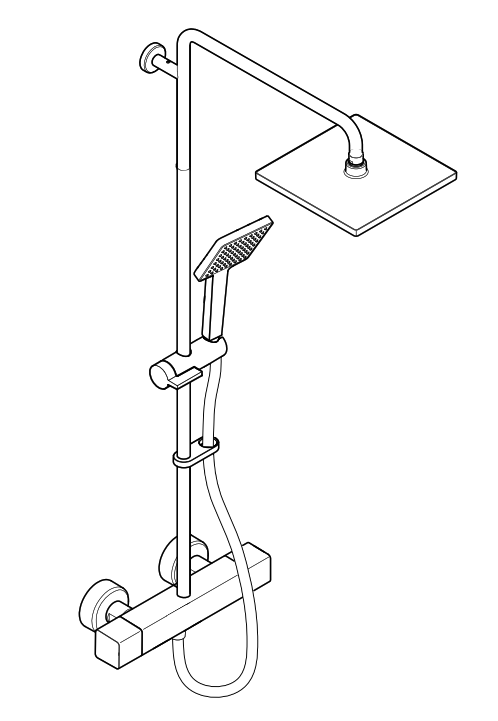
Mira HonestyERD Bar Valve and Fittings
These instructions must be left with the user
Introduction
Thank you for choosing a Mira shower. To enjoy the full potential of your new shower, please take time to read this guide thoroughly, and keep it handy for future reference.
Guarantee
For domestic installations, Mira Showers guarantee this product against any defect in materials or workmanship for a period of five years from the date of purchase (shower fittings for one year).
For non-domestic installations, Mira Showers guarantee this product against any defect in materials or workmanship for a period of one year from the date of purchase.
Failure to follow the instructions provided with the shower will invalidate the guarantee.
For Terms and Conditions refer to the ‘Customer Service’.
Recommended Usage

Design Registration
Design Registration Number – 005259041-0006-0007
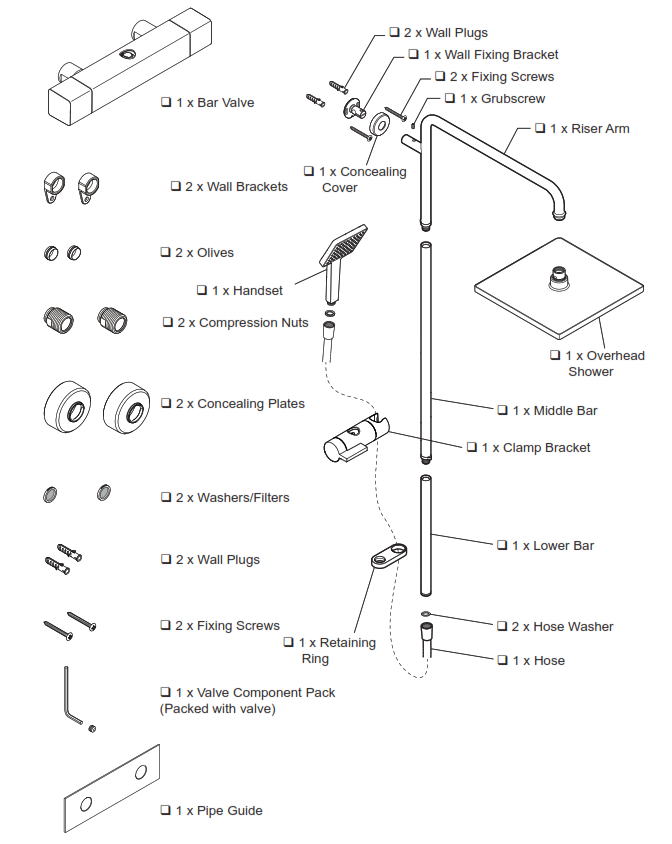
Pack Contents
Safety Information
WARNING – This product can deliver scalding temperatures if not operated, installed or maintained in accordance with the instructions, warnings and cautions contained in this guide. The function of a thermostatic mixing valve is to deliver water consistently at a safe temperature. In keeping with every other mechanism, it cannot be considered as functionally infallible and as such, cannot totally replace a supervisor’s vigilance where that is necessary. Provided it is installed, commissioned, operated and maintained within manufacturers recommendations, the risk of failure, if not eliminated, is reduced to the minimum achievable. PLEASE OBSERVE THE FOLLOWING TO REDUCE THE RISK OF INJURY:
INSTALLING THE SHOWER
- Installation of the shower must be carried out in accordance with these instructions by qualified, competent personnel. Read all instructions before installing the shower.
- DO NOT install the shower where it may be exposed to freezing conditions. Ensure that any pipework that could become frozen is properly insulated.
- DO NOT perform any unspecified modifications, drill or cut holes in the shower or fittings other than instructed by this guide. When servicing only use genuine Kohler Mira replacement parts.
- If the shower is dismantled during installation or servicing then, upon completion, an inspection must be made to ensure all connections are tight and that there are no leaks.
USING THE SHOWER
- The shower must be operated and maintained in accordance with the requirements of this guide. Make sure you fully understand how to operate the shower before use, read all instructions, and retain this guide for future reference.
- DO NOT switch the shower on if there is a possibility that the water in the shower unit or fittings is frozen.
- The shower can be used by children aged from 8 years and above and persons with reduced physical, sensory or mental capabilities or lack of experience and knowledge if they have been given supervision or instruction concerning use of the appliance in a safe way and understand the hazards involved. Children must not be allowed to play with the shower.
- Anyone who may have difficulty understanding or operating the controls of any shower should be attended to whilst showering. Particular consideration should be given to the young, the elderly, the infirm or anyone inexperienced in the correct operation of the controls.
- DO NOT allow children to clean or perform any user maintenance to the shower unit without supervision.
- Always check the water temperature is safe before entering the shower.
- Use caution when altering the water temperature while in use, always check the temperature before continuing to shower.
- DO NOT fit any form of outlet flow control. Only Mira recommended outlet fittings should be used.
- DO NOT operate the temperature control rapidly, allow 10-15 seconds for the temperature to stabilize before use.
- Use caution when altering the water temperature while in use, always check the temperature before continuing to shower.
- DO NOT switch the shower off and back on while standing in the water flow.
- DO NOT connect the outlet of the shower to any tap, control valve, trigger handset, or showerhead other than those specified for use with this shower. Only Kohler Mira recommended accessories must be used.
- The showerhead must be descaled regularly. Any blockage of the showerhead or hose may affect showering performance.
Specification
Pressures
- Max Static Pressure: 10 Bar.
- Max Maintained Pressure: 5 Bar.
- Min Maintained Pressure: (Gas Water Heater): 1.0 Bar (for optimum performance supplies should be nominally equal).
- Min Maintained Pressure (Gravity System): 0.1 Bar (0.1 bar = 1 Metre head from cold tank base to shower handset outlet).
Temperatures
- Close temperature control is provided between 20°C and 50°C.
- Optimum Thermostatic Control Range: 35°C to 45°C (achieved with supplies of 15°C cold, 65°C hot and nominally equal pressures).
- Recommended Hot Supply: 60°C to 65°C (Note! The mixing valve can operate at temperatures up to 85°C for short periods without damage. However for safety reasons it is recommended that the maximum hot water temperature is limited to 65°C).
- Minimum Recommended Differential between Hot Supply and Outlet Temperature: 12°C at desired flow rates.
- Minimum hot water supply temperature: 55°C.
Thermostatic Shut-down
- For safety and comfort the thermostat will shut off the mixing valve within 2 Seconds if either supply fails (achieved only if the blend temperature has a minimum differential of 12°C from either supply temperature).
Connections
- Hot: Left – 15mm pipework, 3/4” BSP to the valve.
- Cold: Right – 15mm to pipework, 3/4” BSP to the valve.
- Outlet: Bottom – 1/2” BSP Male to a flexible hose.Note! This product does not allow for reversed inlets and will deliver unstable temperatures if fitted incorrectly.
Installation
Suitable Plumbing SystemsGravity Fed:The thermostatic mixer must be fed from a cold water cistern (usually fitted in the loft space) and a hot water cylinder (usually fitted in the airing cupboard) providing nominally equal pressures.Gas Heated System:The thermostatic mixer can be installed with a combination boiler.Unvented Mains Pressure System:The thermostatic mixer can be installed with an unvented, stored hot water system.Mains Pressurised Instantaneous Hot Water System:The thermostatic mixer can be installed with systems of this type with balanced pressures.Pumped System:The thermostatic mixer can be installed with an inlet pump (twin impeller). The pump must be installed on the floor next to the hot water cylinder.
General
- Installation of the shower must be carried out in accordance with these instructions by qualified, competent personnel.
- The plumbing installation must comply with all national or local water regulations and all relevant building regulations, or any particular regulation or practice specified by the local water supply company.
- Make sure all pressures and temperatures comply with the requirements of the shower. See ‘Specifications’.
- Full bore / nonrestrictive isolating valves must be fitted in a readily accessible position adjacent to the shower to facilitate maintenance of the shower.DO NOT use a valve with a loose washer plate (jumper) as this can lead to a build-up of static pressure.
- Use copper pipe for all plumbing.
- DO NOT apply excessive force to plumbing connections; always provide mechanical support when making plumbing connections. Any soldered joints should be made before connecting the shower. Pipework must be rigidly supported and avoid any strain on the connections.
- Pipework dead-legs should be kept to a minimum.
- Position the shower unit where the controls are at a convenient height for the user. Position the showerhead so that the water sprays in line with the bath or across the opening of a shower cubicle. The installation must not cause the shower hose to be kinked during normal use or obstruct the use of the control handles.
- The position of the shower unit and hose retaining ring must provide a minimum air gap of 25 mm between the showerhead and the spillover level of any bath, shower tray or basin. There must be a minimum distance of 30 mm between the showerhead and the spillover lever of any toilet, bidet, or other appliance with a Fluid Category 5 backflow risk.Note! There will be occasions when the hose retaining ring will not provide a suitable solution for Fluid Category 3 installations, in these instances an outlet double check valve must be fitted, this will increase the required supply pressure typically by 10kPa (0.1 bar). Double check valves fitted in the inlet supply to the appliance cause a pressure build-up, which affects the maximum static inlet pressure for the appliance and must not be fitted. For Fluid category 5 double check valves are not suitable.

- Only use the inlet connections supplied with the product. DO NOT use any other type of fittings.
- DO NOT overtighten connections, screws, or grubscrews as product damage may occur.

Installation of the Bar Valve Fast Fix Kit
Before installing the pipework, please ensure that there is a minimum of 1260 mm height clearance to allow for the rigid riser and overhead to be installed above. If installing in a restricted height area, a shorter riser rail can be ordered as a spare part.
 Fit the plastic pipe guide over the inlet pipes. Level the pipe guide and secure to the wall to hold in position. Leave the guide in place and finish the wall.
 Make sure that the pipework has been installed correctly and that it protrudes 25 mm from the finished wall surface.
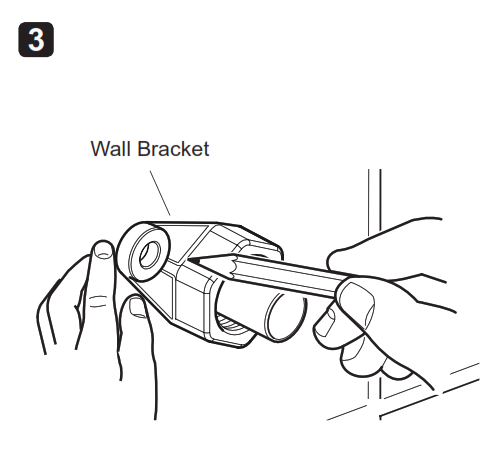 Hold the wall bracket in position and mark the position of the fixing holes.

Drill the fixing holes using an 8 mm diameter drill.

Install the wall plugs.
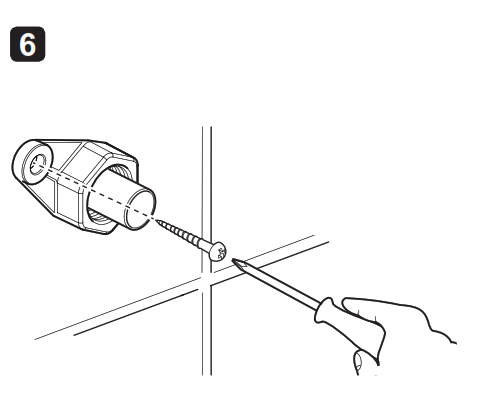
Install the fixing screws and tighten.

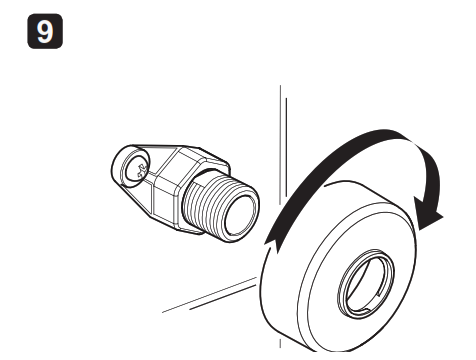
Install the olives and the connectors. Tighten finger tight and then another 1/4 to 1/2 turn.

Turn on the water supply and flush the pipework.
Install the concealing plates.
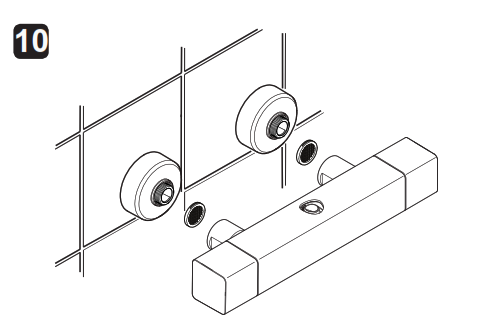
Assemble the bar valve with a sealing washer / filter in each inlet and attach to the wall bracket.Note! Connections are: Hot-Left, Cold- Right.
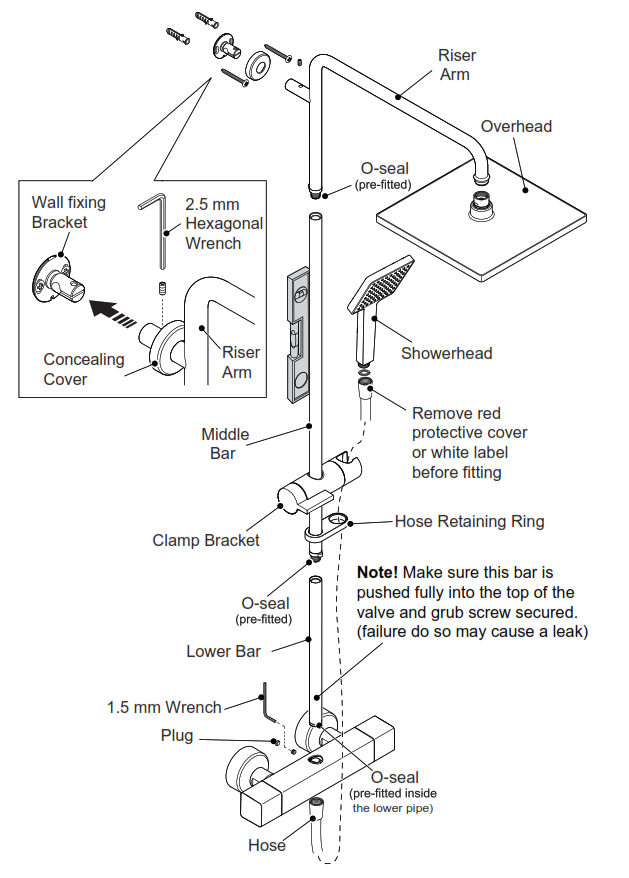
Installing the Shower Fittings
- Fit the hose retaining ring and clamp bracket to the middle bar, then screw all three bars together.
- Fit the wall bracket into the riser arm with the grub screw at the top.
- Make sure that the lower bar is pushed fully into the valve to engage the seal. Failure to do so will position the wall bracket incorrectly and may result in a leak from around the outlet of the valve.
- Mark holes for the vertical wall fixing bracket. Use the riser arm assembly as a guide and ensure it is vertical.
- Remove assembled bar and fixing bracket.
- Drill the holes for the wall fixing bracket. Fit the wall plugs and fix the bracket to the wall using the screws supplied.
- Refit the bar into the shower unit and loosely fit the concealing cover to the riser arm. Ensure the lower bar is fitted correctly as shown in the diagram below.
- Fit the riser arm onto the wall fixing bracket and tighten the grubscrew with a 2.5 mm hex key. Fit the concealing cover over the bracket.
- Tighten the grubscrew at the rear of the shower unit to secure the bar using the 1.5 mm hexagonal wrench. Fit the plug.
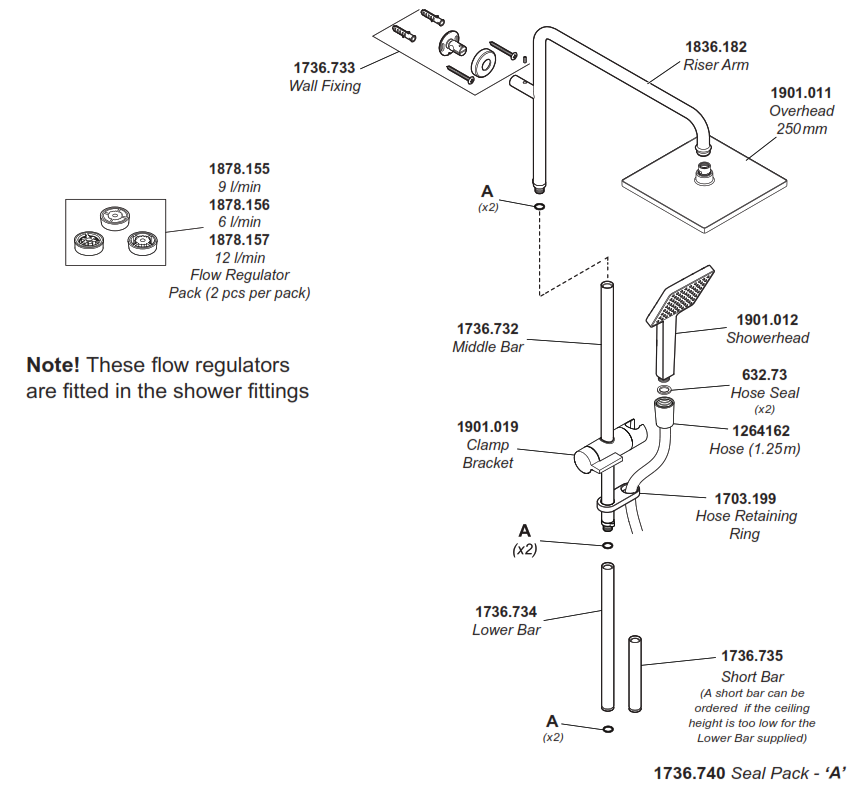
- Fit the overhead spray.Note! A flow regulator (not supplied) may be required for installation on high-pressure systems (above 0.5bar).
- Fit the shower hose through the hose retaining ring and connect to both the shower unit and the showerhead. Connect the conical with the red cover or white label to the showerhead.
Commissioning
Maximum Temperature SettingFollow this procedure to check and adjust the temperature before using the shower for the first time. Make sure that all users are familiar with the operation of the shower. This guide is the property of the homeowner and must be left with them following installation completion.
The shower’s maximum temperature has been preset to 46°C, but may require adjustment for the following reasons:• To reset to a comfortable temperature (may be required to suit the plumbing system).• To suit your showering preference.
The following procedure requires a constant supply of hot water at a minimum temperature of 55°C.
- Turn the shower ON to full flow.
- Turn to full hot. Allow the temperature and flow to stabilize.
- To set the temperature to either warmer or cooler, pull off the temperature knob taking care not to rotate the hub.Note! Take care not to damage the chrome if a tool is used to lever off.
- To increase the temperature, rotate the hub in an anticlockwise direction, colder turn clockwise. Make small adjustments and allow the temperature to settle before making further adjustments. Continue to adjust until the required temperature is achieved.
- Remove the fixing screw securing the hub and refit aligning the hub as shown. Clips to be orientated in the 3, 6, 9, and 12 O’clock positions.
- Retighten the fixing screw without rotating the hub.
- Push on the temperature knob making sure that it locates correctly.Note! The arrow on the inside of the handle should point downwards.
- Rotate the temperature knob to full cold then rotate back to full hot and check the maximum temperature is set correctly.
 Note! Take care not to damage the chrome if a tool is used to lever off.
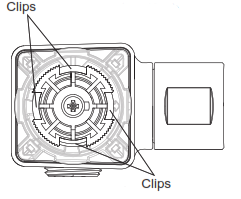
 Note! The arrow on the inside of the handle should point downwards.
Operation

Flow OperationUse the flow handle to turn the shower on / off and select either the overhead or the showerhead.Adjusting the TemperatureUse the temperature handle to make the shower warmer or cooler.
User Maintenance
WARNING! PLEASE OBSERVE THE FOLLOWING TO REDUCE THE RISK OF INJURY OR PRODUCT DAMAGE:
1. DO NOT allow children to clean or perform any user maintenance to the shower unit without supervision.2. If the shower is not to be used for a long period, the water supply to the shower unit should be isolated. If the shower unit or pipework is at risk of freezing during this period, a qualified, competent person should drain them of water.
CleaningMany household and commercial cleaners, including hand and surface cleaning wipes, contain abrasives and chemical substances that can damage plastics, plating, and printing and should not be used. These finishes should be cleaned with a mild washing-up detergent or soap solution, and then wiped dry using a soft cloth.
Important! The showerhead must be descaled regularly, keeping the showerhead clean and free from limescale will ensure that your shower continues to give the best performance. Limescale build-up can restrict the flow rate and may cause damage to your shower.

Use your thumb or a soft cloth to wipe any limescale from the nozzles.
Inspecting the HoseImportant! The shower hose should be inspected periodically for damage or internal collapse, internal collapse can restrict the flow rate from the showerhead and may cause damage to the shower.
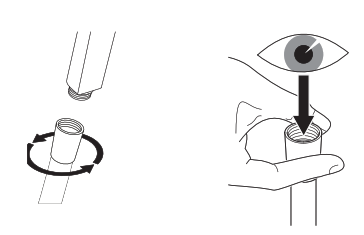
1. Unscrew the hose from the showerhead and the shower outlet.2. Inspect the hose.3. Replace if necessary.
Fault Diagnosis
If you require a Mira trained service engineer or agent, refer to ‘Customer Service’.
Spare Parts

Notes
Customer Service


© Kohler Mira Limited, April 2018
Mira Honesty ERD Bar Valve and Fittings User Manual – Mira Honesty ERD Bar Valve and Fittings User Manual –
[xyz-ips snippet=”download-snippet”]