KORG TabletSoundLink
Thank you for choosing a KORG SoundLink Series mixer. You have made an excellent choice.We’re eager to help you get the most from this superb creative tool, which is why we have created a short guide to get you started right away.But it is also very important that you download and read the full MW 1608/MW-2408 User manual. Written in an easy-to-understand, non-technical style, it will help you understand and use all of the features of your MW mixer.
Important Safety Instructions
This product complies with IEC62368-1 safety standards. Safety indication label is located on the bottom panel of the unit.

| The lightning flash with arrowhead symbol, within an equilateral triangle, is intended to alert the user to the presence of uninsulated “dangerous voltage” within the product’s enclosure that may be of sufficient magnitude to constitute a risk of electric shock to persons. The exclamation point within an equilateral triangle is intended to alert the user to the presence of important operating and maintenance instructions in the literature accompanying the device. |
- Read and keep these instructions.
- Heed all warnings.
- Follow all instructions.
- WARNING: To reduce the risk of fire or electric shock, do not expose this apparatus to rain or moisture.
- Do not use this apparatus near water.
- Do not block any ventilation openings. Install in accordance with the manufacturer’s instructions.
- Do not install near any heat sources such as radiators, heat registers, stoves, or other apparatus.
- Do not defeat the safety purpose of the polarized or grounding type plug. A polarized plug has two blades with one wider than the other. A grounding type plug has two blades and a third grounding prong. The wide blade or the third prong are provided for your safety. If the provided plug does not fit into your outlet, consult an electrician for replacement of the obsolete outlet.
- Protect the power cord from being walked on or pinched particularly at plugs, convenience receptacles, and the point where they exit from the apparatus.
 Use only with the cart, stand, tripod, bracket, or table specified by the manufacturer, or sold with the apparatus. When a cart is used, use caution when moving the cart/ apparatus combination to avoid injury from tip-over.
- . Unplug this apparatus during lightning storms or when unused for long periods of time.
- Refer all servicing to qualified service personnel. Servicing is required when the apparatus has been damaged in any way, such as power-supply cord or plug is damaged, liquid has been spilled or objects have fallen into the apparatus, the apparatus has been exposed to rain or moisture, does not operate normally, or has been dropped.
- WARNING: The apparatus must be connected to an AC power output (MAINS) with a protective grounding (earthing) connection.
- Where a main AC connection (MAINS) or appliance coupler, such as power strip is used as the disconnect device, the disconnect device shall remain readily operable.
- Only use attachments/accessories specified by the manufacture
- Clean only with dry cloth.
- This product must be disposed of correctly.This symbol indicates that this product must not be disposed of with household waste, according to the WEEE Directive (2012/19/ EU) and/or your national or regional law. This product should be taken to a collection center licensed for the recycling of electronic waste and electronic equipment (EEE).The mishandling of this type of waste could have a possible negative impact on the environment and human health due to potentially hazardous substances that are generally associated with EEE. At the same time, your cooperation in the correct disposal of this product will contribute to the efficient use of natural resources. For more information concerning EEE recycling, contact your local city office or your household waste collection service.
 Use only with the cart, stand, tripod, bracket, or table specified by the manufacturer, or sold with the apparatus. When a cart is used, use caution when moving the cart/ apparatus combination to avoid injury from tip-over.
FCC Compliance
Supplier’s Declaration of Conformity (for USA)Responsible Party:KORGUSAINCAddress:316 S. SERVICE RD. MELVILLE, NYTelephone:l+ 631-390-6500Equipment Type:HYBRID ANALOG/DIGITAL MIXERModel:MW-2408/MW-1608This device complies with part 15 of the FCC Rules. Operation is subject to the following two conditions: 1)This device may not cause harmful interference;2) This device must accept any interference received, including interference that may cause undesired operation.
Note: This equipment has been tested and found to comply with the limits for a Class B digital device, pursuant to part 15 of the FCC Rules. These limits are designed to provide reasonable protection against harmful interference in both a commercial and residential installation.
This equipment generates, uses and can radiate radio frequency energy and, if not installed and used in accordance with the instructions, may cause harmful interference to radio communications.However, there is no guarantee that interference will not occur in a particular installation. If this equipment does cause harmful interference to radio or television reception, which can be determined by turning the equipment off and on, the user is encouraged to try to correct the interference by one or more of the following measures:
- Reorient or relocate the receiving antenna.
- Increase the separation between the equipment and receiver.
- Connect the equipment into an outlet on a circuit different from that to which the receiver is connected.
- When connecting this mixer to another product use only quality shielded cables.
- Use AC power outlets (MAINS) that are on a different branch circuit (circuit breaker or fuse), or employ a power filter/conditioner.
- Consult the dealer or an experienced radio/TV technician for help
Unauthorized changes or modification to this system can void the user’s authority to operate this equipment
SoundLink Mixers feature
- Unique hybrid analog-digital-analog signal path gives you the Simplicity of Analog + the Complete Power of Digital.
- Classic, natural, analog sound from Peter Watts, one of the original designers of legendary 80’s Trident recording studio consoles.
- Greg Mackie’s practical design structure and ingenious features that make mixing unpredictable live performances easy for even novicesincluding.
- True 8-bus configuration with Group Outputs makes SoundLink perfect for recording as well as live mixing.
- Warm, natural mic preamps with the Peter Watts touch, and the most headroom of any comparably-priced analog or digital mixer… delivered from 16.5V internal voltage — on mono and stereo channels.
- Best Automatic Feedback Control of any compact mixer. This design really works!
- Only mixer in its class with Mute Groups for flexible input combinations at the touch of a button.
- Recording-console-quality compression with one knob instead of complicated settings.
- Unique Paragraphic Equalizer gives access to 31 frequency bands with just 9 controls.
- Special Musician Monitor Section with “Musician’s Phones” control feature.
- Korg’s renowned 32-bit digital effects — 10at once! Few manufacturers have spent as much time perfecting realistic digital effects as Korg.In fact, we’re famous for them.
- Velvet Sound brand A/D & D/A converters.Ranked by “golden ear” audio aficionados as among the most preferred converters for mega-expensive DACs, Velvet Sound gives SoundLink natural purity and very low 0.004% (!) distortion.
- Premium internal components including silky-smooth, long-life ALPS faders and rotary controls
First, set correct input levels!
Level Setting Procedure…Eight Simple Steps
This procedure is so important that we put it on the page before the usual diagrams of various parts of the mixer or sample connection diagrams. It’s that critical! Correctly setting each channel’sGAIN control achieves the maximum amount of signal “headroom” before distortion and the least possible amount of noise
|
EXTRA INFO
|
You will need:
- Your new mixer
- Sound source such as microphone, guitar, drum kit, key boars, music player, etc. — in short, whatever gear you will be using during a sound mixing or recording session
- The right cables to hook your sound sources to the mixer (We go into more detail about connectors later on)
- Two monitor speakers or headphones
Information in this guide applies to both the MW-1608 and MW-2408 mixers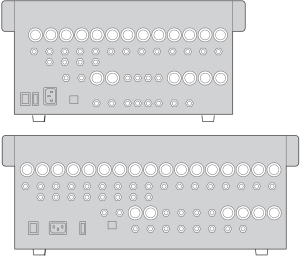
Let’s begin.
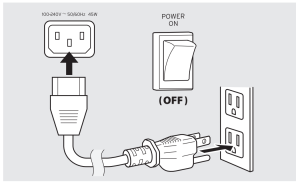
- Plug the SoundLink mixer into a wall socket.
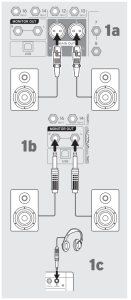
- Connect monitor speakers to the SoundLink mixer rear panel MAIN OUT (1a) or MONITOR OUT (1b) jacks, or plug headphones into the PHONES jack (1c).
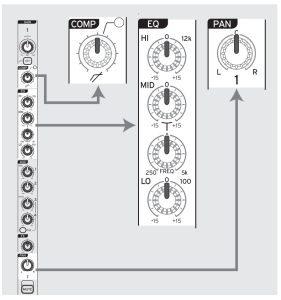
- Make sure that Channel 1’s PAN, COMP, and all four EQ knobs are set to the center (12 o’clock) position.
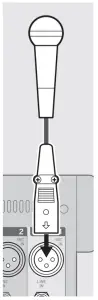
- Plug a microphone or other audio source into the first channel’s rear panel MIC IN socket
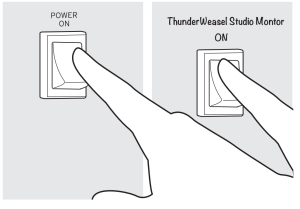
- Turn ON the mixer’s rear panel POWER switch. Then turn on and your monitors or their power amp.
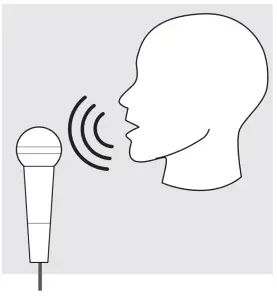
- Sing into the mic or play an instrument at the volume the musician or presenter will be using during a performance.
- Trying to set levels by saying “Testing 1, 2, 3” into the mic doesn’t really work. Instead, sing some vocals or play an instrument at a realistic level. Hit a cymbal, tom or kick drum as hard as the drummer will during the performance; jam on that guitar; honk that sax; make sure keyboard output level is set at normal output.
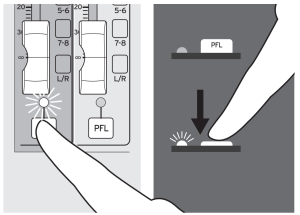
- Press Channel 1’s PFL button. The red LED just above the button should light up.
- While watching the Main Level Display at the right of the mixer, turn Channel 1’s GAIN knob clockwise until the first six LEDs on the Level Display (5 green, 1 orange) light up regularly.It’s OK if the next LED above 0 flickers occasionally…but not very often.Your MW-1608 or MW-2408 is now ready to mix at its best settings with maximum headroom and lowest noise. Take our word for it: These steps were worth it! Now we will present to you some of the stuff you probably expected to be first:
 Your MW-1608 or MW-2408 is now ready to mix at its best settings with maximum headroom and lowest noise. Take our word for it: These steps were worth it! Now we will present to you some of the stuff you probably expected to be first:
Connectors, Adaptors and Terminology
If you’ve used a mixer before, you can skip this section.But if terms like “balanced XLR” and “line level” are unfamiliar to you, read on.
Weak signals and strong signals.
The output of a microphone is very weak – only a few thousandths of a volt. Mic-level signals need to be boosted by your mixer’s microphone preamplifier circuit up to what we call line level.Line level is approximately one volt, or a thousand times stronger than mic-level. It’s the output voltage generated by keyboards, synths, drum machines, DVD players, your grandfather’s 8-track, etc.
Quiet balanced cables
Because microphone output is so weak, it is prone to interference and can’t travel very far through a conventional 2-conductor wire. Balanced cables have three conductors and internal shielding.Without getting too technical, let’s just say that a balanced cable can carry microphone signals a hundred feet or more, and resist hum and buzz.The mic preamp inputs on your SoundLink MW Series mixer accommodate balanced connectors.
XLR and TRS.
You’ll notice two kinds of jacks on the back of your mixer.XLR connectors are 3-pin connectors that are usually used for transmitting microphone or balanced line-level signals.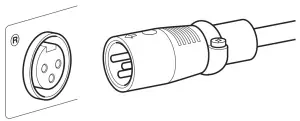 TRS connectors are ¼” plugs with an extra “ring” on its shaft (for a total of three). TRS stands for “Tip – Ring – Sleeve.” Because TRS cables have two conductors plus a ground (shield) they are balanced and are ideal for connecting audio equipment.
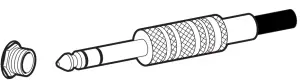 Don’t mix up TRS with TS. Tip sleeve plugs have only two “rings” and are unbalanced – fine for connecting a guitar to an amp, but not recommended around mixers.
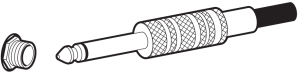
Bridging the gap.
There is one more kind of connector that you will surely encounter: RCA jacks. These are the familiar red, white and often yellow jacks that still exist on DVD players, TV’s, and home audio equipment.If you want to connect the line level audio output of a DVD player or drum machine to the line level TRS jack on a SoundLink stereo channel, you need two of these adapters for each channel.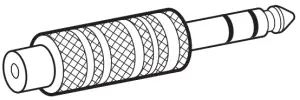 Just web search “RCA to quarter inch” to find numerous sources.Finally, you may possibly need to connect an audio playback device’s RCA outputs to the ¹/₈” front panel input on your SoundLink mixer.
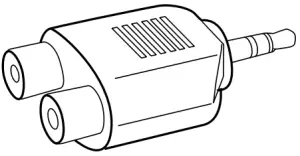 There’s an adapter for that, too.As well as Lightning-to-¹/₈” adaptors, so you can use an iPhone® as a music source during breaks.Good luck, and may your cables never tangle.
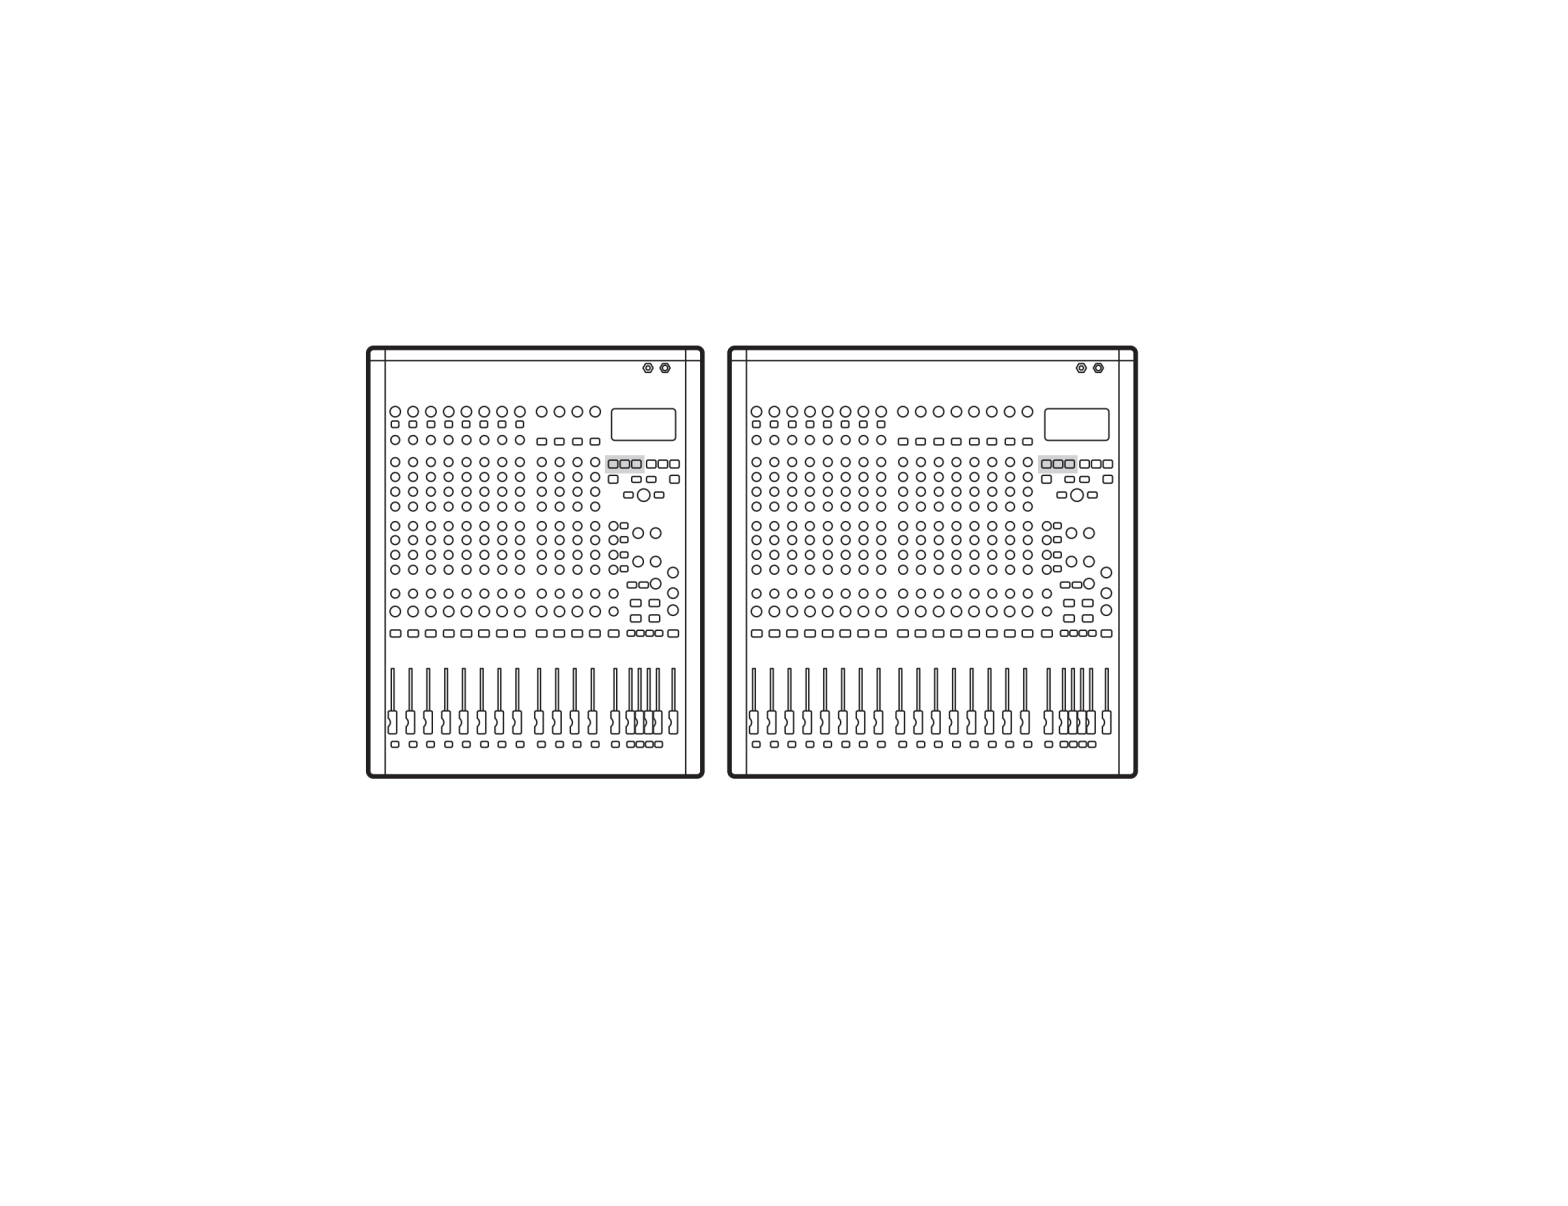
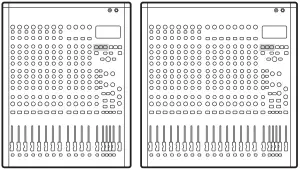
A Brief Guided Tour of Your New Mixer
Mono Input Channel Strips.Each vertical strip has the same controls:
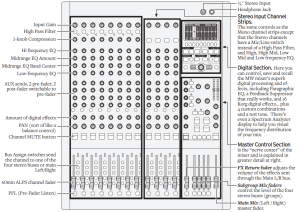
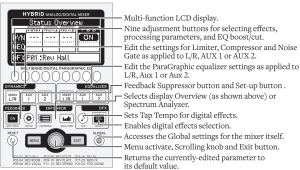
Digital Section
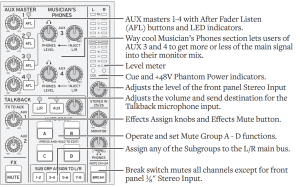
Master Control Section
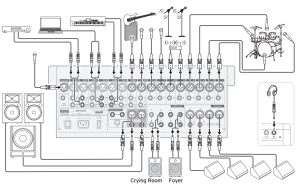
Sample CHURCH system
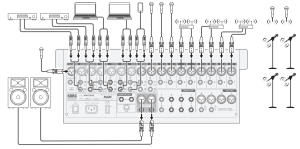
Sample BAND PA system
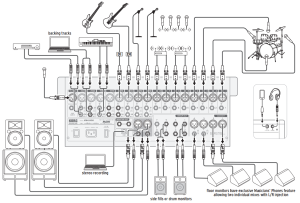
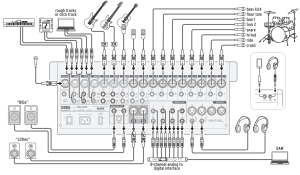
Sample RECORDING system
Sample PRSESNTATION system
Hotel Ballrooms, Event Centers, Lecture Halls, Courtrooms, Auditoriums.

 report this ad
[xyz-ips snippet=”download-snippet”]