KRAMER KIT-Z100 Quick Start Guide
This guide helps you install and use your KIT-Z100 for the first time.
Go to www.kramerav.com/downloads/KIT-Z100 to download the latest user manual and check if firmware upgrades are available.
 Scan for full manual
Step 1: Check what’s in the package
- ECU-Z100
- KT-107Z/KT-107ZRB (with restricted BW, up to 5.35GHz)
- On-wall mount unit
- Panel Mount plate
- 1 19V DC power adapter and cord
- 1 5.2V power adapter and cord
- 1 C-USB/Micro B cable
- 1 right-angle OTG USB cable
- 1 Quick start guide
- Tabletop mount
- Installation screws
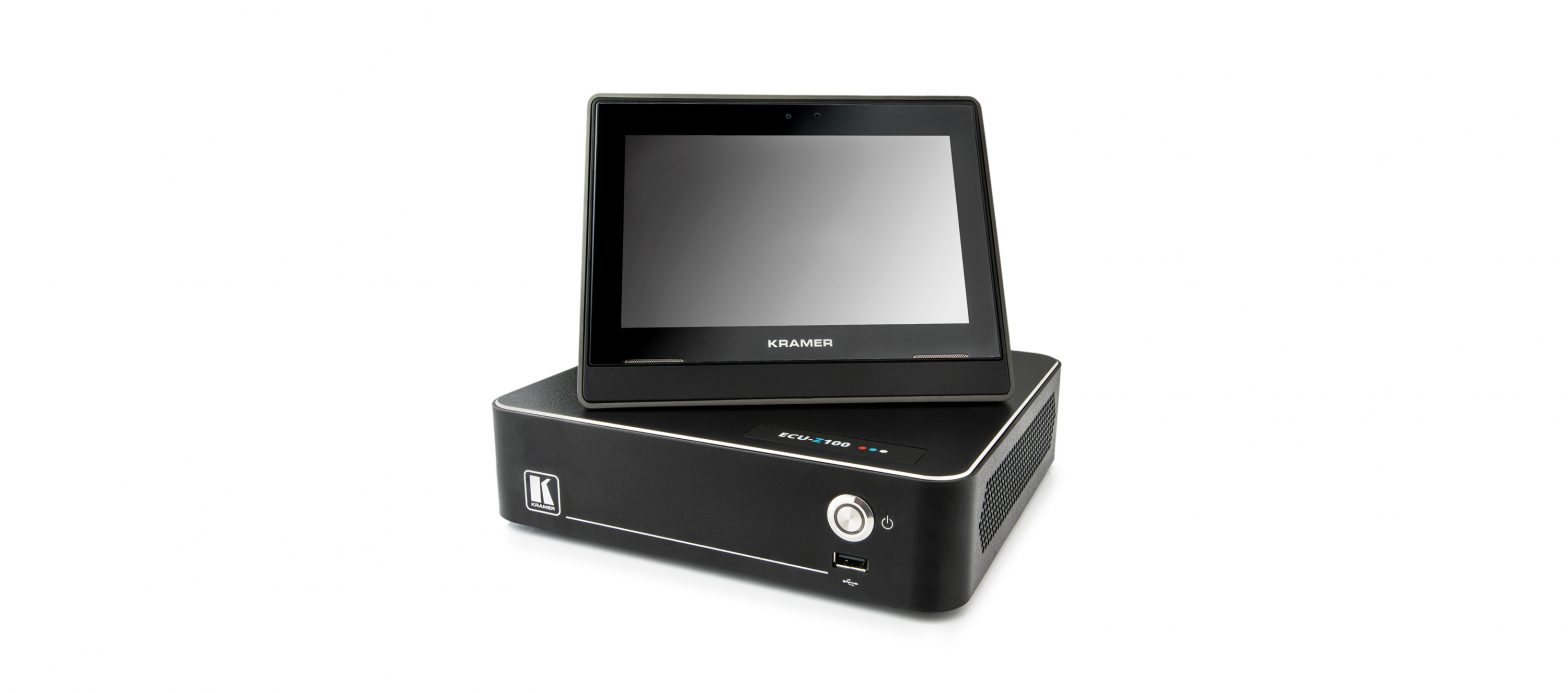
Step 2: Get to know your KIT-Z100
ECU-Z100

KT-107Z/KT-107ZRB
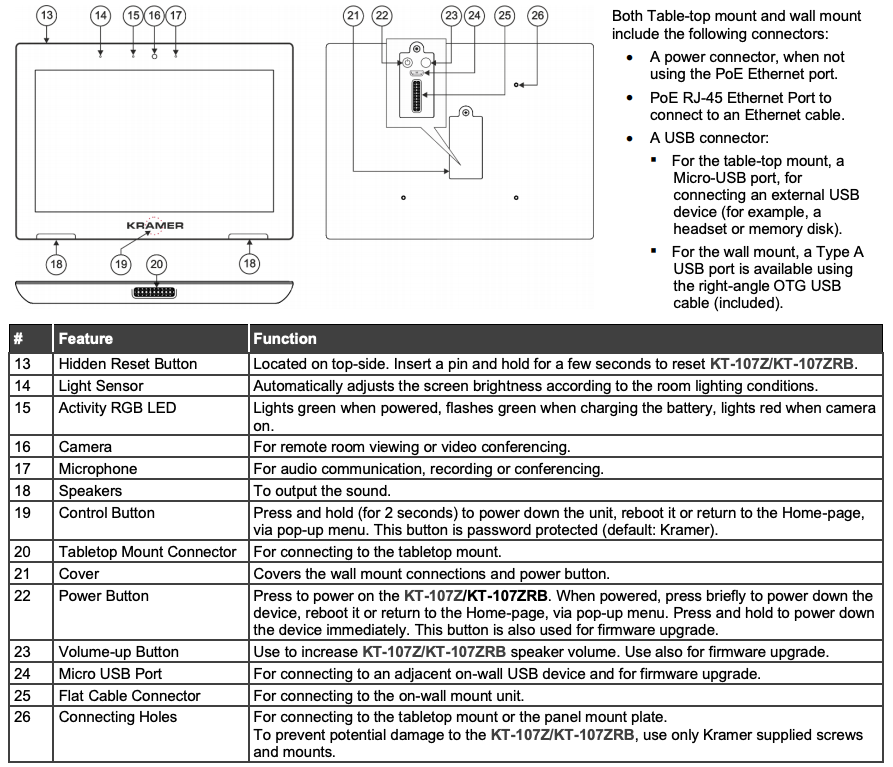
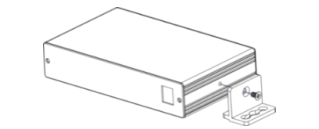
Step 3: Mount ECU-Z100
Install ECU-Z100 using one of the following methods:
- Attach the rubber feet and place the unit on a flat surface.
- Fasten a bracket (included) on each side of the unit and attach it to a flat surface (see www.kramerav.com/downloads/KIT-Z100).
- Mount the unit in a rack using the recommended rack adapter (see www.kramerav.com/product/KIT-Z100).
![]()
- Ensure that the environment (e.g., maximum ambient temperature & air flow) is compatible for the device.
- Avoid uneven mechanical loading.
- Appropriate consideration of equipment nameplate ratings should be used for avoiding overloading of the circuits.
- Reliable earthing of rack-mounted equipment should be maintained.
Step 4: Mount KT-107Z/KT-107ZRB
Mounting on a table using one of the following options:
Portable Mount: place the tabletop mount on the table. Connected cables remain visible and the table remains intact.
Secure Mount: secure the tabletop mount to the table as follows:
- Measure the exact location on the surface of the table where you want to install the KT-107Z/KT-107ZRB.
- Drill a hole in the table and optionally cut the cable pass-through opening according to the cut-out dimensions defined in the user manual.
- Secure the tabletop mount to the table using the M5x60 secure screw.
- Connect the Ethernet port to a PoE-enabled source. Optionally, you can connect the power adapter too (as backup).
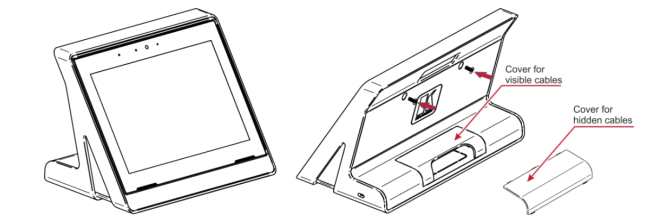
- Replace the appropriate cover and place the KT-107Z/KT-107ZRB over the tabletop mount (the is magnetically held in place), by first inserting the lower part of the then carefully laying the KT-107Z/KT-107ZRB in place.
- Wait for the Home-page to load and then secure the KT-107Z/KT-107ZRB to the tabletop mount from the rear side (using 2 M2x4 screws, supplied with the unit).
- Optionally, lock the tabletop mount with a Kensington locker (not supplied).
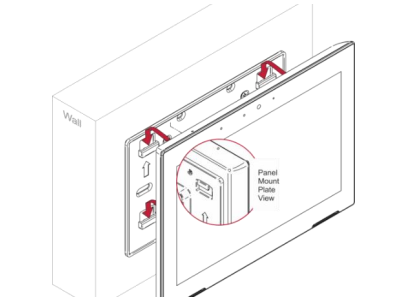
Mounting on the wall:
Before mounting KIT-Z100 on a wall, install an in-wall junction box (recommended boxes are listed in the user manual)
- Attach the on-wall mount unit to the installed junction box (top side up see indication arrows on unit). Connect Ethernet and/or power cables and optionally, insert the right-angle USB cable (supplied) for connecting to an adjacent external USB device.
- Screw the 4 wall-mounting screws (supplied) through the screw openings. The various screw openings fit various types of wall junction boxes.
- On the rear side of the KT-107Z/KT-107ZRB, remove the screw cover and the cover (by slightly pressing downwards and then pulling out) and set aside.
- Attach the panel mount plate to the rear side of the KT-107Z/KT-107ZRB (using 4 M2x4 screws, supplied).
- Connect the flat cable from the on-wall mount (attached to the in-wall junction box) to the connector on the rear of KT-107Z/KT-107ZRB.
- Hang the KT-107Z/KT-107ZRB on the wall by sliding the tabs on the attached panel mount plate over the grooves on the on-wall mount unit.
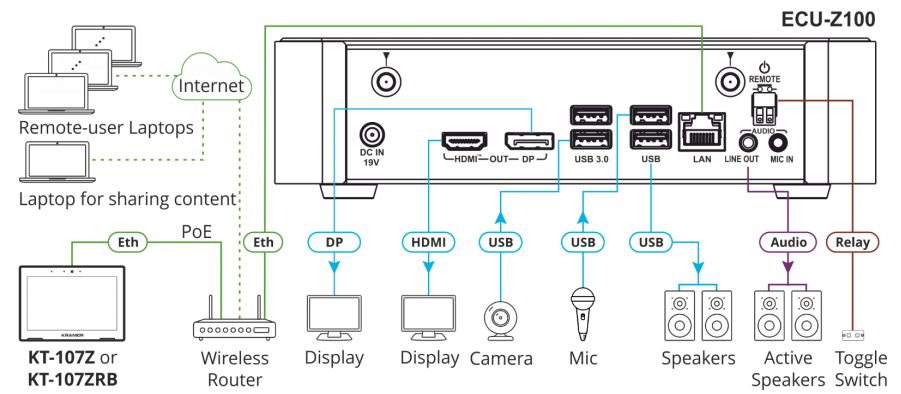
Step 5: Connect inputs and outputs
Always switch OFF the power on each device before connecting it to your KIT-Z100.
![]()
To achieve specified extension distances, use the recommended Kramer cables available at www.kramerav.com/product/KIT-Z100. Using third-party cables may cause damage!
Microphone and speakers can be connected to ECU-Z100 in the following ways:
- Speakers can be connected via LINE OUT connector and/or USB ports.
- Microphones cab be connected via MIC IN connector (via amp) and/or USB ports.
- Speakerphones (combining a speaker and a microphone) can be connected via USB ports.
KT-107Z/KT-107ZRB can be powered in any of the following ways:
- Using the power adapter when connected by LAN (without PoE support).
- Using the power adapter when connected to LAN by Wi-Fi
- By PoE when connecting to Ethernet by PoE-supporting LAN.
Step 6: Connect power
Connect the power cord to ECU-Z100 and plug it into the mains electricity.
If required, connect the power adapter on the KT-107Z/KT-107ZRB to the Power 2-pin terminal block connector on the tabletop mount and to the mains power.
![]() Safety Instructions (See www.kramerav.com for updated safety information)
Safety Instructions (See www.kramerav.com for updated safety information)
Caution:
- There are no operator serviceable parts inside the unit.
Warning:
- Use only the power cord that is supplied with the unit.
- Disconnect the power and unplug the unit from the wall before installing.
- Do not open the unit. High voltages can cause electrical shock! Servicing by qualified personnel only.
- To ensure continuous risk protection, replace fuses only according to the rating specified on the product label which located on the bottom of the unit.
Step 7: Set and operate KIT-Z100
Before setting up the application on KT-107Z/KT-107ZRB, you need to acquire Zoom Rooms licenses.
To set and operate the application, go to the Zoom Rooms website at support.zoom.us/hc/en-us.
To use the Zoom Rooms widget on Kramer Control, go to Zoom Rooms settings at www.manula.com/manuals/kramer/kramer-control/1/en/topic/zoom-room-module.
References
[xyz-ips snippet=”download-snippet”]