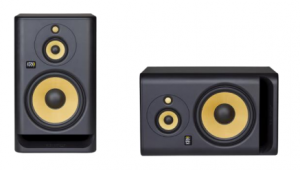
KRK Rokit G4 Dsp Controlled Studio Monitor
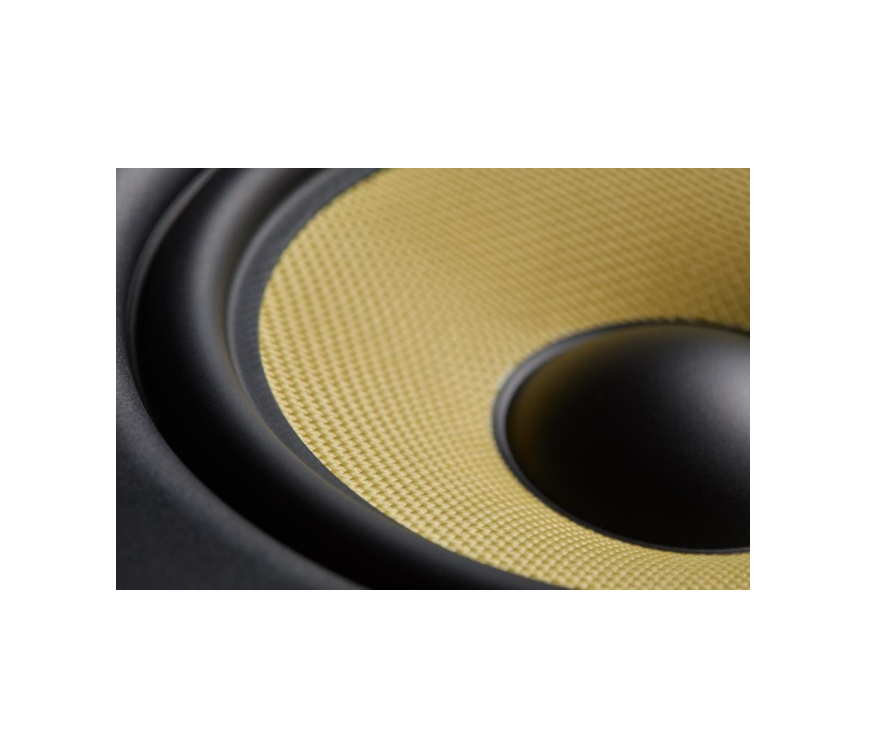
Welcome to ROKIT G4. We wanted to give you some history. In 2016, after working for 2 years with more than 300 professionals, KRK launched the V Series 4 monitors. They have become very popular with pro producers, engineers and power users and the reviews have been stellar. As we developed the ROKIT G4 we started with the goal of bringing the sound and look of the V Series 4 to you, the ROKIT G4 customer. This meant, for the first time in ROKIT history, using drivers designed with Kevlar® as we have done in our premium monitor lines for over 30 years. Like the V Series 4, we used a powerful DSP to give you an incredible soundscape as well as deep EQ control to help you with room acoustics. And this was just the beginning.
Below are some more tips and tricks as well as information to help you get the most out of your listening experience.
Room placement and set up.
The KRK design team has painstakingly modeled and analyzed hundreds of monitor placement and room acoustic situations to ensure that KRK delivers the most useful EQ tools with minimal adjustments. Room acoustics are the biggest issue in today’s studios because we are not in the perfectly built rooms now. Many great studios are just in a revamped house. We are giving you control to correct some of the anomalies you get from these types of situations.
With the LOW EQ and HIGH EQ, we have given you 25 different combinations of EQ voicings to help you correct for your studio’s acoustics to deliver more accurate monitoring. Start with LOW EQ and HIGH EQ set to 3: FLAT, which is truly flat, no cut or boost and the VOLUME set to 0.0dB. Set them up in your room per the information and diagrams below. Listen to some of your favorite songs and mixes. Try different positions in your room and different placements before making EQ adjustments and then adjust the EQ to give you your best listening and monitoring experience.
SYSTEM SETUP
Overall system setup is crucial to avoid unnecessary room acoustic interaction. A room’s natural acoustics may alter the sound level at various frequencies due to abnormal damping or reflections. Follow the checklist below for more details.
- The system setup (studio monitors and work table) should be placed within the front 1/3 of the room. Doing so will reduce reflection buildup of peak frequencies.
- The left and right sides of the system setup should be centered an equal distance from the left and right walls. This will produce even mid and low frequency response and preserve stereo imaging.
- Avoid a listening position (your ears) that is closer than 3 feet (1 meter) from any wall. Also avoid large objects (such as lamps or decorations) near the studio monitor and listening position.
- Diffusers and absorption material in the corners and back of a room will help remove room interaction by preventing reflections.
- Carpeting will help prevent reflections from hard floor surfaces.
- Studio monitor isolators (foam or rubber pads) will help remove low frequency coupling between the stands and desk. Low frequency coupling will cause the stand or desk to vibrate causing unwanted sounds.
- A low noise floor in your room (no outside interference from refrigerators or fans) is important to prevent the masking of low frequency detail. Rattles due to studio monitor playback should be fixed as well.


Within the system setup, the studio monitors and listening placement should be positioned in a near field configuration as follows: The left and right studio monitors should be approximately 3 to 5 feet (1 to 1.5 meters) apart and directed at a 60 degree angle towards the listening location. Measure the distance between the left and right studio monitors and sit in the listening position that is equal distance to both sides. This will form an equilateral triangle. It is important that both left and right studio monitors are level matched (same volume).
The ROKIT G4, in the 5”, 7” and 8” version, is a two-way studio monitor with a tweeter (producing high frequencies) and a woofer (producing mid and low frequencies) in one enclosure. In between the tweeter and woofer is the acoustic axis point where the full frequency range comes together. The ideal location for the acoustic axis point is located at ear level in the listening position. It is acceptable to angle the studio monitors so the acoustic axis is pointed in the correct direction.
The ROKIT G4 10-3 is a three-way studio monitor with a tweeter (producing high frequencies), a midrange driver (producing mid frequencies) and a woofer (producing low frequencies) in one enclosure. Whether using the 10-3 in vertical or horizonal mode, the center of the midrange driver is the acoustic axis point where the full frequency range comes together. The ideal location for the acoustic axis point is located at ear level in the listening position. It is acceptable to angle the studio monitors so the acoustic axis is pointed in the correct direction.
Now that we have giving you a great starting place, feel free to break the rules and try what works for you. For instance, the ROKIT G4 like its big brother, the V Series 4, has a very wide sweet spot so instead of directing them at a 60 degree angle to the listening position, try them at a 70 or 80 degree angle and then try sitting closer to them or further away but always have the acoustic axis point directed at your ears. Listen to the sound scape and again, choose what sounds great to you.
Tips and tricks and features
GrillesYou may decide to purchase the user installable grilles for your monitors. They are only available for the 5”, 7” and 8” versions. While most producers/mixer prefer a monitor to have exposed drivers, there are some instances where having a grille is important or useful.
They are to use in high traffic situations for the protection of your monitor’s drivers. For instance, in mobile recording trucks or studios with a lot of foot traffic. You can use them in your home studio to protect them from little pokey fingers. Use them to protect the drivers as you travel to different studios. Because the grille is held on magnetically, you can put them on just during transport and then switch back to the no grille baffle when you arrive.The front baffle is attached magnetically. To install the grille, simply reach into the port near the left or right side and pull the faceplate forward and off, then snap on the faceplate w/grille.
If you do decide to use the grilles, you can have confidence that they will not affect the sound of the ROKIT G4. Because of the design of the grille, for all intents and purposes, there is no change in frequency response from grille to no grille.
EVA CushionEVA foam cushion on the bottom of your monitors aid in keeping your monitors in place when playing music. It adds punch and clarity because you don’t lose energy due to cabinet movement. The foam also isolates the monitor from your desk.
VOLUME on the HOME SCREEN is the monitor’s input sensitivityWe call it volume because it is the easiest way to understand Input sensitivity. Our amplifier runs wide open and then you adjust how “hard” you hit it with input sensitivity, also known as a pad.
For ROKIT G4 if you put the VOLUME at 0.0dB that is professionally known as +4 dBu. If you put the VOLUME at 11.0dB that is professionally known as -10dBV.
Running at +4 is “quieter” than -10. -10 hits the amp a lot harder so it is perceived as “louder”. But, in essence, this is incorrect. All you are doing is reducing your headroom and dynamic range. The bigger issue is that you will have a much worse signal-to-noise ratio running at -10, again, because the amp is wide open and you are now putting more gain in front of it. So, because of all of that, the more “pro” way to run the monitors is at +4 for almost all situations. You will have more headroom and dynamic range and that will make your music and mixes feel better and more “open” as you work.
So, when would you want to use settings greater than 0.0dB? To match volume level with other monitors you use in your studio. If you are connecting to them directly from your computer’s headphone jack, you may need a bit more “volume”, adjust to taste.
Power onWhen you first power up the ROKIT G4, there is a 3 second delay and the light on the front of the unit comes up and then one second later there is signal to the speakers. The same is true for coming out of standby.
StandbyYour monitors have the ability to power down when you are not using them for 30 minutes. If you don’t want them doing that, you simply switch the standby feature off in the SETUP menu. But if you use standby to save energy or because the power switches are hard to reach in your studio, leave the standby on. You will know that they are in standby because the KRK logo will pulse (even if you normally have the KRK logo light off).
To wake up your monitors after they go into standby. Just like when you first turn them on, there is a three second delay until the light on the front comes on and a second later you get signal to the speaker. If your speakers go into standby, ease your source volume up slowly. You only have to break -50 dBu for them to come out of standby. This will keep you from excessive volume spikes if you ease it up slowly. Also, as you raise the volume, you can use the light going solid as an indication to turn your source back down to avoid any loud spikes. Or if your setting is KRK logo light out, you can use the pulsing light going off to indicate you are about a second from the speaker coming on.
ROKIT G4 10-3. Use in VERTICAL or HORIZONAL mode.These two modes let you set them up based on what works best for your room acoustics or placement. We have included a large piece of EVA foam that you can install on the side of the monitor should you decide to use them in horizonal mode.
To prepare them for use in horizonal mode, the front baffle is held on magnetically. Remove the \ front baffle by reaching into the port and pulling it out near the left or right edge. Then remove the 4 screws around the midrange driver and tweeter enclosure and turn it 90°. Make the two monitors mirror images of each other and set them up with the tweeters on top. You may use them with the woofers on the inside or on the outside depending on your rooms acoustics. Try it both ways and pick which works better for you.
TROUBLESHOOTING
If there is no power, check to see if…
- Check to see if the power cord is plugged into both the IEC socket on the rear panel of the active speaker and into the AC mains. Verify that the AC mains are active by using an approved AC tester or simply connect a lamp with a working light bulb. In some cases, the AC mains may be controlled by a light switch or power strip with suppressor that may not be in the ‘on’ position.
- Verify that the power switch on the active speaker is in the ‘on’ position.
- Check to see if the power light is illuminated. The power light is the KRK logo on the front panel of the monitor. If the power light is not illuminated, turn the power switch OFF and check the A/C mains fuse(s). The fuse is located directly below the power receptacle.NEVER USE A LARGER AMPERAGE FUSE THAN SPECIFIED!
- After the fuse has been checked and replaced, turn the power switch back on. The power light should illuminate.
- Check to see if a fuse change was needed. If you power the monitor back on and the fuse blows again, the monitor needs to be returned to the dealer or distributor where you purchased it or to KRK for servicing.
If you can’t hear certain sounds…
- Repeat steps in the previous troubleshooting section above before continuing to the next steps.
- Check to see if all other audio devices using the same AC outlet are still operating.
- Check to see if the audio source cable is plugged into both the source output and the monitor input.
- Check to see if the signal source (E.g. mixing console, work station, CD player, etc.) is turned up to a level that can properly send a signal to the monitors.
- Check to see if the audio source is in mono or stereo, or information in the mix may also be panned differently which will result in differing cancellation. Audio heard in stereo and not heard in mono may be a result of phase cancellation due to long delays between left and right channels or polarity inversion. Avoid polarity inversion by using matching cables.
- Check to see if one of the monitors is working. Exchange the audio input cable from the non-working monitor to the working unit. This will determine whether it’s really the monitor, a faulty cable, or some other glitch in the audio chain.
- If the monitor is still not responding, it should be returned to the dealer where you purchased it or to KRK for servicing.
If the monitor suddenly stops working…
- Turn the monitor level down or off.
- Repeat steps in the troubleshooting sections above before continuing to the next steps
- Carefully check to see if the amplifier’s back plate is hot! If the monitor has been running at highest power output for an extended period of time, it could be that the unit has become overheated and the protection circuitry has shut the system down momentarily. The monitor provides maximum circuitry protection against AC power surges, amplifier overdrive, and overheating of the amplifiers. Turn the monitor off then wait 30 minutes to allow the back plate to cool down. Turn the power switch back on.
- Increase the volume to check for normal operation.
- If the monitor is still not responding, it should be returned to the dealer where you purchased it or to KRK for servicing.
The sound quality changes…
- Repeat steps in the previous troubleshooting section above before continuing to the next steps.
- It is possible that the change in sound quality is due to changes in the room or listening position. Low frequencies (bass response) can be increased or reduced by changes such as furniture and/or large equipment placement. Try moving the speakers or listening area a different position or return the room back to where the sound quality was acceptable.
- A reduction in bass frequencies may be a result of polarity inversion between the left and right channels or long delays between the left and right channels. Information in the mix may also be panned differently which will result in differing cancellation. Check the audio source and verify if one channel is polarity flipped or long delays are being used. Avoid polarity inversion by using matching cables.
- Disconnect the signal cable at the input of the monitor and adjust the volume control to the minimum setting. With power on, place your ear close to each driver (tweeter/woofer) and listen for noise (i.e., a slight hiss or hum) while slowing increasing the volume from the minimum setting. It is important that the volume is slowly adjusted from minimum setting to avoid any spike in sound levels while the ear is close to the driver (tweeter & woofer). If there’s absolutely no sound whatever, it could be that the driver is at fault. It’s also possible that the problem lies somewhere in the electronics.
- Play some non-distorted source material at a low volume. Carefully cover the woofer (to block the sound) without touching the diaphragm. Is the woofer producing a clean sound? If there is not a clear tonal quality or any sound at all then the woofer probably needs to be replaced.
- Verify the source signal level has not changed or source has changed. This can be tested by connecting the source headphone outputs to a set of headphones and verifying the sound is not loud or distorted. If the sound is poor at the source (preamp stage) than it is not the active speakers.
The monitor hums or makes other loud noises…
- Make sure that the power cord is plugged snugly into the IEC socket on the rear of the monitor.
- Check the connections between the signal source and the monitor. Make sure all connections are secure and that the cable is not damaged or wiredincorrectly.
- If you are using an unbalanced output to balanced cable conversion, make sure it is correct. The shield is connected to the unbalanced ground of the source and pins 1 and 3 of the XLR (or the sleeve and ring on the ¼” TRS jack).
- All audio equipment should use the same ground point. Check all other devices using the same AC output in the building like light dimmers, neon signs, TV screens, and computer monitors. These devices should not be using the same circuit.
- Verify that the signal cables are not routed near AC power lines or other EMI sources (including wall power adapters and computers).
- Excessive hiss may be a result of an incorrect gain setting before the speaker connection. Verify the source signal is not noisy before connecting the monitors.This can be tested by connecting the signal source headphone outputs to a set of headphones.Once you have a better idea of what may be at fault then contact our service department. They will help you determine the best solution to correct your issue.

[xyz-ips snippet=”download-snippet”]