
Lab gruppen 3000 Watt Two Channel Amplifier Precise Power Management
Important Safety Instructions

 Terminals marked with this symbol carry electrical current of sufficient magnitude to constitute risk of electric shock.Use only high-quality professional speaker cables with ¼” TS or twist-locking plugs pre-installed. All other installation or modification should be performed only by qualified personnel.
This symbol, wherever it appears, alerts you to the presence of uninsulated dangerous voltage inside the enclosure – voltage that may be sufficient to constitute a risk of shock.
 This symbol, wherever it appears, alerts you to important operating and maintenance instructions in the accompanying literature. Please read the manual.
CautionTo reduce the risk of electric shock, do notremove the top cover (or the rear section).No user serviceable parts inside. Refer servicing to qualified personnel.
CautionTo reduce the risk of fire or electric shock, do not expose this appliance to rain and moisture. The apparatus shall not be exposed to dripping or splashing liquids and no objects filled with liquids, such as vases, shall be placed on the apparatus.
CautionThese service instructions are for use by qualified service personnel only.To reduce the risk of electric shock do not perform any servicing other than that contained in the operation instructions. Repairs have to be performed by qualified service personnel.
- Read these instructions.
- Keep these instructions.
- Heed all warnings.
- Follow all instructions.
- Do not use this apparatus near water.
- Clean only with dry cloth.
- Do not block any ventilation openings. Install in accordance with the manufacturer’s instructions.
- Do not install near any heat sources such as radiators, heat registers, stoves, or other apparatus (including amplifiers) that produce heat.
- Do not defeat the safety purpose of the polarized or grounding-type plug. A polarized plug has two blades with one wider than the other. A grounding-type plug has two blades and a third grounding prong. The wide blade or the third prong are provided for your safety. If the provided plug does not fit into your outlet, consult an electrician for replacement of the obsolete outlet.
- Protect the power cord from being walked on or pinched particularly at plugs, convenience receptacles, and the point where they exit from the apparatus.
- Use only attachments/accessories specified by the manufacturer.
- Use only with the cart, stand, tripod, bracket, or table specified by the manufacturer, or sold with the apparatus. When a cart is used, use caution when moving the cart/apparatus combination to avoid injury from tip-over.

- Unplug this apparatus during lightning storms or when unused for long periods of time.
- Refer all servicing to qualified service personnel.Servicing is required when the apparatus has been damaged in any way, such as power supply cord or plug is damaged, liquid has been spilled or objects have fallen into the apparatus, the apparatus has been exposed to rain or moisture, does not operate normally, or has been dropped.
- The apparatus shall be connected to a MAINS socket outlet with a protective earthing connection.
- Where the MAINS plug or an appliance coupler is used as the disconnect device, the disconnect device shall remain readily operable.
- Correct disposal of this product: This symbol indicates that this product must not be disposed of with household waste, according to the WEEE Directive (2012/19/EU) and your national law. This productshould be taken to a collection center licensed for the recycling of waste electrical and electronic equipment (EEE). The mishandling of this type of waste could have a possible negative impact on the environment and human health due to potentially hazardous substances that are generally associated with EEE. At the same time, your cooperation in the correct disposal of this product will contribute to the efficient use of natural resources.For more information about where you can take your waste equipment for recycling, please contact your local city office, or your household waste collection service.
- Do not install in a confined space, such as a book case or similar unit.
- Do not place naked flame sources, such as lighted candles, on the apparatus.
- Please keep the environmental aspects of battery disposal in mind. Batteries must be disposed-of at a battery collection point.
- Use this apparatus in tropical and/or moderate climates.

 Correct disposal of this product: This symbol indicates that this product must not be disposed of with household waste, according to the WEEE Directive (2012/19/EU) and your national law. This productshould be taken to a collection center licensed for the recycling of waste electrical and electronic equipment (EEE). The mishandling of this type of waste could have a possible negative impact on the environment and human health due to potentially hazardous substances that are generally associated with EEE. At the same time, your cooperation in the correct disposal of this product will contribute to the efficient use of natural resources.For more information about where you can take your waste equipment for recycling, please contact your local city office, or your household waste collection service.
LEGAL DISCLAIMER
Music Tribe accepts no liability for any loss which may be suffered by any person who relies either wholly or in part upon any description, photograph, or statement contained herein. Technical specifications, appearances and other information are subject to change without notice. All trademarks are the property of their respective owners. Midas, Klark Teknik, Lab Gruppen, Lake, Tannoy, Turbosound, TC Electronic, TC Helicon, Behringer, Bugera, Auratone and Coolaudio are trademarks or registered trademarks of Music Tribe Global Brands Ltd. © Music Tribe Global Brands Ltd. 2020 All rights reserved.
LIMITED WARRANTY
For the applicable warranty terms and conditions and additional information regarding Music Tribe’s Limited Warranty, please see complete details online at musictribe.com/warranty.
Introduction
Welcome
Thank you for choosing a Lab. gruppen PD3000. This manual provides a comprehensive guide to the features and functionality of the PD3000 amplifier. We highly recommend you read through this manual in its entirety to become fully acquainted with configuration options and protection circuitry. As you become thoroughly familiar with all aspects of operation, you may learn of features or options that will affect your choices on amplifier modes or loudspeaker system configuration.
Lab. gruppen PD3000 power amplifiers are designed and built with competitive price and good performance and protection features in mind. Although the PD3000 amplifier features a competitive price, each amplifier draws on the engineering that has made Lab. gruppen the benchmark of quality for touring concert systems: exceptional sonic performance, rugged construction, proven reliability, and protection features that anticipate every unwelcome possibility – that is the core of the “Show must go on” design philosophy that every Lab. gruppen product is created with, with a well matched feature set per product range depending on the expected application.
Features
Your new PD3000 amplifier incorporates a number of sophisticated technologies – many of them proprietary to Lab.gruppen – that ensure the best possible performance and years of reliable operation. Familiarizing yourself with these technologies will prove invaluable in setting up and optimizing your loudspeaker system.
Class D output stage
PD3000 amplifiers employ our unique IDEEA Class D output stage that is ideally matched to the rated power output. To provide flexibility, each channel offers sufficient voltage swing and current capacity to drive loads in any impedance without any additional configuration. In order to have low thermal losses as well as a high voltage swing, the design is based on a permanently bridged output.
Protection and performance optimization
Appropriate and reliable power amplification is vital to any audio system. Inadequate or faulty power amplifiers could cause damage to loudspeakers, or in some cases to the power amplifiers themselves. To prevent damage or service interruptions, PD3000 amplifiers offer advanced features to protect both internal circuits and connected loads. These features are part of the Lab.gruppen “Show must go on” philosophy
PD3000 protection features include:
- CPL (Current Peak Limiter) ensures that the amplifier’s output does not exceed the safe current handling parameters of the amplifier components.
- Temperature protection ensures that the amplifier will not be damaged by exceeding thermal limits. The RDY LED flashes orange when the amplifier approaches thermal limits to allow user action before protective muting engages.
- DC protection ensures destructive DC signals will not appear at the amplifier outputs. If such conditions occur an internal fuse opens.
- RSL (Rail Sensing Limiter) is applied to avoid distortion at the selected voltage limit threshold and to avoid hitting the rail if it has sagged below the configured threshold. Limiting also may be applied when maximum output current has been reached or when the mains voltage is too low to maintain required rail voltage.Limiting activity is shown by the front panel Limiter LED
Unpacking and visual checks
Every Lab.gruppen amplifier is carefully tested and inspected before leaving the factory and should arrive in perfect condition. If any damage is discovered, please notify the shipping carrier immediately.
Save the packing materials for the carrier’s inspection and for any future shipping.
Cooling
PD3000 amplifiers use a forced-air cooling system with front to rear airflow, allowing high continuous power levels without thermal problems.Please ensure that there is sufficient space in the front and rear of each amplifier to allow free flow of air, no doors or covers should be mounted either in the front or rear of the amplifiers.Amplifiers may be stacked directly on top of each other with no spacing, though some spacing may enable more convenient installation of rear cabling. Fit solid blanks (not ventilation blanks) to unused rack spaces to ensure effective air circulation. Leaving gaps in between items of equipment degrades the effectiveness of forced-air cooling.
Operating voltage
Always connect your PD amplifier to the voltage specified on the rear of the device. Connecting the amp to an incorrect voltage can permanently damage your amp.
- USA / Canada / Japan = 100-120 V~, 50/60 Hz
- UK / Australia / Europe / Korea / China 220-240 V~, 50/60 Hz
The locking IEC receptacle on the rear panel accepts the supplied IEC cord which terminates in a connector appropriate for the country of sale.
Control
Front Panel
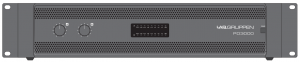
The following indicators and controls are available on the front panel (Fig. 1):
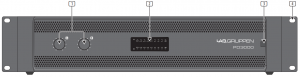 Fig. 1: PD3000 Front Panel
[1] CH A/CH B CONTROLS adjust the input level. To increase signal gain, rotate the knobs clockwise; to reduce the gain, rotate the knobs counter-clockwise.[2] RDY, SIGNAL and LIM LEDs display the signal level and system status for each channel. RDY LED lights to indicate that the amplifier is powered on. The SIGNAL LEDs light to show the input signal level. The LIM LED lights when the input signal exceeds an optimum level and activates the internal limiter. Reduce the input gain if the red LIM LED lights up continuously.[3] POWER button turns the unit off and on.[4] RACK EARS secure the unit into a rack using four attaching screws and washers (fasteners not included). Requires two rack units.
Rear Panel
The following connectors are available on the rear panel (Fig. 2):
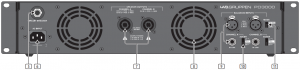 Fig. 2: PD3000 Rear Panel
[5] BREAKER (automated fuse) acts in place of common discardable fuses. After eliminating the cause of faulty operation, simply depress the BREAKER and power up the unit again. The BREAKER acts in place of common discardable fuses.BREAKER WARNING: Take the following actions BEFORE resetting the breaker:
- Unplug the AC main cable
- Move the POWER switch to the “OFF” position
- Turn all input gain control elements down
- And then, reset the breaker, connect the unit to the mains, switch ON and slowly increase the gain to the target volume
[6] POWER SOURCE jack accepts the included IEC power cable.[7] SPEAKER OUTPUTS connect the amplifier to the speakers using professional speaker cables with twist-locking speakON plugs. Both output channels are available by using a 4-pole connector and cable with the CHANNEL A output. CHANNEL B is available separately on the right-hand CHANNEL B output.WARNING! Bridge Mode is not supported!WARNING! Do not connect any output connector poles to ground![8] VENTILATION FAN speed adjusts automatically depending on temperature to ensure trouble-free operation.[9] BALANCED INPUTS (¼” connections) accept audio inputs for each channel from audio cables with ¼” TRS connectors (balanced) or ¼” TS connectors (unbalanced).BALANCED INPUTS (XLR connections) accept balanced audio inputs for each channel from audio cables with XLR connectors.NOTE: The XLR and ¼” connections in the BALANCED INPUTS section are physically linked, and users can use this physical connection to route a copy of the input signal to an additional amplifier. For example, a signal coming in to Channel A through the XLR connection can be split and routed back out over Channel A’s ¼” TRS connection.[10] XOVER switch chooses between three crossover modes: FULL RANGE, LF (low frequency crossover) and HF (high frequency crossover). In LF mode, the unit amplifies only the low frequencies below 100 Hz. In HF mode, the unit only amplifies the high frequencies above 100 Hz. LF and HF modes are typically used in bi-amping applications.[11] MODE switch selects between MONO and STEREO operation modes:
- Stereo: Inputs A and B are amplified individually and are separately available on SPEAKER OUTPUTS A and B.
- Mono: Input A is amplified and available on both SPEAKER OUTPUTS A and B. Input B is disabled.
NOTE: Attenuation of SPEAKER OUTPUTS A and B is individual in both modes on the front panel through the CH A/CH B attenuation knobs.
Installation
Rack mounting
Your PD amplifier fits into a 19″ rack and requires two rack units. Install into the rack using four attaching screws and washers for the front panel. Consider reinforcing the back panel using rack accessories (supplied with rack), especially if you will be taking the PD on the road. Make sure enough cool air reaches the rack, especially when other rack equipment emanates a lot of heat. The PD amplifiers circulate heat from the front to the rear vents to relieve heat inside the rack enclosure.If you are installing multiple power amplifiers into a 19″ rack, add filled panels in the empty rack spaces to avoid circulation of hot air.Fan speed adjusts automatically to assure safe operation. Never block ventilation openings. Should internal temperature reach extreme values, the unit will shut down automatically, and resume operation when cooled down.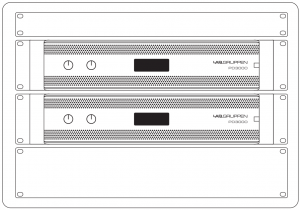
Connections
Audio inputs
Each channel input uses either XLR or ¼” jacks. The XLR jacks can accept balanced XLR connections, while the ¼” jacks can accept both balanced ¼” TRS connectors and unbalanced ¼” TS connectors. To deploy XLR connectors for unbalanced signals, bridge pins 1 and 3; mono ¼” TS connectors do not require any alteration to carry unbalanced signals.When working with balanced signals, please make sure to exclusively use balanced cables.One unbalanced cable in the signal chain can change a balanced signal into an unbalanced signal.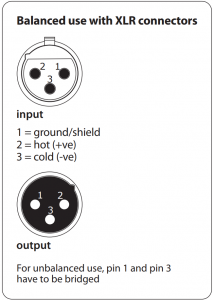


Outputs
Your PD amplifier requires speakON twist-locking professional speaker connectors. These professional speaker connectors were developed specially for driving high-powered speakers. The connectors snap in securely, prevent electric shock, and ensure correct polarity.The CHANNEL A output contains output pins for both CHANNEL A (1+/1-) and CHANNEL B (2+/2-), so that both channels, if desired, can be sent out simultaneously on a single 4-pole speaker cable.The CHANNEL B output, on the other hand, has pin outs for CHANNEL B only (1+/1-).
◊ Whenever possible, use thick and short speaker cables to minimize power loss.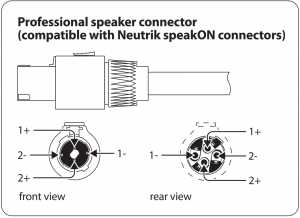
Maximum recommended cable length for
| Cable Size | 2 ohm | 4 ohm |
8 ohm |
||||
|
AWG |
mm2 | meter | feet | meter | feet | meter |
feet |
|
12 |
2.0 | 9 | 30 | 18 | 60 | 36 |
120 |
|
10 |
2.6 | 15 | 50 | 30 | 100 | 60 |
150 |
Connecting to mains
Always connect your PD amplifier to the voltage specified on the rear of the device. Connecting the amp to an incorrect voltage can permanently damage your amp.Before powering up the amplifier, double-check all connections and fully lower the gain setting.
Applications
Bi-amping splits a signal into upper and lower frequency bands, and then assigns each frequency band to separate speaker cabinets. A subwoofer typically takes the low frequency range. By splitting the signal this way, the speakers work more efficiently, and you can achieve a cleaner overall sound.
One side sub and linked passive top, Turbosound NuQ102 and NuQ118B together with Lab.gruppen PD3000

Two passive full range tops in stereo, Turbosound NuQ102 together with Lab.gruppen PD3000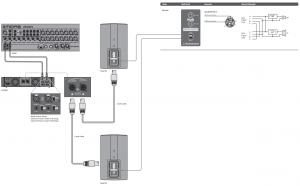
Two passive full range monitors, two Turbosound TFM122M together with Lab.gruppen PD3000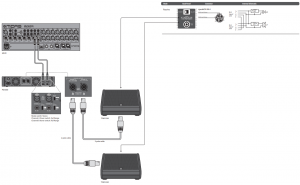
Specifications
General
| Number of amplifier channels | 2 |
| Peak total output all channels driven | 3000 W |
| Peak output voltage per channel | 115 V |
| Peak output current per channel | 32 A |
| Bridge mode | No |
| Output circuit type | Class-D |
Amplifier Outputs
Max Output Power
| All channels driven | |
| 2 Ω per channel, stereo | 1000 W |
| 4 Ω per channel, stereo | 1500 W |
| 8 Ω per channel, stereo | 800 W |
Audio Performance
| THD+N 20 Hz – 20 kHz @ 1 W | < 0.1% |
| THD+N @ 1kHz, 1 dB below clip | < 0.1% |
| Signal-to-noise | >90 dB |
| Channel separation (Crosstalk) @ 1 kHz | >75 dB |
| Frequency response | 10 Hz to 20 kHz, +0.5/ -1 dB |
| Input impedance | 10 kΩ unbalanced, 20 kΩ balanced |
| Distortion,1/8 rated power | < 0.1% |
System
Controls
| Front | Power switch
Gain controls (channels A and B) |
| Rear | Stereo / mono, switchable
Xover: LF / full range / HF, switchable |
| Crossover frequency | 100 Hz |
| Indicators | |
| Power | RDY LEDs lit green |
| Limit, per channel | LIM LEDs lit red |
| Signal, per channel | -30 dB, -24 dB, -18 dB, -12 dB, -9 dB,
-6 dB, -3 dB, LEDs lit green/orange |
| Thermal Warning, per channel | RDY LED blink orange |
| Thermal Warning 90%, PSU | Both RDY LEDs blink orange |
| Thermal fault, per channel | RDY LED blink red |
| Thermal fault 100%, PSU | Both RDY LEDs blink red |
| Fault, channel | RDY LED lit constantly red |
| Fault, device | Both RDY LEDs constantly lit red |
Connectors
| Inputs / link | 2 x XLR
2 x ¼” TRS |
| Outputs | Neutrik speakON (2 x NLT4) |
| Mains connector | Locking IEC appliance inlet, C14 |
| Protection Features | |
| Cooling | Two fans front-to-rear air flow, temperature controller speed |
| Amplifier protection | Thermal and DC protection, Rail sensing and peak current limiting. |
| Load protection | Controlled start and shutdown, behavior, DC-fault protection, Short-circuit protection |
Power Supply
| Voltage | Separate 230 V and 115 V versions available. Not selectable on
the product. |
| USA / Canada / Japan | 100-120 V, 50/60 Hz |
| UK / Australia / Europé / Korea / China | 220-240 V, 50/60 Hz |
| Power consumption @ 4 ohms | 1050 W |
Dimensions / Weight
| Dimensions (H x W x D) | 93 x 483 x 326 mm (3.7 x 19 x 12.8″) |
| Weight | 6.5 kg (14.3 lbs) |
| Finish | Black painted aluminium chassis and grey front |
| Approvals | CE, cTUVus, PSE, RCM, CCC, FCC |
Other important information
- Register online. Please register your new MusicTribe equipment right after you purchase it by visiting labgruppen.com. Registering your purchase using our simple online form helps us to process your repair claims more quickly and efficiently. Also, read the terms and conditions of our warranty, if applicable.
- Malfunction. Should your MusicTribe Authorized Reseller not be located in your vicinity, you may contact the MusicTribe Authorized Fulfiller for your country listed under “Support” at labgruppen.com.Should your country not be listed, please check if your problem can be dealt with by our “Online Support” which may also be found under “Support” at labgruppen.com.Alternatively, please submit an online warranty claim at labgruppen.com BEFORE returning the product.
- Power Connections. Before plugging the unit into a power socket, please make sure you are using the correct mains voltage for your particular model. Faulty fuses must be replaced with fuses of the same type and rating without exception.
FEDERAL COMMUNICATIONS COMMISSION COMPLIANCE INFORMATION

Responsible Party Name: Music Tribe Commercial NV Inc.Address: 901 Grier Drive Las Vegas, NV 89118 USAPhone Number: +1 702 800 8290
PD3000
complies with the FCC rules as mentioned in the following paragraph:
This equipment has been tested and found to comply with the limits for a Class B digital device, pursuant to part 15 of the FCC Rules. These limits are designed to provide reasonable protection against harmful interference in a residential installation. This equipment generates, uses and can radiate radio frequency energy and, if not installed and used in accordance with the instructions, may cause harmful interference to radio communications. However, there is no guarantee that interference will not occur in a particular installation. If this equipment does cause harmful interference to radio or television reception, which can be determined by turning the equipment off and on, the user is encouraged to try to correct the interference by one or more of the following measures:
- Reorient or relocate the receiving antenna
- Increase the separation between the equipment and receiver
- Connect the equipment into an outlet on a circuit different from that to which the receiver is connected
- Consult the dealer or an experienced radio/TV technician for help
This device complies with Part 15 of the FCC rules. Operation is subject to the following two conditions:
(1) this device may not cause harmful interference, and(2) this device must accept any interference received, including interference that may cause undesired operation.
Important information:Changes or modifications to the equipment not expressly approved by Music Tribe can void the user’s authority to use the equipment.

References
[xyz-ips snippet=”download-snippet”]