![]() INSTRUCTION BOOKLETCOMPACTDEEP FAT FRYER
INSTRUCTION BOOKLETCOMPACTDEEP FAT FRYER
 Model: 26774
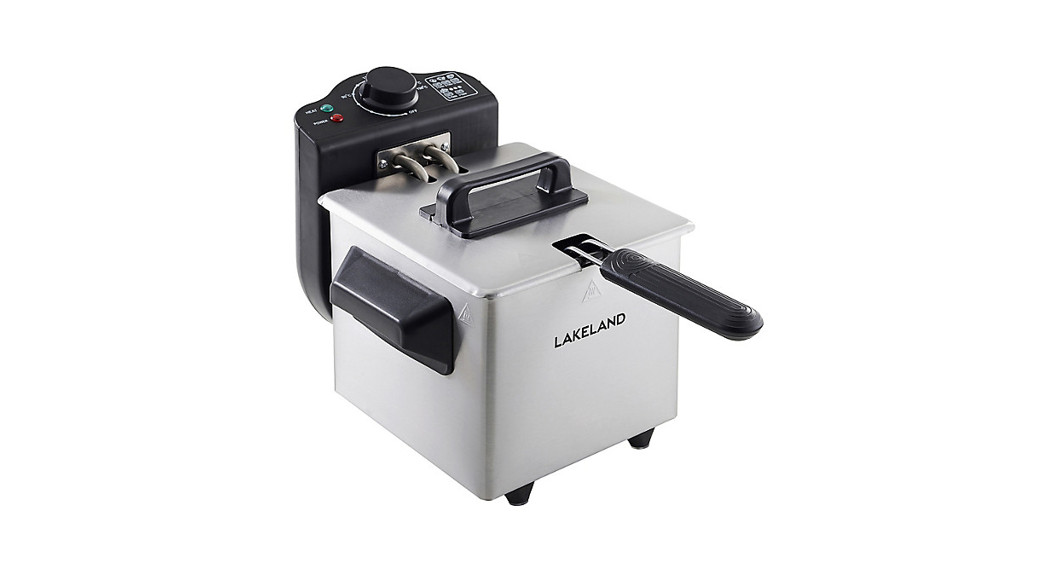
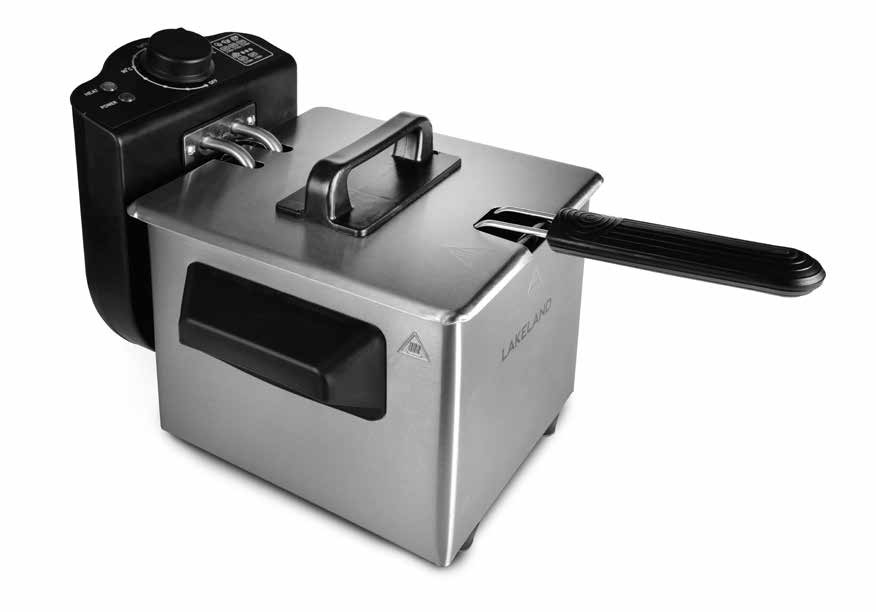
LAKELAND COMPACT DEEP FAT FRYER
Thank you for choosing the Lakeland Compact Deep Fat Fryer.Please take a little time to read this booklet before getting started and keep it in a safe place for future reference.The Lakeland Compact Deep Fat Fryer will sit neatly on the worktop and will help you produce a wide range of foods for meals and treats; from chips, fish, tempura vegetables, chicken, doughnuts, and more.Here at Lakeland, our award-winning family-owned business still offers the same excellent quality, value for money, and exceptional customer service as when we founded the company back in the 1960s.Our products are hand-picked and thoroughly tested so you can be sure that everything your purchase will be a pleasure to use for many years to come.
PRODUCT FEATURES
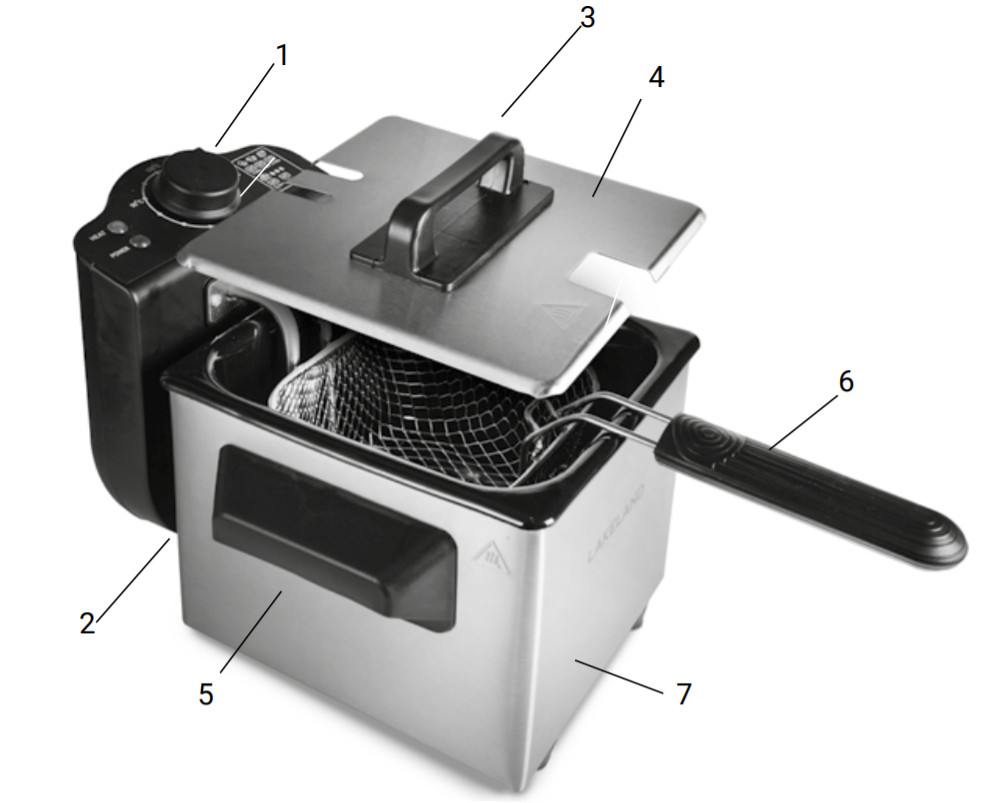 |
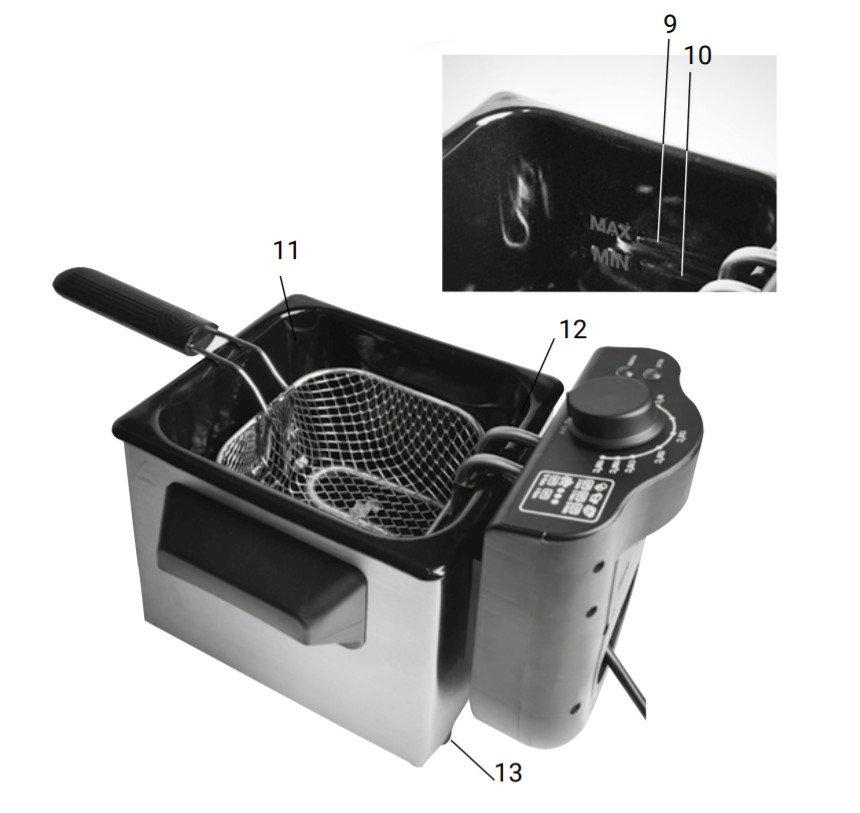 |
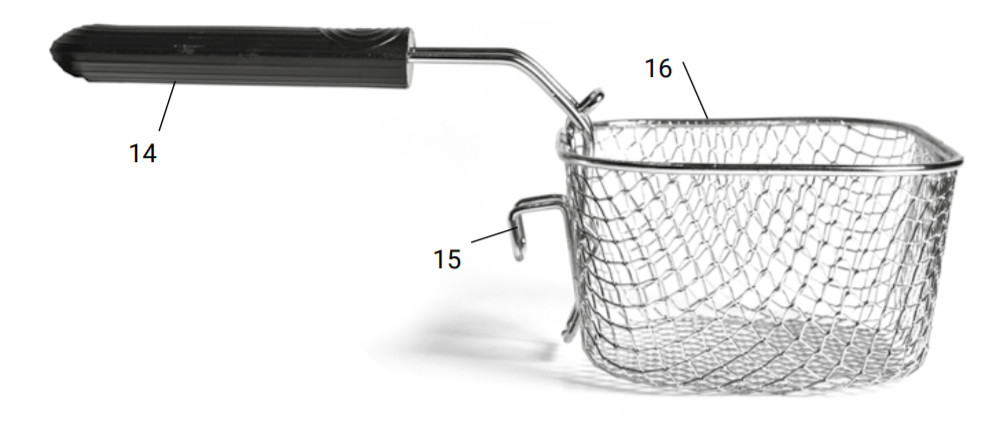 |
| 1. Control panel2. Control panel mounting plate3. Lid handle4. Lid5. Housing carry handles6. Fryer basket handle7. Base unit (stainless steel housing) | 9. Maximum oil level10. Minimum oil level11. Tank12. Heating element13. Non-slip feet14. Removable basket handle15. Basket rest16. Basket |
CONTROL PANEL
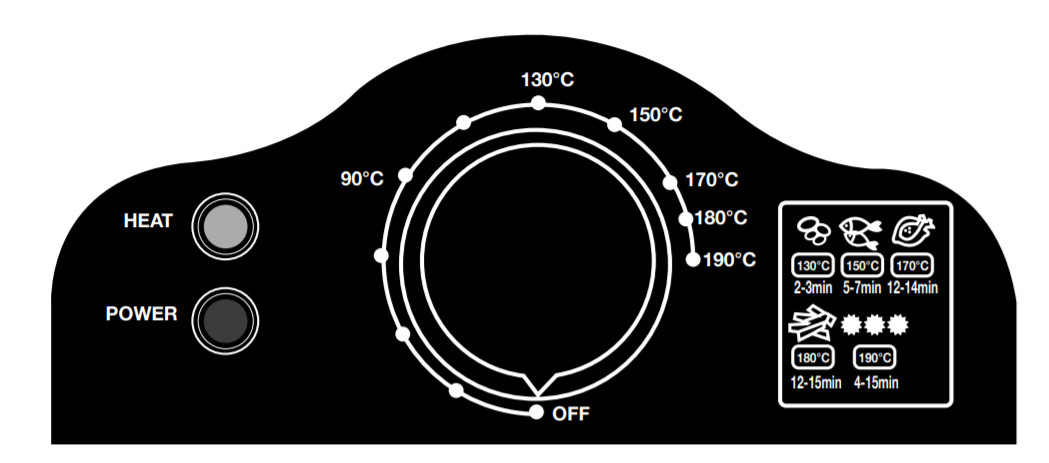
Temperature Control DialThe temperature control dial turns the Fryer on and sets the desired temperature for frying.Power LightThe power light illuminates when the Fryer is on.Heat LightThe heat light will go off when the set temperature has been reached. This light will switch back on as the appliance has lost heat whilst food as been added. This is normal and will switch back off once the appliance is back to the set temperature.Reset FeatureTo protect against damage due to overheating, the appliance will auto turn off should it overheat.Once the appliance has cooled down, you will need to switch the reset button to turn it on again.
SAFETY CAUTIONS
Carefully read all the instructions before using the appliance and keep it in a safe place for future reference. Always follow these safety cautions when using the appliance to avoid personal injury or damage to the appliance. This appliance should be used only as described in this instruction book.
- This appliance can be used by children aged from 8 years and above and persons with reduced physical, sensory or mental capabilities or lack of experience and knowledge if they have been given supervision or instruction concerning the use of the appliance in a safe way and understand the hazards involved.Children shall not play with the appliance. Cleaning and user maintenance shall not be done by children unless they are older than 8 and supervised.
- Make sure your electricity supply matches the voltage shown on the appliance.
- Ensure all packaging materials and any promotional labels or stickers are removed from the appliance before the first use.
- Always inspect the appliance before use for noticeable signs of damage. Do not use if damaged or has been dropped. In the event of damage, or if the appliance develops a fault contact the Lakeland customer care team on 015394 88100.
- Do not use this appliance if the lead is damaged. If the lead is damaged it must be replaced, contact the Lakeland customer care team on 015394 88100.
- Always use the appliance on a dry, level, heat-resistant surface.
- Unplug from the mains when not in use and before cleaning. To disconnect, turn the socket to “off” and remove the plug from the mains socket.
- Do not use any accessories or attachments with this appliance other than those recommended by Lakeland.
- To protect against fire, electric shock, or personal injury, do not immerse the cord, plug, or unit in water or other liquids.
- Do not leave the lead hanging over the edge of a kitchen table or worktop. Avoid contact between the lead and hot surfaces.
- For indoor use only.
- For domestic use only. It is not suitable for commercial use, or for use outdoors.
- This appliance should be used for the preparation of food as described within the instructions for use that accompany it.
- Always ensure that your hands are dry before removing the plug from the mains socket Never pull the plug out of the mains socket by its lead.
- To avoid injury or possible fire, do not cover the appliance when in use.
- Do not connect this appliance to an external timer or remote control system.
- An earthed extension cable may be used with care. The electrical rating of the cable should be at least as great as the appliance. Do not allow the cable to hang over the edge of the worktop or touch any hot surfaces.
- This appliance complies with the basic requirements of Directives 2014/30/EC (Electromagnetic Compatibility) and 2014/35/EU (Low Voltage Directive).
- WARNING: A cut-off plug inserted into a 13 amp socket is a serious safety (shock) hazard. Ensure the cut-off plug is disposed of safely.
 CAUTION: The plastic bags used to wrap this appliance or the packaging may be dangerous. To avoid the risk of suffocation, keep these bags out of reach of babies and children. These bags are not toys.
- Do not heat the Fryer without putting oil in the tank first.
- Do not use the Fryer unless it is fully assembled.
- Oil must be filled to the minimum level at least and not exceed the maximum level.
- Do not attempt to move this appliance or empty the oil when the oil or appliance is still hot. Cool completely before moving.
- Though the tank can be completely immersed in water to clean, it must be thoroughly dried before next use to prevent electric shock.
- Do not add food with an excess of moisture to the hot oil.
- Do not cover the Fryer or block the air vents in the lid whilst in use.
- Avoid lifting the lid when cooking food in the Fryer, as this will decrease the temperature of the oil. Use the window to check the progress of your cooking.
- On completion of frying, always raise the basket and wait a few seconds to allow steam pressure to subside.
- Do not place the Fryer on or near a hot gas or electric burner, or in or near a heated oven.
- Take great care to ensure that the handle is firmly locked into place on the basket.See ‘Attaching the basket handle’.
- Do not place utensils or oversized pieces of food into the Fryer.
- Do not use to boil water.
- Switch off and unplug the Fryer from the socket before cleaning and when not in use. Always allow the fryer to cool down completely before cleaning.
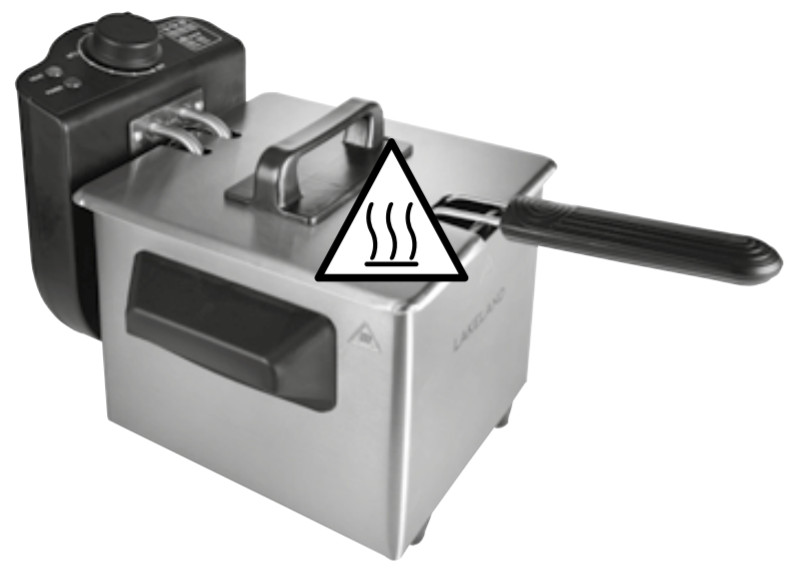
WARNING – HOT SURFACES
The surfaces marked with this symbol will get very hot during use and will stay hot after use.Serious hot oil burns may result from a deep fryer being pulled off a countertop. Do not allow the power cord to hang over the edge of a counter where it may be grabbed by children or become entangled with the user.To prevent injury, DO NOT TOUCH. Allow the appliance and oil to cool completely before handling this appliance, and always use the handles. Use this fryer with caution, use gloves.
SETTING UP THE COMPACT DEEP FAT FRYER AND USING IT FOR THE FIRST TIME
- Unpack the Fryer, basket, and basket handle. Remove all the packaging materials.WARNING: Do not plug in the appliance when the control panel is not fully assembled and installed on the base unit. Only plug in the Fryer when the unit is fully assembled and the heating element is immersed in oil.
- Wash the tank, base unit, lid, basket, and basket handle in warm soapy water, dry thoroughly.WARNING: Do not immerse the control panel, cord, or plug in water.
- When you first use the Fryer there may be an odor, this is normal and will stop after a few uses.
- Before first use, fill the oil tank with oil to the MAX level, heat it for about10 minutes at 150ºC, let it cool down completely, then drain out the oil.
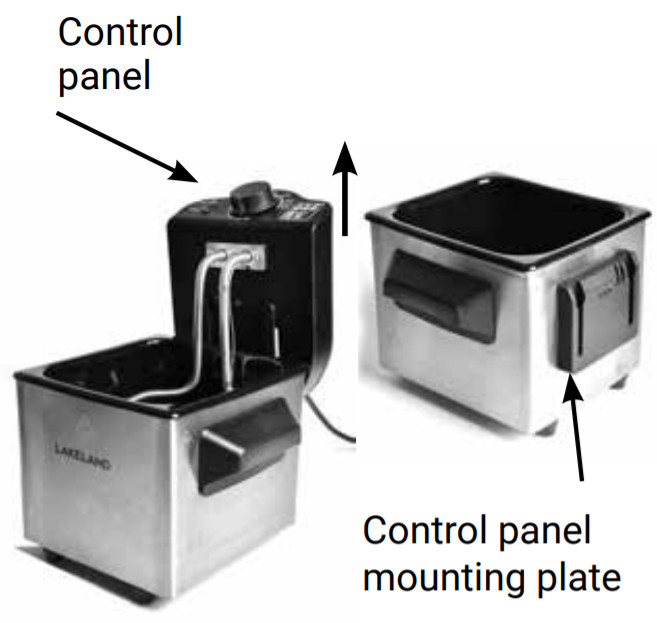
ATTACHING THE CONTROL UNIT TO THE BASE UNIT
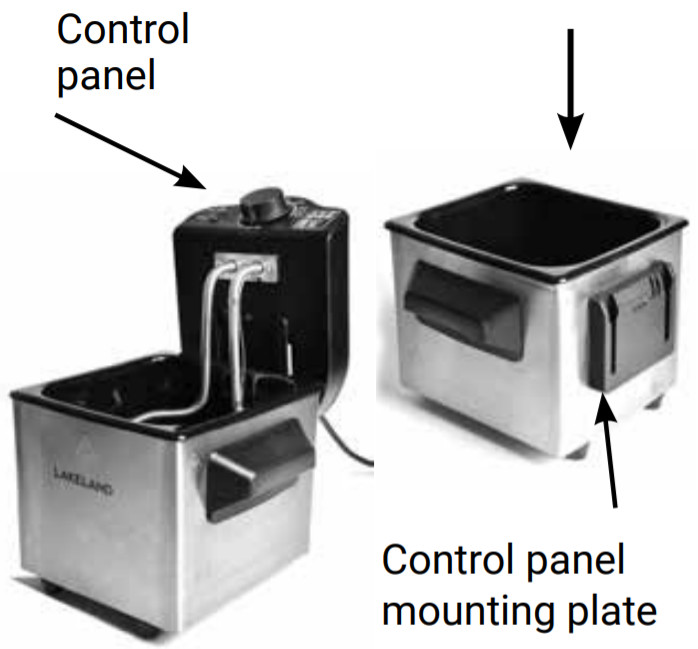
- To attach the control panel to the base, make sure the tank is already inside the base unit.
- With the heating element facing the direction of the tank, slide the control panel onto the control panel mounting plate situated on the back of the base unit.
- Make sure the control panel is secure, as an automatic safety switch will prevent the appliance from switching on.
ATTACHING THE BASKET HANDLE
| 1. Take the basket handle with the two metal prongs facing downwards. | 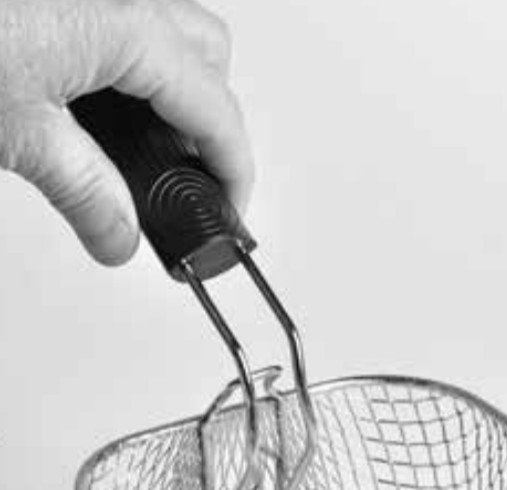 |
| 2. Squeezing the prongs together, slot them into the two holes in the handle attachment on the inside of the basket. | 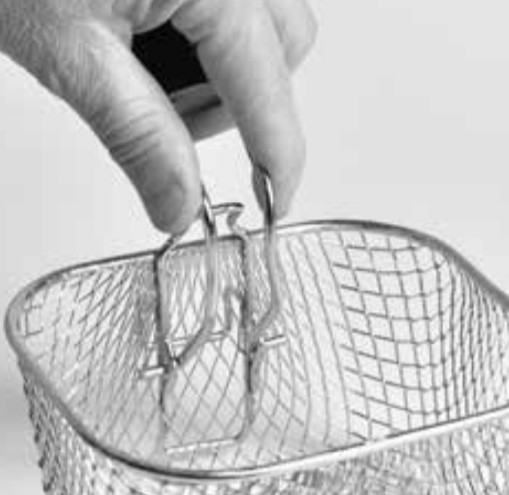 |
| 3. Pull the handle down until it clicks onto the edge basket. | 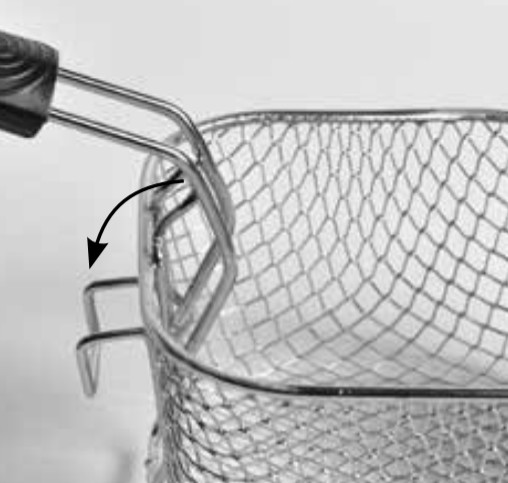 |
| 4. Take great care to ensure that the handle is firmly locked into place on the basket. The handle will feel very secure and look like this. | 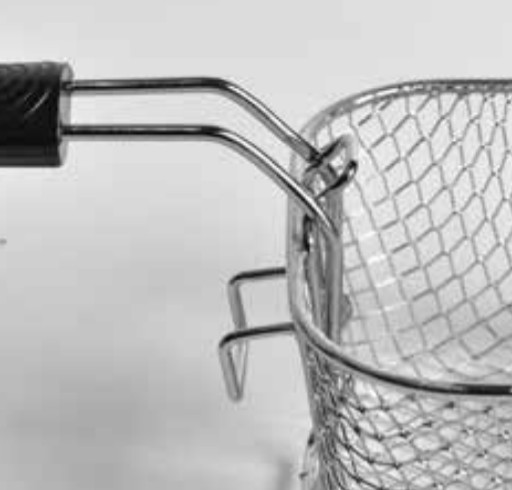 |
INSTRUCTIONS FOR USE
WARNING: Do not heat the Fryer without putting oil in the tank first. Oil must be filled to the minimum level and must not exceed the maximum level. If the Fryer is switched on with no oil in the tank, the appliance will automatically cut out.This is a safety mechanism and will permanently damage the appliance.WARNING: Do not use the Fryer under wall-mounted cupboards, which may prevent the lid from fully opening. Do not leave the Fryer unattended when it is switched on.FILLING THE OIL RESERVOIR
- Pour the oil into the tank making sure that it is between the “MIN” and “MAX” fill lines.
- Do not underfill or overfill. The oil levels must be maintained between the minimum and the maximum levels marked inside the tank.
- You can use blended vegetable oil, corn oil, or rapeseed oil. Do not use olive oil.Never mix old and new oil together or different oils.
PREHEATING
- WARNING: Never plug in the appliance before filling the tank with oil. Always unplug the appliance when it is not in use.
- Make sure that the oil level in the tank is between the “MAX” and “MIN” fill lines inside the tank.
- Place the lid onto the Fryer.
- Insert the plug into the wall socket. The power-on light will illuminate red.
- Turn the temperature control to the desired temperature to turn on the appliance.Select the frying temperature according to the food to be cooked, see ‘Guide to ingredients and cooking times’.
- The heat light will illuminate at first and go off when the set temperature is reached.
FILLING THE FRYING BASKET AND FRYING
- WARNING: When frying frozen foods, remove the frying basket from the deep fryer before filling because the oil will spatter and cause burns.
- CAUTION: When frying frozen foods such as French fries, remove any ice from frozen food prior to frying. Failure to do so may cause the fryer to overflow when food is placed in the oil.
- Do not fill the basket when it is immersed in the hot oil.
- Place the food in the basket. Do not drop the food into the hot cooking oil. Do not overfill it and never exceed the 2/3 depth of the basket. For optimum results and shorter frying time, fry smaller quantities.
- Immerse the basket into the tank carefully and slowly so that you do not splash the oil.
- Replace the lid on the appliance while it is trying to protect you from any splashes of oil when the food is cooking.
- Use the viewing window to view your food or lift the basket out of the oil and hook it onto the side of the tank to have a look.
- When the cooking period is over, carefully remove the lid, lifting it up away from you to allow the steam to escape before removing the lid completely. Keep your face away from the top of the appliance to avoid burns caused by escaping steam.Avoid standing too close to the deep fryer while it is working.
- Turn the temperature control to the “OFF” position, to turn off the Fryer.
- Switch off at the socket and unplug the Fryer.
- Lift up the basket by the handle and hook on the edge of the tank to allow the oil to drain.
- Once the oil has drained from the basket, the basket may be lifted off. Place your cooked food on kitchen paper to soak up any excess oil, then serve.
WARNING: Always let the appliance cool completely (approximately 2 hours) before cleaning or storing. Never carry or move the appliance with hot oil inside.CAUTION: The metal surfaces of the appliance become hot during use. Do not touch the sides of the appliance while it is in use.RESET FEATURE
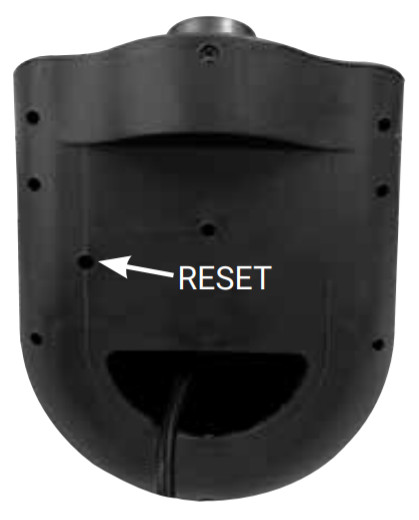
- Should the appliance auto turn off due to overheating turn off and unplug the appliance from the wall socket.Let the appliance and the oil in the oil reservoir cool completely.
- After the appliance has cooled completely, lift the control panel and using the tip of a ballpoint pen or pencil, push the thermostat reset button that is located on the inside of the control panel.
- Re-assemble the control panel to the base unit of the Fryer and then you may resume frying.
GUIDE TO INGREDIENTS AND COOKING TIMES
This table is only an approximate guide to cooking times for different foods. The exact time may be different depending on actual quantity, personal cooking preferences, size and thickness of pieces, etc.You can then use these ingredients in your favorite recipes and dishes.In general, use lower settings for delicate foods (vegetables, fish) and higher settings for frozen foods, chips, and chicken.
| Food | Temperature |
Time |
|
| Onion rings | 130°C | 2 – 3 min. | |
| Fish | 150°C | 5 – 7 min. | |
| Chicken | 170°C | 12 – 14 min. | |
| Fries | 180°C | 12 – 15 min. | |
| Frozen food | 190ºC | 4 – 15 min. |
HINTS AND TIPS
OIL
- We recommend using vegetable oil, corn oil or rapeseed oil. Always check your oil is recommended for deep frying. Do not mix different oils or new and old oil together.
- Always start with clean oil. To keep your oil clean, strain out any pieces of food after use, and replace the oil completely after 10 uses, or longer than 6 months.
- To keep your food crisp and prevent it from soaking up too much oil, always make sure your oil is heated to the right temperature before you start cooking.
- If you are battering food before frying, drain off any excess batter before adding it to the Fryer. This will prevent you from having to clean pieces of batter from the oil.
- The tank is removable, tip and pours are to empty. Do not attempt to empty the oil when the oil or appliance is still hot. Cool completely (approximately 2 hours) before moving, changing the oil, cleaning and storing the Fryer.
- You can store the oil in a separate pot after use or store it inside the Fryer. If storing oil in the Fryer you must keep the oil clean, do not store the oil inside the Fryer for more than 4 weeks. If you do not use the Fryer frequently, empty the oil after each use, clean the appliance and store the oil separately until it is required again.
COOKING
- A wide variety of savory and sweet foods can be cooked in the Fryer.
- Generally, foods with a batter or coating on the outside need a higher cooking temperature.
- Frozen foods and raw meat should be cooked at a lower temperature, so they heat through without browning too quickly.
- Foods cooked from frozen will require longer cooking times than fresh items.
- Remove any excess ice from the outside of frozen food, to avoid the oil spitting when you add food to the Fryer.
- If you are planning on cooking several different foods in the Fryer in one cooking session, start with the least strongly flavored food first, so that the oil does not transfer flavors between the foods.
- Foods containing sugar can turn brown outside without being fully cooked inside, cook them at a lower temperature. Always check the food is fully cooked before serving.
- We strongly recommend that you do not fill the basket with more than two-thirds full of food.
- Cook food for the recommended amount of time, according to the ‘Guide to ingredients and cooking times’ or the instructions on the food packet.
- CAUTION: Remember that the food may begin to turn golden brown before it is fully cooked, check the food is fully cooked before serving.
FREQUENTLY ASKED QUESTIONS
Question: Why is the Fryer not operating?Answer: The control panel may not be slotted correctly onto the base unit.If assembled correctly check that the plug is turned on at the wall socket.The reset safety feature may have tripped, turn off the appliance and unplug from the wall socket.Allow to cool completely, then remove the control panel and press the thermostat reset button.The temperature control dial may be switched off, ensure that at your the desired temperature is selected.Question: Why is there an unpleasant smell when the oil is heating up?Answer: The oil may be dirty. Switch off the Fryer, allow the oil to cool completely, and follow the instructions under Care and Cleaning. Fill the tank with clean oil.Question: Why is my fried food not crispy?Answer: The oil is not hot enough. Make sure it has fully heated to your required temperature before cooking or increase the cooking temperature.There may be too much food in the basket, remove some of the food from the basket.Question: Why is my food not cooked completely?Answer: The food ingredients may be too large, cut them into smaller pieces.You may need to increase the cooking time as it is not long enough.The temperature of the oil is too hot, lower the temperature of the oil to allow the food to cook completely.Question: Why is the oil overflowing?Answer: Either there is too much oil in the fryer or too much food in the basket, check that the oil is below the maximum level or reduce the amount of food in the basket. Or, the food in the fryer is too wet.Make sure excess water has been removed from the food.Question: Why is the oil foaming?Answer: The oil has been used too often, turn off the fryer and allow it to cool completely, refill the oil reservoir with new oil.
CARE AND CLEANING
Switch off and unplug the Fryer from the socket before cleaning and when not in use. Always allow the Fryer to cool down completely (approximately 2 hours) before cleaning.Do not attempt to empty the oil when the oil or appliance is still hot. Cool completely before moving, tip and pour to empty.
- Pour the used oil into a suitable container for disposal.
- Before the first use and after every use, clean each part thoroughly.
- The control panel can be removed for cleaning by sliding the control box upward off its mounting plate.
- Never immerse the control panel, cord, or plug unit in water or any other liquid. To clean, wipe with a clean damp cloth and dry before storing.
- The base unit, tank, frying basket, removable handle, and lid can be washed in hot, soapy water.
- Check all parts before reassembling.
- Re-assemble the control panel to the base unit of the Fryer by sliding it back onto the mounting plate.
- Do not use steel wool, or abrasive cleaners, or materials.
- The filter does not require regular cleaning. In case you do need to clean it, remove the filter cover on the lid under which is the filter. Wash both parts in warm soapy water. Rinse and dry.Replace the parts back into place.
- Store the Fryer with the power cable loosely coiled. Never wrap it tightly around the product.
TECHNICAL INFORMATION
| Power: | 1000W. |
| Voltage: | 220-240V. |
| Frequency: | 50Hz. |
| Flex length approx. | 75cm (29½”). |
ELECTRICAL CONNECTIONS
THIS APPLIANCE MUST BE EARTHEDThe appliance is fitted with a fused three-pin plug to BS1363 which is suitable for use in all homes fitted with sockets to current specifications.CHANGING THE 7 AMP FUSEUse a 7 amp BS1362 fuse. Only BSI or ASTA-approved fuses should be used. If you are unsure which plug or fuse to use, always refer to a qualified electrician.Note: After replacing or changing a fuse on a molded plug that has a fuse cover, the cover must be refitted to the plug; the appliance must not be used without a fuse cover.If lost, replacement fuse covers can be obtained from an electrical shop. This appliance complies with the following EU Directives: 2014/35/EU (Low Voltage Directive) and 2014/30/EU (EMC Directive).
 RECYCLING YOUR ELECTRICALS
 Along with many other high street retailers, Lakeland has joined a schemewhereby customers can take their unwanted electricalproduct to recycling points set up around the country.Visit www.recycle-more.co.ukto find your nearest recycling point.
![]()
Alexandra Buildings, Windermere, Cumbria, UK LA23 1BQTel: +44(0)15394 88100lakeland.co.uk
References
[xyz-ips snippet=”download-snippet”]