![]()
INSTRUCTION BOOKLETMINI MULTICOOKER Model: 31822
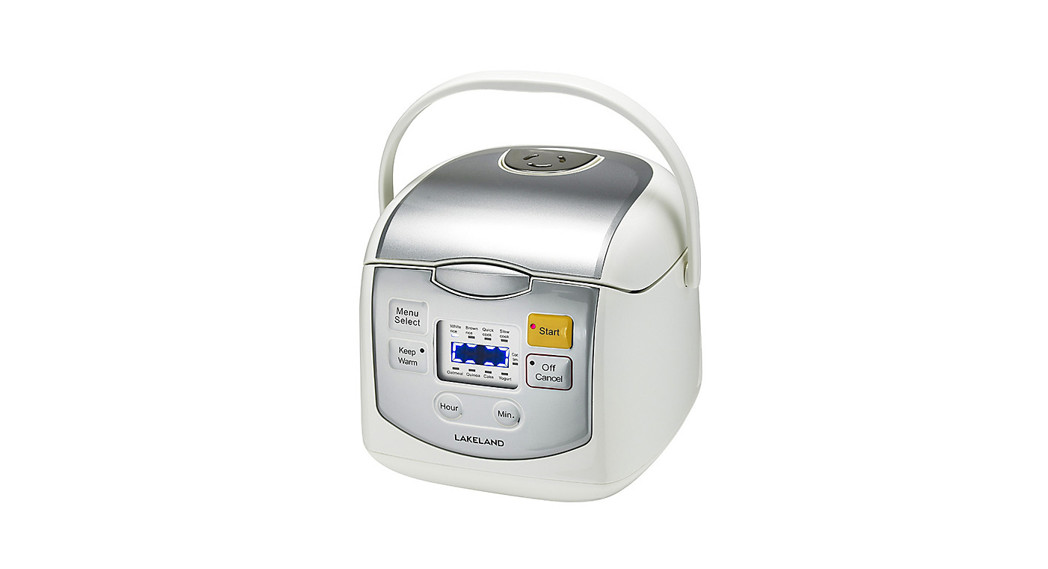
LAKELAND MINI MULTICOOKER
Thank you for choosing the Lakeland Mini Multicooker. Please take a little time to read this booklet before getting started and keep it in a safe place for future reference.Small but mighty, this versatile Mini Multicooker will cook up breakfast, lunch, dinner, or dessert at the touch of a button. With eight cooking programs and intelligent heating, you’ll get perfect results each time. The automatic `Keep Warm’ function will then keep everything hot until you’re ready to serve.Here at Lakeland, our award-winning family-owned business still offers the same excellent quality, value for money, and exceptional customer service as when we founded the company back in the 1960s.Our products are hand-picked and thoroughly tested so you can be sure that everything you purchase will be a pleasure to use for many years to come.
PRODUCT FEATURES
 |
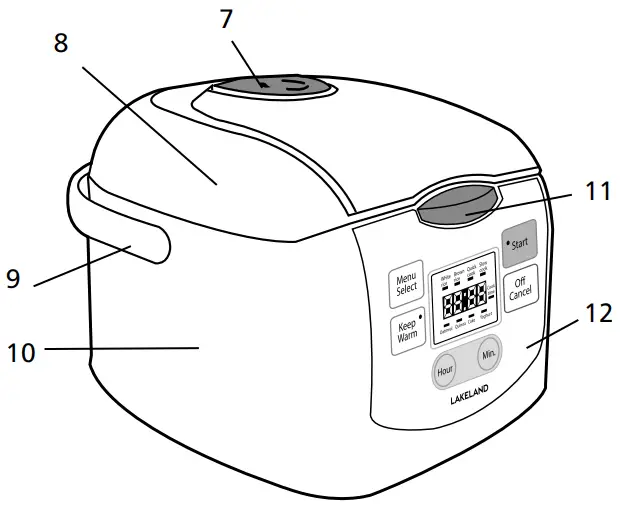 |
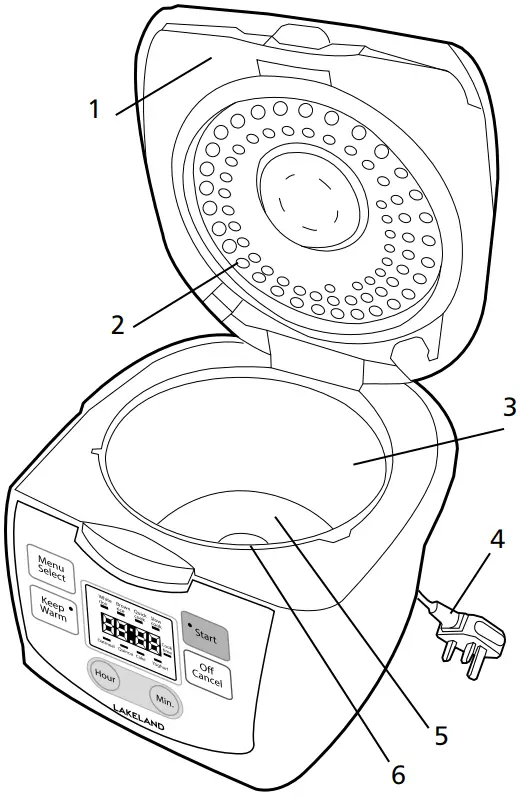
| 1. Lid2. Detachable inner lid3. Cooking pot4. Power cord and plug5. Heating plate6. Temperature sensor | 7. Steam vent8. Main unit9. Handle10. Cooker11. Open button12. Control panel |
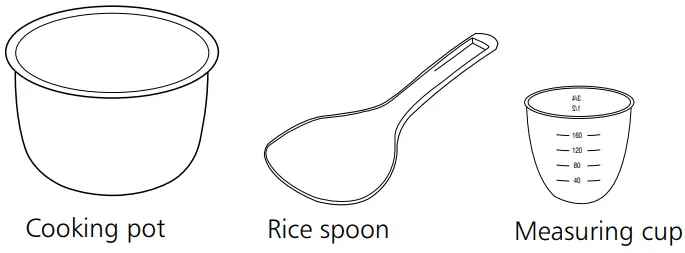
ACCESSORIES
CONTROL PANEL
- MENU/SELECT Press to select one of the 8 cooking programs
- KEEP WARM the Mini Multicooker will automatically go into `Keep Warm’ mode when programs are completed, except the `Yogurt’ program. The light will illuminate when keeping warm and the display will indicate how long it has been keeping warm
- HOUR press to adjust the cooking time in hours
- MINUTES press to adjust the cooking time in minutes
- OFF/CANCEL press to cancel the previous operation or to stop the `Keep Warm’ function
- START to activate the selected cooking program. The light will illuminate when cooking
- COOKING TIME LIGHT this will illuminate when cooking
SAFETY CAUTIONS
Carefully read all the instructions before using the appliance and keep it in a safe place for future reference. Always follow these safety cautions when using the appliance to avoid personal injury or damage to the appliance. This appliance should be used only as described in this instruction book.
- This appliance can be used by children aged 8 years and above and persons with reduced physical, sensory or mental capabilities or lack of experience and knowledge if they have been given supervision or instruction concerning the use of the appliance in a safe way and understand the hazards involved. Children shall not play with the appliance. Cleaning and user maintenance shall not be done by children unless they are older than 8 and supervised.
- Make sure your electricity supply matches the voltage shown on the appliance.
- Ensure all packaging materials and any promotional labels or stickers are removed from the appliance before the first use.
- Always inspect the appliance before use for noticeable signs of damage. Do not use if damaged or has been dropped. In the event of damage, or if the appliance develops a fault contact the Lakeland customer care team on 015394 88100.
- Do not use this appliance if the lead is damaged. Contact the Lakeland customer care team on 015394 88100.
- Always use the appliance on a dry, level, heat-resistant surface.
- Unplug from the mains when not in use and before cleaning. To disconnect, turn the socket to “off ” and remove the plug from the mains socket.
- Do not use any accessories or attachments with this appliance other than those recommended by Lakeland.
- To protect against fire, electric shock, or personal injury, do not immerse the main unit, cord, plug, or lid in water or other liquids.
- Do not leave the lead hanging over the edge of a kitchen table or worktop. Avoid contact between the lead and hot surfaces.
- For indoor use only.
- For domestic use only.
- This appliance should be used for the preparation of food as described within the instructions for use that accompany it.
- Always ensure that your hands are dry before removing the plug from the mains socket. Never pull the plug out of the mains socket by its lead.
- To avoid injury or possible fire, do not cover the appliance when in use.
- Do not connect this appliance to an external timer or remote control system.
- An extension cable may be used with care. The electrical rating of the cable should be at least as great as the appliance. Do not allow the cable to hang over the edge of the worktop or touch any hot surfaces.
- Do not insert any objects into the steam vent.
- Do not put your hands or face close to the steam vent, or touch the steam vent during use or until the appliance has fully cooled down. Steam may burn.
- Do not have any other pots, other than the cooking pot provided in the Mini Multicooker.
- Do not put ingredients directly into the appliance without the cooking pot in place.
- To avoid damaging the cooking pot, do not use metal utensils to stir or remove food.
- This appliance complies with the basic requirements of Directives 2014/30/EU (Electromagnetic Compatibility) and 2014/35/EU (Low Voltage Directive).
- WARNING: A cut-off plug inserted into a 13amp socket is a serious safety (shock) hazard. Ensure the cut-off plug is disposed of safely.
 CAUTION: The plastic bags used to wrap this appliance or the packaging may be dangerous. To avoid the risk of suffocation, keep these bags out of reach of babies and children. These bags are not toys.
- Do not use the cooking pot if the non-stick coating is scratched, cracked, or detached as this may cause overheating.
- Keep the Mini Multicooker away from hot ovens, gas burners, flames, and other hot surfaces.
- Do not move or tilt the Mini Multicooker when the cooking pot contains ingredients.
- Allow the Mini Multicooker to cool completely before moving, cleaning, or storing.
- Never fill the cooking pot with ingredients beyond the maximum level mark, be careful when heating food that could froth. Do not operate empty.
- If food is spilled inside the cooker, switch off and unplug at the socket, and allow it to cool completely before cleaning (see Care and Cleaning page 19).
- The cooking pot of your Mini Multicooker has a non-stick coating, do not use hard or sharp objects for stirring and or mixing food inside. Only use wooden or heat-resistant plastic utensils to stir and serve your food. Do not leave utensils inside the cooking pot during cooking.
- Always use plastic, wooden, or silicone spatulas, as metal utensils will damage non-stick coatings.
WARNING HOT SURFACES
- For all surfaces marked with this injury, the symbol will get very hot during use. To preventDO NOT TOUCH.
- Switch off and unplug the Mini Multicooker and let it cool completely before touching these surfaces.
- Take care when opening the Mini Multicooker as burning hot steam can escape, and fat can spit which can burn. Steam will escape from the steam vent during cooking. Keep your face and hands away from the lid and steam vent in the lid during cooking and when opening.
- Use oven gloves when removing the cooking pot from the Mini Multicooker, and ensure you place it on a heat-resistant board.

USING YOUR MINI MULTICOOKER FOR THE FIRST TIME
Warning: Do not insert the plug into a socket and turn on the Mini Multicooker until you have fully assembled it.
- Unpack the Mini Multicooker, remove all the packaging materials, including the accessories inside the cooker and the protective film on the steam vent.
- Before first use, wipe outer surfaces and inside of the lid with a clean damp cloth.
- Wash the cooking pot and accessories in hot soapy water and dry thoroughly.
- Make sure that all parts are clean and dry before assembling the product.
- During the first use of the appliance an odor may develop, this is normal and will disappear with use.
- Place the appliance on a stable, heat-resistant work surface, at least 20cm away from walls and at least 1 meter from the ceiling, to allow sufficient airflow. Never operate the appliance under cabinets or lighting to avoid damage caused by steam, heat, splashes, and condensation.
- Put the cooking pot inside the Mini Multicooker.
- Slot the end of the power cord into the socket on the side of the Mini Multicooker.
- The Mini Multicooker is now ready to use.

AUDIBLE BEEPA beep will sound when the appliance is connected to a power supply, buttons are pressed and the cooking cycle has finished.
INSTRUCTIONS FOR USE
- Prepare the ingredients according to the recipe following the quantities carefully. Place these evenly in the cooking pot and insert them into the cooker. Please make sure that all ingredients, including liquids, are below the maximum level mark on the inside of the pot.
- Place the cooking pot into the Mini Multicooker ensuring that the pot is firmly in contact with the heating element.
- Close the lid until it clicks into place. Connect the appliance to the power outlet. The appliance will beep and all lights will illuminate once. The display panel will show 4 blue dashes.
- Press the MENU SELECT button to select the program. Once the desired program flashes on the display it is selected. The display will show the default cooking time, if applicable, or show a blue box around the edge.
- When cooking `White Rice’, `Brown Rice’, `Quick Cook’ and `Quinoa’ there will not be any time shown on the display until the food is almost ready. A countdown will then be displayed. This is due to intelligent heating, see page 11.
- If you need to adjust the time, press the HOUR or MINUTE buttons. See the `Cooking Programmes’ table to check the time range you can set the timer for.
- If no buttons are pressed after one minute the Mini Multicooker will beep repeatedly. Press the MENU SELECT button to move through the programs.
- After completion of the program, the Mini Multicooker will beep 5 times. Depending on the setting, the `Keep Warm’ function will start. The `Keep Warm’ light will come on and the display will count up the time.
- To cancel the program at any time, interrupt the cooking process, or interrupt the `Keep Warm’ function, press the OFF/CANCEL button for a couple of seconds.
- To turn off the Mini Multicooker, switch off and unplug at the mains socket.
COOKING PROGRAMMES
Here is an overview of the cooking programs and which type of foods these should be used for. The table below will help you select which program you require:
| Program | Default time | Time range | Increment (Hour) | Increment (Min) | Countdown time appears on the display | Keep warm function? |
| White rice | 1 cup rice to 1 cup water approx.25 mins | N/A | N/A | N/A | It Will does not show until last12 mins remaining. | Yes |
| Brown rice | 1 cup rice to 1 cup water approx.35 mins | N/A | N/A | N/A | It Will does not show until last
12 mins remaining. |
Yes |
| Quick cook | 1 cup rice to 1 cup water approx.15 mins | N/A | N/A | N/A | It Will does not show until the last 6 mins remaining. | Yes |
| Slow cook | 4 hours | 2 — 8 hours | 1 | 10 | Countdown immediately when starts cooking. | Yes |
| Oatmeal | 30 mins | 5 mins – 4 hours | 1 | 5 | Countdown immediately when starts cooking. | Yes |
| Quinoa | 1/2 cup quinoa to 3/4 cup water approx.15 mins | N/A | N/A | N/A | It Will does not show until the last 6 mins remaining. | Yes |
| Cake | 1 hour | 40 mins —2 hours | 1 | 5 | Countdown immediately when starts cooking. | Yes |
| Yogurt | 8 hours | 6 — 12 hours | 1 | 10 | Countdown immediately when starts cooking. | No |
INTELLIGENT HEATING AND COUNTDOWN
For cooking `White Rice’, `Brown Rice’ `Quick Cook’ and `Quinoa’ the Mini Multicooker uses an intelligent microcomputer heating control to ensure delicious results as they cook in different ways. As your favorite rice is cooking, this smart cooking feature continually monitors the temperature to automatically adjust the cooking time and temperature for evenly prepared food.As the countdown timer appears the Mini Multicooker will beep twice and then countdown the final minutes. At the end of the countdown timer, the Mini Multicooker will beep 5 times and then go into `Keep Warm’ mode.
WHITE RICE
- Measure your rice according to the instructions on the packet or with the measuring cup provided. The volume of the measuring cup is about 180ml/150g. Do not fill the cooking pot above the max level.
- Wash the rice until the water is relatively clear and place it into the cooking pot.
- Add water according to the instructions on the packet.
- Place the cooking pot into the main unit, close the lid and check the steam vent is correctly positioned.
- Connect the appliance to a power outlet and switch it on at the socket.
- Press the MENU SELECT button until `White Rice’ appears on the display.
- Press START. The button will light up and `Cook Time’ will illuminate. The indicator lights will flash in a clockwise direction to indicate cooking has begun.
- Using the intelligent heating technology, the countdown timer will show during the last 12 minutes of cooking and will beep twice when it starts.
- When the Mini Multicooker has completed cooking it will beep 5 times and then go into `Keep Warm’ mode. If your rice is cooked, press the OFF/CANCEL button.
- Do not keep rice warm for more than 4 hours.
BROWN RICE
- Measure your rice according to the instructions on the packet with the measuring cup provided. The volume of the measuring cup is about 180ml/150g. Do not fill the cooking pot above the max level.
- Add the rice to the cooking pot and add water according to the instructions on the packet.
- Place the cooking pot into the main unit, close the lid and check the steam vent is correctly positioned.
- Connect the appliance to a power outlet and switch it on at the socket.
- Press the MENU SELECT button until `Brown Rice’ appears on the display.
- Press START. The button will light and `Cook Time’ will illuminate. The indicator lights will flash in a clockwise direction to indicate cooking has begun.
- Using the intelligent heating technology, the countdown timer will show during the last 12 minutes of cooking and will beep twice when it starts.
- When the Mini Multicooker has completed cooking it will beep 5 times and then go into `Keep Warm’ mode. If your rice is cooked, press the OFF/CANCEL button.
- Do not keep rice warm for more than 4 hours.
QUICK COOK
- The Quick cook program is normally used to shorten the amount of time needed to cook rice.
- Add your ingredients to the cooking pot and add water according to the instructions on the packet.
- Place the cooking pot into the main unit, close the lid and check the steam vent is correctly positioned.
- Connect the appliance to a power outlet and switch it on at the socket.
- Press the MENU SELECT button until `Quick Cook’ appears on the display.
- Press START. The button will light and `Cook Time’ will illuminate. The indicator lights will flash in a clockwise direction to indicate cooking has begun.
- Using the intelligent heating technology, the countdown timer will show during the last 6 minutes of cooking and will beep twice when it starts.
- When the Mini Multicooker has completed cooking it will beep 5 times and then go into `Keep Warm’ mode. If your rice is cooked, press the OFF/CANCEL button.
- Do not keep rice warm for more than 4 hours.
SLOW COOK
- The `Slow Cook’ program is used for slow cooking. Adapt the quantity and cooking times of your favorite slow cooker recipes.
- Add your ingredients to the cooking pot according to the recipe.
- Place the cooking pot into the main unit, close the lid and check the steam vent is correctly positioned.
- Connect the appliance to a power outlet and switch it on at the socket.
- Press the MENU SELECT button until `Slow Cook’ appears on the display.
- Press START. The button will light up and `Cook Time’ will illuminate. If the time differs from the cooking time required, you will need to adjust the time of cooking using the HOUR and MINUTE buttons on the control panel. This will then countdown in `HH: MM’ to indicate cooking has begun.
- Stir your food halfway through the cooking cycle. · When cooking is completed, the Mini Multicooker will go into `Keep Warm’ mode. At this point, if you do not want to use the keep warm function, press the OFF/CANCEL button.
OATMEAL
The `Oatmeal’ program is for making porridge or oatmeal with pasteurized milk with low-fat content. To avoid the milk boiling over
- Wash whole-grain cereals thoroughly until the water is clear.
- Grease the cooking pot with a little butter before cooking.
- If you want to reduce or increase the ingredients, do this proportionally and do not exceed the maximum level mark inside the cooking pot.
- Follow the directions on the oatmeal packet.
- You can also use the measuring cup supplied to measure your oatmeal and water/milk. We recommend a ratio of 1:2 (1 cup of oatmeal to 2 cups of water). Do not fill the pan above the max level.
- Place the cooking pot into the main unit, close the lid and check the steam vent is correctly positioned.
- Connect the appliance to a power outlet and switch it on at the socket.
- Press the MENU SELECT button until `Oatmeal’ appears on the display.
- Press START. The button will light up and `Cook Time’ will illuminate. If the time differs from the cooking time required, you will need to adjust the time of cooking using the HOUR and MINUTE buttons on the control panel. This will then countdown in `HH: MM’ to indicate cooking has begun.
- Stir your food halfway through the cooking cycle.
- When cooking is completed, the Mini Multicooker will go into `Keep warm’ mode. At this point, if you do not want to use the keep warm function, press the OFF/ CANCEL button.
- Do not keep oatmeal warm for more than 2 hours.
QUINOA
- Follow the directions on the quinoa packaging.
- You can also use the measuring cup supplied to measure your quinoa and water. We recommend a ratio of 1:2 (1 cup of quinoa to 2 cups of water). Do not fill the pan above the max level.
- Place the cooking pot into the main unit, close the lid and check the steam vent is correctly positioned.
- Connect the appliance to a power outlet and switch it on at the socket.
- Press the MENU SELECT button until `Quinoa’ appears on the display. · Press START. The button will light and `Cook Time’ will illuminate. The indicator lights will flash in a clockwise direction to indicate cooking has begun.
- Using the intelligent heating technology, the countdown timer will show during the last 6 minutes of cooking and will beep twice when it starts.
- When the Mini Multicooker has completed cooking it will beep 5 times and then go into `Keep Warm’ mode. If your rice is cooked, press the OFF/CANCEL button.
- Do not keep quinoa warm for more than 2 hours. CAKE When baking a cake in the Mini Multicooker, we recommend using ready-made cake mixes. Please note that the MAX amount of dry ingredients which can be used is 250g. This is approximately half of the amount of a standard packet of cake mix.
- Follow the instructions on the packaging, mixing the wet and dry ingredients in a bowl.
- To prevent sticking, grease the inside of the cooking pot with butter or margarine.
- Place the cake mix into the cooking pot and then insert it into the main unit, close the lid and check the steam vent is correctly positioned.
- Connect the appliance to a power outlet and switch it on at the socket.
- Press the MENU SELECT button until `Cake’ appears on the display and 1 hour will flash. If the time differs from the cooking time on the cake packaging, you will need to adjust the time of cooking using the HOUR and MINUTE buttons on the control panel.
- Press START. The button will light up and `Cook Time’ will illuminate. This will then countdown in `HH: MM’ to indicate cooking has begun.
- When baking is completed, the Mini Multicooker will go into `Keep Warm’ mode. At this point, you can remove the cake from the Mini Multicooker and place it on a wire rack to cool.
YOGURT
- Take 125ml of starter yogurt (natural plain live yogurt) from the fridge so it has time to warm up closer to room temperature while you are preparing the milk.
- Start with 1250ml of milk. Add this to a saucepan and bring to a boil using a whisk to mix occasionally, this helps make a thicker yogurt. Then leave to cool down to between 32°C to 43°C, check with a cooking thermometer to make sure it has cooled to the correct temperature.
- Add the natural yogurt to the cooled milk and whisk to mix gently. Take care not to whip or beat the mixture too vigorously, the consistency should be smooth with no lumps of yogurt.
- Pour the mixture into the cooking pot.
- Place the cooking pot into the main unit, close the lid and check the steam vent is correctly positioned.
- Connect the appliance to a power outlet and switch it on at the socket.
- Press the MENU SELECT button until `Yogurt’ appears on the display. The timer will automatically be set for 8 hours. You can adjust the time if required (see table on page 11).
- Press START. The button will light up and `Cook Time’ will illuminate. If the time differs from the cooking time required, you will need to adjust the time of cooking using the HOUR and MINUTE buttons on the control panel. This will then countdown in `HH: MM’ to indicate cooking has begun.
- When cooking has finished, remove the yogurt from the Mini Multicooker. There may be a small amount of liquid (whey) on top of the yogurt. This is normal.
- Stir and refrigerate for at least 3 hours.
WARNING: Do not keep yogurt in the refrigerator for more than 4 days after you have made it. Do not use expired milk or expired yogurt, only use fresh ingredients.
KEEP WARM
- If the cooking program has a keep warm mode, the `Keep Warm’ button will illuminate green and the timer on the display will count up in ‘HH: MM’.
RECIPE
Please note: All spoon measurements are standard metric, so 1 tsp is 5ml and 1 tbsp is 15ml. We recommend using measuring spoons for accurate results.Cooking times will vary depending on the foods you choose, so lift the lid and cook for a couple more minutes if needed.
CLASSIC BEEF CASSEROLE – Serves 2Cooking time: 4 hours
| Ingredients | Quantity |
| Vegetable oil | 1 tbsp |
| Stewing beef | 750g, roughly chopped |
| Onion | 1 medium, thinly sliced |
| Carrot | 1 medium, thinly sliced |
| Garlic | 1 clove, crushed |
| Fresh parsley | 1 tbsp, finely chopped |
| Tomato puree | 35g |
| French mustard | 1 tsp |
| Red wine | 125m1 |
| Beef stock | 65m1 |
WHAT YOU DO
In a sauté pan, heat the oil and brown the pieces of beef. Remove the meat and put it onto a plate.Add the onion, carrot, and garlic to the sauté pan. Stir and cook until the onion softens and turns pale gold. Transfer the vegetables to the Mini Multicooker cooking pot.Add the beef to the cooking pot and stir in the parsley, tomato puree, mustard, wine, and stock.Close the lid, switch on the Mini Multicooker and select the `Slow cook’ program for 4 hours or until the beef is tender. Serve with creamy mashed potato.
FREQUENTLY ASKED QUESTIONS
| Question: | Why is the cooking temperature not high enough? |
| Answer: | Do not unnecessarily open the lid during use, as this will release heat.Check that the lid of the appliance is closed properly. Ensure there is nothing obstructing the lid from closing properly and that the seal around the edge is not damaged. |
| Question: | Why hasn’t the food been cooked properly? |
| Answer: | You may have selected the wrong program for the ingredients. Ensure the ingredients and recipe correspond with the cooking program chosen.The ingredients may be too large, chop them smaller. Alternatively, there may be too much food in the Mini Multicooker – check the amount against the recipe or recommended. |
| Question: | Why is my food overcooked? |
| Answer: | After cooking, your food may have been left too long in the `Keep Warm’ mode.The quantity or size of food may be incorrect for the cooking program selected. |
| Question: | Why hasn’t my cake risen and it is burnt? |
| Answer: | If your cake is burnt, you may not have greased the cooking pot prior to baking. Ensure the base and sides of the cooking pot are greased with oil or butter.If your cake hasn’t risen, you may not have beaten the eggs and sugar enough, or the flour was not sifted before adding the other ingredients. Your chosen recipe may not be suitable to use with the Mini Multicooker. |
CARE AND CLEANING
- Unplug the Mini Multicooker, remove the power cord and let it cool completely before cleaning.
- Clean thoroughly before using for the first time and after every use.
- Check the parts for wear or damage after every few uses.
- The steam vent in the lid is removable for cleaning. When this is removed the detachable lid can be removed to be cleaned.
- Remove and wash the cooking pot, steam vent, detachable lid, and accessories in hot soapy water, rinse and dry thoroughly. Do not wash any parts in the dishwasher.
- Do not use abrasive cleaners, scourers, or steel wool when cleaning the cooking pot.
- Stubborn residue can be removed with a soft sponge or soft nylon brush and warm water. If food has cooked onto the bottom of the cooking pot, fill with hot soapy water and leave to soak for 10 minutes before cleaning.
- Never immerse the base in water or any other liquid.
- To clean the outer surfaces, wipe with a clean damp cloth and dry thoroughly before storing.
- Store the Mini Multicooker with the power cord loosely coiled. Never wrap it tightly around the product.
TECHNICAL INFORMATION
- Power: 400W.
- Voltage: 220 – 240 V.
- Frequency: ~50/60 Hz.
ELECTRICAL CONNECTIONS
THIS APPLIANCE MUST BE EARTHEDThe appliance is fitted with a fused three-pin plug to BS1363 which is suitable for use in all homes fitted with sockets to current specifications.
CHANGING THE 3 AMP FUSEUse a 3 amp BS1362 fuse. Only BSI or ASTA-approved fuses should be used. If you are unsure which plug or fuse to use, always refer to a qualified electrician.Note: After replacing or changing a fuse on a molded plug that has a fuse cover, the cover must be refitted to the plug; the appliance must not be used without a fuse cover. If lost, replacement fuse covers can be obtained from an electrical shop. This appliance complies with the following EU Directives: 2014/35/EU (Low Voltage Directive) and 2014/30/EU (EMC Directive).
RECYCLING YOUR ELECTRICALS
 report this ad
 Along with many other high street retailers, Lakeland has joined a scheme whereby customers can take their unwanted electrical products to recycling points set up around the country.Visit www.recycle-more.co.uk to find your nearest recycling point.
LakelandAlexandra Buildings, Windermere, Cumbria, UK LA23 1BQTel: +44(0)15394 88100www.lakeland.co.uk
References
[xyz-ips snippet=”download-snippet”]