
LAKELAND Coffee Pod Machine
 Thank you for choosing the Lakeland Coffee Pod Machine.Please take a little time to read this booklet before you use your appliance and keep it in a safe place for future reference.Quick and easy to use, enjoy a variety of coffee using one machine. The Coffee Pod Machine uses Dolce Gusto®*, Nespresso®* and compatible coffee pod capsules to make coffee just the way you want it.Here at Lakeland, our award-winning family-owned business still offers the same excellent quality, value for money and exceptional customer service as when we founded the company back in the 1960s. Our products are hand-picked and thoroughly tested so you can be sure that everything you purchase will be a pleasure to use for many years to come.* Brand trademarks are owned by third parties.
PRODUCT FEATURES
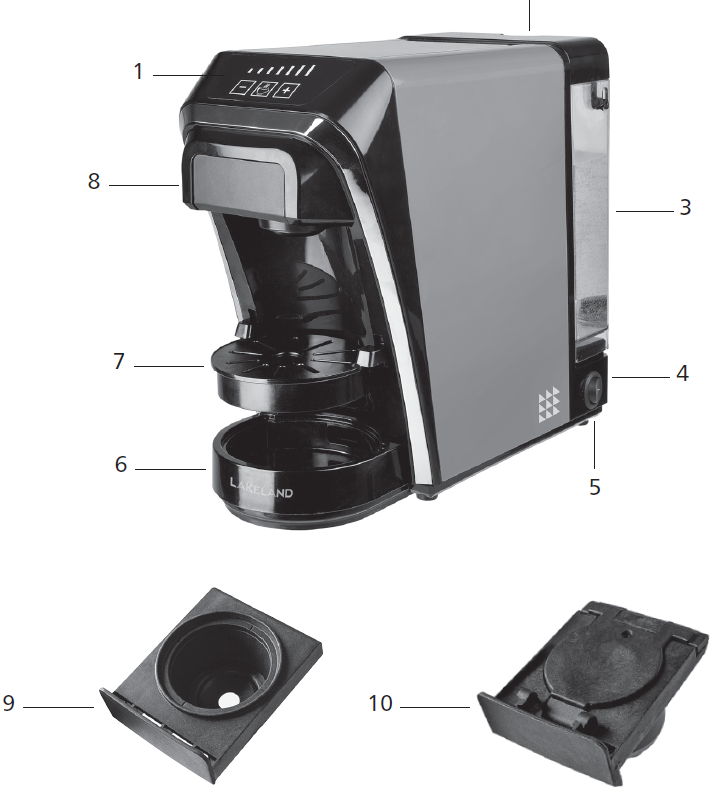
- Touchscreen control panel
- Water tank lid
- Removable water tank
- Cord and plug
- Power switch
- Drip tray holder
- Adjustable drip tray
- Coffee pod drawer
- Dolce Gusto® capsule holder
- Nespresso® capsule holder
TOUCHSCREEN CONTROL PANEL FUNCTIONS
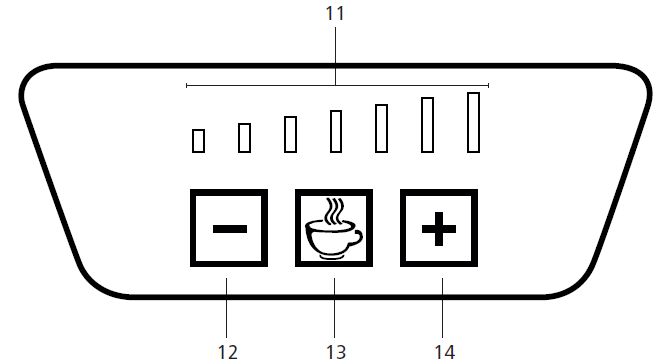
11. Coffee strength indicator12. Reduce water amount button13. Start button14. Increase water amount button
SAFETY CAUTIONS
Carefully read all the instructions before using the appliance and keep in a safe place for future reference. Always follow these safety cautions when using the appliance to avoid personal injury or damage to the appliance. This appliance should be used only as described in this instruction book.
- This appliance can be used by children aged from 8 years and above and persons with reduced physical, sensory or mental capabilities or lack of experience and knowledge if they have been given supervision or instruction concerning use of the appliance in a safe way and understand the hazards involved. Children shall not play with the appliance. Cleaning and user maintenance shall not be done by children unless they are older than 8 and supervised.
- Make sure your electricity supply matches the voltage shown on the appliance.
- Ensure all packaging materials and any promotional labels or stickers are removed from the appliance before the first use.
- Always inspect the appliance before use for noticeable signs of damage. Do not use if damaged or has been dropped. In the event of damage, or if the appliance develops a fault contact the Lakeland customer care team on 015394 88100.
- Do not use this appliance if the lead is damaged. If the lead is damaged it must be replaced with a special lead. Contact the Lakeland customer care team on 015394 88100.
- Always use the appliance on a dry, level, heat resistant surface.
- Unplug from the mains when not in use and before cleaning. To disconnect, turn the socket to “off“ and remove the plug from the mains socket.
- Do not use any accessories or attachments with this appliance other than those recommended by Lakeland.
- To protect against fire, electric shock or personal injury, do not immerse cord, plug or lid in water or other liquids.
- Do not leave the lead hanging over the edge of a kitchen table or worktop. Avoid contact between the lead and hot surfaces.
- For indoor use only.
- For domestic use only.
- This appliance should be used for preparation of drinks as described within the instructions for use that accompany it.
- Always ensure that your hands are dry before removing the plug from the mains socket. Never pull the plug out of the mains socket by its lead.
- To avoid injury or possible fire, do not cover the appliance when in use.
- Do not connect this appliance to an external timer or remote control system.
- An extension cable may be used with care. The electrical rating of the cable should be at least as great as the appliance. DO NOT allow the cable to hang over the edge of the worktop or touch any hot surfaces.
- This appliance complies with the basic requirements of Directives 2014/30/EU(Electromagnetic Compatibility) and 2014/35/EU (Low Voltage Directive).
- WARNING: A cut off plug inserted into a 13amp socket is a serious safety (shock) hazard. Ensure the cut off plug is disposed of safely.
- CAUTION: The plastic bags used to wrap this appliance or the packaging may be dangerous. To avoid risk of suffocation, keep these bags out of reach of babies and children. These bags are not toys.
- DO NOT place the appliance on or near a gas or electric oven, or any hot surfaces.
- DO NOT move the appliance while it is switched on.
- The water tank must be filled with water to at least the ‘MIN’ mark, before it is switched on. DO NOT fill beyond the ‘MAX’ mark, or the appliance may spit boiling water.
- CAUTION: The piercing blades are very sharp in the Nespresso® capsule holder. Care must be taken when handling the capsule holder, emptying and during cleaning.
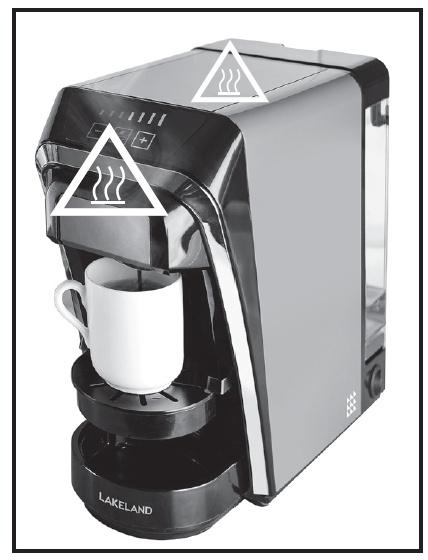
WARNING – HOT SURFACES
- DO NOT open the water tank lid or reach into the water tank when the appliance is switched on. Hot steam will escape and is a scalding hazard. Ensure the water tank lid is fully closed.
- DO NOT place any cloths or objects over the steam vent.
- Never place your arm over the appliance when in use, hot steam will escape and may cause injury.
- Surfaces marked with this symbol will be hot when the appliance is on and for some time after it is switched off.
- Allow the appliance to fully cool down before moving, cleaning or storing.

USING THE COFFEE POD MACHINE FOR THE FIRST TIME
- Unpack the Coffee Pod Machine, remove all the packaging materials.
- Before first use, wipe the main unit with a clean damp cloth.
- Wash the removable water tank, drip tray holder, adjustable drip tray and capsule holders in hot soapy water, rinse and dry thoroughly.
- CAUTION: The piercing blades are very sharp in the Nespresso® capsule holder. Care must be taken when handling the capsule holder, emptying and during cleaning.
- Make sure all parts are clean and dry before assembling the product.
- Place the appliance on a dry, level heat resistant surface.
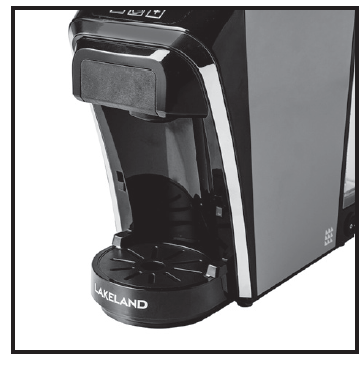
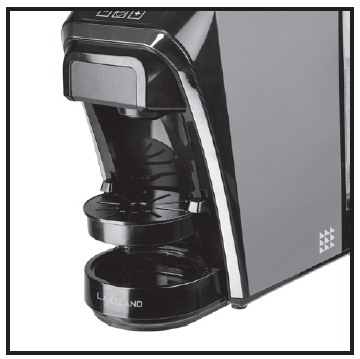
ADJUSTING THE HEIGHT OF THE DRIP TRAY HOLDER
- The adjustable drip tray can be adjusted according to the height of the cups.
- Lower position for full coffee mugs and glasses.
- Higher position for espresso cups.
FILLING THE WATER TANK
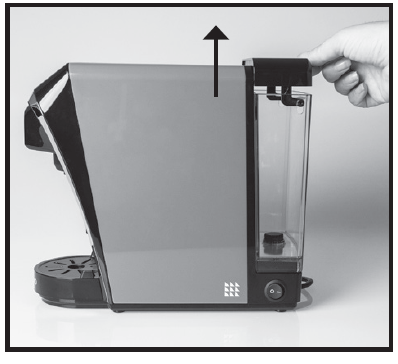
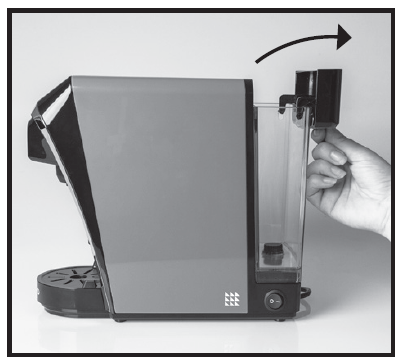
- To open the water tank lid, lift it straight up.
- Then tilt the lid backwards in to the open position.
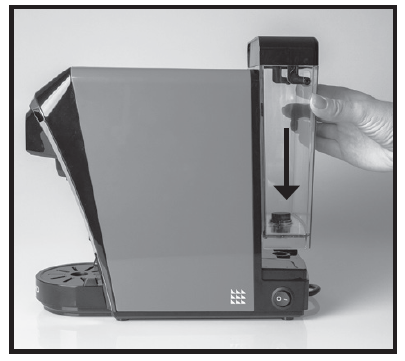
- The water tank can be removed from the appliance for easier filling or cleaning. Lift the whole tank straight up from the machine.
- To replace the removable water tank make sure the groove lip is located over the notch on the back of the appliance.

WARNING: To avoid the risk of burning or scalding from hot coffee or steam DO NOT fill beyond the ‘MAX’ mark, or the appliance may spit boiling water. Always make sure it is filled above the ‘MIN’ mark.
- Before first use, the fill the removable water tank with fresh cold water. Put the Nespresso® capsule holder in position with NO coffee pod capsules present. Make sure a capsule holder is in place otherwise hot water will spit out and may scald.
- Put a tall empty cup on the adjustable drip tray cover.
- Plug in and switch on at the socket and press the power switch on the side of the appliance.
- The button icons will illuminate when turned on and flash, after about 30 seconds the coffee strength indicator will be fully lit.
- Press the button to maximum capacity, then press the ‘START’ button to start the cycle, this will illuminate blue and flash.
- The appliance will begin to pump water and start brewing, the blue lights behind the coffee strength indicator will decrease during the brewing process down to the smallest bar on the left.
- The water is not suitable for drinking and should be thrown away.
- Repeat this three times.
- When you switch on the appliance for the first time there may be a slight burning smell. This is normal for a new product and will disappear after a few uses.
INSTRUCTIONS FOR USE
- When you switch on the appliance for the first time there may be a slight burning smell. This is normal for a new product and will disappear after a few uses.
- Fill the water tank with fresh cold tap water between the ‘MIN’ and ‘MAX’ marks.
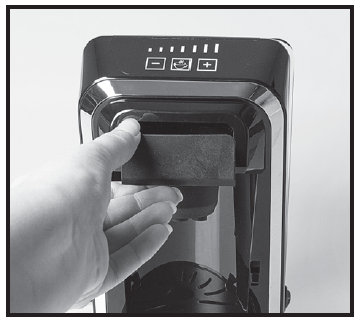
- Remove the coffee pod drawer from the appliance and use the appropriate capsule holder for your choice of coffee pod capsule.
INSERTING A NESPRESSO® CAPSULE OR COMPATIBLE COFFEE POD
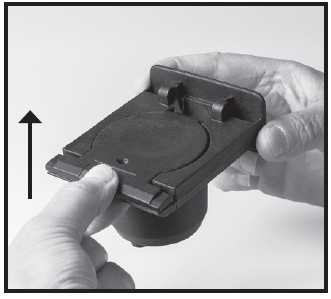
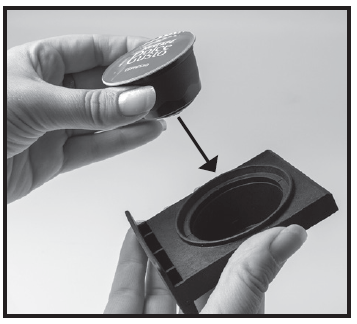
- Lift the Nespresso® capsule holder lid up.
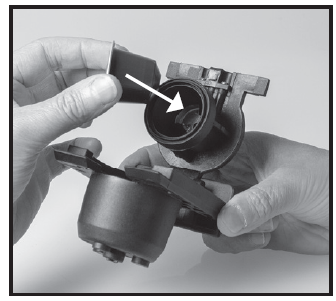
- Insert the coffee pod capsule in to the underside of the lid, with the domed bit first.CAUTION: The piercing blades are very sharp in the Nespresso® capsule holder. Care must be taken when handling the capsule holder, emptying and during cleaning.
- Press firmly to ensure the coffee pod capsule is fully inserted and the top of the pod is flush with the holder.
- Close the lid in the reverse order.
 CAUTION: The piercing blades are very sharp in the Nespresso® capsule holder. Care must be taken when handling the capsule holder, emptying and during cleaning.
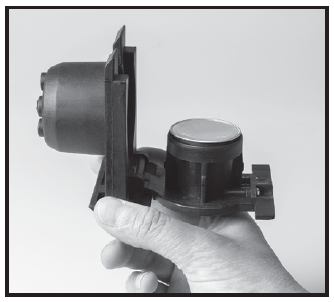
INSERTING A DOLCE GUSTO® POD
- Place the correct coffee pod capsule into the holder with the domed part facing downwards. Press firmly to ensure that it is fully inserted and the top of the pod is flush with the holder.
- Insert the capsule holder in to the machine.
- Plug in and switch on at the socket and press the power switch on the side of the appliance.
- The button icons will illuminate blue and flash, to show that the coffee machine is heating.
- Adjust the drip tray cover according to the height of the cup and place a cup on top of the drip tray cover. Make sure that the cup is in the middle of the drip tray cover and under the coffee outlet.
- Put a capsule into the correct capsule holder, and then put into the coffee pod drawer.
- All of the control panel will illuminate blue and stay fully lit when the coffee machine has reached the correct temperature.
- Adjust the cup capacity i.e the amount of water by pressing the buttons.
- Press the ‘START’ button to brew your coffee. The ‘START’ button will illuminate and keep lit.
- As your coffee is brewing the lights on the coffee strength indicator will decrease to the small bar on the left hand side.
- When the button icons are fully lit, it indicates that brewing has finished.
- It’s normal that there is a blowing sound from the appliance at this stage, and some water may continue to drip into the drip tray, because the appliance is leaking pressure.
- Take out the capsule holder with care, as it will be hot and throw the spent capsule away. Each coffee pod capsule can only be used once, otherwise it will affect the taste of coffee.
- The machine will enter into standby mode after brewing, the machine will automatically turn off if there’s no operation within 15 minutes.
- Brew with fresh water for a better tasting coffee.
- To prevent the residue of milk in the capsule holder or coffee pod drawer when using the Dolce Gusto® capsule holder; after the capsule has brewed, put the empty Dolce Gusto® capsule holder back into the brewing chamber and continue to brew two cups of water to clean the holder and the holder chamber.

FREQUENTLY ASKED QUESTIONS
Question: Why is the ‘START’ button not working?Answer: Check the plug is correctly inserted into the socket, and the power button is in the ‘ON’ position.
Question: Why are the buttons flashing?Answer: There may be insufficient water in the removable water tank.
Question: Why is coffee overflowing from the capsule holder?Answer: There is too much water in the removable water tank. Do not fill beyond the ‘MAX’ mark on the water tank. The capsule holder may not be in the correct position.
Question: Why is the coffee not brewing or the coffee machine not turning on?Answer: The removable water tank may be empty or the appliance is not plugged in. Check the removable water tank is filled and the appliance is plugged in. The thermostat inside the appliance may need to cool down completely before you can make another coffee. This will take around 5 minutes.
Question: Why is the coffee maker taking a long time to brew?Answer: The coffee maker may need cleaning or descaling. See ‘Care and Cleaning’.
CARE AND CLEANING
- Switch off and unplug the appliance from the socket before cleaning.
- Always allow the appliance to cool down completely before cleaning.
- Clean thoroughly before using for the first time and after every use.
- Check the parts for wear or damage after every few uses.
- Do not use abrasive cleaners or steel wool.
- Never immerse the main unit in water or any other liquid. To clean the outer surfaces, wipe with a clean damp cloth and dry thoroughly before storing.
- CAUTION: The piercing blades are very sharp in the Nespresso® capsule holder. Care must be taken when handling the capsule holder, emptying and during cleaning.
- Wash all removable parts in hot soapy water, rinse and dry thoroughly before reusing or storing.
- Rinse the water tank once a day.
- If the coffee maker is not going to be used for a period of time, empty the water tank completely.
- Store the Coffee Pod Machine with the power cable loosely coiled. Never wrap it tightly around the product.
DESCALING
- Bitter tasting coffee, a ‘sizzling’ noise during brewing, or a prolonged brewing time compared to normal indicate that the appliance may need descaling.
- We recommend cleaning the water tank once a month or when the appliance has made 25 brews (or more frequently in hard water areas).
- Ensure there is no coffee pod in the capsule holder.
- Mix 2 cups of cold water and 2 cups of white wine vinegar, and pour into the water tank. You can use a liquid descaler suitable for coffee makers, and read carefully the instructions on its package before use.
- Put a large container on the drip tray cover (it’s suggested to use a container with more than an 800ml capacity).
- Put the empty Nespresso® capsule holder without a capsule into the brewing chamber and connect the machine to a power socket.
- Press and hold the ‘START’ button , then turn the power button to position ‘ON’. The buttons will flash in sequence. Press the START button . The appliance will then enter the cleaning procedure. The machine begins to pump water and start descaling.
- The descaling has finished when it has pumped all the water in the water tank, buttons illuminate and flash in sequence.
- Fill the removable water tank with 600ml of clean fresh water into the water tank. Press the start button and the appliance will enter the cleaning procedure.
NOTE: Never refill the water reservoir with the used descaling solution because it is no longer active.WARNING: Never interrupt the descaling process. Malfunctions caused by scale deposited inside the appliance are not covered by the guarantee if the descaling process is not carried out properly.
ELECTRICAL CONNECTIONS
THIS APPLIANCE MUST BE EARTHEDThe appliance is fitted with a fused three-pin plug to BS1363 which is suitable for use in all homes fitted with sockets to current specifications.
CHANGING THE 10 AMP FUSEUse a 10 amp BS1362 fuse. Only BSI or ASTA approved fuses should be used. If you are unsure which plug or fuse to use, always refer to a qualified electrician.Note: After replacing or changing a fuse on a moulded plug which has a fuse cover, the cover must be refitted to the plug; the appliance must not be used without a fuse cover. If lost, replacement fuse covers can be obtained from an electrical shop. This appliance complies with the following EU Directives: 2014/35/EU (Low Voltage Directive) and 2014/30/EU (EMC Directive).
RECYCLING YOUR ELECTRICALSAlong with many other high street retailers, Lakeland has joined a scheme whereby customers can take their unwanted electrical products to recycling points set up around the country. Visit www.recycle-more.co.uk to find your nearest recycling point.
 Alexandra Buildings, Windermere, Cumbria, UK LA23 1BQTel: +44(0)15394 88100 lakeland.co.uk
References
[xyz-ips snippet=”download-snippet”]