LAKELAND
INSTRUCTION BOOKLETPRESSURE COOKERS
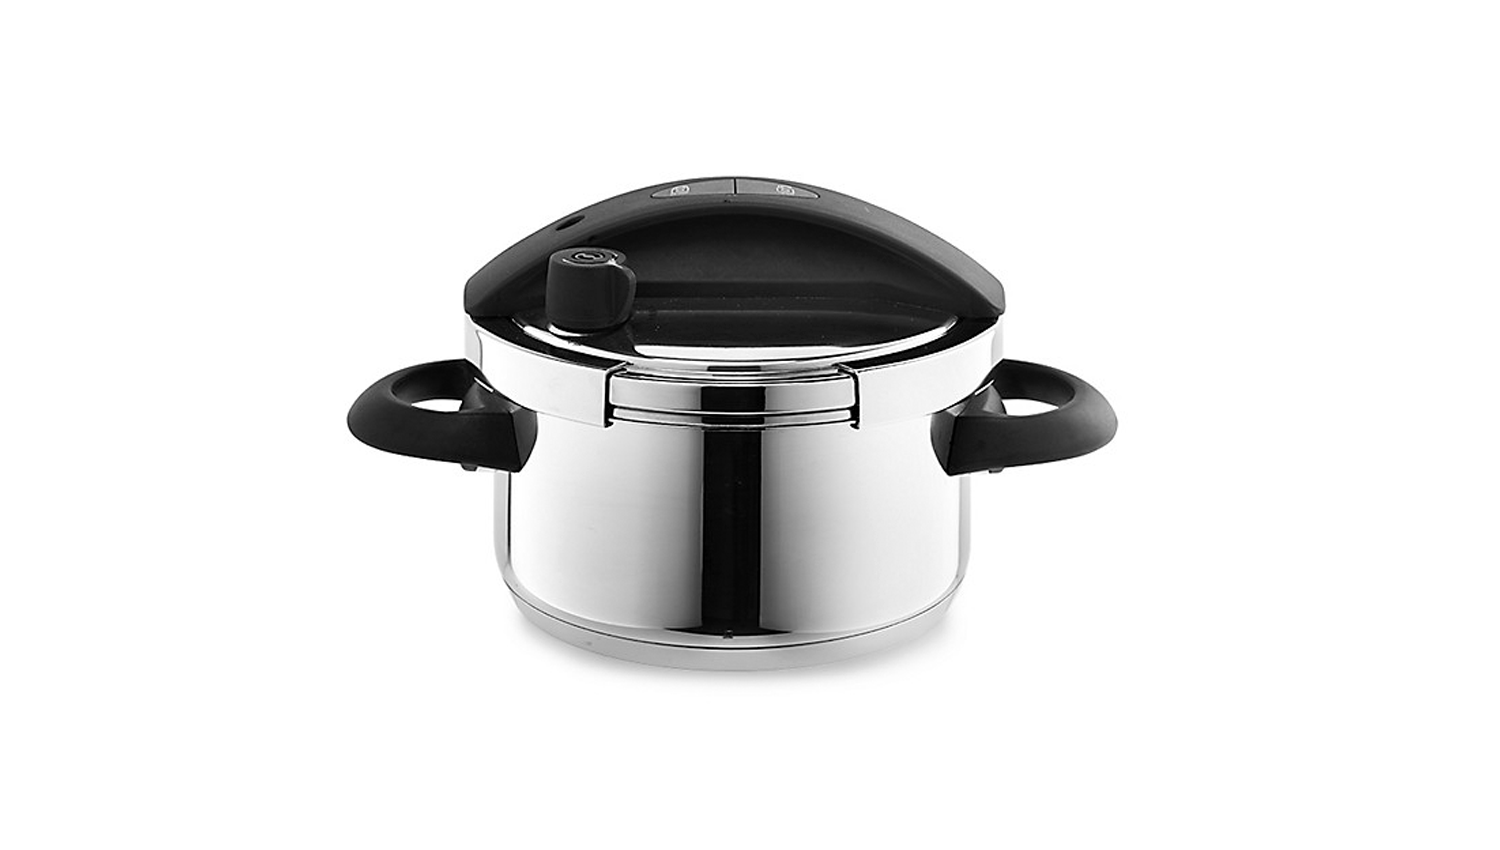
LAKELAND PRESSURE COOKER
Thank you for choosing the Lakeland Pressure Cooker.Before using your Pressure Cooker please read these instructions carefully and keep them for future reference.
Saving considerable time and energy consumption, the traditional method of pressure cooking is enjoying a revival in today’s kitchens. With your Lakeland Pressure Cooker, wholesome and delicious meals can be made from scratch in a fraction of the time thanks to the heat and pressure of steam, including home-made soups, juicy whole roast chickens, melt-in-the-mouth stews and casseroles, pasta dishes and well-loved desserts like steamed puddings.
Here at Lakeland, our award-winning family-owned business still offers the same excellent quality, value for money and exceptional customer service as when we founded the company back in the 1960s.
Our products are hand-picked and thoroughly tested so you can be sure that everything you purchase will be a pleasure to use for many years to come.
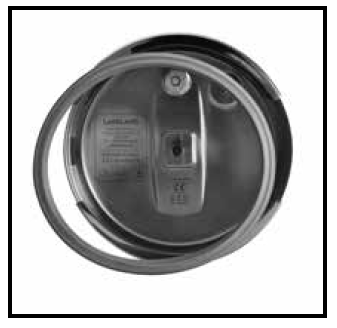
PRODUCT FEATURES
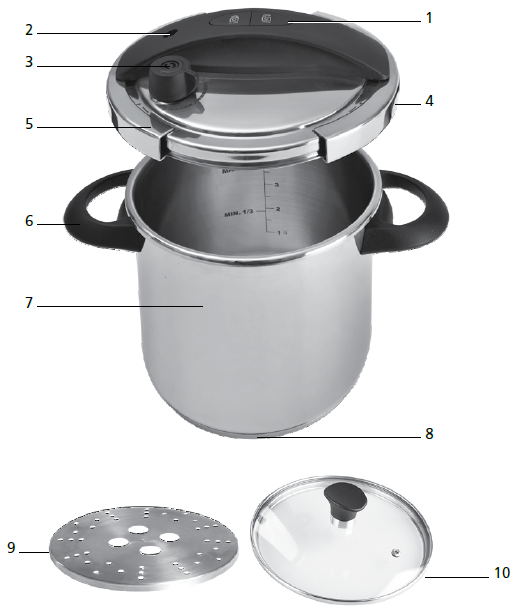
- One-hand closing system
- Red safety valve
- Pressure control valve
- Safety window
- Lid with sealing ring
- Heat-resistant handles on cooking pot
- Cooking pot
- Thermal sandwich bottom
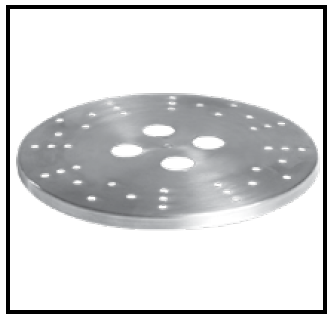
- Trivet
- Additional glass lid
SAFETY CAUTIONS
Before using your Pressure Cooker for the first time, please read these instructions carefully and keep them for future reference.
When using your Pressure Cooker, always follow these safety precautions to avoid injuring yourself or damaging the appliance. The Pressure Cooker should only be used for its intended domestic use as described in this user manual.

Please note that improper use may cause damage.Remove all packaging, labels and stickers before using your Pressure Cooker for the first time.
CAUTION: Plastic bags and packaging may be dangerous. To avoid risk of suffocation, keep them out of reach of babies and children. These bags are not toys.
- This Pressure Cooker must not be used by any persons who are not familiar with how to use it.
- The Pressure Cooker must never be left unattended when it is under pressure.
- DO NOT allow children in the vicinity of the Pressure Cooker when it is in use or play with the Pressure Cooker.
- This Pressure Cooker is not intended for use by people (including children) with reduced physical, sensory or mental capabilities, or lack of experience or knowledge, unless they have been supervised or instructed in using the appliance by someone responsible for their safety.
- Only use the Pressure Cooker for its intended purpose of pressure cooking, for indoor, domestic use only.
- Check that the safety valve, the pressure control valve and the sealing ring are clean and functional before each use.
- The cooking process generates pressure. It is therefore important to ensure that the Pressure Cooker is correctly sealed before use and to read and follow the safety instructions and usage instructions, as improper use can cause personal injury or damage to the Pressure Cooker.
- This Pressure Cooker does not feature a pressure indicator. Please observe the steamthat is emitted from the pressure control valve – this is a sign that pressure is buildingup inside the cooking pot.
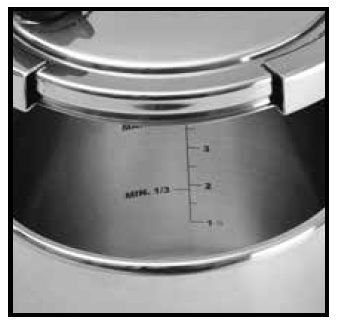
- DO NOT fill the Pressure Cooker below the specified minimum filling quantity ‘MIN’ e.g. liquid and food being cooked.
- DO NOT exceed the specified maximum filling quantity ‘MAX’ e.g. liquid and food being cooked. When cooking food stuffs which expand during cooking, such as rice or dehydrated vegetables, do not fill the cooker to more than half of its capacity.
- Only use the sources of heat that are specified in the instructions for use. To maintain optimum energy efficiency use pan on burner of corresponding diameter, and if using a gas hob adjust the flame so that it does not extend up the sides of the pan. Sliding pans on ceramic hobs could scratch the surface of the hob.
- To avoid injury or fire risk, do not cover the Pressure Cooker during use.
- The Pressure Cooker must never be used under pressure to fry or deep-fry food in oil.
- The Pressure Cooker must not be used in the oven as this will damage it. Do not use in an oven, in a microwave or under the grill.
- See the extra instructions on preparing special dishes in the instructions for use in the ‘READ BEFORE FIRST USE’ section, pages 7-9.
- When the cooking pot is hot, only use the handles to touch it. DO NOT allow handles to extend over burners or over the front of the hob. Always use dry oven gloves or cloth when handling the cooking pot, as handles may get hot during and after cooking. Be careful when moving pans containing hot oil or liquids.
- The Pressure Cooker must never be forced open. Before opening the Pressure Cooker, make sure that the pressure has been completely released. (For more information, see the instructions for use, page 11.
- While steam is being released, keep your hands, head and body away from the area in which the steam is released. Steam can scald and burn. Always make sure the red pressure indicator has dropped before opening the lid. See page 13 ‘PARTS/FUNCTIONS’.
- DO NOT place hot pans on delicate surfaces always use a trivet.
- After cooking meat with a skin (e.g. ox tongue) which may swell under the effect of pressure, do not prick the meat while the skin is swollen; you might be scalded.
- When cooking doughy food, gently shake that cooker before opening the lid to avoidfood ejection.
- DO NOT put the lid of the Pressure Cooker (or any parts of the lid) in the dishwasher for cleaning.
- Only use genuine spare parts.
- Always check the Pressure Cooker for damage before use. If a spare or repair is required, it has been damaged, dropped or becomes faulty, do not use it. Contact Lakeland customer services on 015394 88100 (see back page).
- Any stains on the base of the cooking pot can be easily removed with lemon or vinegar. To remove limescale deposits, please follow the instructions.
- Never use scouring agents or steel scouring pads to clean the Pressure Cooker.
- Make sure that the instructions for use are stored carefully.
- The cooking pot must not be used for deep-frying with oil or fat.
- Never leave fat unattended. Please note that hot fat may ignite. Do not extinguish burning fat with water – instead, use a suitable blanket or a Class F fire extinguisher.
- Never use your Pressure Cooker without adding water or liquid, this would seriously damage it.
- Food should never be dry-cooked. Always fill your cooking pot with enough food/ liquid to reach the ‘MIN’ fill level. Do not leave an empty pan on a hot hob or allow to boil dry. In the event of pan boiling dry do not move from hob until it has cooled down.
- We hope you enjoy using the Pressure Cooker and tasting the results.
READ BEFORE FIRST USE
- Clean the cooking pot with hot soapy water and dry thoroughly before first use.
- Any white marks that appear on the bottom of the cooking pot after first use are caused by a very high chalk content in the water.
- These marks are easy to remove using vinegar and limescale remover. Never use scouring agents or steel scouring pads for cleaning. This also applies to the outer stainless steel surfaces.
- Please check that the pressure control valve and the pin in the safety valve can be moved freely.
- This Pressure Cooker must not be used by any persons who are not familiar with how to use it.
- Please exercise particular caution when using the Pressure Cooker in the vicinity of children.
- This Pressure Cooker must only be used for its intended purpose of pressure cooking. It can only be used as a “normal” cooking pot without the lid. Never use it in the oven or microwave.
- Always monitor the Pressure Cooker when heating it on the highest setting.
- When using an electric hob, the hot plate must be smaller than the diameter of the cooking pot or the same size.
- When using a gas hob, the hob must not exceed the diameter of the base. If the gas flame is too large, it may damage the handles.
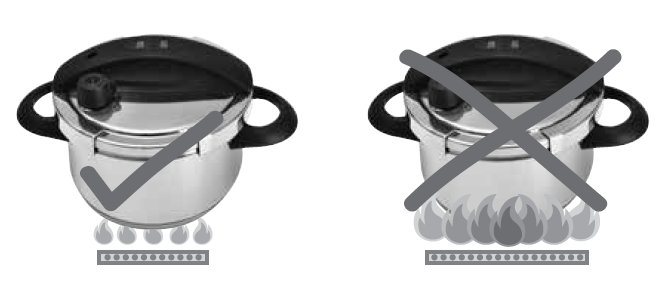
- When using a ceramic hob, the base of the cooking pot should be clean and dry.
- Never touch the hot outer surface of the Pressure Cooker during the cooking process as you may burn yourself.
- If the Pressure Cooker is still hot, it must only be picked up and moved with great care by the handles (not by the lid).
- This Pressure Cooker must never be used without liquid as this may damage the Pressure Cooker.

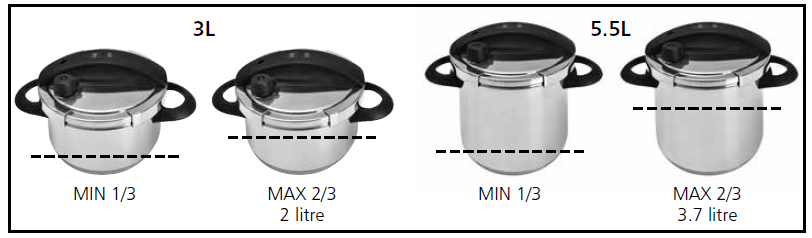
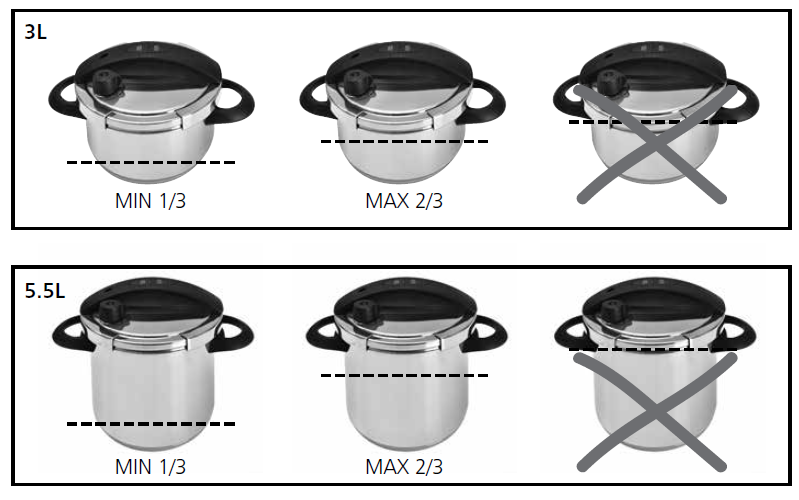
- For any quantity of food being cooked, the minimum amount of liquid should be approx. 250ml. The cooking pot should be at least 1/3 full.
- Please observe the filling quantity scale inside the pot.
- The Pressure Cooker must never be filled more than 2/3 full; for food that will expand or foam up (rice, legumes), it must not be filled more than half full. Please partially cook this food first with the Pressure Cooker open, then skim off the foam and close the lid.
- • Sausages with artificial casing must be pierced before cooking. If the casing is not pierced, it will expand under pressure and may burst. The resulting spray may cause burns.
- If you have cooked meat in its skin and this has become swollen after cooking, allow the swelling to reduce instead of piercing the skin. Otherwise, you may burn yourself. 250ml
- Please do not cook any food that tends to form foam, such as apple sauce, rhubarb, pasta, oat flakes or other grains. As this food whirls up during cooking, there is a risk that the pressure control valve may become blocked.
- If the contents are mushy, shake the Pressure Cooker gently before opening (depressurised).
- During the cooking process, jets of steam escape vertically from the centre of the pressure control valve when the cooking temperature is reached.
- Please take care not to come into contact with this hot steam.
- The safety systems must not be touched during the cooking process.
- When it is under pressure, the Pressure Cooker must never be forced open.
- The Pressure Cooker must be allowed to cool off before opening. The steam must be completely released, otherwise the cooking pot cannot be opened. Please follow the opening instructions on page 19.
- Do not make any alterations to the safety devices as there is a risk of scalding. While steam is being released, keep your hands, head and body away from the area in which the steam is released.
- Only use genuine accessory parts, lids and cooking pots that are intended for this Pressure Cooker .
- Never use deformed or damaged Pressure Cookers or accessory parts.
- If a repair is required, please contact our customer service team.
BEFORE COOKING
- Check that the safety valve, the pressure control valve and the sealing ring are clean and functional before each use.
- Take particular care to ensure that the safety valve on the underside of the lid can be moved.
- Before each cooking process, the pin should be checked to ensure it can be moved (against the spring pressure).
QUICK START – INSTRUCTIONS FOR USE
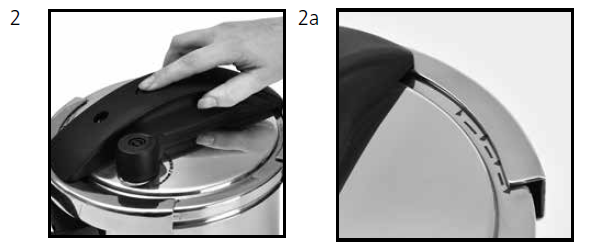
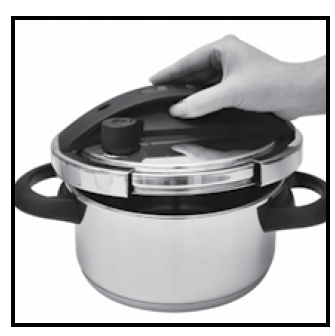
1. Opening:
Press the ![]() button with your index finger. You will hear the clamping jaws open. The control arrows appear and the lid can be removed.
button with your index finger. You will hear the clamping jaws open. The control arrows appear and the lid can be removed.
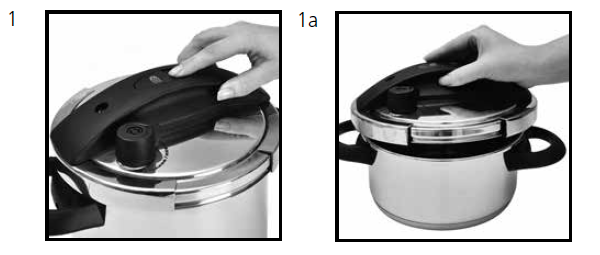
2. Closing:
Place the lid on the cooking pot. When doing so, make sure that the clamping jaws are in the open position, i.e. that the control arrows are visible. Then press the button with your index finger so that the clamping jaws audibly attach to the edge of the cooking pot and the control arrows (2a) are no longer visible.
3. Adding food:
Observe the minimum liquid quantity of 250 ml
The minimum filling quantity of liquid and food should be at least 1/3 of the volume of the cooking pot.
Now add the food that you wish to cook. Fill the cooking pot to a max. 1/2 full for food that will expand or foam up. Fill the cooking pot to a max. 2/3 full for all other food. The filling quantities always refer to the food and liquid.
4. Setting the pressure level:
1 = For gradual cooking2 = For quick cooking
5. Set the hob to the highest setting.

6. Pressure cooking starts.
When steam escapes from the valve, set the hob to the lowest setting. The cooking time now starts.

7. Cooking time complete.
Switch off the hob!
8. Slowly and gradually allow steam to escape…
… or follow the recipe instructions and wait until the pressure is released. Do not change directly from position 2 to position . Instead, change first from position 2 to position 1, wait a few seconds, and then change to position If you are using pressure level 1, you can change directly from position 1 to Caution: The steam is very hot (see page 19).
Other pressure release methods are described on page 20.
9. Opening the Pressure Cooker:
If no more steam is escaping, you can open the Pressure Cooker. The lid can be removed. WARNING: Never force the lid open.
BENEFITS
This Pressure Cooker has been manufactured to extremely high standards using only the best materials in order to guarantee safety and durability. We hope you enjoy using it.
This Pressure Cooker offers many advantages:
- The two-level, infinitely adjustable pressure control valve.Instructions in recipes and in tables of cooking times can only ever be guide values. For this reason, this Pressure Cooker has a pressure control valve with two pressure levels. The benefit of this valve is that you can use it to adjust the pressure inside the cooking pot depending on the amount and size of the food that you are cooking. The basic settings can be found in the table of cooking times at the end of these instructions.
- You will cook healthier food.As the food is cooked using steam in an oxygen-free cooking pot, and as the cooking times are shorter, your food is prepared in a particularly gentle way. Each minute you save means you gain important vitamins, nutrients and minerals.
- You will cook more delicious food.The oxygen-free cooking process ensures that the flavour and natural colours of your vegetables are largely retained.
- Cooking is faster and saves time and energy.This Pressure Cooker reduces your previous cooking time by up to 70%. And you will save energy: up to 60% for dishes that take a long time to cook, and between 30% and 40% for dishes with shorter cooking times.
- The cooking process will largely exclude cooking odours and vapours.If you take care of your Pressure Cooker, it will make cooking a pleasure and give you along service life. For this reason, please read these instructions for use carefully and thoroughly.
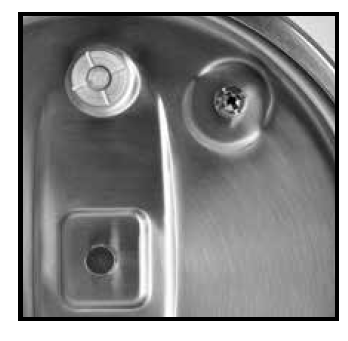
PARTS/FUNCTIONS
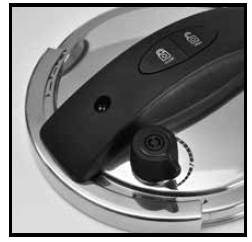
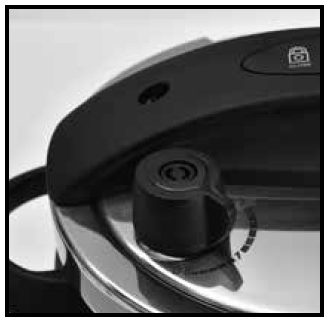
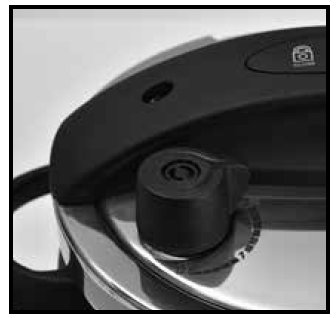
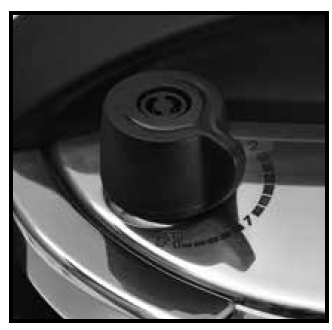
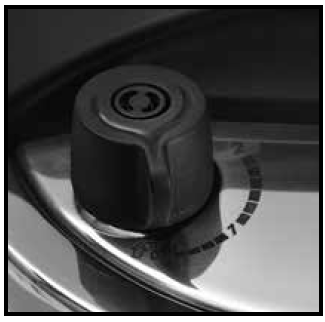
PRESSURE CONTROL VALVE
The pressure control valve is used to adjust the pressure level. The valve automatically maintains the pressure and temperature at the required setting:
- Position 2 – For quick cooking (90 kPa) approx. 120˚C.
- Position 1 – For gradual cooking (60 kPa) approx. 113˚C.
- Position – For slow pressure release.
- Position – For removing and cleaning the valve.
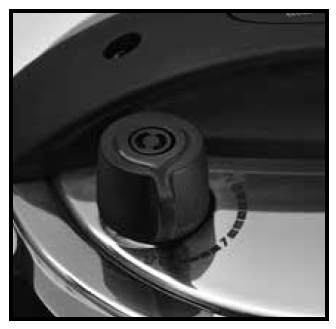
Maximum permitted pressure for these Pressure Cookers:2.7bar / 270 kPa.
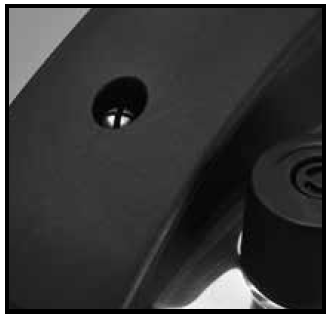
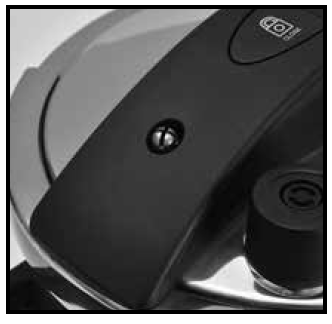
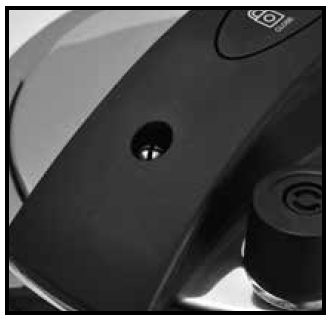
RED SAFETY VALVE
1. The safety valve:While the pressure builds up in the cooking pot, the red safety valve becomes visible and the cooking pot is closed (never force the cooking pot open).
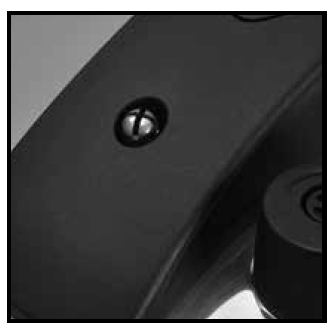
2. If the safety valve is no longer visible, the cooking pot is no longer under pressure and can be opened.If, for some unforeseeable reason, the pressure control valve does not release steam correctly and excess pressure is generated inside the cooking pot, the safety valve opens automatically in accordance with the prescribed values in order to release the excess pressure.
3. The one-hand opening and closing system:The Pressure Cooker is opened and closed simply by pressing the appropriate open button or close button Remove the lid from the cooking pot with one hand and place it back on the cooking pot in any position.WARNING: Always allow the steam to be completely released before opening the cooking pot – never force the cooking pot open!

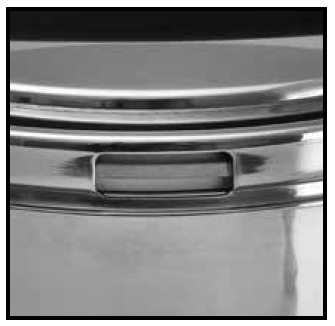
4. The safety window:The safety window in the lid is another safety element.If there is excess pressure inside the cooking pot, the sealing ring presses outwards through this window and the steam can escape.
5. Lid with sealing ring:Sealing rings are subject to wear and may need to be replaced.Important: Only use genuine sealing rings supplied by us.
6. Heat-resistant handles on cooking pot.(WARNING: Not suitable for oven use).

7. The Pressure Cooker:This Pressure Cooker comes in a timeless and appealing design made from high-quality and easy-care stainless steel 18/10. Hand wash only.The cooking pot must be used with the glass lid for daily cooking.

8. The thermal sandwich bottom:
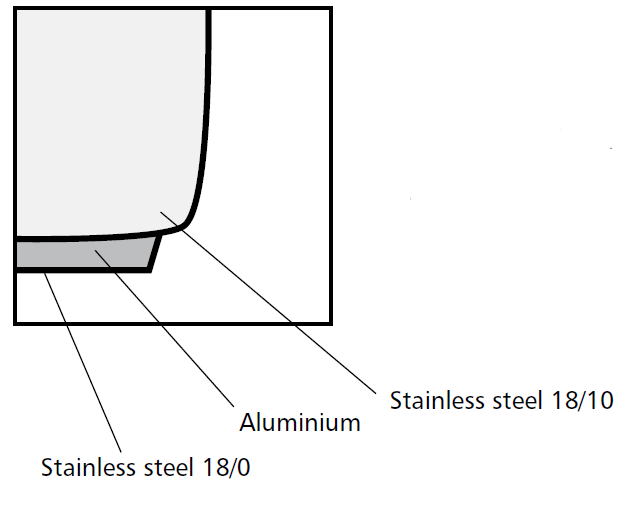 This is an extra strong base for use on all types of hob. It is absolutely robust and guarantees optimal heating properties while saving energy.
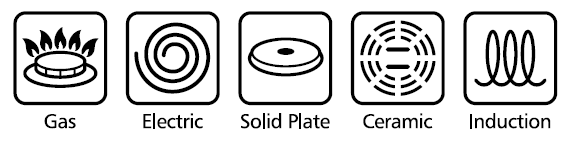
It is suitable for all types of hob.
PRESSURE COOKING IN DETAIL
STEAMING FOOD WITH THE PRESSURE COOKER
- Add the liquid that is required to generate steam (water, sauce, stock) to the cooking pot.
- WARNING: Always add sufficient liquid. The cooking pot must not be allowed to cook dry.
- Now add the food that you wish to cook.
- The liquid and food should fill the cooking pot to at least 1/3 of its volume. Fill the cooking pot to a max. 1/2 full for food that will expand or foam up.
- Fill the cooking pot to a max. 2/3 full for all other food.
- Please observe the filling quantity scale inside the cooking pot.
- Please check that there is sufficient clearance between the food that you are cooking and the lid and valves.
- Note: To ensure the base of the cooking pot is not corroded by salt, only add and stir salt into water that is already boiling.
- You can now place the lid on the cooking pot.
- Then press the
 button with your index finger so that the clamping jaws audibly attach to the edge of the cooking pot and the control arrows are no longer visible.
 - The trivet insert: Place the trivet inside the cooking pot if you wish to raise food such as joints of meat off the base of the pot or out of the cooking liquid. The trivet may also be used to keep heatproof dishes off the base of the pot.
The trivet insert: Place the trivet inside the cooking pot if you wish to raise food such as joints of meat off the base of the pot or out of the cooking liquid. The trivet may also be used to keep heatproof dishes off the base of the pot.
SETTING THE PRESSURE LEVEL
1. Position 1:For gradual cooking, approx. 113°C (cooking organic food).For steaming sensitive food like vegetables, fish, etc.
2. Position 2:For quick cooking, approx. 120°C (quick cooking).For cooking and braising, e.g. meat, soup, stews, etc. Table of cooking times on pages 23-26.
PRESSURE COOKING REALLY IS THIS EASY…
1. Use the pressure control valve to select the required pressure level:1 = For gradual cooking.2 = For quick cooking.
2. Set the hob to the highest setting:Place the Pressure Cooker with preselected pressure level on the appropriate hob.As the pressure increases, the red safety valve becomes visible. It is now no longer possible to open the Pressure Cooker.
3. Depending on the filling quantity, it may take several minutes before the preset pressure level is reached. The cooking level has been reached once steam is escaping constantly from the pressure control valve.
The cooking time only begins from this moment. The hob must now be set to a low setting. This will prevent any unnecessary energy consumption and avoid the risk of the cooking pot cooking dry.
4. The cooking time is complete… Switch off the hob!
5. Slowly and gradually allow steam to escape…Turn the pressure control valve from the preselected cooking level to the level. At pressure level 2, first turn the pressure down to level 1 and then wait a few seconds before turning down to the level.
 WARNING! The escaping steam is very hot – protect yourself against burns and scalding by keeping your face, body and arms away from the steam.
6. Open the pressure cooker:If no more steam is escaping, you can open the Pressure Cooker. The lid can be removed.
 WARNING: Never force the lid open.
Once the cooking time is complete, the source of heat is switched off and the pressure in the cooking pot must be released. To do this, remove the cooking pot from the hob and place it on a suitable base. There are three ways to release the pressure:
1. Allow the Pressure Cooker to cool:Wait until the red safety valve has completely retracted. This is recommended for dishes that are mushy or that create a lot of foam.
2. Slow pressure release:Slowly turn the pressure control valve to the position . Do not change directly from position 2 to position . Instead, change first from position 2 to position 1, wait a few seconds, and then change to position . If you are using pressure level 1, you can change directly from position 1 to .WARNING: The escaping steam is very hot. The steam escapes upwards. Please do not place your hands over the valve – wait until no more steam is escaping and the pressure indicator is no longer visible. This method is not suitable for food that is mushy or that creates a lot of foam.
3. Quick pressure release:Hold the cooking pot under the tap and allow moderately cold running water to run over the lid – not over the plastic parts – until the red safety valve has lowered completely. Do not place the cooking pot in water. If the safety valve has lowered completely, the cooking pot is no longer under pressure. Now set the pressure control valve to the position . If no more steam is escaping, you can open the Pressure Cooker. The lid can be lifted off.
WARNING: Never force the lid open and do not make any alterations to the safety systems. The Pressure Cooker cannot be opened until it has been depressurised.
CLEANING AND MAINTENANCE
- Always let the Pressure Cooker cool completely before cleaning.
- Clean each part thoroughly before first use and after each use with hot soapy water. Check all the parts periodically.
- Never immerse the lid in water or any other liquid. Wipe it with a clean, damp cloth and then dry before storing.
- Wash the cooking pot in warm, soapy water, rinse and dry thoroughly.
- To remove any burnt-on food left in the cooking pot, leave to soak for a few minutes in hot soapy water before starting to clean.
- Do not use any abrasive, alkaline or chlorinated detergents, or steel wool.
- PLEASE NOTE: The Pressure Cooker hand wash only.
- Store the Pressure Cooker with the lid off to let air circulate
CLEANING AND REPLACING THE SEALING RING
Wipe off the sealing ring, rinse it under warm running water and dry it off.
In normal use, the sealing ring should be replaced every 1-2 years depending on the number of cooking processes it has been through. At the latest, it should be replaced when it has become hard or dark (brown colour).
THE SAFETY VALVE
Along with the lid, it only needs to be rinsed out under running water. A pointed object can be used to ensure that it is moving freely.
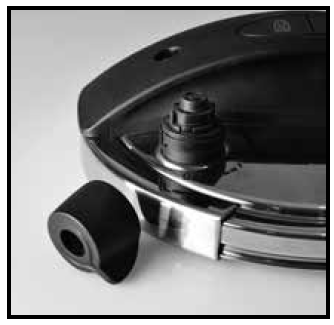
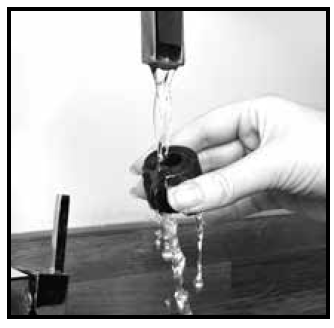
CLEANING THE PRESSURE CONTROL VALVE
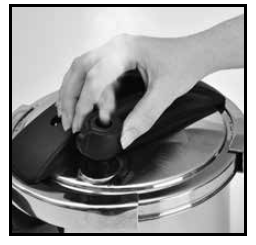
Check whether the ventilation pipe is free. First remove the plastic attachment from the lid of the Pressure Cooker, and then remove the valve. To do this, press the valve and turn it anti-clockwise as far as it will go.

It is cleaned under running water and then re-inserted.Clean the bottom part of the valve from the inside of the lid. Gently press the end of the valve and check that it can lift and lower normally. When doing so, please ensure that the grooves on the valve can be inserted into the appropriate retainers.
When doing so, please ensure that the grooves on the valve can be inserted into the appropriate retainers.
Store the clean and dry Pressure Cooker in a clean, dry and safe place. Do not place the lid on the cooking pot or close it; instead, it can be placed upside down on the cooking pot.
HANDLES
Check the stability of the handles on a regular basis. If the handles have come loose, tighten them again with a conventional screwdriver.
LID
Do not clean the lid of the Pressure Cooker in the dishwasher. Hand wash only.
INGREDIENTS GUIDE AND COOKING TIMES
By cooking food faster, your Pressure Cooker helps to seal in most of the goodness, nutrients, flavour and moisture.
The more finely you cut the vegetables, the shorter their cooking time. If you like them crunchy, then the cooking time is shorter still. The larger the quantity, the longer the cooking time.
Suggestion: It is better for the cooking time to be too short, as you can always cook them for longer.
Rice cooks in just a few minutes, whilst chickpeas, beans and pulses such as lentils in soups also have their cooking time reduced considerably. A whole chicken, large roasts and pulled pork can be cooked in a fraction of the usual time, and you can take advantage of cheaper, traditionally slow-cooked cuts of meat for stews and casseroles, without having to cook them for hours.
Our featured recipes will help you get a feel for your Pressure Cooker, giving you the confidence to go on and adapt your favourite recipes for pressure cooking.
FRESH VEGETABLES
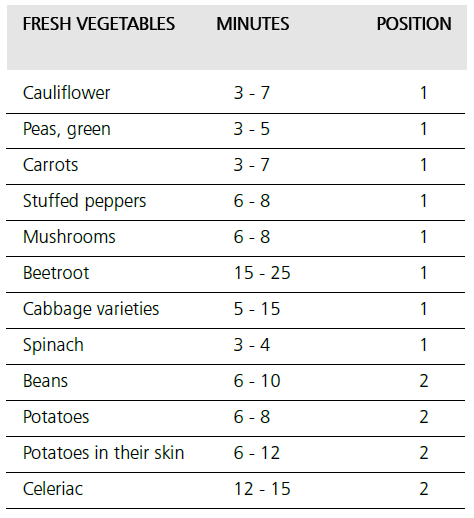
Wash and peel vegetables as normal. They cook very fast in a Pressure Cooker, usually on the highest setting. The times in the cooking chart are simply a guide; cooking times will depend on freshness, storage, size and how the vegetables are chopped. The more finely you cut the vegetables, the shorter their cooking time. If you like them crunchy, then the cooking time is shorter still. The larger the quantity, the longer the cooking time. Steaming the vegetables over the water in the pot and cooking them in the water will give slightly different cooking times. Whichever you prefer, it’s always best to undercook vegetables, as you can always cook them a little longer if need be. Once your vegetables are ready, stop the cooking immediately using the ‘quick release’ method. Frozen veg needs half a minute or so longer than the times in the chart.
MEAT

For improved flavour and colour, we recommend browning your meat and chicken before pressure cooking. Meat and chicken are usually cooked on the highest setting, and the cooking times chart above offers a guide, with cooking times varying according to age and tenderness, the temperature of the meat before it goes in the pot, size, thickness and weight. Expensive cuts of meat will dry out and taste bland, so are best avoided in favour of more economical cuts. Chicken is easily overcooked, especially boneless fillets.
The meat is first browned in the cooking pot with the lid removed. The necessary liquid is then added when deglazing. If any pieces are too large cut them accordingly, brown them individually, and then finish cooking them by placing them on top of one another.
FISH

Cook with the appropriate amount of liquid for the quantity of fish. As fish stock sticks, the lid should be removed immediately once the pressure indicator has retracted fully.
RICE AND OTHER GRAINS
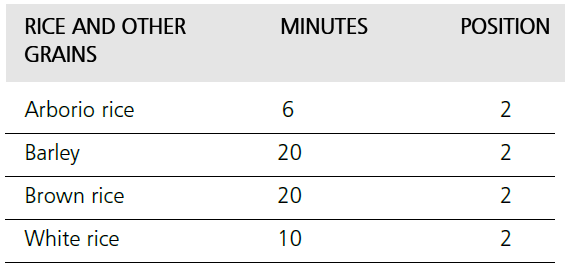
Pressure cooking yields successful results with rice and other grains. As a guide, allow 3 cups of water for each cup of grain. Once cooked, quickly drain off the excess water.
- Grains such as brown rice and barley are cooked at high pressure, followed by a slow release of pressure (which allows further cooking) – and finally a quick release of pressure to stop the cooking.
- White rice, including medium and long grain, basmati and jasmine, is also cooked as above.
- Short rice, such as Arborio, is usually cooked at high pressure, followed by a quick release of pressure to prevent overcooking.
All grains need a little fat to prevent foaming as they cook, so add around 1 tablespoon of butter or oil for each cup of grain. Season with salt if desired. Remember that rice and most grains almost triple in bulk when cooked, so the Pressure Cooker should only be half full with grain and cooking liquid. The cooking times chart above gives a guide to total cooking times, which include the initial time at high pressure followed by the slow and/or quick release of pressure times.
PULSES
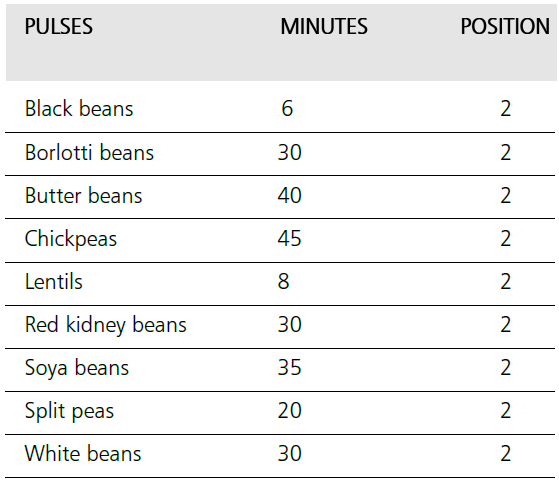
Dried beans, peas and lentils are cooked at the highest pressure, then usually allowed to stand until the pressure releases naturally from the cooker. Pulses should be washed and drained well before cooking. There is no need to pre-soak lentils, but soaking pulses will reduce their cooking time by 5 to 10 minutes, depending on the variety. Remember that pulses expand during cooking, so don’t overfill the Pressure Cooker: as a guide, only one-third fill it with pulses and water. 1 teaspoon of butter or vegetable oil for every half-cup of pulses to prevent foaming. Don’t add salt as this will make the pulses hard.
The cooking times chart above offers a guide to cooking times for pulses which have NOT been soaked overnight. Tenderness after cooking will vary according age and moisture content. Pulses may appear to store well for lengthy periods, but they do dry out over time. It’s best to buy little and often and keep them in the fridge or, even better, soak them overnight, drain and freeze in portion sizes ready for pressure cooking.
FROZEN FOOD
Long thawing times can be reduced to minutes, but this depends on the type and size of the food you are thawing. Thawing in the Pressure Cooker is good for retaining vitamins, minerals and flavour in your food.
RECIPES
Please note that all spoon measurements are standard metric, so 1tsp is 5ml and 1tbsp is 15ml. We recommend using a set of measuring spoons for accurate results.
LENTIL SOUP
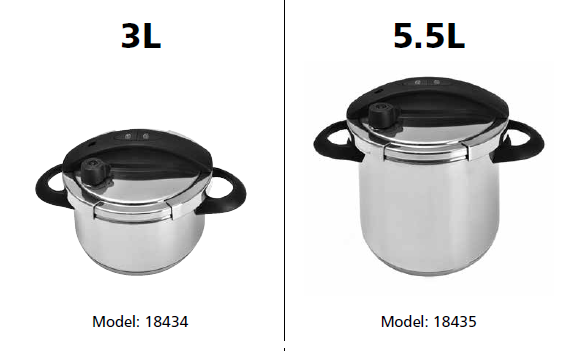
Quantities for both 3L (4 servings) and 5.5L (6 servings).
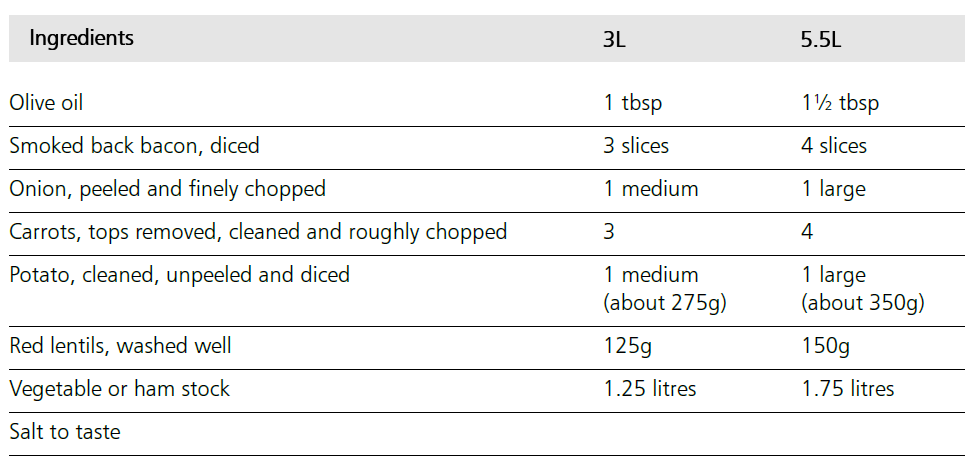
WHAT YOU DO
Over a low heat, gently heat the oil in the cooking pot, add the bacon and fry for 3-4 minutes until the fat begins to melt.
Add the chopped onion, turn the heat up to medium and cook for 2-3 minutes, until the onion is soft and translucent. Add the remaining vegetables and the lentils and cook for 2 more minutes.
Pour in the stock, place the lid on the pot with the pressure regulating valve turned to high and lock the lid. Turn the heat up high and bring to pressure, then reduce the heat and cook for 10 minutes.
Turn off the heat. Release the pressure as described on page 20, remove the lid and blend with a stick blender. Taste and season with salt if desired.
TIP: Can be made with vegetable stock and no bacon for vegetarians.
PULLED PORK
Quantities for both 3L (4 servings) and 5.5L (6 servings).

WHAT YOU DOIn a bowl, mix the salt, sugar and paprika, then add the pork and combine well. Place the trivet in the base of the cooking pot, then add the meat and the water.
Place the lid on the pot with the pressure regulating valve turned to high and lock the lid. Turn the heat up high on the hob and bring to pressure, then reduce the heat and cook 10 minutes.
Turn off the heat. Release the pressure as described on page 20, remove the lid and stir in the rest of the seasoning. Using two forks, pull the pork into shreds. Leave to stand for at least 1 hour, ideally 3-4 hours or overnight, before serving.
ROAST CHICKEN
Quantities for both 3L (4 servings) and 5.5L (6 servings).
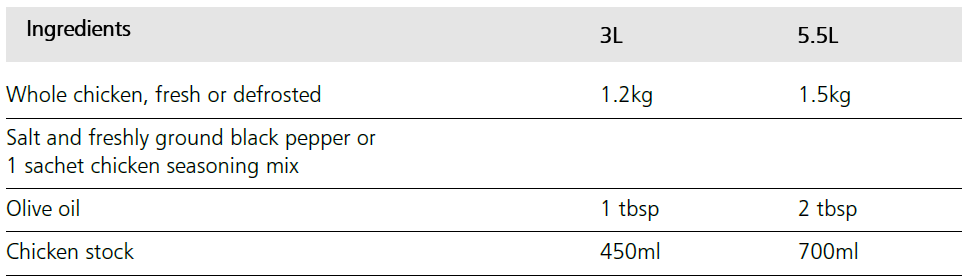
WHAT YOU DOCoat the skin with salt and pepper or seasoning mix.
Over a medium heat, warm the oil in the cooking pot, add the chicken and cook for 3-4 minutes, then turn and repeat until the whole bird has browned.
Lift out the chicken using tongs or forks, place the trivet on the base of the pot and return the chicken to the pot. Pour in the stock, place the lid on the pot with the pressure regulating valve turned to high and lock the lid. Turn the heat up high and bring to pressure, then reduce the heat and cook for 6 minutes per 500g chicken.
Turn off the heat. Release the pressure as described on page 20 and remove the lid. With a sharp knife, pierce a chicken leg to ensure the juices run clear and the chicken is fully cooked. Lift out the chicken and let it rest before carving, or place in a preheated oven at 200˚C, Gas 6 for 10 minutes to crisp the skin. The leftover stock can be made into gravy.
TIP: For a complete roast dinner, use the ‘quick release’ method to open the Pressure Cooker 10 minutes before the chicken is ready and add vegetables such as carrots, broccoli and small potatoes. Bring back up to pressure and cook for 10 minutes, then make gravy with the juices.
LAMB BIRYANI
Quantities for both 3L (4 servings) and 5.5L (6 servings).
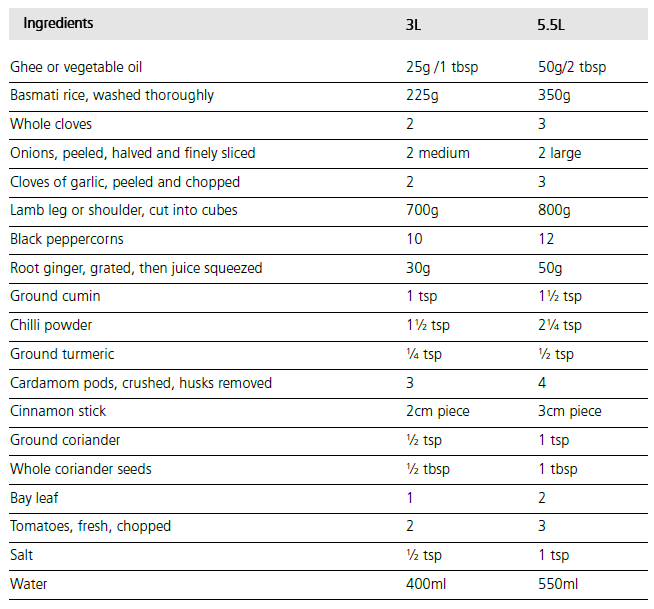
WHAT YOU DOOver a medium heat, warm the ghee or oil in the cooking pot, add the rice and cloves and cook for about 2 minutes, stirring. Remove the mixture from the pot and set aside.
Fry the onion and garlic in the pot over a medium heat, add the lamb and cook for 5-10 minutes, stirring constantly until all the meat has browned.
Add all the spices, the bay leaf, tomatoes and salt, cook for 3-4 minutes and then pour in the water. Place the lid on the pot with the pressure regulating valve turned to high and lock the lid. Turn the heat up high and bring to pressure, then reduce the heat and cook for 15 minutes.
Turn off the heat. Release the pressure using the ‘quick release’ method as described on page 20, remove the lid, add the rice and mix well. Add 300ml water, place the lid back on and bring back up to pressure, then reduce the heat and cook for 12 more minutes. Take the pot off the heat, release the pressure, remove the lid and transfer to a warmed serving dish.
TIP: Delicious served with a cool relish of chopped cucumber, tomato and onion.
MACARONI CHEESE WITH SAUSAGE AND MUSHROOM
quantities for both 3L (4 servings) and 5.5L (6 servings).

WHAT YOU DOPlace the sausages, onion and mushrooms in the cooking pot and cook on a low heat until they start to brown. Add the macaroni, stock, cream, salt and pepper.
Place the lid on the pot with the pressure regulating valve turned to high and lock the lid.
Turn the heat up high and bring to pressure, then reduce the heat and cook for 7 minutes.
Turn off the heat. Release the pressure as described on page 20 and remove the lid. Add the butter, milk and grated cheese, then place in a serving dish. Serve immediately or place under a hot grill for 3-4 minutes until crispy and golden.
CRÈME BRÛLÉE
Quantities for both 3L (4 servings) and 5.5L (6 servings).
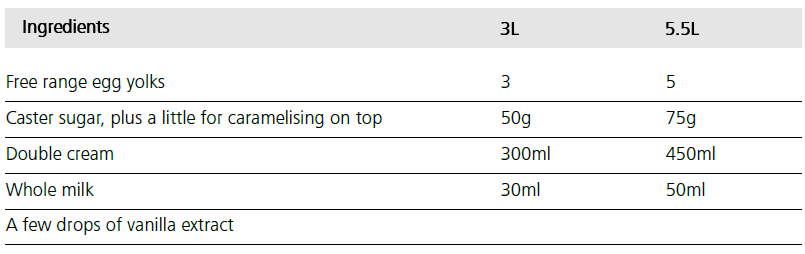
WHAT YOU DOPlace the trivet on the base of the cooking pot and pour in 300ml water.In a large jug, whisk the egg yolks and sugar together, then add the cream, milk and vanilla extract.
Pour the mixture into 4 or 6 ramekins, or a large heatproof dish. Cover with foil and place on the trivet – if need be, you can create two layers inside the cooking pot by placing the base of a loose-bottomed cake tin or another trivet between the layers.
Place the lid on the pot with the pressure regulating valve turned to low and lock the lid.
Turn the heat up high and bring to pressure, then reduce the heat and cook for 6 minute for individual ramekins or 10 minutes for a large dish.
Turn off the heat and use the ‘quick release’ method to open the Pressure Cooker. Remove the desserts and chill until ready to serve. Sprinkle with a little extra caster sugar and caramelise under a hot grill or using a blowtorch before serving.
ADAPTING YOUR OWN RECIPES
Once you’ve got a feel for your Pressure Cooker by making some of our featured recipes, you may like to adapt some of your own favourite dishes. We recommend choosing a recipe from this booklet which is similar to your own and using this as a guide. These simple rules of thumb may help.
- Chicken on the bone needs 6 minutes’ cooking time per 500g; boneless breasts need just 4-5 minutes.
- Chunks of casserole beef take 10 minutes, and a roast of beef will cook in just under an hour.
- Lamb chops can be ready in just 4-6 minutes, and a lamb shank will take around 25 minutes.
- Cook fish on the lower setting. An average-sized fillet will take just 2-3 minutes.
- Apples cut into quarters will cook in 2-3 minutes. Soft fruits such as strawberries or raspberries take only 1-2 minutes.
- Cabbage, whether red, green or Savoy, will cook in 3-4 minutes. Sliced carrots take just 2 minutes and baby new potatoes can be cooked in 5 minutes.
HINTS AND TIPS
- Store the Pressure Cooker with the lid off to let air circulate.
- If in doubt select a lower cooking time. You can always check your food and then leave it to cook a little longer.
- Cooking liquid doesn’t have to be plain water, alternatives are milk, tomato sauce, stock or coconut milk.
- Cutting similar foods like meat or vegetables into evenly sized pieces will ensure they cook at the same speed.
- Pressure cooking tends to intensify the flavour of herbs, seasonings, onion and garlic, so use smaller quantities if adjusting a favourite recipe and choose fresh herbs rather than dried.
- If your finished dish is too moist, place the cooking pot on the hob without a lid to allow some of the liquid to evaporate.
- If it takes a long time for the cooking time to start:– The energy supply is too weak. Set the source of heat to the highest setting.
- If the red safety valve has not lifted and no steam is escaping from the valve during cooking:This is normal in the first few minutes (as pressure is building up). Otherwise, check the following:– Check that the source of heat is strong enough. If not, increase it.– Check that the amount of liquid in the cooking pot is sufficient.– Check that the pressure control valve is not set to– Check that the Pressure Cooker is correctly closed.– Check that the sealing ring or the edge of the cooking pot is not damaged.
- If the safety valve has lifted and no steam is escaping from the pressure control valve during cooking:– Hold the Pressure Cooker under cold water to release the steam.– Open the cooking pot. Clean the pressure control valve and the safety valve.
- If the steam around the lid dissipates, check the following:– Check that the lid is closed.– Check that the sealing ring is inserted correctly.– Check the condition of the sealing ring (and replace it if necessary).– Check that the lid, safety valve and pressure control valve are clean.– Check that the edge of the cooking pot is in a good condition.
- If the lid will not open:– Check that the safety valve is fully lowered. If not, release the steam.– If necessary, cool the cooking pot under cold water.
- If the food is not cooked or is burnt, check the following:– Check the cooking time (too short or too long).– Check the power of the source of heat.– Check that the pressure control valve is set correctly.– Check the quantity of liquid.
- If the handles on the cooking pot are loose:– Tighten the screws with a screwdriver.
FREQUENTLY ASKED QUESTIONS
Question: Why does the pressure indicator keep dropping during cooking?Answer: The heat may be too low. Increase the heat slightly until the indicator rises and stays there.
Question: Why is the Pressure Cooker not getting to pressure?Answer: The lid may not be fitted correctly, or the seal may be loose or worn. Remove from the heat and, taking care to avoid burns, check the lid is locked on correctly. When the Pressure Cooker is not in use, check the seal inside the lid has not perished or been damaged. If it has, call Lakeland customer services on 015394 88100.
Question: Why is lots of steam pouring out of the lid and food is escaping too?Answer: The pressure may not have been fully released before you tried to open the lid. Make sure the indicator has dropped fully before removing the lid.
Question: Why is food is spitting from the pressure valve and there’s lots of steam?Answer: Either the pot is too full or the heat is too high. Reduce the heat and, if there’s still a problem, take the pot off the heat, allow the pressure to drop, remove the lid and take out some food.
Question: Why is food in the cooking pot burnt?Answer: Soak the cooking pot for some time before you rinse it out. Do not use any alkaline or chlorinated detergents.
Question: One of the safety systems has triggered, what should I do?Answer: Switch off the source of heat. Allow the Pressure Cooker to cool. Open the Pressure Cooker. Check and clean the pressure control valve, the safety valve and the sealing ring. When making all dishes, always ensure that the appropriate amount of liquid is added – the Pressure Cooker must never be allowed to cook dry. Please ensure that the cooking pot is never filled more than ‘MAX’ level. Read the appropriate instructions in these instructions for use. The different cooking times depend on the quality and size of the food, so the following times are only approximate. Over time, you will gain enough experience to know exactly how long to cook your dishes. Frozen food does not need to be thawed in advance. All you need to do is extend the cooking time slightly.
Question: What is the best way to cook soups and stews with roasted meat?Answer: If the cooking times for the ingredients are not too different (e.g. meat and vegetables), the meat is browned and the vegetables are added when deglazing. If the cooking times are very different, interrupt the cooking process for the meat and add the vegetables for the last few minutes. The meat and vegetables will then be cooked at the same time.
For soups and stews, make sure that any foods that create foam are partially cooked with the cooking pot open, then skim off the foam before you close the lid. At the end, allow the steam to release slowly or the Pressure Cooker to cool.
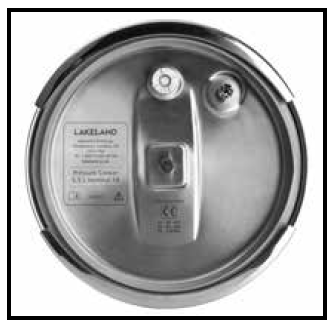
EC DECLARATION OF CONFORMITY
EC DECLARATION OF CONFORMITY for Pressure Cookers EC type examination, module B (design verification)
We hereby declare that the Pressure Cookers designated below comply with the relevant health and safety requirements in the EU directives on the basis of their design and constructions as well as in the designs distributed by us.
If any changes are made to the devices that are not authorised by us, this declaration shall become invalid.Device type: “RUBY” Pressure CookerRelevant EU directives: 2014/68/EUApplicable standard: EN 12778 / 09.05B/R/K Vertriebs-GmbHPeter Rommerskirchen, Managing Director
RECYCLING
The packaging is made of recyclable materials. Please dispose of these materials in an environmentally friendly manner and in the appropriate recycling containers. If the product can no longer be used, ask the responsible waste disposal association about the necessary disposal measures.
IMPORTANT! SERVICE AND SPARES
If you are replacing parts, then only GENUINE spare parts that are intended for this Pressure Cooker are permitted to be used.If a repair is required, please contact Lakeland customer service team on 015394 88100.Repairs may only be performed by authorised persons.
Importer:B / R / K Vertriebs-GmbHHeinz-Fangman-Str. 242287 Wuppertal, Germany
Lakeland
Alexandra Buildings, Windermere, Cumbria, UK LA23 1BQTel: +44(0)15394 88100 www.lakeland.co.uk
References
[xyz-ips snippet=”download-snippet”]