LASER CDBB-200-BLK CD Boombox with AM/Fm Radio User Guide
QUICK OPERATION GUIDE
|
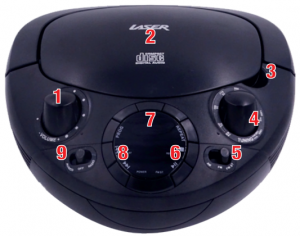
No |
Button |
|
1 |
Volume Control |
|
2 |
CD Compartment |
|
3 |
AUX Input |
|
4 |
Tuning Control |
|
5 |
AM / FM Radio Selector |
|
6 |
Repeat / Stop / Pause buttons |
|
7 |
Digital display |
|
8 |
Program / Next / Previous buttons |
|
9 |
Aux/Off/Radio function selector |
WHATS IN THE BOX
- 1 x CD Boom Box.
- 1 x Mains Power Cable.
- 1 x User Manual.
INSERTING BATTERIES
- Disconnect the AC cord and insert 6 “C” size batteries into the battery compartment noting the correct polarity as shown inside the battery compartment.
RADIO RECEPTION
- For best reception, fully extend the FM antenna to receive FM stations.
- For AM reception, position the actual Boom Box for best reception as the Boom Box has an internal AM antenna
RADIO OPERATION
- Set the FUNCTION switch to the RADIO position.
- Rotate the TUNING control to tune to your desired radio station.
- Adjust the sound level by rotating the VOLUME control.
- To turn off the radio, set the FUNCTION switch to the OFF position.
CD OPERATION
- Set the FUNCTION switch to the AUX/CD position.
- Insert the CD disc in the CD compartment and close the CD door. The unit will start reading the disc and display the total number of tracks of the disc.
- To start playing the CD, press the PLAY/PAUSE button.
- Adjust the VOLUME Control to the desired volume level.
- To stop playing the CD, press the STOP button.
SKIP MODE
- During Playback or Pause mode, press the Next Track button to go to the next track.
- During Playback or /Pause mode, press the Previous Track button to go to the start of the current track.
- During Playback mode, press the Previous Track button twice to go to the previous track.
CREATING A PLAY LIST
- The programming of the CD player should be done while stopped.
- Press the PROGRAM button. The LED display will show ‘01‘and flash continuously.
- Press the Next or Previous Track button to select the desired track.
- Press the PROGRAM button again to store this track in memory. ‘02‘ will then be displayed.Note: Repeat steps from 2 to 3 to store more tracks in memory. You can store up to 20 tracks in the memory.
- Press the PLAY/PAUSE button to begin playback, in the programmed order.
- To stop playback, press the STOP button.
- To cancel the programming list, press the STOP button, or, open the CD door.
REPEAT MODE
Repeat one track: Press the REPEAT button once. The repeat LED indicator will turn ON and flash continuously. This single track will then be played repeated.
Repeat all tracks: Press the REPEAT button twice. The repeat LED indicator will turn on (but not flash). The whole disc will then be played repeatedly.
Cancel Repeat: Press the REPEAT button until the repeat LED indicator is turned off.
MP3/AUX IN CONNECTION
* a 3.5mm to 3.5mm audio jack cable is required (not supplied)
- Insert one side of the audio cable into the AUX line-out jack of your audio device and the other end into the Boom Box.
- Turn on the Boom Box and slide the function selector to AUX/CD position.
- Turn on your Audio device and begin playback.
SPECIFICATIONS
Frequency Range: AM 530 – 1600 KHz, FM 88 – 108 MHzPower Supply: AC 240V ~ 50Hz, or 6 x C size batteries
WARRANTY AGAINST DEFECTS
Laser warrants your new product to be free from defects in materials and workmanship for 12 months, from the date of purchase, provided that the product is used in accordance with accompanying recommendations or Instruction where provided. the benefit of this warranty is in addition to your rights under the Australian Consumer Law and to other rights and remedies of the consumer under a law in relation to the goods or services to which the warranty relates.
Through a network of retailers and resellers, Laser will provide you with your choice of a refund, repair, or exchange (where possible) for this product if it becomes defective within the warranty period. This warranty will no longer apply where the defect is a result of alteration, accident, misuse, abuse, normal wear and tear, neglect, or improper storage. Please retain your receipt as proof of purchase.
How to make a product warranty claim:
- Find your receipt with date of purchase. If this is not available, Laser will make an assessment based on the date of manufacture, condition of the product and type of defect.
- Please contact your original place of purchase. They will assess the nature of the fault and refund or replace the product as per their store refund or warranty policy.
- If your original place of purchase cannot be contacted, please contact Laser with a description of the fault. To assist our team in providing you with a quick resolution, please include any photos and/or a short video demonstrating the fault with your product.
- Phone: (02) 9870 3355
- Email:
- Online: www.laserco.net/support/warranty and follow the website instructions
- Business address: U1 6-8 Byfield street, Macquarie park, 2113 NSW, Australia
- Laser will review your claim and in the first instance, attempt to troubleshoot and resolve the issue for you without the need to return the product.
- If it is determined via troubleshooting that your product may be faulty, our team will provide instructions to have the product returned for assessment. If the product does need to be returned within the warranty period, Laser will arrange return shipping at no cost to you.
- Once we receive the product, our experienced technicians will assess it and determine howbest to resolve the issue.
Our goods come with guarantees that cannot be excluded under the Australian Consumer Law. You are entitled to a replacement or refund for a major failure and compensation for any other reasonably foreseeable loss or damage. You are also entitled to have the goods repaired or replaced if the goods fail to be of acceptable quality and the failure does not amount to a major failure.
For further product information and instructions please visit our product web page atwww.laserco.com.au or email www.laserco.com.au/supports/email.phpPlease note: As continuous improvements are made to this product, slight operational differences may occur. For the most up-to-date user manual, please visit our web site.
For more helpful guides visit us at ![]() LASER www.youtube.com/LasercoAu
LASER www.youtube.com/LasercoAu
Scan here QR Code for more Information:
References
[xyz-ips snippet=”download-snippet”]