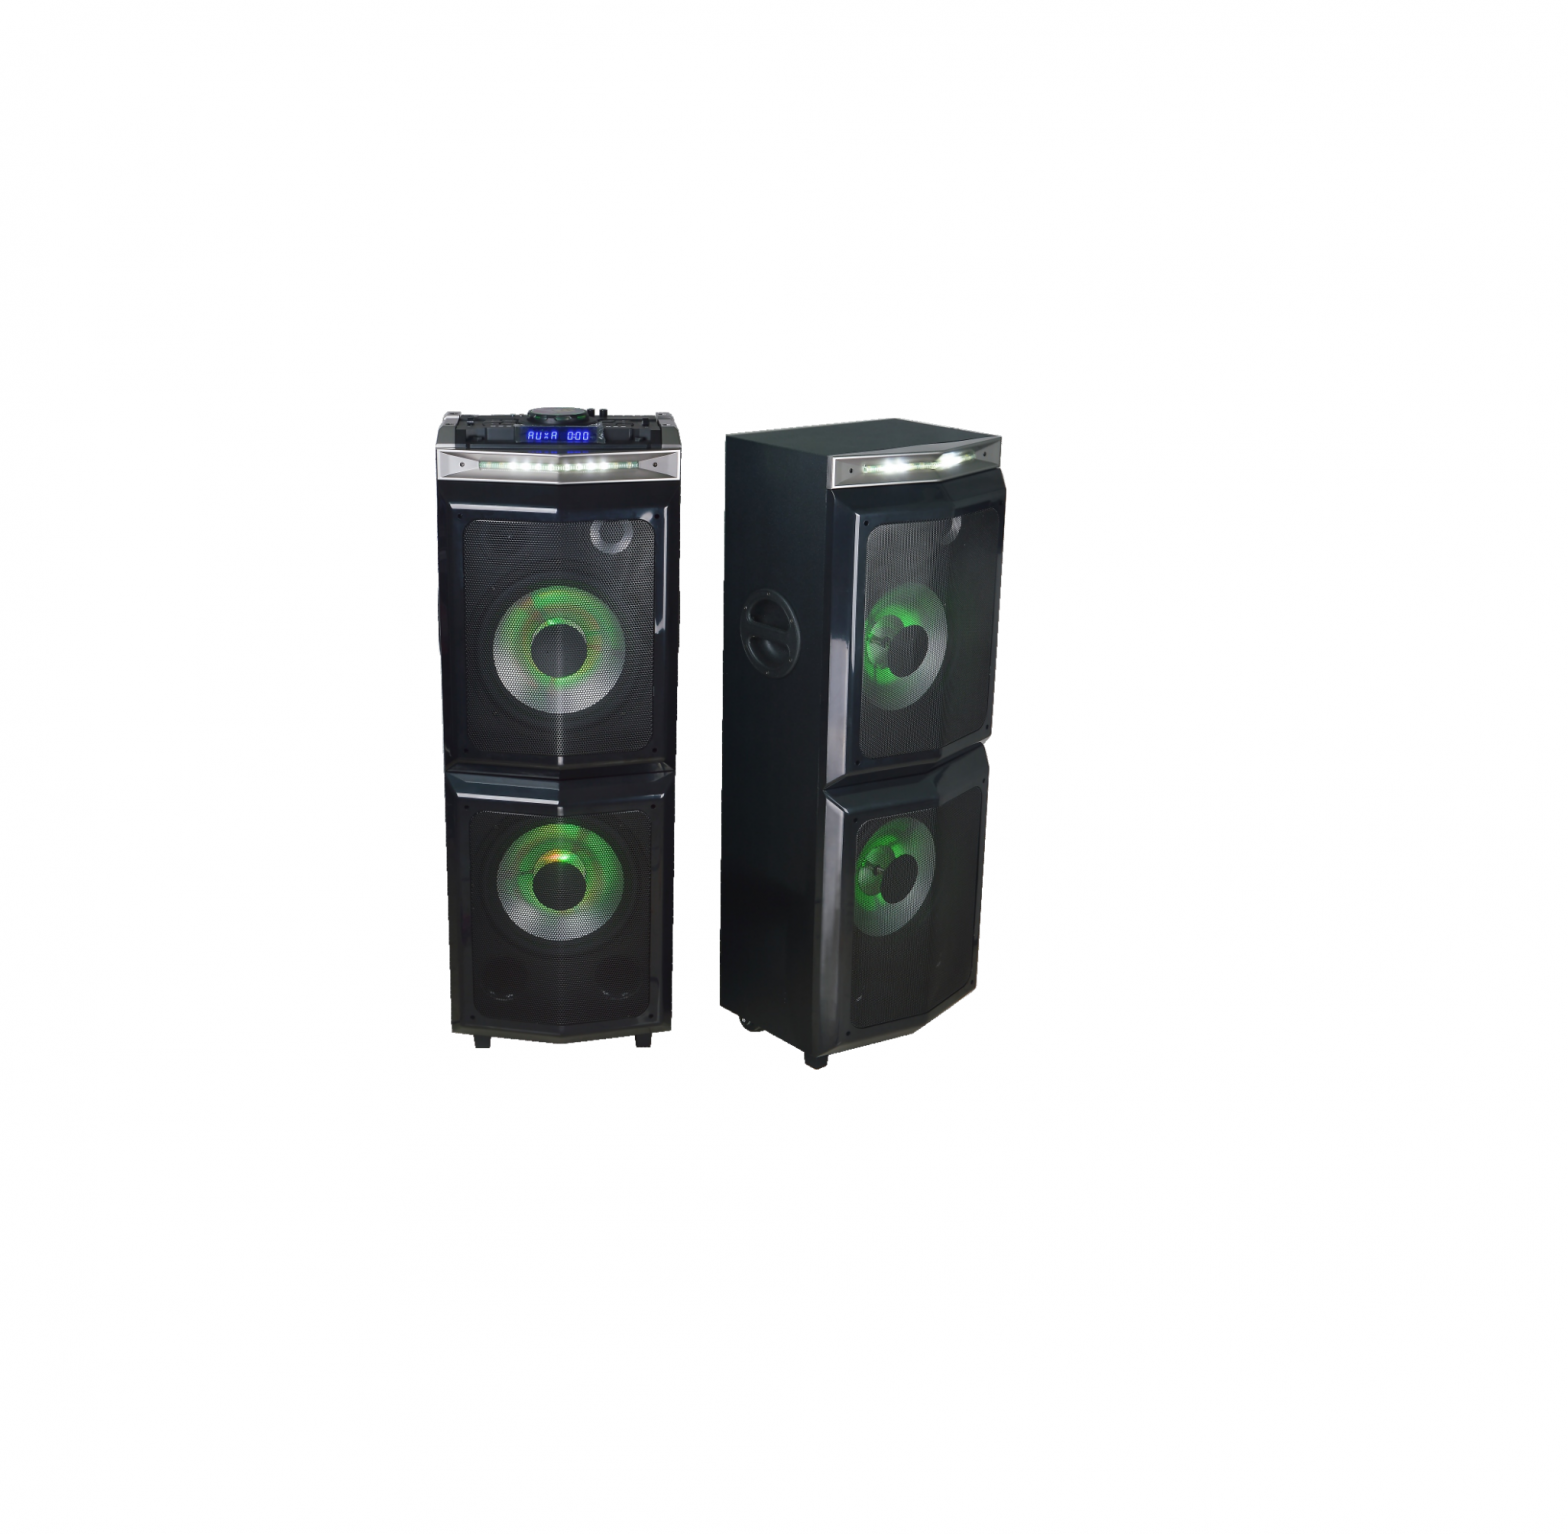
LASER Dj Party Speaker System

SAFETY INSTRUCTIONS
CAUTION: READ THIS BEFORE OPERATION
- To assure the best performance, please read this manual carefully. Keep it in a safe place for future reference.
- Install this sound system in a well ventilated, cool, dry and clean place – away from direct sunlight, heat sources, vibration, dust, moisture, and/or cold. For proper ventilation, allow the following minimum clearances around this unit.Top: 10 cm ( 4 i n )Rear: 10 cm ( 4 i n )Sides: 10 cm ( 4 in)
- Locate this unit away from other electrical appliances, motors, o r transformers t o avoid humming sounds.
- Do not expose this unit to sudden temperature changes from cold to hot, and do not locate this unit in an environment with high humidity (i.e. a room with a humidifier) to prevent condensation inside this unit, which may cause an electrical shock, fire, damage to this unit, and/or personal injury.
- Avoid installing this unit where foreign objects may fall onto this unit and/or this unit may b e exposed to liquid dripping o r splashing. O n the top o f this unit, d o not place:Other components, as they may cause damage and/or discoloration o n the surface of this unit. Burning objects (i.e. candles), as they may cause fire, damage to this unit, and/or personal injury. Containers with liquid in them, a s they may fall and liquid may cause electrical shock t o the user and/or damage to this unit.
- Do not cover this unit with a newspaper, tablecloth, curtain, etc. i n order not to obstruct heat radiation. If the temperature inside this unit rises, i t may cause fire, damage t o this unit, and/or personal injury.
- Do not plug in this unit t o a wall outlet until all connections are complete.
- Do not operate this unit upside-down. I t may overheat, possibly causing damage.
- Do not use force on switches, knobs and/or cords.
- When disconnecting the power cable from the wall outlet, grasp the plug; do not pull the cable.
- Do not clean this unit with chemical solvents; this might damage the finish. Use a clean, dry cloth.
- Only voltage specified on this unit must b e used. Using this unit with a higher voltage than specified is dangerous and may cause fire, damage t o this unit, and/or personal injury. W e will not b e held responsible for any damage resulting from use o f this unit with a voltage other than specified.
- To prevent damage b y lightning, keep the power cable and outdoor antennas disconnected from a wall outlet or this unit during a lightning storm.
- Do not attempt t o modify or fix this unit. Contact a qualified service personnel when any service is needed. The cabinet should never b e opened for any reason.
- When not planning t o use this unit for long periods o f time (i.e. vacation), disconnect the AC power plug from the wall outlet.
- Be sure t o read the TROUBLESHOOTING section o n common operating errors before concluding that this unit i s faulty.
- Before moving this unit, disconnect the AC power plug from the wall outlet.
- When using this unit for a long time, this unit may become warm. Turn the power off, then leave this unit alone for cooling.
- Install this unit near the AC outlet and where the A C power plug can be reached easily. 20)Excessive sound pressure from earphones and headphones can cause hearing loss.
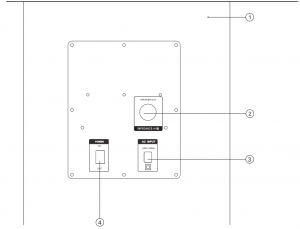
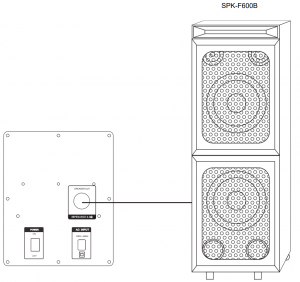
REAR PANEL
- FM ANTENNA
- SPEAKER OUTPUT JACK: Connect to the other speakers.
- AC INPUT: AC 240V~, 60Hz
- POWER: Switch power on or off.

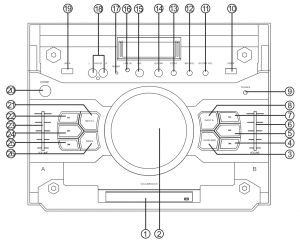
FRONT PANEL
- LED DISPLAYDisplays system status information. Left side displays the INPUT A status, right side display the INPUT B status
- VOLUME/MULTIMEDIA CONTROLRotate the knob to adjust the main volume , phones volume, treble, bass. Short press this key to choose different music effect SCRATCH, REVERB, BEAT BOX, YEAH, BRING IT, GEYA, COME ON. Long press plays DRUMS effect.
- HEADPHONEPress this key to choose different EARPHONES mode, INPUT A, INPUT B, INPUT AB
- INPUT B PREVPress this key to choose previous music with USB B
- INPUT B NEXTPress this key to choose next music with INPUT B
- INPUT B VOLUMEThis is used to adjust the volume with INPUT B
- INPUT B PAUSEPress this key to choose play/pause music with INPUT B
- INPUT B MODEPress this key to choose different INPUT B mode, LINE, USB B
- EARPHONES INPUT JACK 10. USB B input jack
- GUITAR VOLUMEAdjust the volume of the GUITAR input
- MIC VOLUMEAdjust the volume of the MICROPHONE input
- ECHOAdjust the ECHO depth of the microphone
- GUITAR jack
- MIC jack
- LINE IN AUDIO INPUT JACKConnect to LINE IN signal input jack.
- POWER light
- AUX AUDIO INPUT JACKConnect to AUX signal input jack.
- USB A input jack
- STANDBY
- INPUT A MODEPress this key to choose different INPUT A mode, AUX A, BT, FM, USB A
- INPUT A PAUSEPress this key to choose play/pause music with INPUT A
- INPUT A VOLUMEThis is used to adjust the volume with INPUT A
- INPUT A NEXTPress this key to choose next music with INPUT A
- INPUT A PREVPress this key to choose previous music with INPUT A
- MENUThis switch selects the main volume, bass, treble, x driver, light.
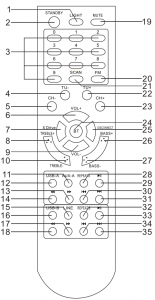
REMOTE CONTROL
- LIGHT
- STANDBY
- NUMBER BUTTON
- TUNING
- CHANNEL
- VOLUME+
- X DRIVE
- TREBLE+
- VOLUME
- TREBLE
- AUX-A
- USB-A
- USB-A F.WARD
- USB-A B.WARD
- LINE
- USB-B
- USB-B F.WARD
- USB-B B.WARD
- MUTE
- FM
- SCAN
- TUNING+
- CHANNEL+
- BT
- DISCONNECT
- BASS+
- BASS
- INPUT-A REPEAT
- INPUT-A PAUSE
- INPUT-A PREVIOUS
- INPUT-A NEXT
- INPUT-B REPEAT
- INPUT-B PAUSE
- INPUT-B PREVIOUS
- INPUT-B NEXT
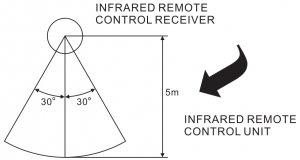
REMOTE CONTROL OPERATION:
- If the remote control conflicts with other devices, the operation will be affected.
- Do not simultaneously press buttons on the unit and the remote control.
- Avoid using two remote controls at the same time as this will cause a malfunction.
- Use only “AAA“ size batteries.
- Do not mix old batteries with new ones. If the batteries leak, clean thoroughly before replacing with new ones.
- Do not short two terminals of the batteries. Dispose of old batteries in a suitable place.
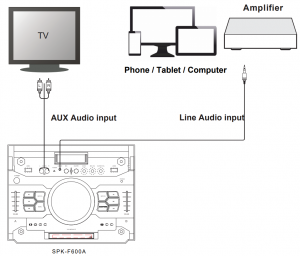
CONNECTIONS
Equipment connections instruction (example) 230V~,60Hz1) Please switch off power whilst connecting2) All inputs should be inserted firmly to avoid noise distortion
OPERATING
NORMAL FUNCTION
- Be sure to switch off the power and to connect to corresponding input jacks.
- Turn on the power and wait 3-4 seconds until the speaker functions are connected.
- Select an audio source by pressing the INPUT A key on the front panel to display AUX A, BT-A, FM, USB A. Press the INPUT B key on the front panel to display LINE,USB B.
- Adjust the VOLUME/MULTI knob on the front panel or the VOL+/- key on the remote control to adjust the setting of the main volume, treble, bass. Then turn the left push shot to adjust the volume of INPUT A, turn the right push shot to change the volume of the INPUT B.
- Press the MENU key on the front panel to display BASS, TREBLE, XDRIVE,AUTO, MAIN then adjust the VOLUME knob to change music treble, bass, light mode and sound effect.
- PHONES OUTPUT selection. Press the HEADPHONE button on the front panel to display INPUT A, INPUT B, or INPUT AB. PHONES VOLUME adjustment. Press the HEADPHONE button on the front panel to display INPUT A or INPUT B or INPUT AB, then rotate the VOLUME/MULTI knob to adjust the HEADPHONE of INPUT A or INPUT B or INPUT AB
- Press the LIGHT button on the remote control or press the MENU button on the front panel to display light mode, then press the VOLUME/MULTI knob to change the OFF,R,G,B,RG,RB,GB, RGB, AUTO,DEMO light mode.
- Press the MUTE key to mute, press it again to reset. Press X DRIVE on the remote to turn on/off X-Bass effect.
LIGHT COLOUR CONTROL FUNCTION
To control the light mode coming from the speaker panels by “Speaker” menu or “light model” button on remote control
- R = red lights flash
- G = green lights flash
- B = blue lights flash
- RG = red and green lights flash
- RB = red and blue lights flash
- GB = green and blue lights flash
- RGB = red, green, and blue lights flash Auto = the various color combinations cycle through and flash. Demo = lights flash and change color as if they were responding to the beat of the music.
TUNER APPLICATIONS
- Before using the radio functions, you must attach the supplied antenna. Adjust the antenna to obtain optimum reception. Press the INPUT A key on the front panel(amplifier)or the FM key on the remote control, to select FM function.
- Press the CH+/CH- key on the remote control to find radio bands that you have previously saved .
- Press or hold the TU+/TU- key on the remote control to adjust the radio frequency manually.
- Press the AUTO key on the remote control, the machine will scan radio channels from low-frequency to high-frequency by itself and memorise the channels one by one.
KARAOKE & GUITAR FUNCTION
- The machine can auto detect whether MIC or GUITAR is inserted. Please turn off the microphone volume and adjust the volume gradually after inserting the microphone.
- Press VOL+/- on the remote or adjust the MIC.VOL knob on the front panel to change the microphone VOLUME.
- Adjust the ECHO knob on the front panel to change the microphone ECHO.
- Adjust the GUITAR.VOL knob on the front panel to change the guitar VOLUME.Note: Do not touch the top of the microphone when singing in order to avoid howling effect. Adjust the microphone volume gradually to avoid howling effect
BLUETOOTH PAIR AND CONNECT
- Turn off any Bluetooth devices previously paired (linked) with this unit.
- Turn on the Bluetooth features on your phone or music player.
- Turn on and set this unit to Bluetooth mode. The flashing blue light BT on LED display indicates it is in pairing mode.
- Set your phone or music player to search for Bluetooth devices.
- Select SPK-F600 from search results on your phone or music player.
- Select OK or YES to pair this unit with your phone or music player.
- If protected, enter 0000 for passkey steady blue light indicates successful connection.
- Press the DISCONNECT key on the remote to disconnect the Bluetooth.
FUNCTION OF USB READER
This unit has two USB ports Press the INPUT A key to select USB A, then you can insert a USB to play music. Press the INPUT B key to select USB B, then you can insert the another USB to play music.Important: The USB port is intended only for data transfer only, other devices cannot be used with this USB connection. The use of USB extension cords is not recommended.
INPUTS
Switch seamlessly between Input A and Input B for a continuous audio track.Using the input volume faders. (6) (23)

Input A Input B
• USB A • USB B• Bluetooth • Aux 3.5mm line in• Aux In Analogue• FM Radio
ACCESSORIES
| Remote control | 1pc |
| Instruction Manual | 1pc |
SPECIFICATION
Frequency Response:
| BASS | 20Hz-3KHz |
| TREBLE | 3KHz-20KHz |
| Power Source | 240V~,60Hz |
| Power Output | 300W+300W |
- The specification presents only as a reference. The value of weight and size are an approximation
WARNING AGAINST DEFECTS
Laser Corporation Pty Ltd (“Laser”) warrants your new product to be free from defects in materials and workmanship for 12 months, from the date of purchase, provided that the product is used in accordance with accompanying recommendations or instructions where provided. The benefit of this warranty is in addition to your rights under the Australian Consumer Law and to other rights and remedies of the consumer under a law in relation to the goods or services to which the warranty relates. Through a network of retailers and resellers, Laser will provide you with your choice of a repair, exchange (where possible) or refund (within Dead on Arrival period) for this product if it becomes defective within the warranty period. This warranty will no longer apply where the defect is a result of alteration, accident, misuse, abuse, normal wear and tear, neglect or improper storage. Please retain your receipt as proof of purchase How to make a product warranty claim:
Step 1: Find your receipt which proves the date of purchase. Where the date of purchase cannot be verified, your place of purchase or Laser will make an assessment based on the date of manufacture, the condition of the Laser Product and the type of defect.
Step 2a): Contact your place of purchase. They will assess the nature of the fault and repair, replace or fund the product as per their store refund or warranty policy. Step 2b): If your place of purchase cannot be contacted, then you can contact Laser. Customer Service with details of your defective Laser Product:
Phone: (02) 9870 3355; or Email: or online www.laserco.com.au/warranty (click on “Consumers (End Users)”). Our business address is at 1/6-8 Byfield Street, North Ryde, NSW 2113
Step 3: Laser will issue you with a Return Authorisation (RA) number within 48 hours. When requested, send us the defective Product and a copy of your receipt. Laser will cover the cost of the return delivery.
Step 4: Wait for us to contact you. Once we have received your defective Laser Product for inspection, we will inform you of our assessment of your claim within 7 days. When we contact you, we will firstly let you know whether you have a valid claim under this Warranty, and if so, we will inform you whether your defective Laser Product will be replaced or repaired, together with the number of days you can expect to wait to receive your replaced or repaired Laser Product.
Step 5: For further details on warranty cover and returns, please check Terms and Conditions for Warranty Returns section on http://www.laserco.com.au/warranty
Our goods come with guarantees that cannot be excluded under the Australian Consumer Law. You are entitled to a replacement or refund for a major failure and compensation for any other reasonably foreseeable loss or damage. You are also entitled to have the goods repaired or replaced if the goods fail to be of acceptable quality and the failure does not amount to a major failure.

References
[xyz-ips snippet=”download-snippet”]