
USER MANUALWIRELESS MAGNETIC HITCH CAMERA
With 5″ HD Monitor With 6800mAh Rechargeable Battery
Note: please go to download latest user manual!
Note: please read the manual carefully before using!
INTRODUCTION
The user manual has a detailed description on how to correctly use the hitch camera and provides detailed product information, including operation, installation precautions and technical specifications.
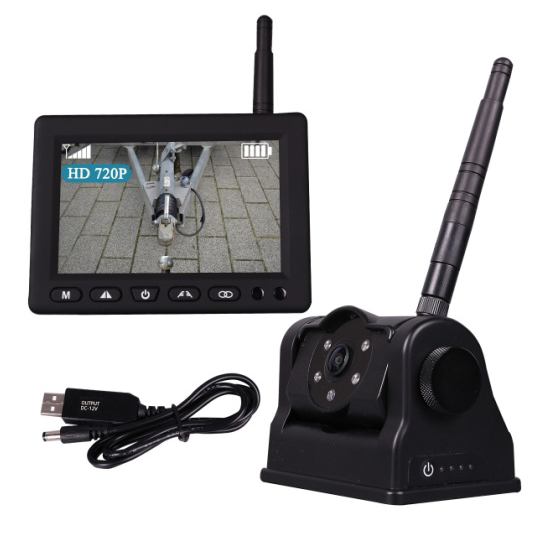
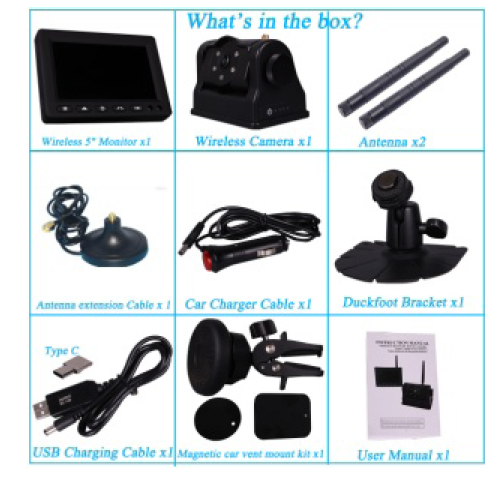
PACKAGE LIST
- 1x wireless magnetic hitch camera
- 1x 5” IPS monitor
- 2x 2.4G antenna(5DB)
- 1x 2.4G antenna extension cable(10ft)
- 1x car charger cable(incar)
- 1x fan-shaped mount bracket
- 1x USB charger cable(indoor)
- 1x magnetic car vent mount kit
FEATURE
- Wireless Connection : view hitch camera on 5” monitor, 2.4G wireless transmission, 5DB antenna.
- Magnetic Camera Mount : Magnet anti-skid function, Mounts anywhere with no hardware.
- Built-in Rechargeable Battery,up to 18H working time at daytime, recharge with car charger cable or USB charger cable.
- Night Vision with four 940 infra-red lights.
- Waterproof Rating IP67.
- Transmission bandwidth 8MHZ,82ft in open distance.
- Viewing Angle 120 degree.
- DC 5.5 female connector,12-24V DC charging, short circuit and over-voltage protection.
- Battery display indicator, low voltage red light indicator.
- Support for charge while using.
- Monitor standby mode: No signal automatically shut off the screen, standby current is 2mA, start up in second with signal.
BEFORE BEGINNING INSTALLATION
Please indoor 5-minute simple basic function test verification before actual installation on the cars/tucks.
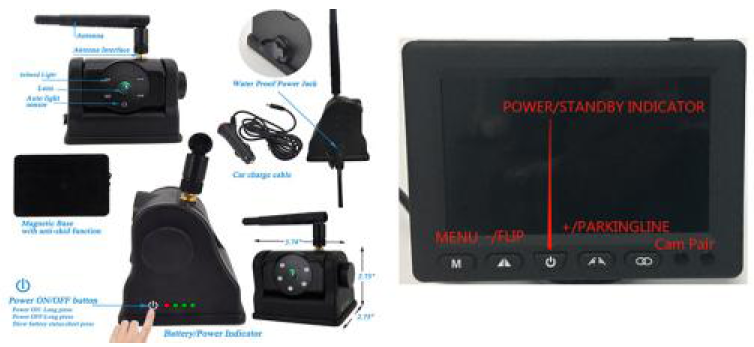
FUNCTIONS OF EACH PART
CAMERA INSTALLATION
- Attach camera close to hitch ball, centered on vehicle.
- Adjust the camera angle.
- Recommended installation placement that close to hitch ball.
MONITOR INSTALLATION
- Attach monitor to magnetic car vent mount, and adjust mounting angle to allow optimum driver viewing comfort.
- Recommended installation locationt of viewing comfort.
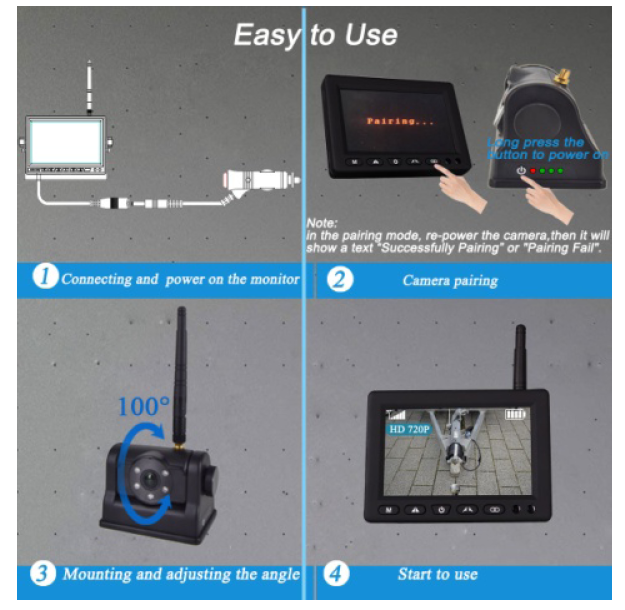
START TO USE
- First turn ON the camera by long press the power button, then the red led will turn on.
- You will now be able to see the camera view on your monitor.
FINISH/END TO USE
Turn OFF the camera by long press the power button, then the four led will flash once at the same time,avoiding the camera is always ON and therefore can drain the built-in battery.
FUNCTIONS AND OPERATION
- Menu Setting:Press the “MENU” key on the panel, can open the option of the “contrast”, “saturation” and “brightness” in menu,press “FLIP” button or “ParkingLine” button to set the “brightness”, “contrast” and “saturation” of the camera.
- Flip Setting:Press “FLIP” butto , set UP, Down, Left(front view),Right(back view) flip image;
- ParkingLine Setting:Press “ParkingLine ” button, set it ON/OFF.
- Camera Pairing:Long press the “Pairing” button on the panel to enter the pairing state (the state lasts for 10S) and display “pairing” (as shown in the figure below). In the pairing state, interrupt the power supply of the camera and re-power it, It will show a text“Successfully Pairing”, or will show “Pairing Fail”means failure to pair, needs to pair again;
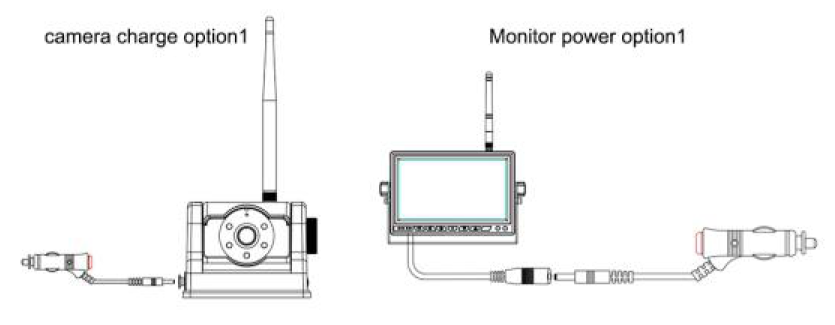
- Camera charge methods:car charge cable and usb charge cable and power cable.
- Test Signal Strength:Put the monitor and the camera at the intended position to test signal strength.

WIRING DIAGRAM
SPECIFICATION & DIMENSION
Wireless camera built-in battery
- Sensor: 1/2.7” Color CMOS
- Resolution: 1280x720P
- System: L P/N automatically
- Viewing Angle: 120˚
- Night Vision: 4 infra-red lights
- Transmission Type: Digital Wireless (2400-2483.5MHz)
- Transmission Range: up to 200ft in open area
- Waterproof Level: IP67
- Shockproof Level: 4G
- Receive Sensitivity: -89dBm
- Operation Temperature: –20℃ ~ 70℃
- Storage Temperature: –30℃ ~ 85℃
- Battery Capacity: 6800mAh
- Battery working time: 18 hrs( continuous daytime); 15hrs( continuous night)
- Battery standby time: 360 hrs( continuous daytime); 68 hrs( continuous night)
- Battery Charging time : 8 hrs(80%),16 hrs(100% full)
- Battery capacity indicator: 4 LED lights
- Built-in Strong Magnet Base: Yes
- Camera adjustable angle: 0-100 degree
- Dimensions: 74*45.5*56.5mm
Wireless monitor
Lcd size: 5” color ips pannelResolution: 800×3(RGB)x480Brightness: 550cd/m2Contrast: 500:1View angle: U/D:85˚;L/R:85˚Power Supply: DC9-36VPower Consumption: <3WShockproof level: 4GWorking temperature: -20~+70℃Storage temperature: -30~+85℃Transmission Type: Digital Wireless (2400-2483.5MHz)Transmission Range: up to 200ft in open areaDimensions:
TROUBLESHOOTING
If you have any questions about this product, Please send us an mailbox above!
1. No signal
- Please check whether the camera is powered on.First, Whether it is in power on mode? Observe whether the red led is on after SHORT press the power button.Second, Whether it is in power off mode?Observe whether the red led is on after LONG press the power button.At last, is draining the battery? Please charge first!!
- Please check whether antennas are plugged on the camera.
- Please check the angle of the antenna.
- Please check whether metal obstacles near the antenna
- Pairing information is missing or wrong, please re-pair.
- Out of range, please add an antenna extension cable or change the camera mounting location
2. No picture
- Pairing information is missing or wrong, please re-pair.
- Out of range, the wireless signal is blocked too badly or poor signal, please add an antenna extension cable or change the camera mounting location.
- Please check low voltage red light blinking(flash) indicator, please charge first!
3. Freezes and disconnects / Unstable / static video
- Out of range, Please add an antenna extension cable or change the camera mounting location.
- The wireless signal is blocked too badly or poor signal, please add an antenna extension cable or change the camera mounting location.
4. Fuzzy picture, Not clear
- Please remove the camera lens protector to get best picture quality after install.
- Please check whether wipe off the camera lens.
5. The mounted camera slides or falls
Please check whether remove the film from the camera base, or Not steel iron furface.
FAQs
Q: Do you provide instruction manuals?A: Please goto the product website and download latest instruction manuals document.
Q: Do the backup camera systems work at night?A: Yes, with infra-red lights and all come with excellent night vision.
Q: Will I be able to install a camera system myself?A: Many people do have the handiness to install our systems without having to hire assistance.
Q: Battery lifeA: fully charged time:8 hour(80%), full daytime continuous work time:18 hours,full night continuous work time:15 hours,cold weather will consume power a little faster.A2: The battery life is superb. I charged it fully and used it for months off one charge but I did turn it off when it wasn’t in use.
Q: How to check if the camera is in power-on mode or power-off mode?A: Please check after short press the power button, power-on mode when the red led is on status ,power-off mode or draining the battery when the red led is off status.
Q: How to check whether the camera is draining the battery ?A: the four leds of the camera are always off by long press the power button hold 3 second.
Q: How to power on/power off ?A: power on: the red led on when long press the power button hold 3 second.power off: the full four led blink on and then all off when long press the power button hold 3 second.
Q: How to check the battery?A: In power on mode, Please check whether the four leds of the camera indicator by short press the power button,one red led on plus three green led on(about 100%),one red led on plus two green led on(about 75%),one red led on plus one green led on(about 50%),one red led on plus three green led off(about 25%),full four led off (about 0%).
Q: How to check low voltage of the “No picture /Fuzzy picture”A: the red LED blinking(flash) indicator, please charge first!
[xyz-ips snippet=”download-snippet”]