User Manual
![]()

leak SMART Sensextend Extension Kit
Congratulations on purchasing the SensXtend Extension Kit!This SensXtend kit works with a LeakSmart Sensor to detect leaks and monitor temperatures at high-risk areas in your home. The sensor attaches to the SensXtend dock and rope sensor to reach farther with its ability to detect leaks in tight, hard to reach places. To setup and use the SensXtend kit, you will need a LeakSmart hub and an account through our free LeakSmart app available in the Apple App Store or Google Play.
Sensor Placement
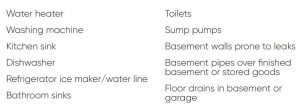
We understand that every home is unique, so our water sensors and accessories are customizable to suit your home’s needs. Use the LeakSmart Sensor on its own in places where water is likely to pool in a specific area. For low profile appliances or tight, hard-to-reach areas, add the SensXtend dock and rope sensor.As the world’s most intelligent leak and flood protection system, we have spent countless hours researching where leaks happen most and have developed the following list of areas sensors should be placed to provide coverage across your home:
A Triple Threat to Leaks Everywhere
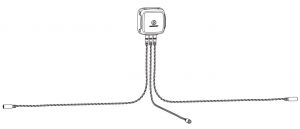
This SensXtend kit comes with one 4’ rope sensor that senses water along its entire surface. One optional 4’ extension cable is included to extend the rope sensor’s reach along walls or cabinets where water detection may not be needed. Our patented SensXtend dock with Tri-port Technology allows up to three separate rope extensions for paths in three different directions up to 300’ (100’ each), tripling the coverage across your home. Contact your local contractor or head to leaksmart.com to find out how to purchase additional rope sensors
Register your system at LeakSmart.com/support/registration/Troubleshooting: LeakSmart.com/frequently-asked-questions/LeakSmart is compatible with other smart home products. Check out LeakSmart.com/integrations
System Components:

- LeakSmart Sensor*
- AAA Batteries (3)*
- Sensor Dock with Tri-Port Technology™
- Rope Sensor (4’)
- Extension Cable (4’)*
- Screws (2)
- Wall Anchors (2)
- Adhesive pad
- Magnet
- Cable Clips (2)
- Setup Manual* May be sold separately
Setup Requirements
You will need: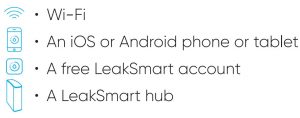
LeakSmart Sensor Setup and Operation
 Note: Setup requires previous installation of the LeakSmart hub and a free LeakSmart account. You will also need a Phillips head screwdriver, a damp cloth and a dry cloth.
- Take sensors, batteries and SensXtend accessories to the location your sensor will be placed.
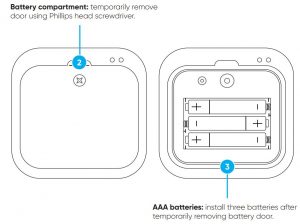
- Use the Phillips head screwdriver to remove the battery compartment door from the LeakSmart Sensor.
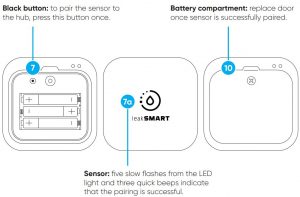
- Install the three provided AAA batteries, butDO NOT REPLACE THE BATTERY DOOR.• A chirp from the sensor indicates that the batteries have been installed.• A flashing blue light on the front of the sensor indicates that it’s ready to pair.
- Open the LeakSmart app on your phone or tablet.
- Tap Add Devices from the home screen.
- Tap Next in the LeakSmart app.
7. To pair the sensor to the hub, press the black button inside the battery compartment of the LeakSmart Sensor one time.• When the pairing is successful, the light on top of the sensor will blink slowly five times, and you’ll hear three quick beeps.8. The sensor will now be visible within the app on the home screen.9. Tap All My Devices are Paired.10. With the sensor successfully paired, replace the battery compartment door.
![]() Note: Pairing mode will last for three minutes. If you don’t successfully pair the sensor(s) before the three-minute pairing mode ends, you’ll have to start over at step 4.
Note: Pairing mode will last for three minutes. If you don’t successfully pair the sensor(s) before the three-minute pairing mode ends, you’ll have to start over at step 4.
Name and Test Sensors
- Follow the in-app instructions to name each sensor and set temperature limits.• Name the sensor to identify its location, e.g., master bath toilet (the sensor name can have a maximum of 20 characters).
- Some app versions may require you to test the sensor. To test sensors, follow these instructions:
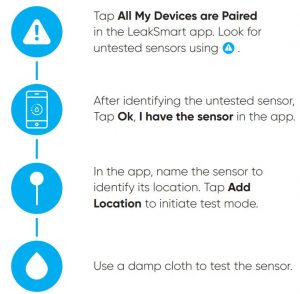
- Newly paired sensors are displayed under Untested Sensors with a
 indicating that the sensor needs to be named and tested.
 - Tap on a sensor from the untested sensors list. The selected sensor will beep to identify itself.
- When you hear the sensor, tap Ok, I have the sensor in the app.
- Tap Add Location to initiate test mode.
- Press and hold the damp cloth to the gold pins on the back of the sensor to trigger a leak (it will beep).
- Keeping the damp cloth on the gold pins, tap My Sensor is Beeping in the app. Hold damp cloth until it displays Success.
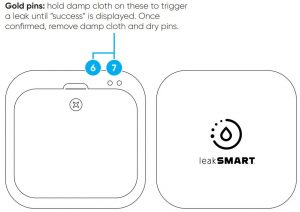
Note: If “success” does not display, refer to the website for additional troubleshooting tips. Your app version may not require testing during setup.
Sensor Dock Mounting Accessories
Determine the location for your Sensor Dock with Tri-Port™ Technology and choose the appropriate mounting accessory.

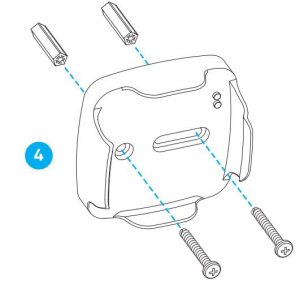
Sensor Dock Screw and Wall Anchor Instructions
- Determine where the sensor dock will be placed and use a pencil to mark where the screws will be placed on the wall.
- Use a screwdriver or drill to create a pilot hole (a hole smaller than the wall anchors provided).
- Once the pilot holes are created, press the wall anchors into the wall. Tap the head of the anchor lightly with a hammer until it is flush with the wall.
Note: If the pilot hole is not large enough for the wall anchors, enlarge the hole slightly instead of trying to force the anchor. If the fit is too tight, you may bend or break the anchor. Use a flathead screwdriver or the claw end of the hammer to gently remove the anchor if this happens.
4. Once the wall anchors are in place, align the screw holes on 1 the sensor dock with the wall anchors and insert the screws with a screwdriver or drill. Be sure to tighten the sensor dock enough so it does not move, but be careful not to over-tighten and crack the sensor dock.
Sensor Dock Adhesive Pad and Magnet Mount Instructions
Peel the adhesive cover that states: ”apply this side to sensor” from the pad or magnet and apply it to the back of the sensor dock.
- For walls or other non-metal surfaces:Peel the adhesive cover from the side of the pad that will be applied to the wall and press firmly to adhere it to the wall.
- For metal surfaces:Simply place the sensor dock with applied magnet to a metal surface.

Sensor Placement, Extension Cable and Rope Sensor Assembly
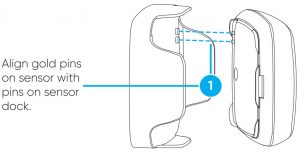
- Once the sensor dock is in place, slide the LeakSmart sensor into place by finding the 2 gold pins on the back of the sensor and aligning them with the pins on the sensor dock. Firmly press into place.
- Plug the extension cable or rope sensor cable into any of the 3 ports on the sensor dock.
Note: The extension cable does not detect leaks. It is included for use in areas where leak detection isn’t necessary (i.e. along walls, floors or cabinets). This allows you to maximize the rope sensor’s ability to detect leaks where it’s needed most.
3. Add as many extension cables or rope sensors as needed to cover the leaks in your home. One sensor dock can accommodate 3 separate rope paths that extend up to 100’ each.
Note: The extension cable is optional; the rope sensor will work without the extension cable when plugged directly into any of the three dock input ports.
Alert Setup
- Open the LeakSmart app.
- Tap Alerts .
- Customize alerts to your preference.
Adding Alert Contacts
- Tap Add Contact (You may add up to 20 contacts).
- Type contact’s name.
- Toggle on Email Alerts and type the contact’s email address.
- Toggle on Text Message alerts and type the contact’s phone number.
- Tap Done to save added contact(s).
Test Leak Simulation
The LeakSmart sensor and SensXtend accessories work with any LeakSmart shut-off valve system. To test the SensXtend kit with your system:
- Ensure your valve is in the open position.
- Press and hold the damp cloth to the rope sensor, so that the sensor begins to beep.
- If this sensor is set to Protect mode, confirm that the valve closes.
- Look for the banner at the top of the LeakSmart App to turn red. Confirm that your contacts receive the email and/or text alerts that a leak has been detected. If alerts are not received, tap Alerts in the app and check that they are turned on.
Clearing Test Leaks
- Dry off the rope sensor.
- Place the rope sensor in its location.
- Confirm the banner at the top of the LeakSmart app turned green. (System OK)
- Open the valve using the buttons on the shut-off valve or via the app.
FCC Compliances:
Sensors Compliance:FCC: W72-ZICM357SP1 | IC:8254A-ZICM357SP2
This equipment has been tested and found to comply with the limits for a Class B digital device, pursuant to part 15 of the FCC Rules. These limits are designed to provide reasonable protection against harmful interference in a residential installation. This equipment generates, uses and can radiate radio frequency energy, and if not installed and used in accordance with the instructions, may cause harmful interference to radio communications.
However, there is no guarantee that interference will not occur in a particular installation. If this equipment does cause harmful interference to radio or television reception, which can be determined by turning the equipment off and on, the user is encouraged to try to correct the interference by one or more of the following measures:
- Reorient or relocate the receiving antenna
- Increase the separation between the equipment and the receiver
- Connect the equipment into an outlet on a circuit different from that to which the receiver is connected
- Consult the dealer or an experienced radio/TV technician for help
 WARNING
This product can expose you to chemicals including lead which is known to the State of California to cause cancer, birth defects and other reproductive harm.
For more information, go to www.P65Warnings.ca.gov

Questions? Contact our technical service team: 855-532-5457
Designed in the U.S.A. Made in China.© 2020 LeakSmart, Inc. All rights reserved.
References
[xyz-ips snippet=”download-snippet”]