
 STEREO 130INTEGRATED AMPLIFIER
Important Safety Information
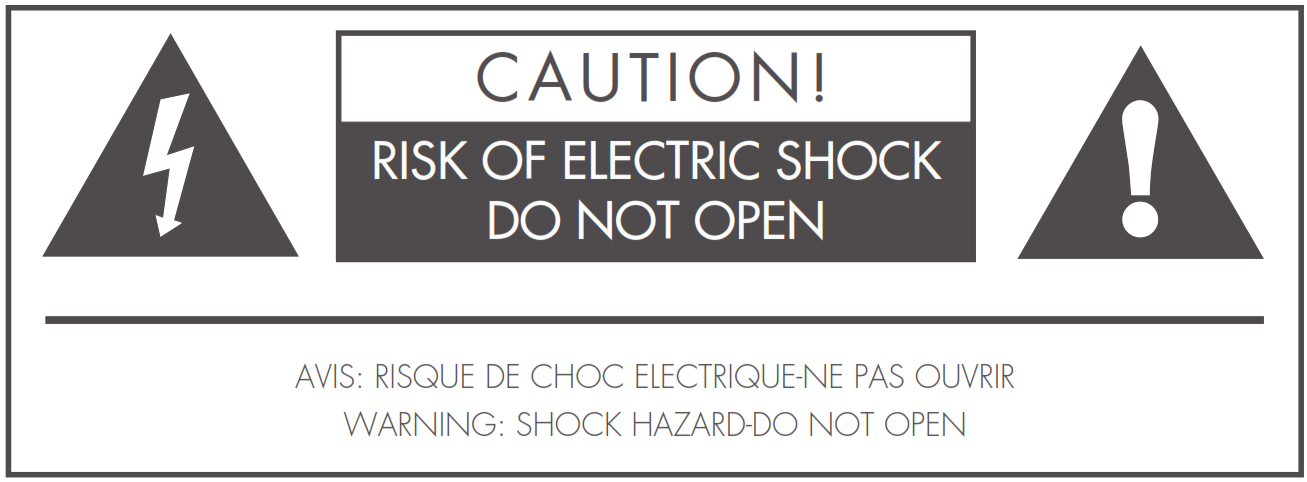 This lightning flash with an arrowhead symbol within an equilateral triangle is intended to alert the user to the presence of non-insulated “dangerous voltage” within the product’s enclosure that may be of sufficient magnitude to constitute a risk of electric shock.Warning: To reduce the risk of electric shock, do not remove cover (or back) as there are no user-serviceable parts inside. Refer servicing to qualified personnel. The exclamation point within an equilateral triangle is intended to alert the user to the presence of important operating and maintenance instructions in the literature accompanying the appliance.Read these instructions.Keep these instructions.Heed all warnings.Follow all instructions.Do not use this apparatus near water.Clean only with a dry cloth.Do not block any ventilation openings. Install in accordance with the manufacturer’s instructions.Do not install near any heat sources such as radiators, heat registers, stoves, or other apparatus (including amplifiers) that produce heat.Do not defeat the safety purpose of the polarized or grounding-type plug. A polarized plug has two blades with one wider than the other. A grounding plug has two blades and a third grounding prong. The wide blade or the third prong is provided for your safety. If the provided plug does not fit into your outlet, consult an electrician for the replacement of the obsolete outlet. Protect the power cord from being stepped on or pinched, particularly at the plugs, convenience receptacles, and at the point where they exit from the apparatus. Unplug this apparatus during lightning storms or when unused for long periods of time. Refer all servicing to qualified service personnel. Servicing is required when the apparatus has been damaged in any way, such as power supply cord or plug is damaged, liquid has been spilled or objects have fallen into the apparatus, the apparatus has been exposed to rain or moisture, does not operate normally, or has been dropped.CAUTION: These servicing instructions are for use by qualified service personnel only. To reduce the risk of electric shock, do not perform any servicing other than that contained in the operating instructions unless you are qualified to do so. Do not install this equipment in a confined or built-in space such as a bookcase or similar unit, and keep well ventilated in an open space. The ventilation should not be impeded by covering the ventilation openings with items such as newspaper, tablecloths, curtains, etc.WARNING: Only use attachments/accessories specified or provided by the manufacturer (such as the exclusive supply adapter, battery, etc).WARNING: Please refer to the information on the exterior panel of the enclosure for electrical and safety information before installing or operating the apparatus.WARNING: To reduce the risk of fire or electric shock, do not expose this apparatus to rain or moisture. The apparatus shall not be exposed to dripping or splashing and that objects filled with liquids, such as vases, shall not be placed on the apparatus.WARNING: For the terminals marked with the symbol of “
![]() ” may be of sufficient magnitude to constitute a risk of electric shock. The external wiring connected to the terminals requires installation by an instructed person or the use of ready-made leads or cords.
” may be of sufficient magnitude to constitute a risk of electric shock. The external wiring connected to the terminals requires installation by an instructed person or the use of ready-made leads or cords. Protective earthing terminal. The apparatus should be connected to a mains socket outlet with a protective earthing connection. The product is designed to use in moderate/ tropical climates.
WARNING: No naked flame sources, such as lighted candles, should be placed on the apparatus. WARNING: Attention should be drawn to the environmental aspects of battery disposal.WARNING: Use of the apparatus in tropical climates.THE FUSE VALUES ARE: 220 – 240V (UK, China, etc.) T2.0AL 250V Slow Blow100 – 120V (USA, Japan, etc.) T4.0AL 250V Slow Blow
Getting Started
INTRODUCTION
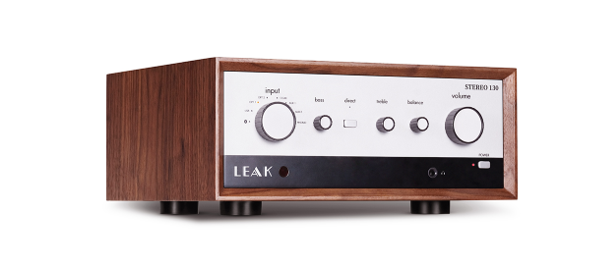
The LEAK STEREO 130 is a high-performance, high-fidelity integrated amplifier designed for audio enthusiasts. It is designed to be the perfect match to a wide variety of sources and provides the necessary amplification to realize the highest quality of your stored music through your loudspeakers and headphones.The LEAK STEREO 130 can be connected to both analog and digital sources, thanks to its diversity of inputs. A built-in Moving Magnet (MM) phono pre-amplifier allows for direct connection to turntable record players.The LEAK STEREO 130 will operate as a high-fidelity Digital Audio Converter (DAC). You can also stream music to the LEAK STEREO 130 from any Bluetooth device such as portable music players and smartphones. The LEAK STEREO 130 is designed with the innovative built-in aptX codec so that you can hear CD-quality audio over the Bluetooth wireless connection.To ensure proper operation, please read this owner’s manual carefully before using the product. After reading this manual, be sure to keep it for future reference.
FEATURES
• 2 × 65W RMS (4 ohm) / 2 x 45W RMS (8 ohm) amplifier• ESS Sabre32 Reference ES9018K2M D/A converter• Bluetooth 4.2 aptX receiver• 2 × Optical TOSlink inputs• 1 × RCA coax input• 1 × Optical TOSlink output• 1 × RCA coax output• 2 × RCA aux inputs• 1 × RCA MM phono input• 1× 6.3mm (1/4”) jack headphone output
UNPACKING THE EQUIPMENT
Unpack the product fully. The carton should contain:• The LEAK STEREO 130 amplifier• One IEC power cord suitable for your area• One remote headset• One antenna (for metal enclosure version only. LEAK STEREO 130 with wooden chassis does not have antenna)• The LEAK STEREO 130 user manual
USB DRIVERS (AND FIRMWARE UPDATES)
To download Windows Drivers, please see the separate manual. Any firmware updates will also be available from www.leak-hifi.co.uk
PLACEMENT
The unit must be mounted on a solid, level, and stable surface. Before you connect the LEAK STEREO 130 to the AC mains power, ensure your AC mains voltage corresponds to the rating on the rear panel of the product. If in doubt, consult your dealer. If you move to an area that has a different AC mains voltage, seek advice from a LEAK-appointed dealer or a competent service technician.
Controls and Connectors
 Remote Handset
 Remote Handset
NOTE: the handset buttons shown crossed out are for use with other LEAK units such as the LEAK CDT and are therefore not functional when used with theLEAK STEREO 130.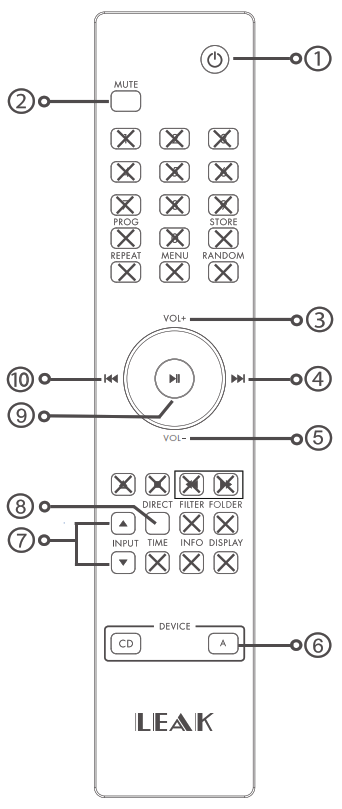 1. STANDBY: Press to bring the unit in/out of Standby2. MUTE: Press to Mute/Unmute the sound. In Mute, the source indicator on the front panel will flash.3. VOL+: Press to increase the volume
4. ![]() : Press to move to the next track. (Bluetooth play mode)5. VOL-: Press to decrease volume,6. A: Press to select the LEAK STEREO 130 remote mode (press the CD button for the LEAK CDT controls)7: Press to select the source inputINPUT: Press to select the direct mode8. DIRECT: Press to select the direct mode9.
: Press to move to the next track. (Bluetooth play mode)5. VOL-: Press to decrease volume,6. A: Press to select the LEAK STEREO 130 remote mode (press the CD button for the LEAK CDT controls)7: Press to select the source inputINPUT: Press to select the direct mode8. DIRECT: Press to select the direct mode9. ![]() : Press to Play/Pause (Bluetooth play mode) Press and hold for 3 seconds to disconnect Bluetooth10 . Press to move to the previous track. (Bluetooth play mode)NOTE:Always use AAA batteries and replace them in sets – never mix old and new batteries. Very weak batteries can leak and damage the handset. Replace them in good time! There is a risk of fire and burns if a battery is handled improperly. Do not disassemble, crush, puncture, short the contacts or dispose of the batteries in fire or water. Do not attempt to open or service a battery. Discard used batteries in full accordance with recycling regulations in force in your area.
: Press to Play/Pause (Bluetooth play mode) Press and hold for 3 seconds to disconnect Bluetooth10 . Press to move to the previous track. (Bluetooth play mode)NOTE:Always use AAA batteries and replace them in sets – never mix old and new batteries. Very weak batteries can leak and damage the handset. Replace them in good time! There is a risk of fire and burns if a battery is handled improperly. Do not disassemble, crush, puncture, short the contacts or dispose of the batteries in fire or water. Do not attempt to open or service a battery. Discard used batteries in full accordance with recycling regulations in force in your area.
Connection
INSTALLATION
Before making any connections to your high fidelity equipment make sure that all units in the system are switched off and unplugged at the mains.
AC POWER CONNECTION
The Power On/Off switch is on the rear panel. Before connecting the LEAK equipment to the AC mains supply check and make sure the voltage marked onthe back matches your supply voltage.
DIGITAL SIGNAL OUTPUT CONNECTIONS
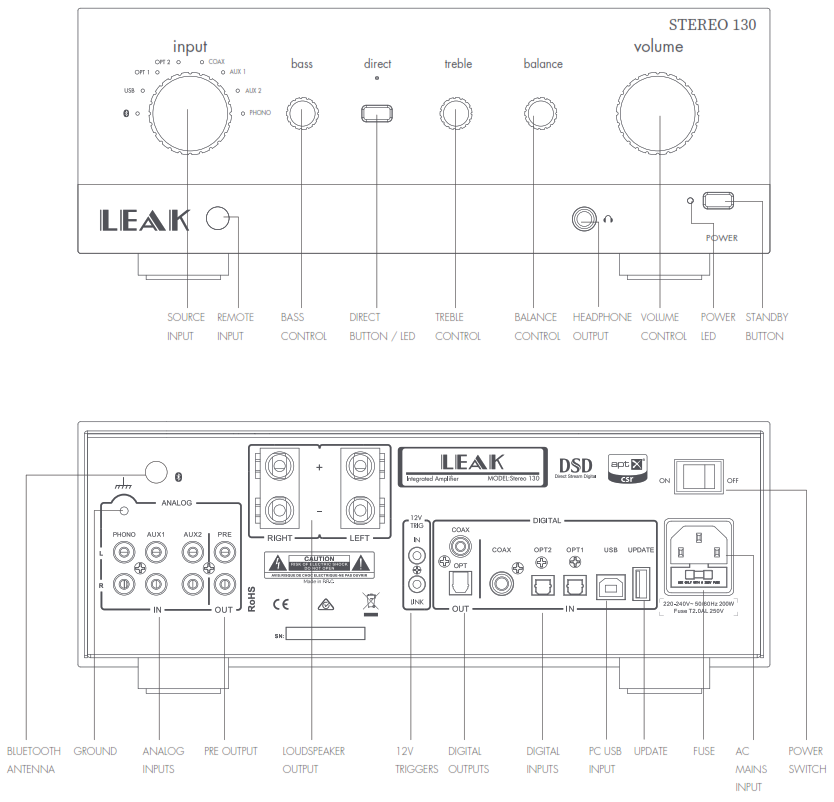
Coaxial OutputLEAK STEREO 130 has one coaxial SPDIF output. Connect an RCA digital interconnect between the digital coaxial out ofLEAK STEREO 130 unit and the required input of your equipment.Optical OutputsLEAK STEREO 130 has one optical SPDIF output. Connect an optical (TOSLink) interconnect between the digital optical out of LEAK STEREO 130 and the required input of your associated equipment.
ANALOG SIGNAL OUTPUT CONNECTIONS
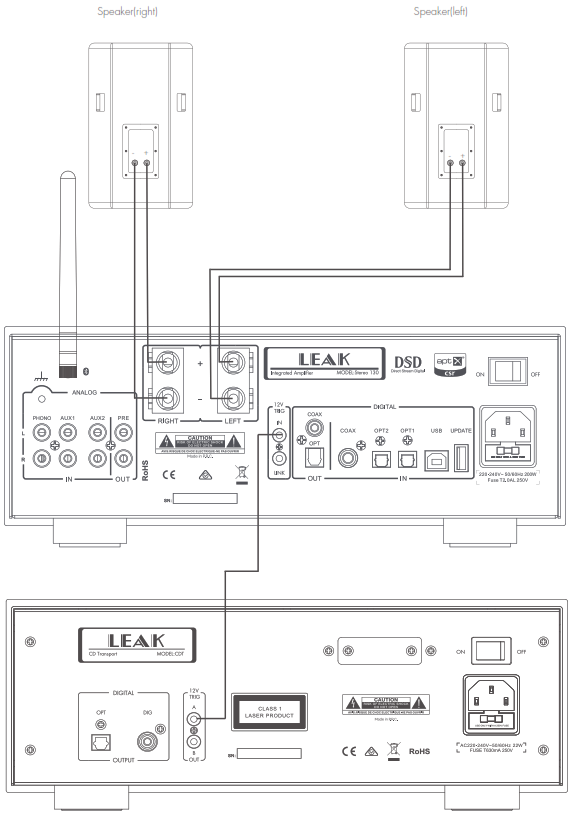
Preamplifier OutputThe LEAK STEREO 130 has one pair of unbalanced RCA outputs which can make the unit operate as a preamplifier.Connect an RCA cable between the unbalanced pre output of the LEAK STEREO 130 and the unbalanced input of a power amplifier or associated equipment.Interconnection should be of low-noise construction and fully screened to minimize hum and noise transmission.Loudspeaker OutputsThe LEAK STEREO 130 has two sets of loudspeaker outputs. They are independent for right and left stereo amplifier outputs.Connect the Positive (+) RED terminals of the amplifier to the Positive (+) RED terminals of the loudspeakers. Connect the Negative (-) BLACK terminals similarly.If the speaker has the wrong polarity connection, the sound becomes unnatural or lacks bass When connecting loudspeakers tighten the terminals securely by hand. Make sure there are no loose strands of wires which could cause short circuits.Headphone OutputThe LEAK STEREO 130 has a stereo 6.3mm(1/4”) jack on the front panel for connecting headphones. Connecting the headphones will mute the audio signal to the loudspeakers. The LEAK STEREO 130 headphone output can be adjusted up to 4.5V. Select a comfortable output level to suit your headphones.WARNING: Listening to music at high volume levels and for extended durations can damage one’s hearing. In order to reduce the risk of damage to hearing, one should lower the volume to a safe, comfortable level, and reduce the amount of time listening to high levels. Headsets should comply with EN 50332-2 requirements (for GS certification).
Output Connection
ANALOG SIGNAL INPUT CONNECTIONS
The LEAK STEREO 130 has two sets of unbalanced RCA inputs for connection to units that do not feature balanced outputs. Both sets are identical. Connect an RCA cable between the unbalanced input of the LEAK STEREO 130 and the unbalanced output of a source unit like a CD player or DAC. Interconnections should of low-noise construction and fully screened to minimize hum and noise transmission.
PHONO SIGNAL INPUT CONNECTIONS
The LEAK STEREO 130 has a PHONO signal input, the PHONO input should only be connected to turntables fitted with MM or high output MC cartridges.
DIGITAL SIGNAL INPUT CONNECTIONS
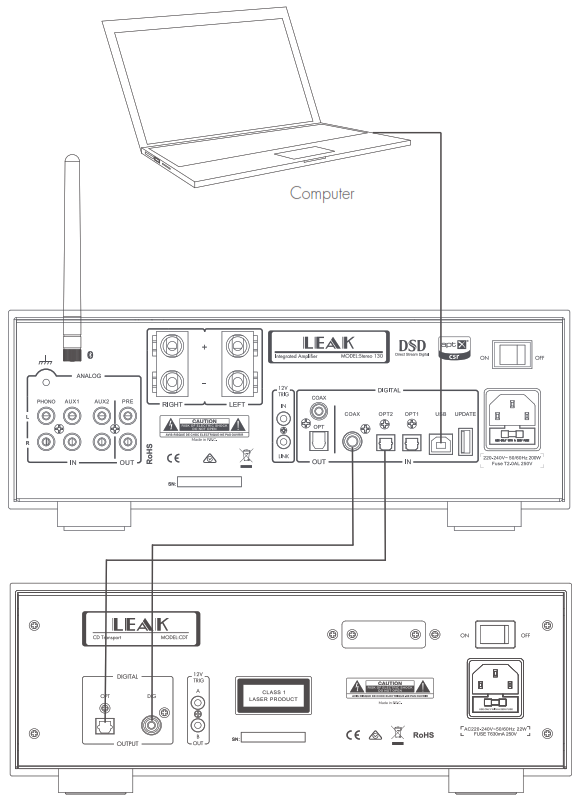
The LEAK STEREO 130 has a variety of digital inputs, which can be connected to most popular digital sources, like the digital output of a CD or DVD player, DAC, PC.Coaxial InputsThe LEAK STEREO 130 has a coaxial SPDIF input. Connect an RCA digital interconnect between the digital coaxial output of the source unit to the COAX input of the LEAK STEREO 130.Optical InputsThe LEAK STEREO 130 has an optical SPDIF input. Connect an optical (TOSlink) interconnection between the digital optical output of the source unit to the OPT1 or OPT2 input on LEAK STEREO 130.Bluetooth InputThe LEAK STEREO 130 has a built-in Bluetooth signal processor module that can play audio files transmitted from the source unit via Bluetooth wireless transmission. Please refer to page 12 to enable this function.USB InputThe LEAK STEREO 130 has one B-type USB input which lets you connect a Mac or PC to play audio files stored on a computer. B-type USB
UPDATE
The LEAK STEREO 130 provides a type-A USB port for firmware upgrades. Upgrade method: Put the upgrade file onto a USB disk, plug it into the UPDATE USB interface, press and hold the STANDBY button on the front panel while switching on the power using the rear panel POWER switch. LEAK STEREO 130 will upgrade automatically. After upgrading, unplug the USB disk and power on the amplifier for normal use.
GROUND TERMINAL
The grounding terminal connected with this product is used to reduce noise when connecting with other associated equipment fitted with a separate ground lead. This terminal is required to be used when the turntable amplifier and turntable player are both double insulated. In this case, the metal housing of the machine is grounded to eliminate the residual hum, and the ground terminal cannot be used as safety for other equipment. If you have any questions, please consult the distributor.
Input Connection
Operation

STANDBY MODE
The LEAK STEREO 130 will be in standby mode when powered on. The power LED indicator on the front panel will show dark red. Press the Standby button or the button![]() on the remote handset to bring LEAK STEREO 130 out of standby. You can activate the ‘auto standby’ function by pressing and holding the Standby button on the front panel until the LED blinks. A short press of the Standby button then selects the Auto – Standby function as follows:20 min Auto-StandbyThe Power LED indicator flashes twice: Auto-Standby 20 minutes. LEAK STEREO 130 will automatically go into Standby mode if there is no signal input or operation for 20 minutes.1 Hour Auto-StandbyThe Power LED indicator flashes thrice: Auto-Standby 1 hour. LEAK STEREO 130 will automatically go into Standby mode if there is no signal input or operation for 1 hour.Never Auto-Standby (Default)The Power LED indicator flashes once: Auto-Standby Never. LEAK STEREO 130 will not go into Standby mode.
on the remote handset to bring LEAK STEREO 130 out of standby. You can activate the ‘auto standby’ function by pressing and holding the Standby button on the front panel until the LED blinks. A short press of the Standby button then selects the Auto – Standby function as follows:20 min Auto-StandbyThe Power LED indicator flashes twice: Auto-Standby 20 minutes. LEAK STEREO 130 will automatically go into Standby mode if there is no signal input or operation for 20 minutes.1 Hour Auto-StandbyThe Power LED indicator flashes thrice: Auto-Standby 1 hour. LEAK STEREO 130 will automatically go into Standby mode if there is no signal input or operation for 1 hour.Never Auto-Standby (Default)The Power LED indicator flashes once: Auto-Standby Never. LEAK STEREO 130 will not go into Standby mode.
VOLUME CONTROL
Before turning on the LEAK STEREO 130, please check the volume level before playing the source. The volume control will remain at the level it was last set at when the unit was put in stand-by.You can adjust the volume knob on the front panel or press the volume button of the remote control to adjust the volume level as needed. Press the MUTE button on the remote control to enter MUTE mode. Note: the selected input indicator flashes to show the amplifier is in MUTE mode.
PLAYING MUSIC VIA ANALOG INPUTS
Connect the analog signal of a source unit to LEAK STEREO 130’s AUX1 or AUX2 input. Rotate the INPUT selector on the front panel (or press the INPUT selectkey on the remote control) to select the AUX1 or AUX2 input indicator will light and music will start playing.
PLAYING MUSIC VIA DIGITAL INPUTS
Connect the coaxial SPDIF signal of source units to the digital in COAX jack or the optical (TOSlink) signal of source units to the OPT1 or OPT2 jack on the LEAK STEREO 130’s rear panel. Rotate the INPUT selector on the front panel (or press the INPUT select key on the remote control) to select the COAX/OPT1/OPT2 LEAK Stereo130 input, the selected input indicator will light and music will start playing.
PLAYING MUSIC VIA USB INPUTS
When connecting the LEAK STEREO 130 to a Windows computer for the first time, you will need to install the USB driver on your computer. Connect to a Mac or PC via the type-B USB interface on the LEAK STEREO 130’s rear panel. Rotate the INPUT selector on the front panel (or press the INPUT select key on the remote control) to select the USB input, the selected input indicator will light. Select the unit as the playback output device on the computer and then start playing music with your chosen music software program.
PLAYING MUSIC VIA BLUETOOTH
You can wirelessly connect LEAK STEREO 130 to a music source via Bluetooth wireless technology. When the Bluetooth is not connected, the indicator light of the Bluetooth input flashes. After the Bluetooth is connected, the indicator LED glows steadily.Open Bluetooth search on your mobile phone or tablet and connect to “LEAK STEREO 130 BT”, if prompted to enter the password, enter “0000”. When the connection is successful, the music starts playing. Switch to another input during Bluetooth playback will disconnect after 1 minute. Switch back to the Bluetooth input for automatic connection.To disconnect the Bluetooth:• Move the Bluetooth source beyond the communication area.• Turn off the connected device or turn off its Bluetooth function.• Hold press the![]() button of the remote control for 3 seconds to force the current Bluetooth connection to be disconnected.
button of the remote control for 3 seconds to force the current Bluetooth connection to be disconnected.
BASS
Turn the bass adjusting knob on the front panel to increase (clockwise) or decrease (counterclockwise) the low-frequency response. Control range: -6db to +6dB.
TREBLE
Turn the treble adjusting knob on the front panel to increase (clockwise) or decrease (counterclockwise) the high-frequency response. Control range: -6db to 6dB.Note:The RIAA playback characteristic has been incorporated in the LEAK STEREO 130, as this is the internationally agreed standard. This characteristic does not take into account the acoustics of the recording studio, the position of the microphones relative to the artists, your pickup, your loudspeaker systems, the acoustics of your room, and your particular ears! In other words, the play-back characteristic is of use only as an approximation, and it may well be necessary to adjust the final result by using the controls marked as ‘BASS’ and ‘TREBLE’; this is the reason for their presence. When playing LP records (33 and 45 r.p.m) made prior to 1955, for instance, the bass and treble control may be used to correct differences in the recording characteristic. 1/3 When playing European 78 records, the ‘TREBLE’ control should, theoretically, be turned to ‘2 O’Clock’. Consumer opinion in some countries insists on a magnitude of available bass boost which, if used at maximum, can only result in a travesty of the originalmusic. We have provided you with the availability of bass boost which you certainly should not need if your pickup and loudspeakers are moderately good.It is not possible to obtain true bass from small loudspeaker systems by turning the ‘BASS’; control to maximum, though an intermediate setting may be helpful, particularly when listening to low-intensity levels (as in an apartment late at night).
BALANCE
The balance knob on the front panel can adjust the sound output balance of the left and right speakers to compensate for an unbalanced sound.Note: if you turn the balance control knob to full Left or Right, the other channel will be silent.
DIRECT
Press the Direct button on the front panel of the LEAK STEREO 130 to activate the direct function, and the indicator above the key will light up. Click to turn off Direct again and the indicator goes off.The LEAK STEREO 130 will bypass certain circuits within the amplifier design by stopping the power supply to these circuits. It will reduce noise and electronic interference (albeit minor) in order to reproduce the purest sound as is electronically possible.Note: bass, treble, and balance controls are not available when direct is activated.
PROTECTION MODE
LEAK STEREO 130 is protected by a thermal switch that interrupts the AC Power supply if the amplifier is grossly overloaded for a period of time. To restore operation, simply press the Standby button on the front panel. It is thus fully protected against gross overload, short-circuited output, etc, but not necessarily against seriously inadequate ventilation.
Warranty
LEAK warrants this product to be free from defects in materials and workmanship, subject to the terms and conditions below. During the warranty period LEAK will repair or replace (at LEAK’s option) this product, or any defective part in this product, if it is found to be defective due to faulty materials, workmanship or function. The statutory warranty period may vary from country to country.
TERMS AND CONDITIONS
The warranty starts on the date of purchase as per the proof of purchase (or the date of delivery if this is later).You must provide proof of purchase/delivery before work can be carried out. Without this proof, any work carried out will be subject to charge. All work will be carried out by LEAK or its authorized agents or distributors. Any unauthorized repair or modification will void this warranty. If any part is no longer available it will be replaced with a functional replacement part. Any parts that are replaced will become the property of LEAK. Any repair or replacement under this warranty will not extend the original period of warranty. This warranty is valid only in the county of purchase, applies only to the first purchaser and is not transferable.
THE FOLLOWING ARE NOT COVERED:
1. Products where the serial number has been removed, altered or otherwise made illegible.2. Normal wear, tear and cosmetic damage.3. Transportation or installation of the product.4. Accidental damage, fault caused by commercial use, acts of God, incorrect installation, connection or packing, misuse, neglect or careless operation or handling of the product which is not in accordance with LEAK’s user instructions.5. Repairs or alterations carried out by parties other than LEAK or its authorized agents or distributors.6. Products not purchased from a LEAK authorized dealer.7. Products that were not new at the time of original purchase.8. Products sold ‘as is’, ‘as seen’ or ‘with all faults.Repairs or replacements as provided under this warranty are the exclusive remedies of the consumer.LEAK shall not be liable for any incidental or consequential damages for breach of any express or implied warranty in this product. Except to the extent prohibited by law, this warranty is exclusive and in lieu of all other warranties whatsoever, both express and implied, including, but not limited to, the warrantyof merchantability and fitness for a practical purpose.This warranty provides benefits that are additional to and do not affect your statutory rights as a consumer. Some countries and U.S. states do not allow the exclusion or limitation of incidental or consequential damages or implied warranties so the exclusions in the paragraph above may not apply to you. This warranty gives you specific legal rights, and you may have other statutory rights, which vary from state to state or county to county.
HOW TO CLAIM:
To obtain warranty service contact the LEAK authorized dealer from which you purchased this product. Do not dispatch goods without the prior agreement of the dealer, LEAK or their authorized distributors. If asked to return products for inspection and/or repair, pack carefully, preferably in the original cartons or packing affording an equal degree of protection, and return prepaid. If unsuitable packaging is used, LEAK may make a charge for the supply of new packaging. Insurance is recommended and goods are returned at the owner’s risk. LEAK or its authorized distributors cannot be held liable for loss or damage in transit.
Specifications
Measurement made with 230V power supply
| Model | STEREO 130 |
| D/A Converter | ESS Sabre32 Reference ES9018K2M |
| Input Sampling Rates | Optical, Coaxial: 44.1kHz~192kHz; USB: 44.1kHz~384kHz (PCM)/DSD64, DSD128, DSD256 |
| Rated Output Power | 2 x 45W (8ohm)/2x65W (4ohm) |
| Total Harmonic Distortion | < 0.005% (30W, 8ohm) |
| Frequency Response | 20Hz-20kHz (+/-0.5dB) |
| Input Sensitivity | 480mV (RCA AUX IN); 4.1mV (phono MM) |
| Input Impedance | 10Kohm (AUX) ; 47Kohm //100pF (phono MM) |
| Signal to Noise Ratio (S/N) | ≥108dB (A-weighted, ref.45W) |
| Pre Output Level | 2.3V (Max) |
| Pre Output Total Harmonic Distortion (THD) | < 0.003% |
| Pre Output Signal to Noise (S/N) | >110dB (A-weighted) |
| Bluetooth Version | 4.2 |
| Profile | A2DP |
| Codec | aptX (priority), SBC |
| USB Input | 1 x USB (B-type) |
| Digital Audio Inputs | 2 x Optical TOSlink ,1 x RCA COAX |
| Digital Audio Outputs | 1 x Optical TOSlink ,1 x RCA COAX |
| Analog Inputs | 2 x RCA (AUX1, AUX2) ,1 x RCA (phono MM) |
| Analog Output | 1 x RCA (PRE OUT) |
| Power Requirement (Depends on your area) | 220-240V ~ 50/60Hz100-120V ~ 50/60Hz |
| Dimensions W x H x D (mm) | 302 x 118 x 270 (Metal) |
| 326 x 146 x 276 (Wood) | |
| Carton Size W x H x D (mm) | 475 x 248 x 450 |
| Net Weight | 7.02kg (Silver) 8.30kg (Walnut) |
| Gross Weight | 9.30kg (Silver)10.60kg (Walnut) |
| Finish | Silver/Walnut |
 Current disposal of this product. This marking indicates that this product should not be disposed of with other household wastes throughout the EU. To prevent possible harm to the environment or human health from uncontrolled waste disposal, recycle it responsibly to promote the sustainable reuse of material resources. To return your used device, please use the return and collection systems or contact the retailer where the product was purchased. They can take this product for environmentally safe recycling.
IAG House, 13 /14 Glebe Road, Huntingdon, Cambridgeshire, PE29 7DL, UKTel: +44(0)1480 452561 Email: [email protected] Website: http://www.leak-hifi.co.uk
References
[xyz-ips snippet=”download-snippet”]