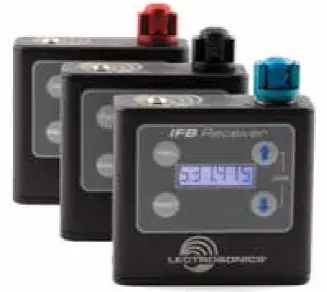
LECTROSONICS IFBR1B UHF Multi-Frequency Belt-Pack IFB Receiver
This guide is intended to assist with initial setup and operation of your Lectrosonics product. For a detailed user manual, download the most current version at: www.lectrosonics.com
IFBR1B Features

On/Off and Volume KnobTurns unit on or off and controls headphone audio level. When the IFBR1B is first turned on, the firmware version will display briefly.
Battery Status LEDWhen the battery status LED glows green, the batteries are good. The color changes to red at a midpoint during the runtime. When the LED begins to blink red, only a few minutes remain. The exact point at which the LED turns red will vary with battery brand and condition, temperature and power consumption. The LED is intended to simply catch your attention, not to be an exact indicator of remaining time.
RF Link LEDWhen a valid RF signal from a transmitter is received, this LED will light up blue.Headphone OutputA 3.5 mm mini phone jack accommodates a standard mono or stereo type 3.5 mm plug. The unit will drive low or high impedance earphones. The jack is also the receiver antenna input with the earphone cord acting as the antenna. The cord length is not critical but must be at least 6 inches minimum.USB PortFirmware updates via Wireless Designer are made easy with the USB port in the battery compartment.
Installing the Battery
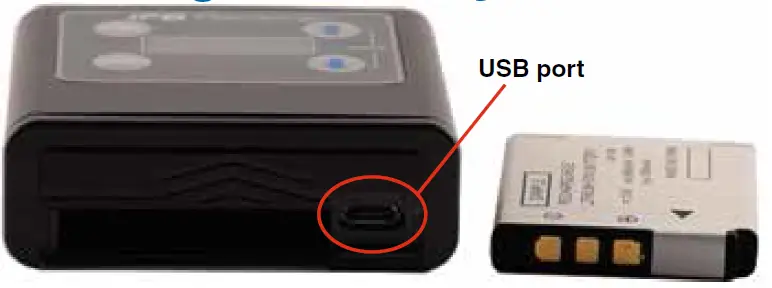
An attached sliding door makes battery installation easy. The USB port is located in the battery compartment. Slide the battery compartment door open, drop the battery in so that the connectors match and slide the battery door closed.
Battery Charging
The receiver operates on a 3.6 V rechargeable battery that will provide about six hours of operation per charge.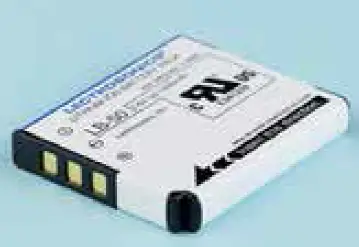 CAUTION: Use only Lectrosonics LB-50 supplied battery (p/n 40106-1).The optional battery charger kit provides a folding NEMA 2-prong plug on the charger, and will operate from 100-240 VAC sources. The LED glows red during charging and turns green when the battery is fully charged. The kit includes a Euro plug adapter and vehicle auxiliary power adapter cord.
Battery charger kit P/N 40107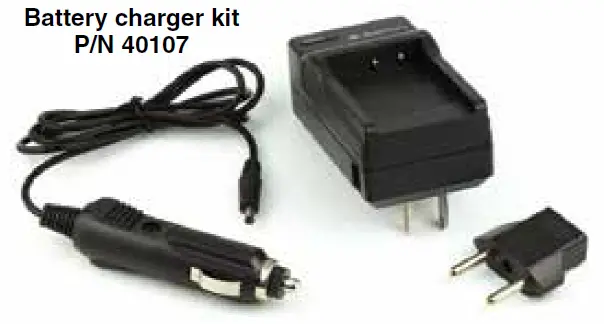
CAUTION: Use only Lectrosonics battery chargers, P/N 40107 or CHSIFBRIB.
IFBR1B Functions
Frequency SelectionPress the FREQ button to select receiver frequency. Frequency is shown in MHz. The UP and DOWN arrow buttons adjust the frequency in 25 0r 100 kHz steps (VHF: 125 kHz steps). Simultaneous press of FREQ + UP or FREQ + DOWN adjusts the frequency in 1 MHz steps.
NOTE: Holding down the UP or DOWN arrow button, as opposed to a quick press, will scroll through the frequency steps at an accelerated pace.
Preset SelectionPress the PRESET button to select preset frequencies for future use. Presets are displayed as: P on the left and the current preset number (1-10) on the right OR If the current preset slot is empty, an E also appears on the right. Use the UPand DOWN arrow buttons to navigate among any programmed presets, tuning the receiver to each.NOTE: If the preset number is blinking, the receiver IS NOT currently tuned to that preset.
There are two options available for setting presets:Choosing the preset slot first:
- Press PRESET to display the preset menu.
- Use PRESET + UP and PRESET + DOWN to choose the desired slot. When navigating among the preset slots in this way, all slots are accessible, even the empty ones, and the receiver’s tuning is not affected.
- If the desired preset slot is occupied, you can reprogram by pressing PRESET + DOWN to clear the slot.
- Press FREQ to display the frequency, then use the UP and DOWN arrow buttons adjust the frequency in 25 kHz steps.
- Press PRESET again to return to the presets menu. You should see an E next to the blinking preset number.
- Press and hold PRESET + UP to program the preset. The E will disappear and the preset number will stop blinking, indicating that this slot has now been programmed with the current frequency.
Choosing the frequency first:
- Press FREQ to display the frequency, then use the UP and DOWN arrow buttons adjust the frequency in 25 kHz steps.
- Press PRESET to display the preset menu.
- Use PRESET + UP and PRESET + DOWN to choose the desired slot. When navigating among the preset slots in this way, all slots are accessible, even the empty ones, and the receiver’s tuning is not affected.
- If the desired preset slot is occupied, you can reprogram by pressing PRESET + DOWN to clear the slot.
- Press and hold PRESET + UP to program the preset. The E will disappear and the preset number will stop blinking, indicating that this slot has now been programmed with the current frequency.
Clear a Preset Selection
- Press PRESET to display the preset menu.
- Press either UP or DOWN arrow buttons (tuning as you scroll) or PRESET + UP and PRESET + DOWN (selecting the preset without tuning) to select the preset number you wish to clear.NOTE: If there is an E next to the preset number, the slot is already clear.
- Press and hold PRESET + DOWN to clear the slot. The E will appear and the preset number will blink, indicating the slot is now empty.
Backlight SettingsPress the UP arrow button while powering on the receiver to display the backlight time out menu. Use the UP and DOWN arrow buttons to scroll through the options:bL: Backlight always on; default settingbL 30: Backlight times out after 30 secondsbL 5: Backlight times out after 5 secondsPress the FREQ button to exit and save settings.
LED On/OffPress the UP arrow button while powering on the receiver. From the backlight time out menu, press the FREQ button to access the LED on/off menu. Use the UP and DOWN arrow buttons to scroll through the options. Press the FREQ button to exit and save settings.
Locale MenuOn block 941 receivers ONLY, from the LED On/Off menu, press the FREQ button to access the LOCALE menu. Use the UP and DOWN arrow buttons to scroll through the options:LC CA: Use with SMV/E07-941, SMQV/E07-941, HMA/E07-941, HHA/E07- 941, SMWB/E07-941 and SMDWB/E07-941LC –: Use with all other Block 941 transmittersPress the FREQ button to exit and save settings.
Locking the Settings
To lock or unlock the IFBR1B settings, press and hold the UP and DOWN arrow buttons simultaneously until the countdown completes.There are two options available for locked settings:Locking Frequency: If frequency is displayed when the receiver is locked, the frequency remains displayed, and the UP or DOWN arrow buttons will not alter the frequency.Locking Preset: If preset is displayed when the receiver is locked, preset remains displayed, and the UP or DOWN arrow buttons can be used to scroll through previously programmed presets; however, the presets may not be programmed or deleted.
Firmware Update Instructions
Use the Lectrosonics wireless Designer program to install firmware updates. Firmware update files and change notes are available from the Lectrosonics website. Remove the battery and connect the IFBR1B to your Windows or macOS computer with a USB cable. The cable must have a micro-B male connector to mate with the USB jack in the IFBR1B. When updating firmware, the IFBR1B is powered by the USB cable. Use the “Firmware Update” Wizard in Wireless Designer to open the firmware file and install the new firmware version.
Accessories

LIMITED ONE YEAR WARRANTY
The equipment is warranted for one year from date of purchase against defects in materials or workmanship provided it was purchased from an authorized dealer. This warranty does not cover equipment which has been abused or damaged by careless handling or shipping. This warranty does not apply to used or demonstrator equipment. Should any defect develop, Lectrosonics, Inc. will, at our option, repair or replace any defective parts without charge for either parts or labor. If Lectrosonics, Inc. cannot correct the defect in your equipment, it will be replaced at no charge with a similar new item. Lectrosonics, Inc. will pay for the cost of returning your equipment to you. This warranty applies only to items returned to Lectrosonics, Inc. or an authorized dealer, shipping costs prepaid, within one year from the date of purchase.
 report this ad
This Limited Warranty is governed by the laws of the State of New Mexico. It states the entire liablility of Lectrosonics Inc. and the entire remedy of the purchaser for any breach of warranty as outlined above. NEITHER LECTROSONICS, INC. NOR ANYONE INVOLVED IN THE PRODUCTION OR DELIVERY OF THE EQUIPMENT SHALL BE LIABLE FOR ANY INDIRECT, SPECIAL, PUNITIVE, CONSEQUENTIAL, OR INCIDENTAL DAMAGES ARISING OUT OF THE USE OR INABILITY TO USE THIS EQUIPMENT EVEN IF LECTROSONICS, INC. HAS BEEN ADVISED OF THE POSSIBILITY OF SUCH DAMAGES. IN NO EVENT SHALL THE LIABILITY OF LECTROSONICS, INC. EXCEED THE PURCHASE PRICE OF ANY DEFECTIVE EQUIPMENT.This warranty gives you specific legal rights. You may have additional legal rights which vary from state to state.![]()
References
[xyz-ips snippet=”download-snippet”]