
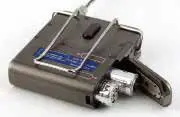
LECTROSONICS LT Digital Hybrid Wireless Belt-Pack Transmitter
![]()
This guide is intended to assist with initial setup and operation of your Lectrosonics product.For a detailed user manual, download the most current version at: www.lectrosonics.com/manuals
Controls and Features
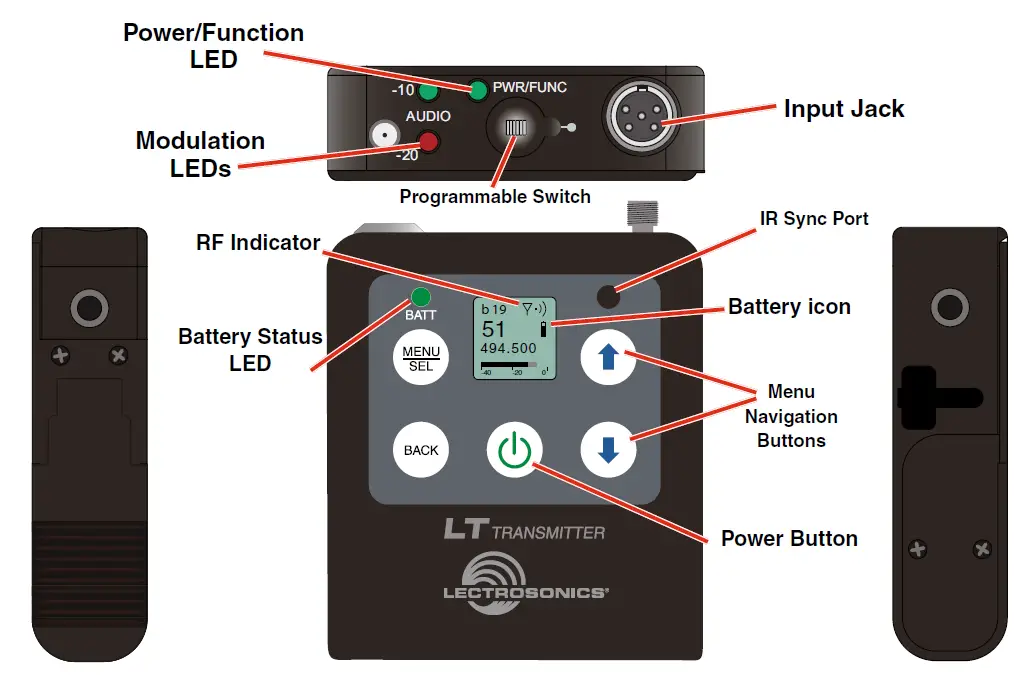
Full access to all settings is provided through the keypad and LCD. The trans-mitter can also be configured as a “one button” device by locking the ability to make changes with the keypad, and configuring the top panel switch as either power on/off or a mute function.
Keypad and LCD Interface
- BATT LEDGlows green when the batteries are good. As the batteries are drained, the LED will turn to a steady red at a mid-point during their life, then begin to blink red when only a few minutes of operation remain.
- MENU/SEL ButtonPressing this button enters the menu and selects menu items to enter the setup screens.
- BACK ButtonPressing this button returns to the previous menu or screen.
- Power ButtonTurns the unit off and on and enters the power menu.
- Arrow ButtonsUsed to navigate the menus.
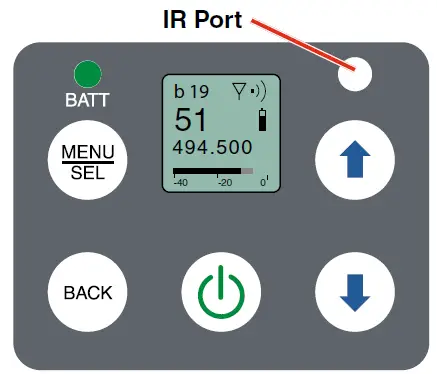
IR (infrared) Sync
The opening on the keypad is an IR port for quick setup using a receiver with this function available. IR Sync will transfer the settings for frequency, step size and compatibility mode from the receiver to the transmitter.
NOTE: If a mismatch exists between the receiver and transmitter, an error message will appear on the transmitter LCD stating what the problem is.
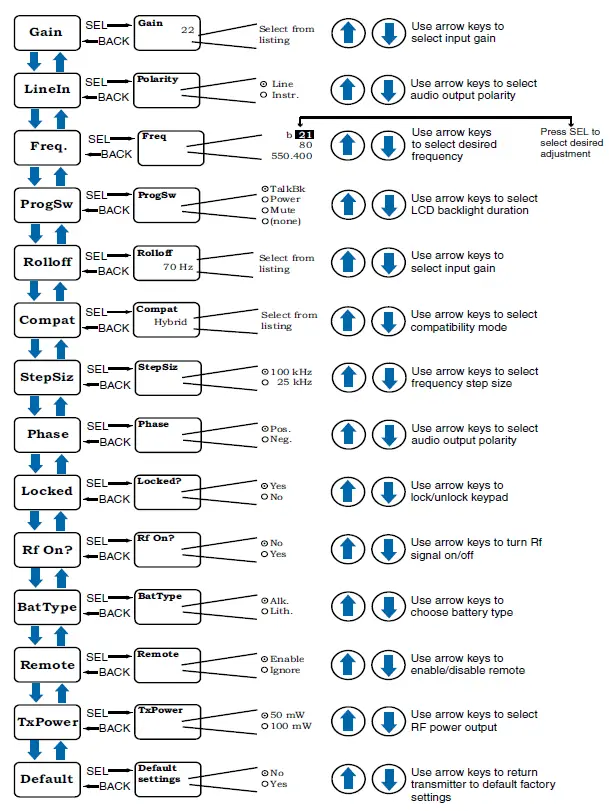
Menu setup items are arranged in a vertical list on the LCD. Press MENU/SEL to enter the menu, then navigate with the UP and DOWN arrows to highlight the desired setup item. Press MENU/SEL to enter the setup screen for that item.
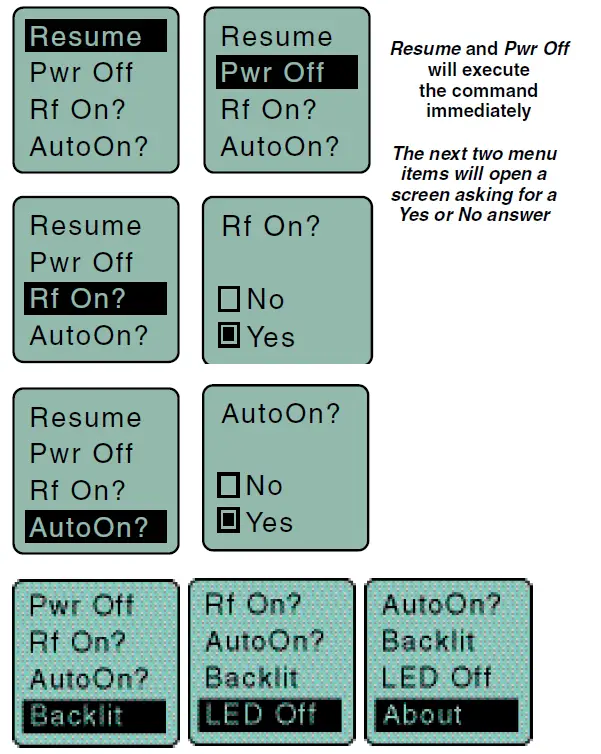
Pressing the power button when the unit is turned on will display a menu with several options:
- Resume – returns to the previous mode and screen
- Pwr Off – turns the unit off irrevocably
- Rf On? – enters a screen to enable the operating or standby modes
- AutoOn? – allows the unit to automatically power back up after a power failure or when new batteries are installed (works in the operating mode only)
- Blk606? – enables Block 606 legacy mode for use with Block 606 receivers (feature only available on Blocks B1 and C1)
- Backlit – the backlight can be turned on continuously or set to turn off automatically after either 30 seconds or 5 minutes.
- LED Off – gives you the option of the battery indicator light normal or dark.
- About – Indicates latest firmware version
System Setup Procedures
Summary of Steps
1) Install good batteries and turn power on.2) Set the compatibility mode to match the receiver.3) Connect the signal source and adjust input gain for optimum modulation level.4) Set Step Size and frequency to match receiver. Also see receiver manual for scanning procedure to find a clear operating frequency.5) Turn on the receiver and verify that solid RF and audio signals are pres-ent (see receiver manual).
- Install BatteriesInsert the batteries according to the markings on the back of the housing.

- Set Compatibility ModeWhen used with a Lectrosonics Digital Hybrid Wireless® receiver, the best audio quality will be achieved with the system set to the Nu Hybrid compat-ibility mode.Use the UP and DOWN arrows to select the desired mode, then press the BACK button twice to return to the Main Window.Compatibility modes are as follows:Receiver Models
- Nu Hybrid
- IFB
- Mode 3
- Adjusting Input GainThe two bicolor Modulation LEDs on the control panel and keypad provide a visual indication of the audio signal level entering the transmitter. The LEDs will glow either red or green to indicate modulation levels as shown in the following table.NOTE: Full modulation is achieved at 0 dB, when the “-20” LED first turns red. The limiter can cleanly handle peaks up to 30 dB above this point.
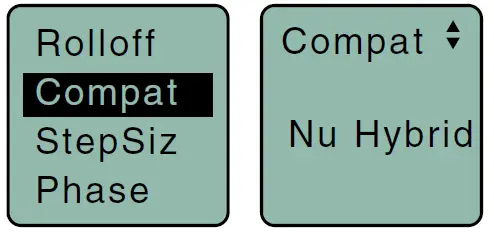 Use the UP and DOWN arrows to select the desired mode, then press the BACK button twice to return to the Main Window.Compatibility modes are as follows:Receiver Models
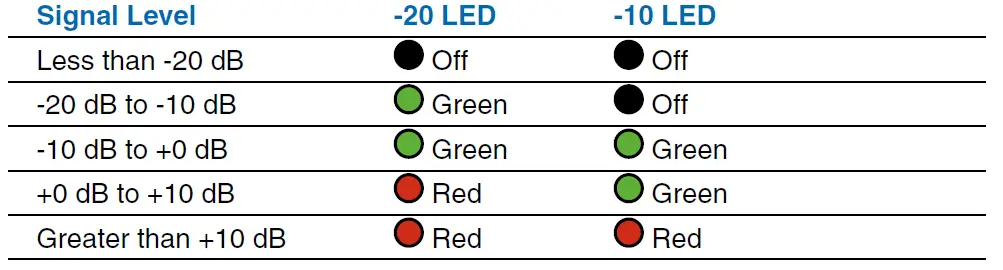 NOTE: Full modulation is achieved at 0 dB, when the “-20” LED first turns red. The limiter can cleanly handle peaks up to 30 dB above this point.
It is best to go through the following procedure with the transmitter in the standby mode so that no audio will enter the sound system or recorder during adjustment.
- With fresh batteries in the transmitter, power the unit on in the standby mode (see previous section Powering On in Standby Mode).
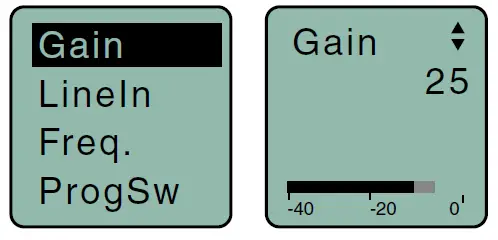
- Navigate to the Gain setup screen.
- Prepare the signal source. Position a microphone the way it will be used in actual operation and have the user speak or sing at the loudest level that occur during use, or set the output level of the instrument or audio device to the maximum level that will be used.
- Use the and arrow buttons to adjust the gain until the –10 dB glows green and the –20 dB LED starts to flicker red during the loudest peaks in the audio.
- Once the audio gain has been set, the signal can be sent through the sound system for overall level adjustments, monitor settings, etc.
- If the audio output level of the receiver is too high or low, use only the controls on the receiver to make adjustments. Always leave the trans-mitter gain adjustment set according to these instructions, and do not change it to adjust the audio output level of the receiver.
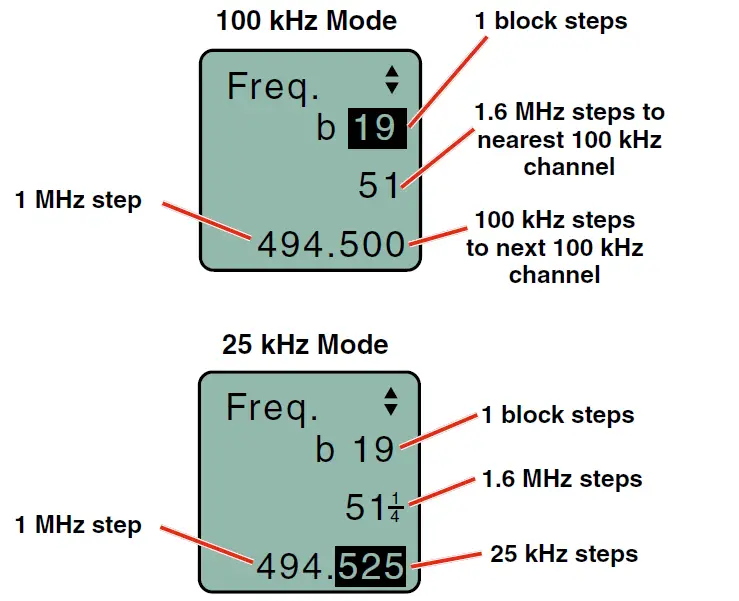
Select Step SizeThis menu item allows frequencies to be selected in either 100 kHz or 25 kHz increments.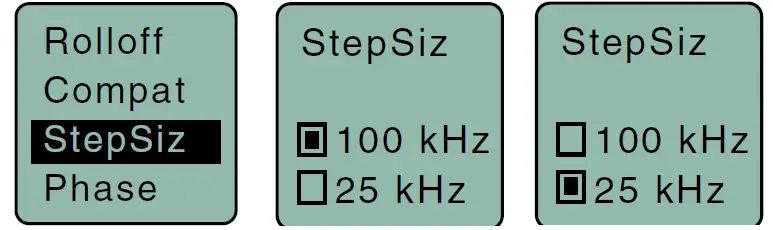
If the desired frequency ends in .025, .050 or .075 MHz, the 25 kHz step size must be selected.Normally, the receiver is used to find a clear operating frequency. All Lectro-sonics Digital Hybrid Wireless® receivers provide a scanning function to quickly and easily find prospective frequencies with little or no RF interference. In other cases, a frequency may be specified by officials at a large event such as the Olympics or a major league ball game. Once the frequency is determined, set the transmitter to match the associated receiver.
Selecting FrequencyThe setup screen for frequency selection offers several ways to browse the available frequencies.
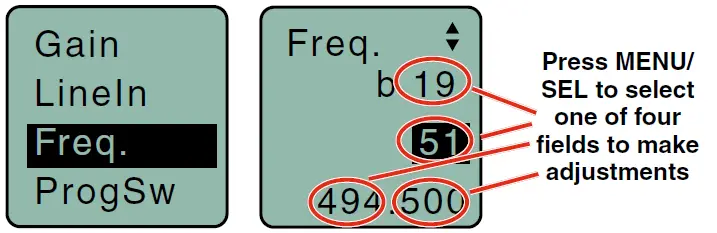
Each field will step through the available frequencies in a different increment. The increments are also different in the 25 kHz mode from the 100 kHz mode.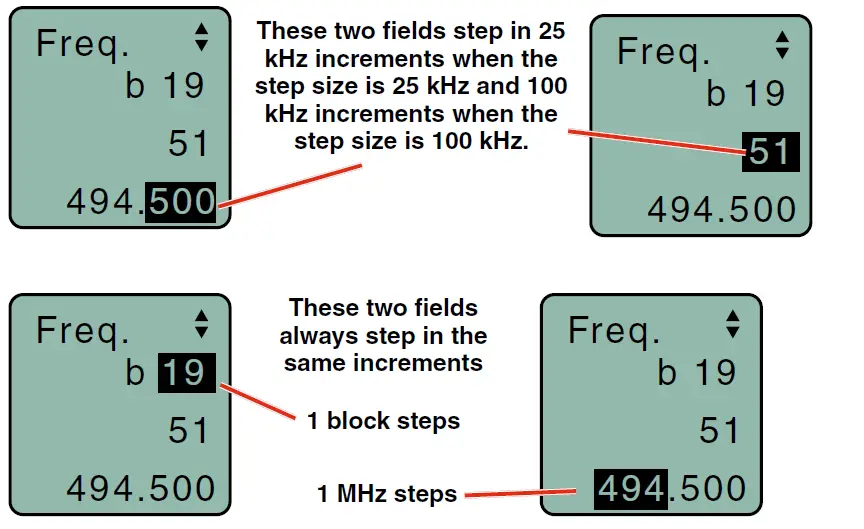
A fraction will appear next to the hex code in the setup screen and in the main window when the frequency ends in .025, .050 or .075 MHz.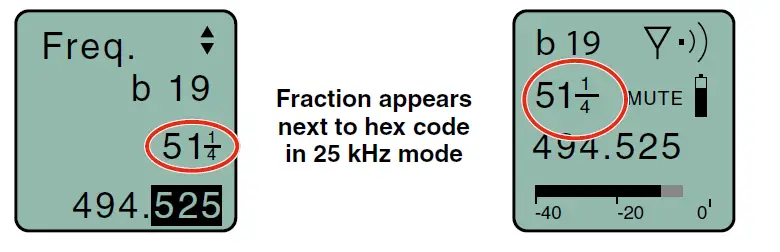
Hold the MENU/SEL button in, then use the and arrow buttons for alter-nate increments.
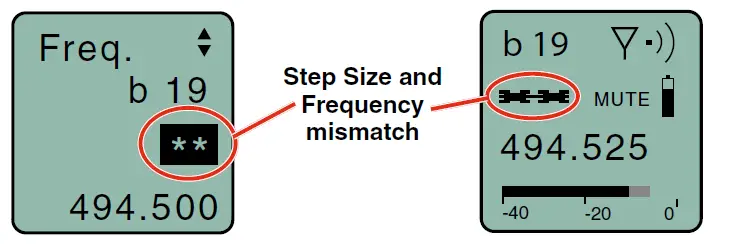
If the Step Size is 25 kHz with the frequency set between even 100 kHz steps and the Step Size is then changed to 100 kHz, the mismatch will cause the hex code to display as two asterisks.
Main Window Indicators
The Main Window displays the block number, Standby or Operating mode, operating frequency, audio level, battery status and programmable switch function. When the frequency step size is set at 100 kHz, the LCD will look like the following.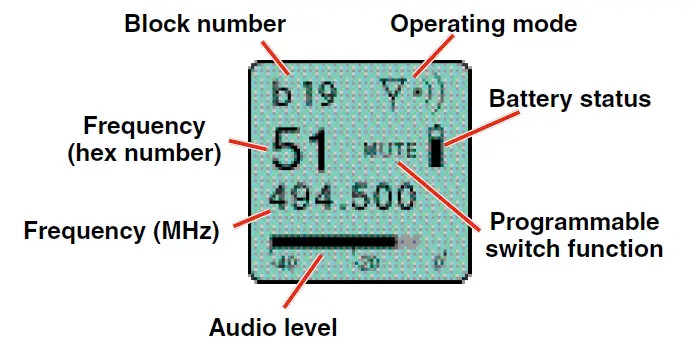
When the frequency step size is set to 25 kHz, the hex number will appear smaller and may include a fraction.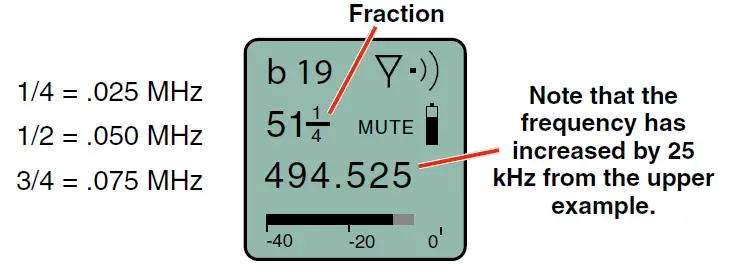
Changing the step size never changes the frequency. It only changes the way the user interface works. If the frequency is set to a fractional increment be-tween even 100 kHz steps and the step size is changed to 100 kHz, the hex code will be replaced by two asterisks on the main screen and the frequency screen.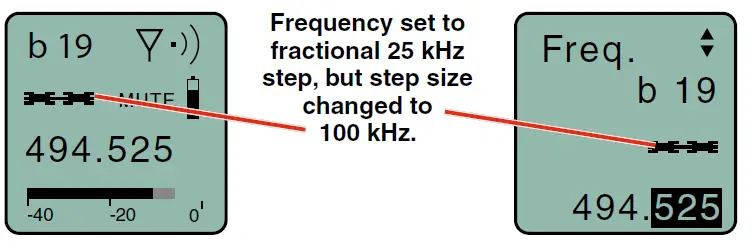
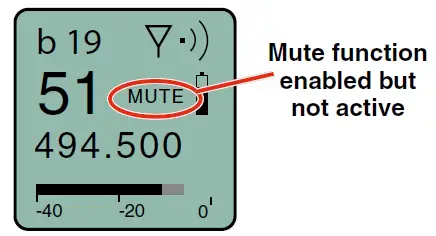
If the programmable switch function is set for Mute, the Main Window will indicate that the function is enabled.
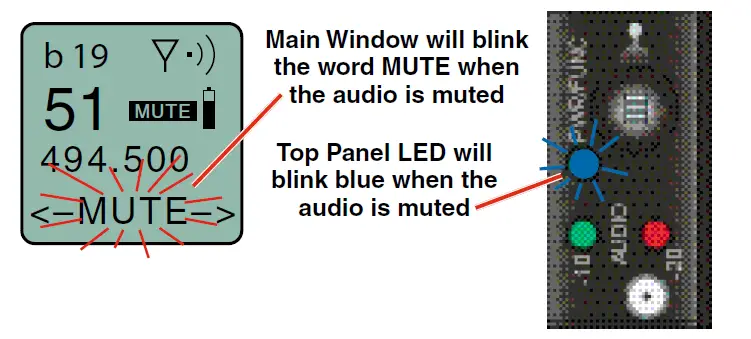
When the switch is turned on, the mute icon appearance will change, the word MUTE will blink at the bottom of the display, and the power/function LED will blink blue.
If the programmable switch function is set for Talkback, the Main Window will indicate that the function is enabled but not active.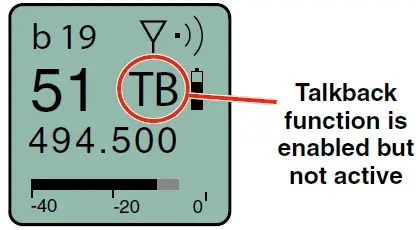
When the programmable switch is turned on, the talkback icon appearance will change and the power/function LED will glow blue.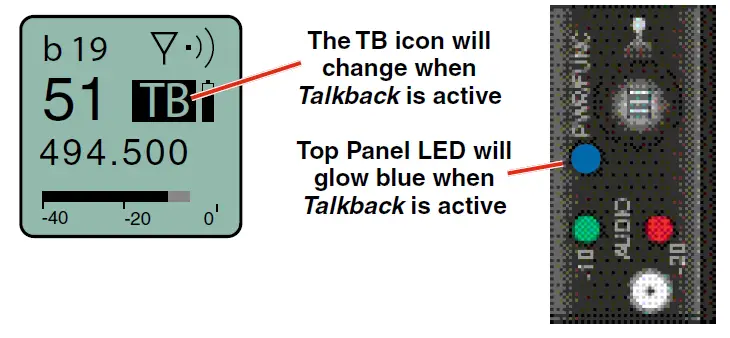
Selecting Programmable Switch Functions
The programmable switch on the top panel can be configured using the menu to provide several functions:
- Power – turns the power on and off
- Mute – mutes the audio when switched on
- TalkBk (talkback) – redirects the audio to a different output channel on the receiver (with receivers that offer this function)
- (none) – disables the switch
NOTE: The programmable switch will continue to operate whether or not keypad changes are locked.
LIMITED ONE YEAR WARRANTY
The equipment is warranted for one year from date of purchase against defects in materials or workmanship provided it was purchased from an authorized dealer. This warranty does not cover equipment which has been abused or damaged by careless handling or shipping. This warranty does not apply to used or demonstrator equipment.
Should any defect develop, Lectrosonics, Inc. will, at our option, repair or replace any defective parts without charge for either parts or labor. If Lectrosonics, Inc. cannot correct the defect in your equipment, it will be replaced at no charge with a similar new item. Lectrosonics, Inc. will pay for the cost of returning your equipment to you.
 report this ad
This warranty applies only to items returned to Lectrosonics, Inc. or an authorized dealer, shipping costs prepaid, within one year from the date of purchase.This Limited Warranty is governed by the laws of the State of New Mexico. It states the entire liablility of Lectrosonics Inc. and the entire remedy of the purchaser for any breach of warranty as outlined above. NEITHER LECTROSONICS, INC. NOR ANYONE INVOLVED IN THE PRODUCTION OR DELIVERY OF THE EQUIPMENT SHALL BE LIABLE FOR ANY INDIRECT, SPECIAL, PUNITIVE, CONSEQUENTIAL, OR INCIDENTAL DAMAGES ARISING OUT OF THE USE OR INABILITY TO USE THIS EQUIPMENT EVEN IF LECTROSONICS, INC. HAS BEEN ADVISED OF THE POSSIBILITY OF SUCH DAMAGES. IN NO EVENT SHALL THE LIABILITY OF LECTROSONICS, INC. EXCEED THE PURCHASE PRICE OF ANY DEFECTIVE EQUIPMENT.This warranty gives you specific legal rights. You may have additional legal rights which vary from state to state.
References
[xyz-ips snippet=”download-snippet”]