
lefant Robot Vacuum Cleaner M201
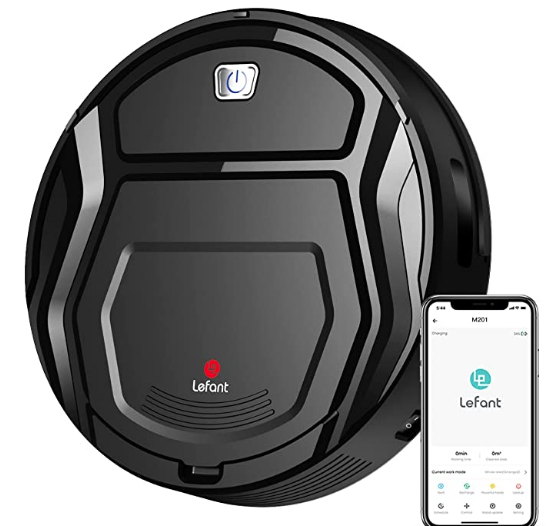
lefant Robot Vacuum Cleaner M201
MODEL Applicable for M201
Please read these instructions carefully before using the product and keep it in a safe place
Congratulations on the purchase of your Lefant ROBOTICS!
We hope it brings you many years of satisfaction. We trust the purchase of your new robot will help keep your home clean and provide you more quality time to do other things. Wisdom Inspired Freedom Should you encounter situations that have not been properly addressed in this Instruction Manual, please contact our Customer Service Center where a technician can address your specific problem or question.
For more information, please visit the Levant ROBOTICS official website: www.lefantlife.com or send an email to [email protected]The Company reserves the right to make technological and design changes to this product for continuous improvement.
Important Safety Instructions
When using the product, please keep your vigilance and follow below information:
- This Appliance can be used by children aged from 8 years and above and persons with reduced physical, sensory or mental capabilities or lack of experience and knowledge if they have been given supervision or instruction concerning use of the Appliance in a safe way and understand the hazards involved. Children shall not play with the Appliance. Cleaning and user maintenance shall not be made by children without supervision.
- Clear the area to be cleaned. Remove power cords and small objects from the floor that could entangle the Appliance. Tuckrug fringe under the rug base, and lift items such as curtains and tablecloths off the floor.
- If there is a drop off in the cleaning area due to a step or stairs, you should operate the Appliance to ensure that it can detect the step without falling over the edge. It may become necessary to place a physical barrier at the edge to keep the unit from falling. Make sure the physical barrier is not a trip hazard.
- Only use as described in this manual. Only use attachments recommended or sold by the manufacturer.
- Please make sure your power supply voltage matches the power voltage marked on the Charging Dock.
- For INDOOR household use ONLY. Do not use the Appliance in outdoor, commercial or industrial environments.
- Non-rechargeable batteries are prohibited.
- Do not use without dust bin and/or filters in place.
- Do not operate the Appliance in an area where there are li t candles or fragile objects.
- Do not use in extremely hot or cold environments (below-5℃/23℉ or above 40℃/104℉).
- Keep hair, loose clothing, fingers, and all parts of body away from any openings and moving parts.
- Do not operate the Appliance in a room where an infant or child is sleeping.
- Do not use Appliance on wet surfaces or surfaces with standing water.
- Do not allow the Appliance to pick up large objects like stones, large pieces of paper or any item that may clog the Appliance.
- Do not use Appliance to pick up flammable or combustible materials such as gasoline, printer or copier toner, or use in areas where they may be present.
- Do not use Appliance to pick up anything that is burning or smoking, such as cigarettes, matches, hot ashes, or anything that could cause a fire.
- Do not put objects into the suction intake. Do not use if the suction intake is blocked. Keep the intake clear of dust, lint, hair, or anything that may reduce air flow.
- Take care not to damage the power cord. Do not pull on or carry the Appliance or Charging Dock by the power cord, use the power cord as a handle, close a door on the power cord, or pull the power cord around sharp edges or corners. Do not run Appliance over the power cord. Keep power cord away from hot surfaces.
- If the power cord is damaged, it must be replaced by the manufacturer or its service agent in order to avoid a hazard.
- Do not use the Charging Dock if it is damaged.
- Do not use with a damaged power cord or receptacle. Do not use the Appliance or Charging Dock if it is not working properly, has been dropped, damaged, left outdoors, or come in contact with water. It must be repaired by the manufacturer or its service agent in order to avoid a hazard.
- Turn OFF the Power Switch before cleaning or maintaining the Appliance.EN
- The plug must be removed from the receptacle before cleaning or maintaining the Charging Dock.
- Remove the Appliance from the Charging Dock, and turn OFF the Power Switch to the Appliance before removing the battery for disposal of the Appliance.
- The battery must be removed and discarded according to local laws and regulations before disposal of the Appliance.
- Please dispose of used batteries according to local laws and regulations.
- Do not incinerate the Appliance even if it is severely damaged. The batteries can explode in a fire.
- When not using the Charging Dock for a long period of time, please unplug it.
- The Appliance must be used in accordance with the directions in this Instruction Manual. LEFANT ROBOTICS cannot be held liable or responsible for any damages or injuries caused by improper use.
- The robot contains batteries that are only replaceable by skilled persons. To replace or remove the battery, please contact Customer Service.
- If the robot will not be used for a long time, fully charge the robot and power OFF for storage and unplug the Charging Dock.
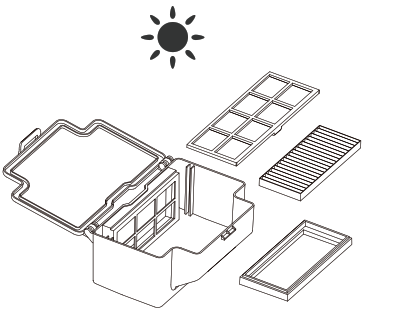
Product Composition
Robot
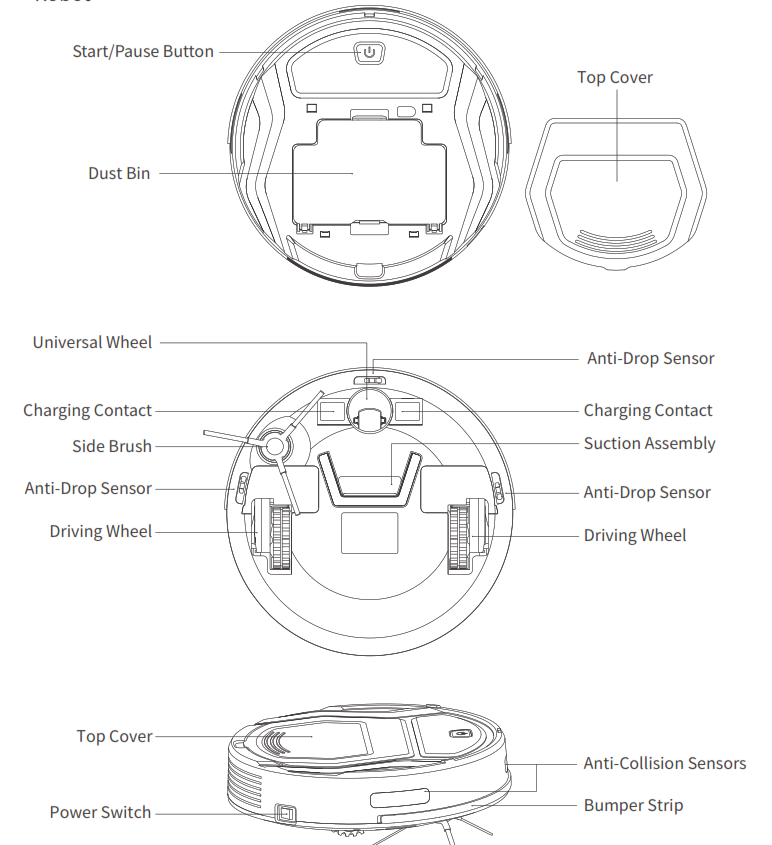
Product Composition
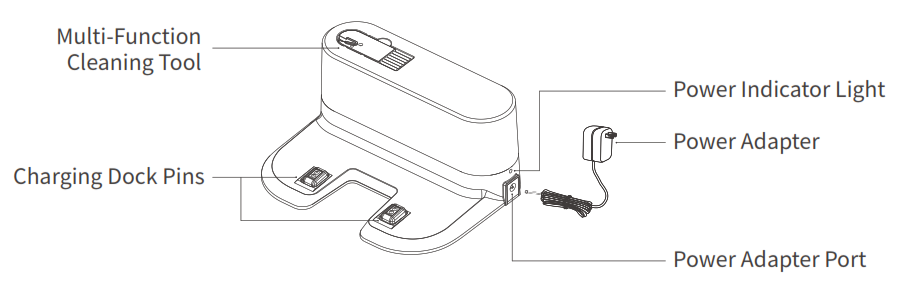
Charging Dock
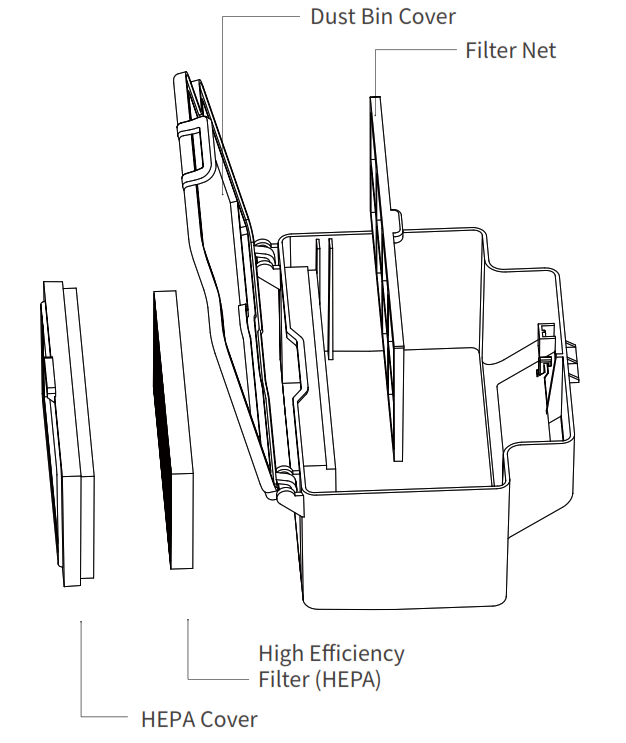
Dust Bin
Operating and Programming
Notes Before Cleaning
Please refer to the following guidelines to check the cleaning area before using the robot.

Remove power cords and small objects from the floor that could entangle the products.
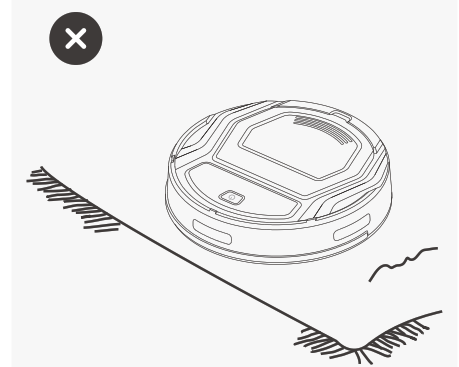
The product is not suitable for use on long-pile carpet. Before using the product near an area rug or on a short-pile area rug with tasseled edges, please fold area rug edges under themselves.
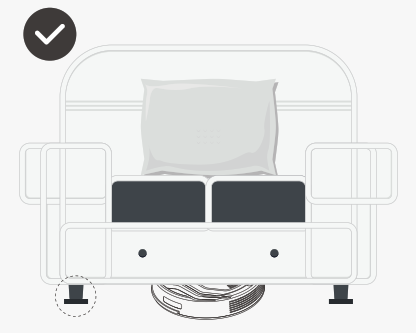
Please be aware that the robot needs at least an 8 cm (3”) clearance to clean under furniture without complications.
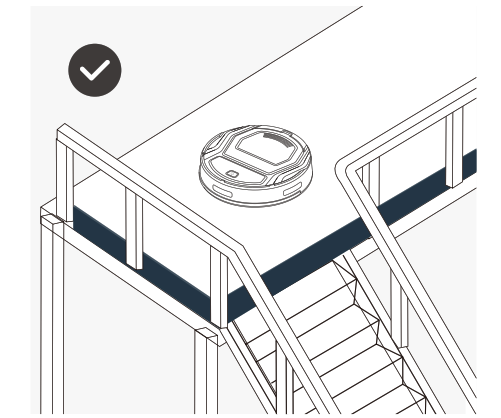
If there is a step or stairs in the cleaning area, please operate the robot to ensure its Anti-Drop Sensors can detect the drop off. It may be necessary to place a physical barrier at the edge of the drop off to keep the unit from falling over the edge.
Quick Start
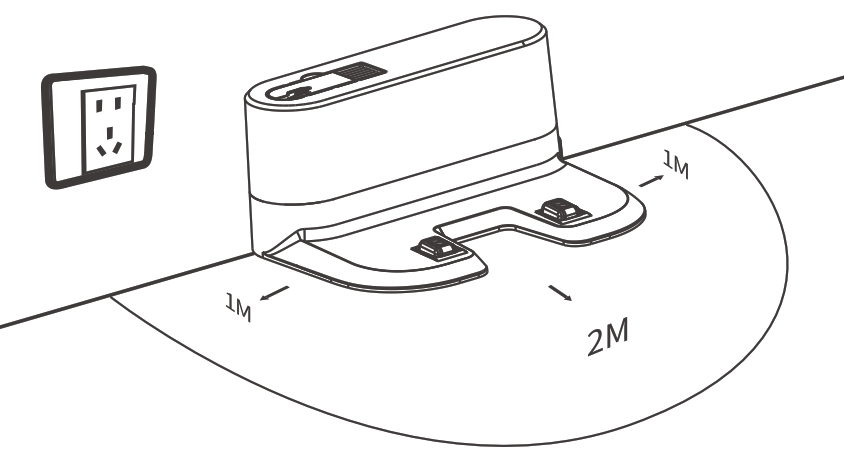
Charging Dock PlacementConnect the adapter to the charging DockPlace the Charging Dock on a level floor surface against the wall with the base perpendicular to the ground. Keep the immediate area 2m (6.6’) in front of the charger and 1 m (3.3’) on both sides of the charger clear of objects and reflective surfaces. Plug the Charging Dock in, the Power Indicator Light on the Charging Dock glows.
Place the Charging Dock
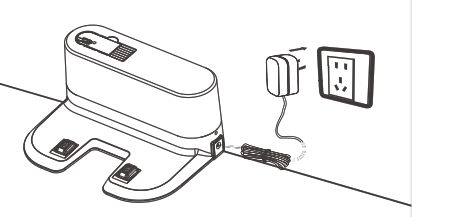
Connect the power supply
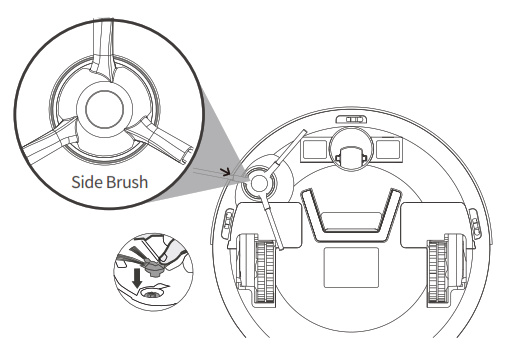
Install Side BrushAttach Side Brush to the bottom of robot by pressing a brush into each slot until it clicks.
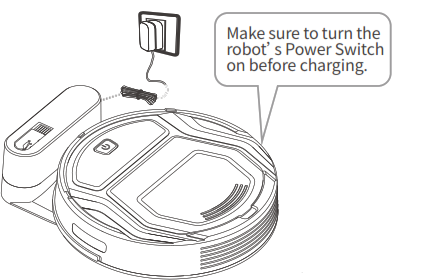
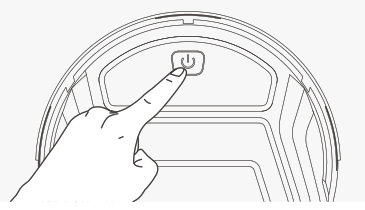
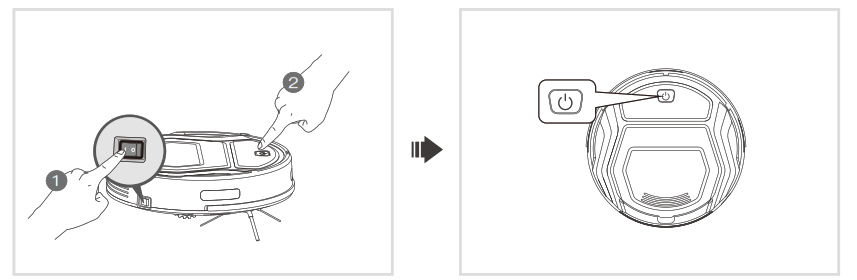
Start to ChargeTurn on the RobotTurn the robot’s Side Power Switch to the ON position. “-” indicates power ON and“O” indicates power OFF. The robot is powered ON when the button glows a continuous BLUE.

Charge RobotPlace the robot on the Charging Dock making sure the Charging Contacts on robot and the Charging Dock Pins make a connection.![]() button in breathing status when the robot is charging,
button in breathing status when the robot is charging, ![]() button stops glowing after the robot is fully charged.Usually, take 3.5 hours from low battery mode to fully charged.
button stops glowing after the robot is fully charged.Usually, take 3.5 hours from low battery mode to fully charged.
Start CleaningPress the ![]() button on the robot to start the automatic cleaning mode.
button on the robot to start the automatic cleaning mode.
Pause CleaningPress the![]() button to Pause the Cleaning.
button to Pause the Cleaning.
Return to the Charging dockWhen battery power gets low, Robot automatically switches to Return to Charger Mode and returns to the Charging Dock to recharge itself. Alternatively, double click on the Start/Pause![]() button on the robot to start the Return to Charger Mode.
button on the robot to start the Return to Charger Mode.
APP download and network configuration
Scan the QR code to download and install the appThis app is compatible with IOS9.0 and Android 4.0 or above.ios system: Please search “Lefant life” in the app store. Android system: Please scan the QR code or search “Lefant Life” on google play to download.
 https://smartapp.tuya.com/umouseclear
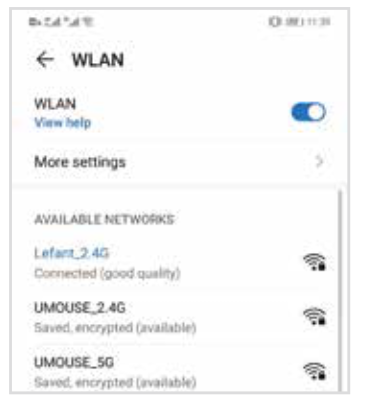
Connect to your Indoor 2.4G WIFI networkMake sure the mobile device is connected to the indoor 2.4G WIFI network, and the signal quality is good enough, register and log in to the mobile app.
EZ MODE
Network paring EZ mode (Only 2.4G Wi-Fi can be supported)
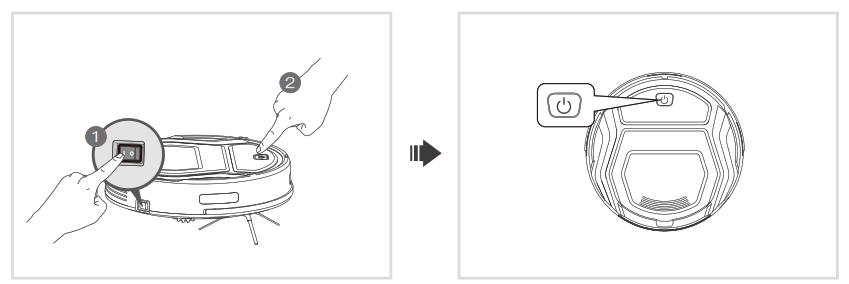
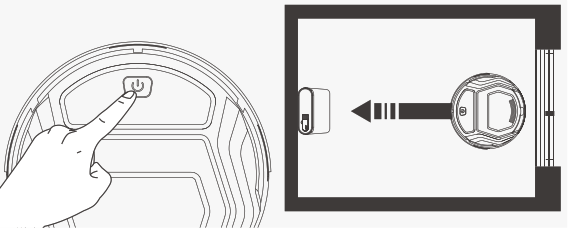
Turn on the side switch. ![]() Press and hold the key for about 3 seconds until you hear a beep and release.The robot enters the network configuration EZ mode, and the start/pause flash quickly in blue.
Press and hold the key for about 3 seconds until you hear a beep and release.The robot enters the network configuration EZ mode, and the start/pause flash quickly in blue.
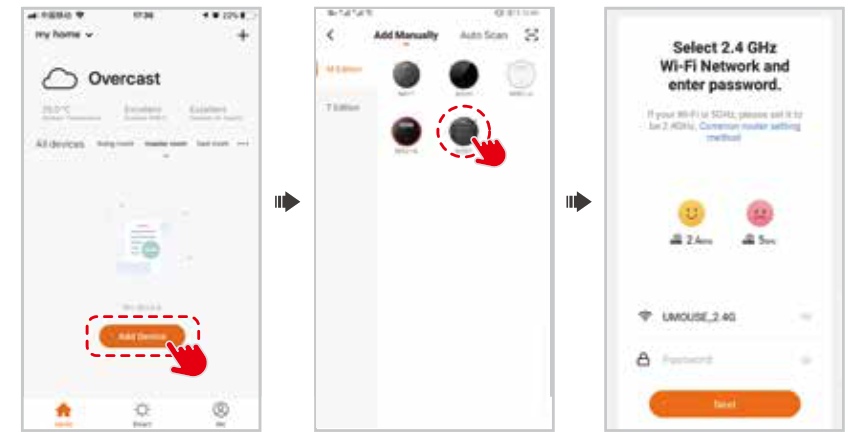
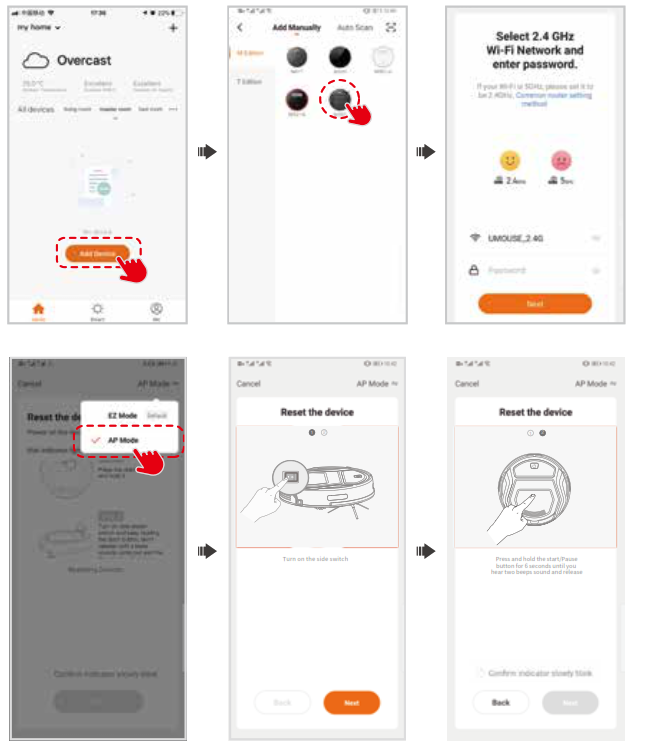
Open the app and select add device, the interface as follows:
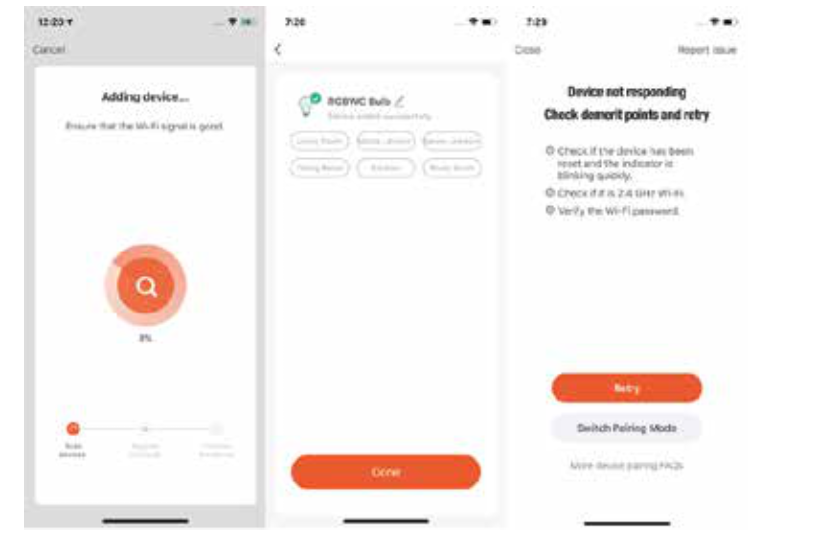
![]() If you experience with network pairing failure, please restart the robot and start over again. Or try the AP mode network pairing method instead.
If you experience with network pairing failure, please restart the robot and start over again. Or try the AP mode network pairing method instead.
AP MODE
Network paring AP mode (Only 2.4G Wi-Fi can be supported)
Turn on the side switch. Press and hold the![]() key for about 6 seconds until you hear two beeps and release.The robot enters the network configuration AP mode, and the start/pause flash slowly in blue.
key for about 6 seconds until you hear two beeps and release.The robot enters the network configuration AP mode, and the start/pause flash slowly in blue.
Add Manually- Wi-Fi-AP Mode
Connect your phone to a Wi-Fi that starts with the name “SmartLife”.
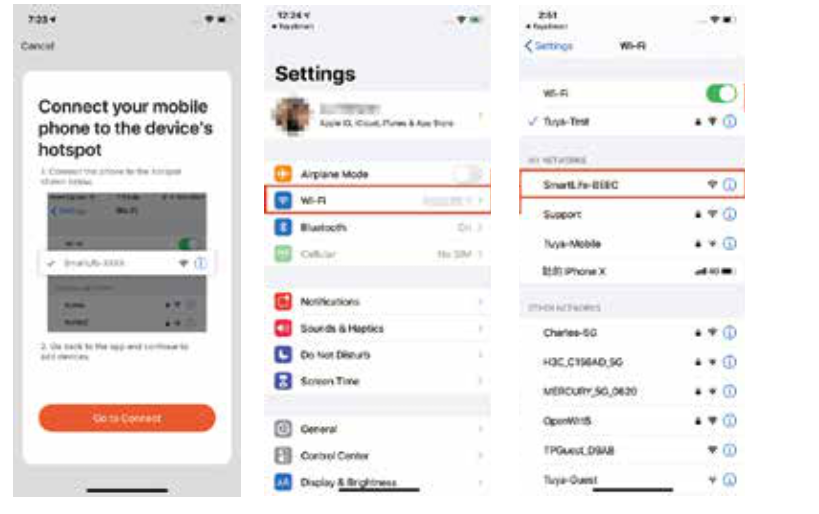
After successfully connecting to the Wi-Fi, return the APP and start the network configuration.
Maintenance
Dust Bin and Filters
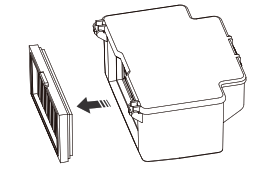
Open the Top Cover to take out the Dust Bin, open the Dust Bin Cover and empty the Dust Bin.Remove the Dust Bin, open the Dust Bin Cover, and empty the Dust Bin.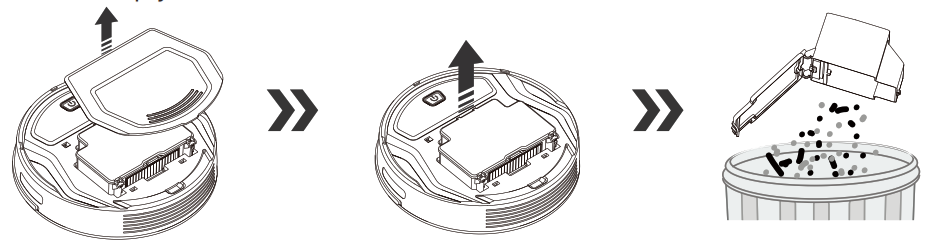 Remove the High Efficiency Filter. Pat the High Efficiency Filter clean. Do not rinse the High Efficiency Filter under water.
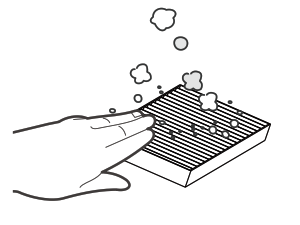
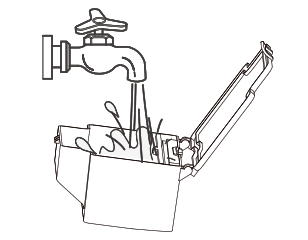
Flush the Dust Bin and the Filter Net.
Dry the High Efficiency Filter, Dust Bin and Filter Net completely before reinstalling.
Suction Assembly and Side Brush
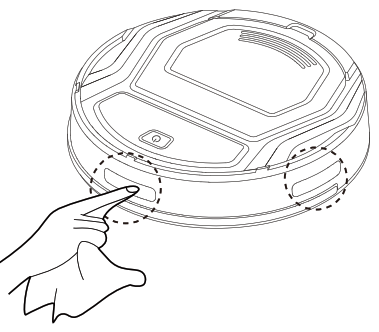
Clean the suction port If there is a lot of dust in the suction port, use a cloth clean up.
Cleaning the Side BrushRemove the Side Brush. Wipe the Side Brush and their slot with a dry cloth.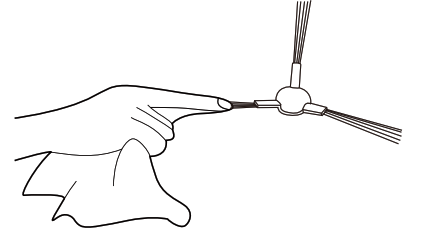 Clean the Driving Wheels to maintain their effectiveness.
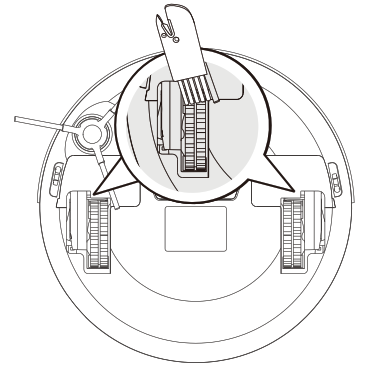 Use the Multi-Function Cleaning Tool to cut off and remove any hair tangled around the Universal Wheel.
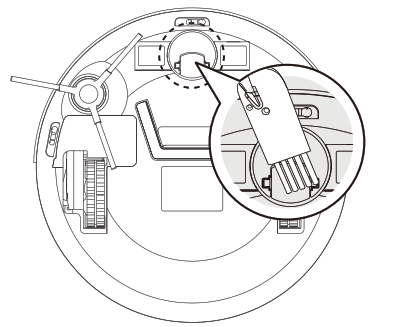
Other Components
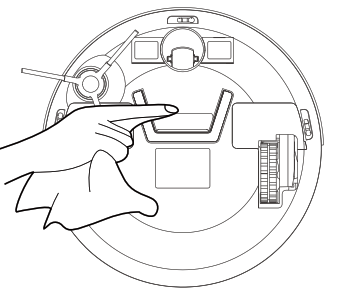
■ Clean Anti-Collision Sensors.
■ Wipe the Anti-drop Sensors with the brush or the felt side of the MultiFunction Cleaning Tool to maintain their effectiveness.
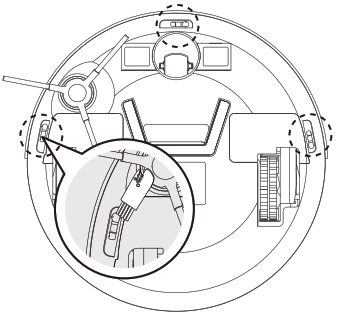
■ Wipe the Charging Contacts and Charging Dock Pins with the brush of the Multi-Function Cleaning Tool or a dry clean cloth to maintain their effectiveness.

Indicator Light and Alarm Sounds
Indicator Light
|
Robot Status |
Indicator Light |
| Charging | Glows a solid PINK or BLUE |
| Finished Charging | The BLUE goes out |
| Has a Problem | Flashes RED or glows a solid RED |
| Low Battery | Glows a solid RED |
| Cleaning Mode | Glows a solid BLUE |
| Before starting network pairing | Glows a solid BLUE |
| network pairing process/WiFi connection was lost | Exit the network pairing mode after 3minutes, the BLUE goes out |
| Connect to Wi-Fi | Glows a solid BLUE |
Alarm Tips
When the robot fails, the robot indicator flashes red and a beeping sound of varying lengths is emitted. Refer to the following table to query the cause of the failure:
| Glowing a solid RED | |||
| No | Cause of issue | Beeps | APP Error prompts and solutions |
| 1 | Driven wheel abnormal | 1 beep 3 times | Please check whether the Driving Wheels is entangled and clean the Driving Wheels. |
| 2 | Side Brush abnormal | 2 beeps 3 times | please check if the Side Brush is entangled, and clean the Side Brush |
| 3 | Motor Fan abnormal | 3 beeps 3 times | Please empty the Dust Bin, clean the Filter Net and High Efficiency Filter. |
| Flashing RED | |||
| 1 | Anti-drop detection alarm | 2 beeps 3 times | The robot is floating, please move to the ground. |
| 2 | Failure to get out of trouble | 3 beeps 3 times | Place the robot on an even surface, or remove the obstacles, and restart the robot. |
| 3 | Low Battery | 4 beeps 3 times | Manually place the robot on the Charging Dock to charge. |
| 4 | Charging voltage abnormal | 5 beeps 3 times | Please wipe the Charging Contacts and Charging Dock Pins, otherwise replace the adapter. |
| 5 | Charging abnormal | 6 beeps 3 times | Please check if the Power Switch is on. |
If the trouble cannot be eliminated according to the above operation, Please try the following operations Re-open the Power Switch on the side of the robot and restart the robot. Please contact [email protected].
Troubleshooting
Please use this chart to troubleshoot common problems using robot.
|
No |
Malfunction | Possible Causes |
Solutions |
| 01 | Robot is not able to connect to the home Wi-Fi network. | Incorrect home Wi-Fi username or password entered. | Enter the correct home Wi-Fi username and password. |
| Download the incorrect APP. | Please scan the QR code in the user manual or search “Lefant life” on google play or app store. | ||
| Robot is not within range of your home Wi-Fi signal. | Make sure robot is within range of your home Wi-Fi signal. | ||
| The robot isn’t in-network pairing mode. | Make sure the robot is in the network pairing mode. | ||
| The robot does not support 5GHz Wi-Fi. | Make sure the robot has connected to a 2.4GHz Wi-Fi network. | ||
| Your smartphone’s operating system needs to be updated. | Update your smartphone’s operating system. The Lefant life App runs on iOS9.0 and above, Android 4.0 and above. | ||
| 02 | Robot is not charging. | Robot is not switched ON. | Switch ON robot. |
| Robot has not connected to the Charging Dock. | Be sure that the robot’s Charging Contacts have connected to the Charging Dock Pins. | ||
| The Power Adapter is not connected to the Charging Dock. | Make sure the Power Adapter is firmly connected to the Charging Dock. | ||
| The Power Adapter is not connected to the power supply. | Make sure the Power Adapter is connected to the power supply. | ||
| 03 | Robot gets into trouble while working and stops. | The robot is tangled with something on the floor (electrical cords, drooping
curtains, carpet fringe etc.). |
Robot will try various ways to get itself out of trouble.
If it is unsuccessful, manually remove the obstacles and restart. |
| Side Brush is stuck or the rotation speed of the Side Brush decreases. | Remove the debris tangled around the Side Brush. If the Side Brush still rotates slowly, contact Customer Service. | ||
| 04 | Robot returns to the Charging Dock before it finishes cleaning | When battery power gets low, the robot automatically switches to Return to Charger Mode and returns to the Charging Dock to recharge itself. | This is normal. No solution necessary. |
| Working time varies according to floor surface,room complexity and the Cleaning Mode selected. | This is normal. No solution necessary. | ||
| 05 | Robot will not clean automatically at scheduled time | Time Scheduling function is canceled. | Reset Time Scheduling function. |
| Robot is powered OFF. | Power ON robot. | ||
| Robot’s battery is low. | Keep robot powered ON and on the Charging Dock to make sure it has a full battery to work at any time. | ||
| Robot’s components are tangled with debris. | Power OFF robot, clean the Dust Bin, and invert the robot. Clean Side Brush as described in section 4. | ||
| 06 | Robot does not clean the whole area. | The cleaning area is not tidy. | Remove small objects from the floor and tidy up the cleaning area before robot starts cleaning. |
If the trouble cannot be eliminated according to the above operation, Please contact [email protected] The images are only for reference, please refer to the actual item as the standard. Lohas reserves the right to update products without prior notice.
Technical Parameters
| .Technical Parameters | |
| Working Voltage(V): 12.8 |
Power Rating(W): 15 |
| Charging Stand | |
| Rated Input Voltage(V): 19 |
Rated output current(A): 0.6 |

Shenzhen Lohas Technology Co.,LTDhttp://www.lefantlife.com / [email protected]Eastern area, 4th Floor, Factory Building 3, Longcheng Industrial Park, Huanggekeng Community, Longcheng Street, Longgang District, Shenzhen.
DOWNLOAD RESOURCES
- [pdf] User Manual M201, Lefant Robotics
- Read more:
FAQ’S
The robot is powered ON when the button glows a continuous BLUE. Place the robot on the Charging Dock making sure the Charging Contacts on robot and the Charging Dock Pins make a connection. button stops glowing after the robot is fully charged. Usually, take 3.5 hours from low battery mode to fully charged.
If your robot vacuum features a remote control that isn’t functioning, it might need new batteries. If the robovac itself isn’t switching on, or is requiring more regular re-charging, you might need to replace the battery in the unit.
in order to fix a robot vacuum cleaner, you must check if any of the wheels is broken or smoothened. If that’s the case, replacing the wheel is the best solution. Or else, your favorite house-help won’t move freely.
Each eligible product sold at iRobot comes with a limited one-year warranty.
If your Roomba is not charging, clean the charging ports with a soft cloth and some rubbing alcohol to remove dust, hair, or gunk accumulation. You may also have to reinstall or replace your battery or charging dock or even reset the Roomba to factory settings.
This product is 110V.
This product is 0.6KW.
This product makes noise around 60-65db.
This product is made of ABS plastic.
Yes, it has a remote control. You can use it to control the robot vacuum cleaner from anywhere in your home.
The battery can last for 2 hours when fully charged. The battery will be automatically charged when the robot returns to its base station and dock. If you want to charge the battery manually, please press the button on the back of the robot vacuum cleaner to start charging. When charging, please do not unplug or stop charging during charging process, otherwise you will damage your robot vacuum cleaner and void your warranty.
The filter can be cleaned about 200 times before needing replacement.
You don’t need WiFi to use the Roomba. You only need WiFi if you want to connect it to your phone or another device like Alexa. I just walk over to it and hit the clean button on top and it goes.
VIDEO
References
[xyz-ips snippet=”download-snippet”]