LeKKeR Jordaan+ Women eBike
User Manual

Enjoy your Jordaan+
Dear LEKKER Customer, First and foremost – congratulations on your brand new bicycle! We can’t wait for you to experience the thrill and joy of riding your LEKKER bike, the Amsterdam way. But before you do, we want to help you make sure your bike is in tip-top condition, as well as provide you with some tips and tricks to keep it that way.This manual will outline all the tools and knowledge needed to put the finishing touches on your bike, as well as how to use it and useful guidance on maintenance and care. Feast your eyes on what’s to come – we guarantee it’ll be worthwhile, even if you’re an experienced rider.The first few chapters are particularly important, for both your enjoyment and safety, as we walk you through key steps in ensuring your bike is safe to ride.Please also note that as your brand new Jordaan+ is hot off the press, the images in this manual are not reflective of the bike that’s in front of you. The images used are from one of our older bike models. And without them, we thought your manual wouldn’t look quite so beautiful
![]()
Note: We have to stress that this manual won’t teach you all the skills of a bicycle mechanic. Even a manual the size of every Harry Potter book combined couldn’t detail every possible combination, tricks and available components. For this reason, our manual is only applicableto your new LEKKER bicycle and its assembly, alongside any important notes, warnings and maintenance guides.
![]()
Getting Started
We’ve created this manual to help you put the finishing touches on your LEKKER bike. Run through these quick steps and you’ll be exploring and adventuring in no time.
So, without further ado, unbox your LEKKER bike and feast your eyes on your newest sidekick. Once you’-ve removed the packaging, make sure you have your trustly toolkit to hand, as shown in the illustration on the next page.
![]()
![]()
Fitting the saddle and handlebars
Saddle.
Using a 5mm allen key, loosen the seat post clamp bolt and adjust the seat post height. Ensure it’s at the correct height for you, and tighten the bolt.
Tip: Your knee should slightly bend when the pedal is at its lowest position while sitting on the saddle.
Handlebars.
Step 1: Now, using a 6mm allen key, loosen the bolt located at the top of the handlebar stem, then insert it into the frame. Once inserted, center the handlebar and stem and tighten it.
Step 2: To adjust the angle of the handlebar, loosen the allen bolts of the front plate until you can move the handle bar freely. Once you’ve found your preferred bar angle, tighten the bolt.
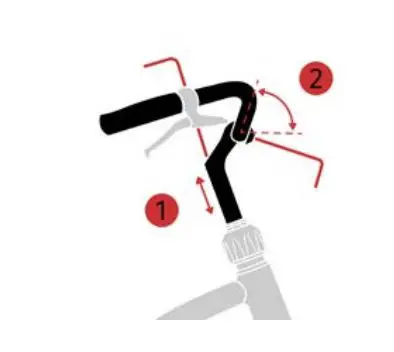
Tip: Should you wish to adjust the angles of your grips, brakes and shifter, you can do so with a simple turn of allen key 3 or 4. However, this should be correctly set already
Fitting the pedals
To assemble the pedals, you will need a 15mm openended spanner. Insert the pedal into the crank and ensure the pedals are properly tightened. Please see below for which pedal should go on each side of the bike.
LEFT pedal: this is the pedal that has indented horizontal lines on the small part between the pedal and thread.
RIGHT pedal: this pedal has no indented lines and is smooth in between the pedal and thread.
ATTENTION: please make sure you check the thread direction before inserting the pedals. Fitting the pedal to the wrong side can damage the crank arm and is not covered under warranty
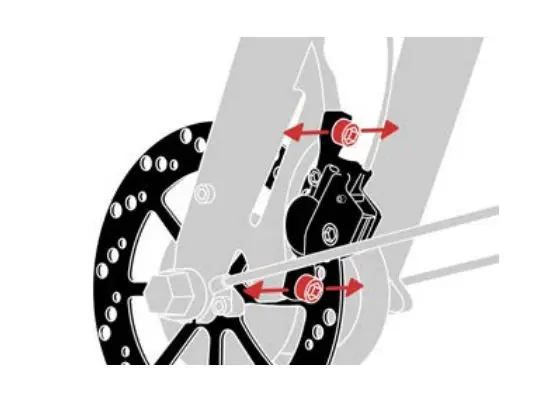
Aligning the brakes
Lift the wheel off the ground and give it a spin. It should spin freely and without any noise. If you hear a metallic rubbing sound, then the brakes will need adjusting.
To do this, you’ll need to use the 5mm allen key. With the bike upside down, adjust the caliper. You will need to slightly loosen the two 5mm allen key bolts (found on the top of the caliper), so that you can gently move the caliper horizontally, allowing the disc rotor to move freely between the brake pads.
Battery set-up
Make sure that the battery is properly inserted into the frame. When you feel a click, you’ll know it’s been locked into place. Using your battery lock key (1 in the illustration), you can easily remove the battery for charging. Your battery can be charged whilst the battery is inside the frame, or you can simply take it out (2 in the illustration) and charge it separately. Remember to remove the key from the battery lock whilst riding.
All batteries will come partially charged. However, to get the most out of your battery and allow it to reach full charging capacity, we recommend that you fully charge it before your first ride and then charge it for 12 hour cycles, for its first three charges.
Once you’ve finished inserting the battery, it’s time to turn the bike on!
Note: All batteries and frames are water-resistant, but if you are storing the bike outside overnight, or for long periods of time, we recommend that the battery is removed and kept inside and the bike is covered and stored. Removing the battery overnight will not only help to maximize its overall lifespan, but also lower the risk of theft.

Display Settings
We recommend that you sit on your bike before you turn it on. This means you’ll have full control over the bike and can avoid any accidents.
To turn on your Jordaan+, using the display that’s on the left hand side of your handlebar, press and hold the power button for 2 seconds. This will turn on the screen.
Once on, you can scroll through the 5 levels of motor assist using the + and – buttons on the front of the control module / display. For more in-depth instructions for your screen, please refer to the Bafang manual, found in PDF format on our website.
Finally, to turn on your front light, press and hold the + button for 2 seconds.
Finishing Touches
Install the bell on your handlebars, in your preferred position. Generally, this is on the left hand side, next to the brake lever.
Pump the tyres to 55-65 PSI
If you’ve ordered any accessories such as racks, locks or lights, don’t forget to fit these too. They each come with their own instructions and also have their own mounting points.
Now, you’re good to go. Enjoy your ride, the Amsterdam way!

Safety and warranty
We offer a 2-year warranty on our LEKKER frames. Additionally, we supply you with 2 years warranty on the components of our different models starting on the day of purchase. This warranty is only for replaceable components. Unfortunately, our warranty is not transferable (including when sold to another consumer) and can only be used by the original buyer of a LEKKER product. If you want to use the warranty, please ensure you have your receipt and go to the original shop in which you made your purchase.
There are cases when our warranty isn’t valid. Our warranty doesn’t cover wear and tear, incorrect assembly or maintenance. There’s no warranty in the case of; damage caused by accidents, improper use or negligence. Our warranty is also void if changes are made to the original design of the LEKKER bike.
All pedelec eBikes must be limited to 250w power output and motor assist cannot exceed 25km/h. LEKKER Bikes will not be held liable for any aftermarket modifications to the motor or system that may have an effect on its performance.
Do not make any changes to your electric system or fit any other products to it, aimed at increasing the power output from your eBike. As a rule, you will shorten the service life of the system, risk damaging the Drive Unit (motor) and also the e-bike itself. There’s also the danger that you’ll void the warranty of your ebike. Furthermore, as a result of inexpert work on the system you will jeopardise your own safety, as well as that of other road users. Risking accidents caused by manipulations can lead to high personal liability costs and potentially even the danger of criminal prosecution.
Please note: your frame number is located on the bottom of the bike frame, near the bottom bracket. This might be needed for insurance purposes.
Contact
AustraliaPhone03 4828 3202 – Melbourne03 4828 3202 – Sydney
Address23 Provost Street,North Melbourne,3051, VIC, Australia415 Bourke Street, Surry Hills,2010, NSW, Australia
Email[email protected][email protected]
Europe & USA
Phone+31-681878491
AddressTweede Kostverlorenkade 68Amsterdam, The Netherlands
Email[email protected]
Assembly Maintenance Guidelekkerbikes.com
 report this ad
References
[xyz-ips snippet=”download-snippet”]