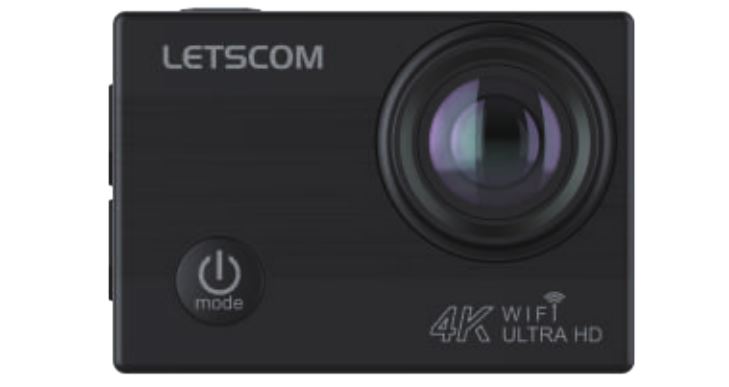
LETSCOM 4K Action Camera User Manual

Thank you for purchasing our products. This manual addresses the safety guidelines, warranty and operating instructions. Please review this manual thoroughly before operating your device.
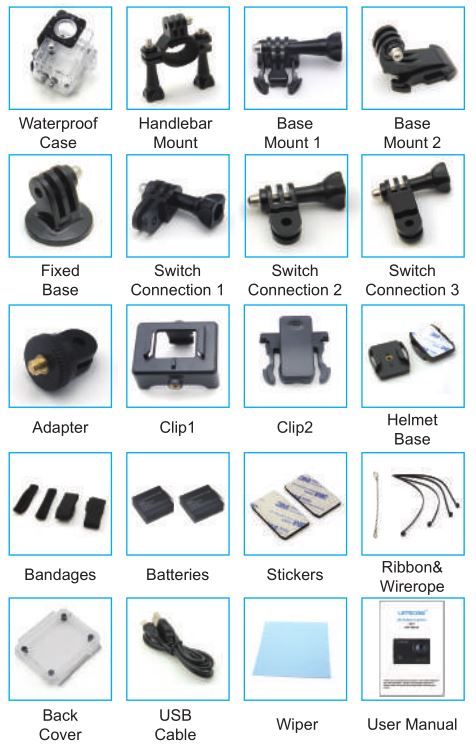
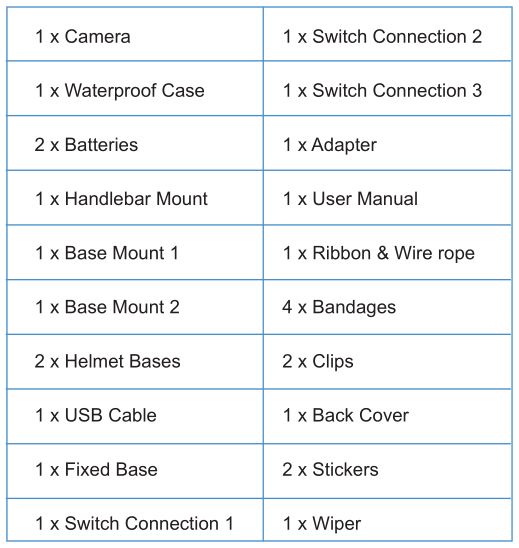
Package Contents
NOTES:
- The Micro SD card is NOT included in the package. Micro SD card (Class 10 or higher up to 32GB) is supported.
- Two batteries are included in the package, one of the batteries has been installed in the camera.
At a Glance

Application Diagram of Assemble

Features
- 170° wide-angle lens
- 2.0″ display screen
- Built-in WIFI & HDOUT
- 100 feet waterproof casing
LED Indicator Guide

Install & Take Out the Battery
Install the battery:1) Stir downward the battery compartment cover and open it.2) Install the battery into the camera correctly (Please mind the plus-minus hole).
Take out the battery:Pull the label on the battery to take it out.
Install & Take Out the Micro SD Card
NOTES:
- Please choose the Micro SD card over class 10. Micro SD cards up to a maximum 32GB capacity are supported. (Capacity above 8G is recommended)
- Please make sure the camera is turned off before installing or taking out the Micro SD card or battery.
Install the Micro SD card:
- Insert the Micro SD card into the card slot with its label side upwards. A “click” sound indicates that the card is installed successfully.
- Format the Micro SD card by using the camera’s “Setting menu” “Format” before using it for the first time, especially when a card has been used in other devices.
Take out the Micro SD card:Push in the card gently and then it will pop outward. The card is released from the slot and ready to be removed when you hear the click.
Charge the Battery
- Plug the small end of the USB cable into the Micro USB on the camera.
- Plug the other end into a USB wall charger or computer (DC 5V) that is powered on.
NOTE: When the camera is being charged, the Red LED indicator keeps flashing. When it is fully charged, the Red LED indicator keeps on.
Use Your Q3H
NOTE: Please remove the plastic protective films from the camera lens and the screen before use.
Power on & offPower on/off: Press the MODE button for 2-3 seconds.
Turn on & off the WIFIBefore using the WIFI function, please install the “XDV” app on your mobile phone. The app can be downloaded from Google Play for Android phone, and from Apple Store for IOS phone.
You can also scan the “XDV” app dimensional code below directly and follow the prompts to complete the installation.


Turn on the WIFI:
- Long press the UP button for 2 seconds after the camera is turned on, and WIFI message will appear on the screen, then the WIFI indicator will flash.
- Go to the WIFI settings of your phone/tablet. Choose the WIFI name “Q3H” from the WIFI list and type in the password “1234567890” to connect.
- Open the “XDV” app on your phone/tablet. Click on “Q3H” from the WIFI list, and the camera is connected to the “XDV” app on your phone/tablet. Then you can view the shooting screen of the camera on your phone/ tablet and shoot videos/photos and playback/download/delete/share files using your phone/tablet.
Turn off the WIFI:
Press the UP button to exit WIFI.
NOTES:
- App installation requires Android 4.1/IOS 7 above.
- Please make sure the camera is turned off before installing or taking out the Micro SD card or battery.
Video, photo, slow motion and playback mode menus
A. Video mode
- Press the OK button to start recording.
- Press the OK button to stop recording.
B. Photo mode
- Press the MODE button to switch to photo mode (A corresponding icon will be displayed on the upper left corner of the screen when entering into camera mode).
- Press the OK button to take a photo.
C. Slow motion mode
- Press the MODE button to switch to slow mode (A corresponding icon will be displayed on the upper left corner of the screen when entering into slow motion mode).
- Press the OK button to start recording.
- Press the OK button to stop recording.
D. Playback mode Playback photo/video files:
- Press the MODE to switch to the file playback page.
- Press UP/DOWN buttons to view the previous shot files. Delete photo/video files: Press the MODE button to switch to playback page, then choose the file you want to delete and press the OK button for 3-5 seconds.
Remove & Share photo/video files
Connect the camera with PC by the USB cable. Then three options: USB mode, PC camera, and charging mode, will be displayed on the camera screen. Choose “USB mode” and click “My Computer” “UDISK” on your computer. Then you can copy photo/video files to your computer.
Software upgrade
- Make sure that the phone’s net is working.
- Open the app which has been connected with the camera, if the new version is available, it will prompt to upgrade automatically.
Using your Q3H with an HDTVUse a micro HD cable (not included in the package) to connect your camera to an HDTV or a larger monitor.
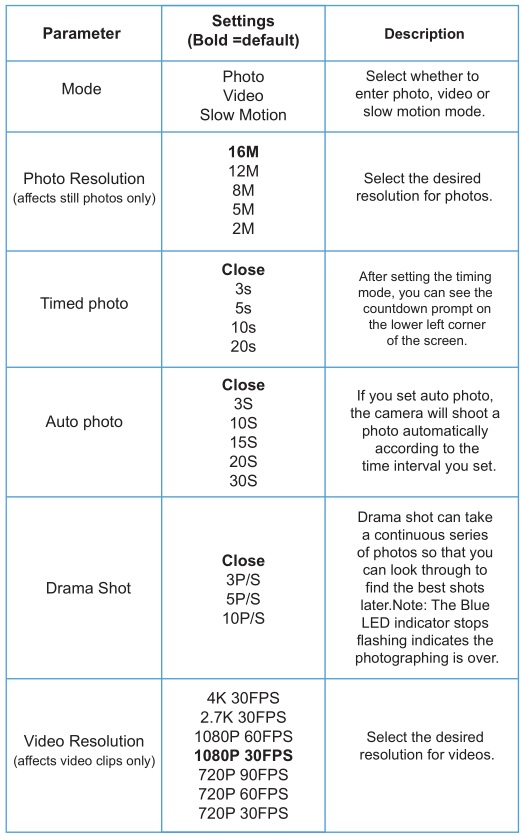
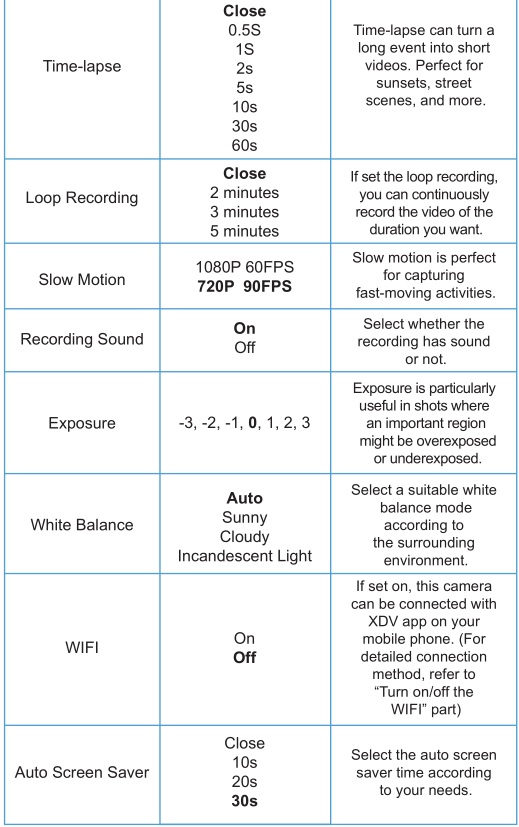
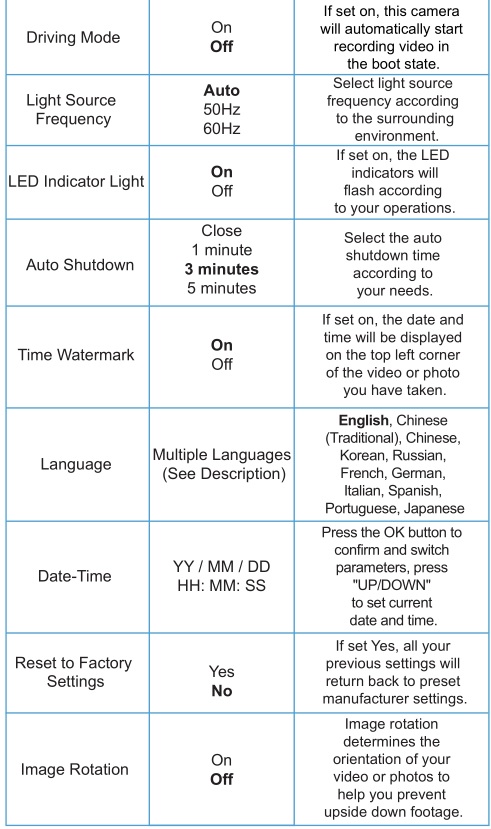
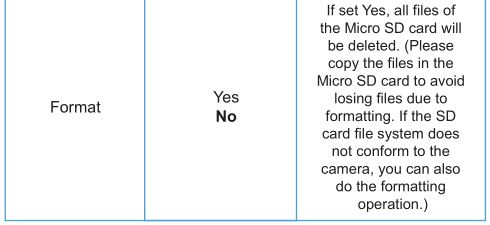
Customize Your Q3H
The sports action camera comes with preset manufacturer settings. You can change the settings to meet your requirements.
When this camera is powered on, you can press the MODE button to switch/exit mode. Press the OK button to enter the setting menu. Press the UP/DOWN button to select the parameter you want to change, and press the OK button to confirm the change (always remember to press the OK button to save the change).
Specifications


NOTE: Specifications could be subject to modification due to upgrading or updating, please regard the actual product as the standard form.
FAQs
Battery life is shorter than expected.The battery life will vary with operating temperature, resolution of photo/video and the recording time (the longer the recording time, the faster the power consumption.), we recommend you set your camera reasonably according to your needs to avoid battery running out quickly.
My camera is dead.Please try reloading the battery. If it still won’t work, please contact our customer support for further information.
Camera won’t retain settings.Make sure that you have saved the changes to any parameter settings that you made by pressing the “OK” button after changing the setting. If you don’t save your new setting after changing it, the camera will continue to use the original default setting for that parameter.
Camera stops taking images or won’t take images.
- Make sure that the camera is not in low battery. The camera will stop taking images/videos when it is in low battery (a low battery notification will be displayed).
- Make sure that the Micro SD card is over class 10 with high speed, and its capacity ranges from 8G to 32G.
- Make sure that the Micro SD card is not full. The camera will stop taking images/videos if the Micro SD card is full. You can choose to format it (make sure you have backed up any important files firstly).
- Make sure that the file system of the micro SD card is FAT32. This camera does not support NTFS or exFAT. If the micro SD card file system is wrong, the camera will prompt to format before it can be used normally.
How long can the video be?
- In normal recording mode, no matter which resolution is selected to record video, video files are saved every 15 minutes, and restart timing every 15 minutes.
- Time-lapse recording mode: video files are saved as a complete file.
- Slow motion (1080P 60FPS): video files are saved every 30 minutes.
- Slow motion (720P 90FPS): video files are saved every 60 minutes.
Warnings/Cautions
- This is a high-precision product, please avoid falling and collision when you use the camera.
- Please keep the camera away from the objects with strong-magnetic, such as magnet and power-driven machine.
- Please do not expose this camera to high temperature places.
- Please choose the Micro SD card over class 10 (capacity ranges from 8G to 32G) with high speed. Because using a low-speed card may result in unclear or inconsistent videos.
- Please keep the Micro SD card away from places where the magnetic is strong in case that the data on the Micro SD card lose.
- During the process of charging up the battery, if the camera overheats, smokes or gives off a peculiar smell, please unplug the power immediately for fire prevention.
- Please keep the camera away from your children when charging up the battery, for electric shock prevention.
- Please keep the product in shady, dry and insulated places.
Warranty
We strive to build our products with the highest attention to detail and craftsmanship. However, sometimes there are occurrences of defect.
We are happy to offer a 1-year hassle-free warranty to all our products as we continue to make amazing products. Please contact us if you have any questions about our devices.
FCC ID2AR5E-Q3H
NOTE: This equipment has been tested and found to comply with the limits for a Class B digital device, pursuant to part 15 of the FCC Rules. These limits are designed to provide reasonable protection against harmful interference in a residential installation. This equipment generates uses and can radiate radio frequency energy and, if not installed and used in accordance with the instructions, may cause harmful interference to radio communications. However, there is no guarantee that interference will not occur in a particular installation. If this equipment does cause harmful interference to radio or television reception, which can be determined by turning the equipment off and on, the user is encouraged to try to correct the interference by one or more of the following measures:
- Reorient or relocate the receiving antenna.
- Increase the separation between the equipment and receiver.
- Connect the equipment into an outlet on a circuit different from that to which the receiver is connected.
- Consult the dealer or an experienced radio/TV technician for help
Changes or modifications not expressly approved by the party responsible for compliance could void the user’s authority to operate the equipment.
This device complies with Part 15 of the FCC Rules. Operation is subject to the following two conditions:
- this device may not cause harmful interference, and
- this device must accept any interference received, including interference that may cause undesired operation.
[xyz-ips snippet=”download-snippet”]