![]() USER MANUALMini UltrasonicCool Mist HumidifierModel: Classic 150-RWH
USER MANUALMini UltrasonicCool Mist HumidifierModel: Classic 150-RWH
Questions or Concerns?Please contact us Mon–Fri, 9:00 am–5:00 pm PST/PDT at [email protected] or at (888) 726-8520.
Package Contents1 x Mini Ultrasonic Cool Mist Humidifier1 x USB Cable3 x Cotton Bars (1 Pre-Installed)1 x User Manual
Specifications
| Power Supply | DC 5V |
| Rated Power | 2.6W |
| Water Tank Capacity | 11/2 US cups / 350 mL |
| Max Run Time | Up to 6 hours of continuous use Up to 17 hours of intermittent useNote: The humidifier may run for a longer or shorter time depending on the environmental temperature and humidity. |
| Automatic Shutoff | 4 hours |
| Noise Level | < 20dB |
| Mist Output | Continuous Mist Mode: 40 mUh |
| Humidifier Dimensions | Diameter: 27 in / 6.8 cm Height: 6.2 in /157 cm |
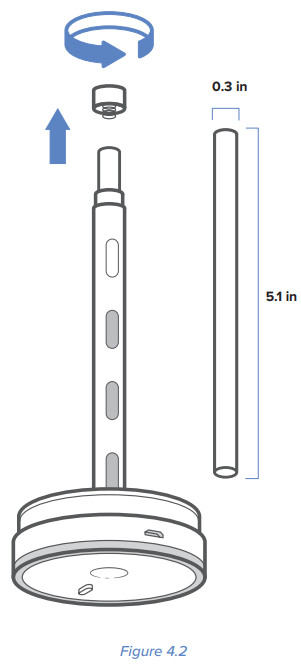
| Cotton Bar Dimensions | Diameter: 0.3 in / 0.8 cm Height: 51 in /13 cm |
| Weight | 0.33 lb /150 g |
READ AND SAVE THESE INSTRUCTIONS SAFETY INFORMATIONTo reduce the risk of fire, electric shock, or another injury, follow all instructions and safety guidelines.
General Safety
- Only use the humidifier as described in this manual.
- Place the humidifier and cord so that it will not be knocked over. Do not place near large pieces of furniture or in high-traffic areas.
- When not in use, turn the humidifier off and disconnect from power by removing the plug from the USB port.
- Do not use the humidifier in wet environments.
- Keep the humidifier out of reach from children.
- Always unplug your humidifier from the power outlet before cleaning your humidifier or detaching the water tank cover.
- Always make sure to place the humidifier on a flat, level surface or in a car cup holder before operation.
- Only fill the water tank with clean water.Never fill the water tank with any other liquids.
- Do not add essential oil into the water tank or onto the transducer.
- Do not place the humidifier near sources of heat, such as stovetops, ovens, or radiators.
- Do not place the humidifier directly on floors, carpets, or rugs.
- Do not use other items as replacement parts for this product.
- Do not cover the transducer while the humidifier is on. Doing so may damage the humidifier.
- Do not immerse the water tank cover, USB cable, or plug in water.
- If the humidifier is damaged or is not functioning properly, stop using it and contact Customer Support immediately.
- Not for commercial use. Household use only. Caution: Risk of Leaks & Electric Shock
- Do not add essential oils, supplemental water treatment liquids, or water filters into the water tank or onto the transducer. This will damage the humidifier and cause leaks.
Plug & Cord
- Ensure that the plug fits properly into a USB port.
- Do not handle the USB cable or plug with wet hands. Keep the plug and USB cable away from liquids.
GETTING TO KNOW YOUR HUMIDIFIER
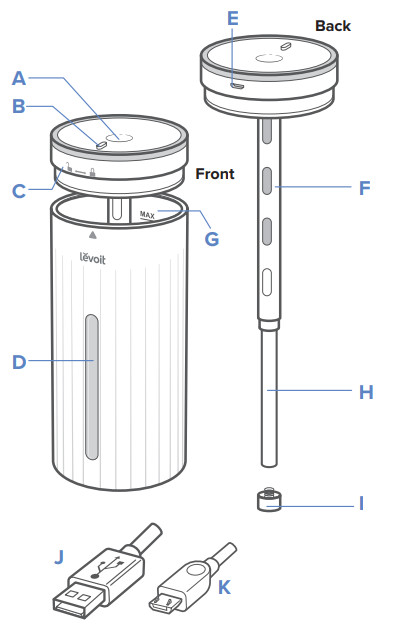
| A. TransducerB. Power ButtonC. Lock / Unlock IndicatorsD. Water Tank WindowE. Micro USB Port | F. Cotton Bar CoverG. Max Water LineH. Cotton BarI. Cotton Bar Cover CapJ. USB ConnectorK. Micro USB Connector |
FILLING & REFILLING
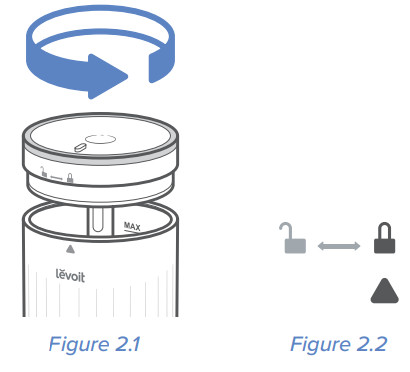
- Turn the water tank cover counterclockwise to unlock, then lift up to remove. [Figure 2.1]
- Fill the water tank with room-temperature purified or distilled water. Do not fill with hot water.CAUTION:• Do not fill past the max water line.• Do not add essential oils into the humidifier.• Do not use water treatment liquids or third-party water filters in this humidifier.
- Replace the water tank cover, turning it clockwise until the arrow aligns with it
 . [Figure 2.2]
USING YOUR HUMIDIFIER
- Connect the USB cable to the humidifier and plug it into a USB port.Note: Do not reverse the micro USB. Ensure the cable is correctly inserted into the port.The cable can be plugged into any USB port, including a car charger (not included).
- Press the Power button once to turn on the humidifier in Continuous Mist Mode.Note: Alternatively, while the humidifier is off, press and hold the Power button to turn on the humidifier in Intermittent Mist Mode.
- Press the Power button a second time to turn on the LED light with color rotation.
- While the humidifier rotates through colors, press the Power button to lock a color.Repeatedly press the Power button to continue cycling through colors and functions.Note: You can also turn the humidifier off at any time by pressing and holding the Power button for 2 seconds.
| Cycle Order | Function |
| 1 | Turn on the mist |
| 2 | Turn on the light with color rotation |
| 3 | White |
| 4 | Purple |
| 5 | Royal Purple |
CARE & MAINTENANCENote:
- All maintenance should be done on a water-resistant surface, such as a kitchen counter.
- Change the water daily to avoid bacteria growth.
- Use a cotton swab to clean the transducer regularly.
- If not using the humidifier for 1 week or longer, do not leave water inside. Clean and dry the humidifier instead.

| Cycle Order | Function |
| 6 | Blue |
| 7 | Aqua |
| 8 | Green |
| 9 | Yellow |
| 10 | Turn off the humidifier |
CleaningYou should clean your humidifier every 3 days, and when you’re ready to store it.Note:
- Never immerse the water tank cover in water or liquid. Do not place any part of the humidifier in a dishwasher.
- Do not use detergents to clean the humidifier.
- Unplug the humidifier.
- Remove the water tank cover by turning it counterclockwise.
- Clean the transducer with a cotton swab moistened with room temperature water. [Figure 3.1]
- Wipe the interior and exterior of the water tank with a soft cloth.
- Dry all parts with a cloth. Make sure all parts are completely dry before reassembling or storing.
Descaling
Descaling removes any mineral deposits that may have built up inside the humidifier. Always descale the humidifier before and after storing it for long periods of time.
- Unplug the humidifier and pour out all the water.
- Clean the transducer and water tank interior using distilled vinegar.
- If the humidifier has thick scale buildup, scrub with a non-scratch scrub sponge.
- Wipe off any remaining scale with a non-abrasive cloth, sponge, or cleaning brush.
Replacing the Cotton Bar
- Unplug the humidifier.
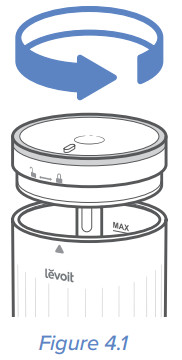
- Remove the water tank cover by turning it counterclockwise. [Figure 4.1]
- Flip the water tank cover upside down and twist the cotton bar cover cap counterclockwise to remove it. [Figure 4.2]
- Flip the water tank cover right side up so that the cotton bar falls out.
- Insert a new cotton bar into the cotton bar cover.
- Replace the cotton bar cover cap by placing it back on and twisting it clockwise to lock it on.Note: We recommend replacing the cotton bar every month with consistent use. To purchase cotton bar replacements, search “USB humidifier replacement” online. Make sure the bars purchased are the correct dimensions (see Figure 4.2). Bars can also be trimmed to fit the humidifier if they are too long in height. Soak the cotton bar in purified water for 5 minutes before installing.
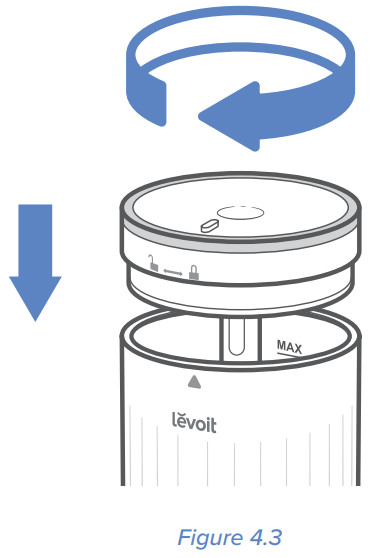
ReassemblingRefill the tank, if necessary. Replace the water tank cover by firmly inserting it on the tank and twisting it clockwise back in place, aligning the arrow with ![]() . [Figure 4.3]StoringFollow the cleaning instructions (see Care & Maintenance) and allow all parts to dry completely before storing. Store in a cool, dry location.
. [Figure 4.3]StoringFollow the cleaning instructions (see Care & Maintenance) and allow all parts to dry completely before storing. Store in a cool, dry location.
TROUBLESHOOTING
| Problem | Possible Solution |
| The humidifier doesn’t turn on. | Make sure the humidifier is connected to the correct power supply. |
| The humidifier may have overheated. Allow the humidifier to cool and make sure there is water in the tank. | |
| Little or no mist comes out | Fill the water tank. |
| Make sure the humidifier is connected to the correct power supply. | |
| Make sure the humidifier is on a flat, level surface. | |
| Make sure the transducer is not blocked or clogged. | |
| Replace the cotton bar. | |
| The humidifier light blinks red and the humidifier turns off. | The humidifier has run out of water. Fill the tank with water. |
| Humidifier uses water too quickly. | The humidifier uses up water based on environmental temperature and humidity. If your environment is cold and/or dry, the humidifier will run out of water faster. |
| Humidifier produces an unusual smell. | If the humidifier is new, remove and rinse the water tank, and place the water tank cover in a cool, dry place for 12 hours. |
| Clean the water tank (see Care & Maintenance). | |
| White dust appears around the humidifier. | We recommend using purified or distilled water to fill the humidifier. Avoid using water with high mineral content. |
| Clean the humidifier (see Care & Maintenance). | |
| Water leaks from the humidifier. | Make sure the water level is below the Max line. |
| Make sure the humidifier is standing upright on a flat, level surface. | |
| Mold grows inside the humidifier. | Clean the water tank and water tank cover regularly (see Care & Maintenance). |
If your problem is not listed, please contact Customer Support.
LIMITED ONE-YEAR WARRANTY
| Product | Mini Ultrasonic Cool Mist Humidifier |
| Model | Classic 150-RWH |
| For your own reference, we strongly recommend that you record your order ID and date of purchase. | |
| Order ID | |
| Date of Purchase |
Provost Corporation warrants this product to the original purchaser to be free from defects in material and workmanship, under normal use and conditions, for a period of one year from the date of original purchase.Provost Corporation agrees, at our option during the warranty period, to repair any defect in material or workmanship or furnish an equal product in exchange without charge, subject to verification of the defect or malfunction and proof of the date of purchase.There is no other express warranty. This warranty does not apply:
- If the product has been modified from its original condition;
- If the product has not been used in accordance with directions and instructions in the user manual;
- To damages or defects caused by accident, abuse, misuse or improper or inadequate maintenance;
- To damages or defects caused by service or repair of the product performed by an unauthorized service provider or by anyone other than Arovast Corporation;
- To damages or defects occurring during commercial use, rental use, or any use for which the product is not intended;
- To damages or defects exceeding the cost of the product.
Provost Corporation will not be liable for indirect, incidental, or consequential damages in connection with the use of the product covered by this warranty.This warranty extends only to the original consumer purchaser of the product and is not transferable to any subsequent owner of the product regardless of whether the product is transferred during the specified term of the warranty.This warranty does not extend to products purchased from unauthorized sellers. Provost Corporation’s warranty extends only to products purchased from authorized sellers that are subject to Arovast Corporation’s quality controls and have agreed to follow its quality controls.All implied warranties are limited to the period of this limited warranty.This warranty gives you specific legal rights and you may also have other rights which vary from state to state. Some states do not allow the exclusion or limitation of incidental or consequential damages, so the above limitation or exclusion may not apply to you.If you discover that your product is defective within the specified warranty period, please contact Customer Support via [email protected]. DO NOT dispose of your product before contacting us. Once our Customer Support Team has approved your request, please return the product with a copy of the invoice and order ID. Extend Your Warranty by 1 Year Register your product within 14 days of purchase at www.levoit.com/warranty to extend your 1-year warranty by an additional year.This warranty is made by:Arovast Corporation1202 N. Miller St. Suite AAnaheim, CA 93806
CUSTOMER SUPPORTIf you have any questions or concerns about yourthe new product, please contact our helpful CustomerSupport Team.Provost Corporation1202 N. Miller St., Suite AAnaheim, CA 92806
Email: [email protected]Toll-Free: (888) 726-8520Support HoursMon–Fri, 9:00 am–5:00 pm PST/PDT*Please have your order invoice and order ID readybefore contacting Customer Support.ALL EXPRESSED AND IMPLIED WARRANTIES, INCLUDING THE WARRANTY OF MERCHANTABILITY, ARE LIMITED TO THE PERIOD OF THE LIMITED WARRANTY.
References
[xyz-ips snippet=”download-snippet”]