
 Model Guide:
 Model Guide:
This instruction manual covers the operation and care of the Lezyne Mega Drive LED Light system.
 Please READ THIS ENTIRE MANUAL before operation in order to ensure proper use and care of your new Lezyne LED Light. Traffic laws mandating lighting vary from country to country. we strongly suggest you inform yourself about lighting laws in the country of intended use.
Overview:

Accessories:
The following accessories are included with your Lezyne LED Light:

Do In The Dark:
Adventures in the dark are inherently dangerous activities; it is strongly advised that you to take caution at night. Lezyne LED Lights will greatly improve your visibility, but there are still many dangers. Lezyne recommends for every night adventure that you always perform a few pre-flight checks, which include but are not limited to the following:
– Wearing protective gear– Dressed in highly visible clothing– Using a RED rear-facing tail light– Travelling with proper tools and tire repair– Light is properly mounted (see MOUNTING)– Light is properly charged (see CHARGING)
Warnings:
– Lezyne LED Lights are meant to be operated in temperatures between -25°C and 45°C (5°F and 113°F).– Lezyne LED Lights should only be attached using supplied mounting brackets. DO NOT use Lezyne LED Lights as handheld flashlights.– DO NOT look directly into light beam, or shine at another person’s eyes.– Lezyne LED Lights are water resistant under normal conditions, but are NOT waterproof. DO NOT SUBMERGE UNDERWATER. If moisture gets inside light body, open the Rear Battery Door, remove the battery, and air-out until completely dry.– NEVER ATTEMPT TO REMOVE FRONT LENS OR ELECTRONICS. Doing so will void your warranty.
If replacing battery, only use Lezyne branded LIR 2 Cell (part # 4712805979608). Make certain (+) positive terminal and (-) negative terminal are inserted into housing correctly aligned. Never attempt to use two (2) LIR 28650 batteries in place of one LIR 2 Cell battery. See CHARGING for instructions on installing the battery.Lezyne USA Inc. does not accept any liability for injuries or other damages resulting from the use of this product in any circumstances
Warranty
In the U.S. and U.K., Lezyne LED Lights carry a two (2) year warranty from the original purchase date to the original owner (proof of purchase is required). This warranty covers materials and manufacturing defects on the LED light housing, electronics, LED, and the mounting bracket supplied. Lezyne Batteries carry a 6-month warranty against any manufacturing defects. Issues not covered by the warranty include normal wear and tear, improper installation, attempted access to electronics, modification of electronics, damage or failure due to accident, misuse, abuse, and/or neglect.Contact your local dealer or visit www.lezyne.com for complete warranty information and contact information regarding warranty issues.
For warranty issues outside of the U.S., please contact the Lezyne distributor/retailer for your country or region directly.

![]()
![]()
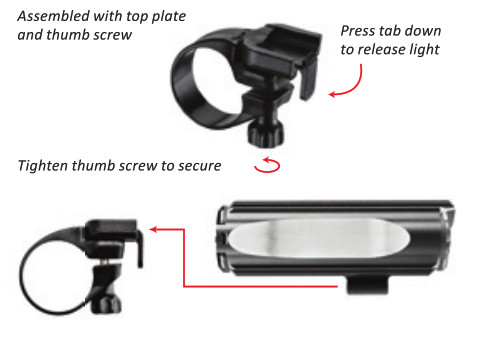
Mounting:
- Select correct bar clamp for handlebar diameter (25.4mm or 31.8mm; use rubber shims for handlebar diameter variation).
- Slide clamp over handlebar with bolt hole facing forward, place top mount on clamp, and insert thumbscrew from bottom.
- Tighten thumbscrew until snug; clamp should not rotate on handlebar. DO NOT OVERTIGHTEN.
- Slide LED light into top plate from front and push until body clicks into place.
- To remove LED light, press release tab and pull light forward. Take caution as light body may be warm.
Operation:

*Race Mode: With the light off, press and hold the Power Button for five (5) seconds, until the light flashes, then release the button. The light will now enter Race Mode where only Blast and Economy modes are selectable. The light will remain in Race Mode even when turned off or when the battery is removed. With the light off, press and hold the Power Button for an additional five (5) seconds to return the light to normal mode.
Run Times and Modes:
Mode Check: When the light is OFF you can check the selected mode set. Click the Power Button once to display the mode set. A BLUE LED that blinks twice means the light is in race mode.
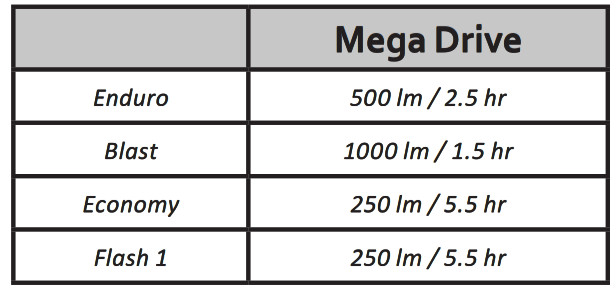
With a fully charged Lezyne battery your Lezyne LED Light will have approximately the following run times and outputs (Lumens = Im).
Intelligent Power Indicator: Lezyne LED Lights are equipped with a battery monitor to indicate remaining run time during use. A green and red LED located in the Power Button show the battery status.
Battery Check: When the light is OFF you can check the charge level. Click the Power Button once to display the charge status for 2 seconds. A red LED means you should charge the light before your ride.
 Thermal protection circuit: Lezyne LED Lights are protected by a thermal detection system. If the operating temperature of the light is too high, the light will automatically change to the lowest setting. To return to normal mode settings, turn off the light and allow it cool until the ambient temperature is below 45°C (113°F).
Charging:
Before using your Lezyne LED Light for the first time, fully charge the battery.To charge battery:
- Confirm light is turned off.
- Release Rear Battery Door Latch and open Rear Battery Door.
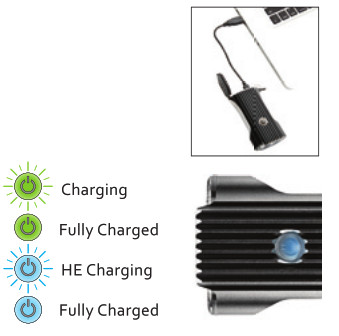
- Insert small end of USB cable into light. Insert other end of cable into powered USB port.
- When charging, green LED will flash. If the USB port is capable of High-Efficiency Charging, blue LED will flash and light will automatically switch to HE Charging.
- If green or blue LED does not flash when plugged in, selected USB port may not be powered. Try another USB port.
- Battery will be fully charged in 4-6 hours using HE Charging and 10-12 hours using standard charging. Battery is fully charged when green or blue LED becomes solid.
- Remove light from charger and secure Rear Battery Door.
- If there is a problem with battery, both red and green LEDs will light up. Remove/replace battery.
Spare batteries: If you choose to carry extra batteries it is okay to change the batteries at any point during use.
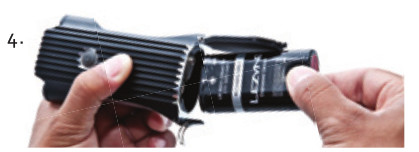
To remove the battery when the light is OFF: (2) Open Rear Battery Door. The battery will now be exposed. (2) Rotate the Battery Retaining Tab out of the way. (3) Use gravity to slide the battery out. (4) Replace it with a correctly aligned LIR 2 Cell Lezyne battery. (5) Replace the Rear Battery Door and secure latch.

When storing your Lezyne LED Light for long periods of time it is suggested that you remove the battery from the light. Before your next use fully charge the battery.
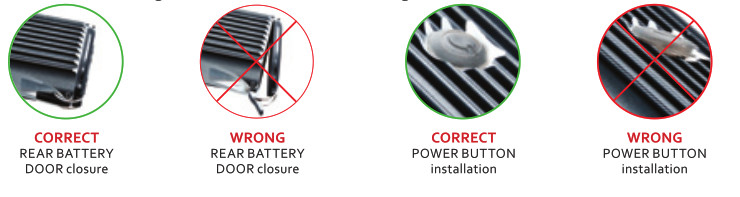
Water Protection:
To ensure water tightness, note the below images for correct installation of Rear Battery Door and Power Button before use.
Maintenance:
In order to ensure proper function of your light:– Keep Lezyne LED Light clean—keeping mud and debris off of body will improve heat dissipation.– If lens is dirty, use soft, damp cloth to wipe dirt away. – Do not use harsh materials or chemicals to clean; these may scratch lens surface.– Never use hose or high-pressure washer to clean light.– Always secure Rear Battery Door correctly to prevent water damage.
More Information:
For more information and instructional videos about Lezyne LED Lights, visit: http://lezyne.com/XLledFor Lezyne LED Light accessories and replacement parts, visit: http://lezyne.com/led-accessories
Lezyne Mega Drive LED Light User Manual – Lezyne Mega Drive LED Light User Manual –
[xyz-ips snippet=”download-snippet”]