
OWNER’S MANUALOIL FILLED RADIATOR HEATERITEM NO.: SH37

 Intertek
120V ~ 60Hz 1500W
ATTACH YOUR RECEIPT HEREPurchase Date ____________Serial Number (located on back of unit) __________________
Questions, problems, missing parts? Contact technical support department at 657-341-0362, 9:00 a.m. – 5 p.m., PST, Monday – Friday or visit us online at www.lifesmartcomfort.comPlease have your model and serial number ready
BEFORE USING YOUR NEW HEATER
Please read this guide. It will help you to operate your new Heater in the safest and most effective way.Keep this book and your sales check (receipt) in a safe place for future reference.
IMPORTANT SAFETY INSTRUCTIONS
Read all instructions in this guide before using your Heater.This product is intended for indoor residential, office and personal shop use only, not for industrial or other commercial applications. Use only with electrical wiring that is in good working order and that meets applicable codes and ordinances. If you have any questions whether your wiring is adequate, consult a qualified electrician.While using your Heater, you should follow the IMPORTANT SAFETY INSTRUCTIONS listed below. As part of those instructions, we have used the word ” ![]() WARNING “ to indicate the level of hazard:
WARNING “ to indicate the level of hazard:![]() WARNING: indicates a hazard which, if not avoided, could result in injury or death.IMPORTANT INSTRUCTIONSWhen using electrical appliances, basic precautions should always be followed to reduce the risk of fire, electric shock, and injury to persons, including the following:
WARNING: indicates a hazard which, if not avoided, could result in injury or death.IMPORTANT INSTRUCTIONSWhen using electrical appliances, basic precautions should always be followed to reduce the risk of fire, electric shock, and injury to persons, including the following:
- Read all instructions before using this Heater.
- Use this heater only as described in this manual. Any other use not recommended by the manufacturer may cause electrical shock, fire, or injury to persons.
- Do not operate the heater with a damaged power cord or after the heater malfunctions or has been dropped in any manner.
- Do not use heater unattended. This appliance is not intended for use by persons (including children) with reduced physical, sensory or mental capabilities, or lack of experience and knowledge unless they have been given supervision or instruction concerning use of the appliance by a person responsible for their safety.
- Do not place the heater on a small, unlevel, uneven, or any surface that might allow Heater to tip or fall.
- For proper operation, the heater should be placed on a smooth, non-combustible surface.
IMPORTANT SAFETY INSTRUCTIONS
- Always unplug the heater when not in use.
- Do not operate heater with blade guards or any safety device remove.
- Do not run power cord under carpeting. Do not cover cord with throw rugs, runners, or the like. Arrange cord away from traffic area where it will not be tripped over.
- Avoid the use of extension cords due to risk of fire. If an extension cord must be used, the cord must be a minimum 14AWG and rated not less than 1875 watts.
- Do not insert or allow any object to enter any openings on the heater. Doing so may cause electric shock and/or fire hazard.
- This product is intended for indoor residential, office and personal shop use only, not for industrial or other commercial applications. This warranty is void if this product is ever used for other than private household purposes.
![]() WARNING: SHOCK HAZARDUse your heater only in dry environments. This heater is not intended for use in a bathroom, laundry area, or similar locations, or near sinks, washing machines, swimming pools or other sources of water. Never locate heater where it may fall into a bathtub or other water container. Do not use heater outdoors. Do not use in damp environments such as flooded basements.
WARNING: SHOCK HAZARDUse your heater only in dry environments. This heater is not intended for use in a bathroom, laundry area, or similar locations, or near sinks, washing machines, swimming pools or other sources of water. Never locate heater where it may fall into a bathtub or other water container. Do not use heater outdoors. Do not use in damp environments such as flooded basements.
![]() WARNING: HOT SURFACESDo not touch body of heater when in use. This heater is hot when in use, to avoid burns, do not let bare skin touch hot surfaces. If provided, use handles when moving this heater.
WARNING: HOT SURFACESDo not touch body of heater when in use. This heater is hot when in use, to avoid burns, do not let bare skin touch hot surfaces. If provided, use handles when moving this heater.![]() WARNING: FIRE HAZARDHeater has hot and arcing or sparking parts inside. Do not use near combustible materials or flammable gases or sources of heat. DO NOT USE in areas where gasoline, paint or flammable materials are used or stored. Keep combustible materials such as furniture, pillows, bedding, papers, clothes and curtains at least 3 feet (0.9 m) from the front of the heater and keep them away from the sides and rear. To prevent a possible fire, do not block air intakes or exhaust in any manner. Do not use on soft surfaces, like a bed, where openings may become blocked. Do not place the heater near a bed because objects such as pillows or blankets can fall off the bed and be ignited by the heater. Do not insert or allow foreign objects to enter any ventilation or exhaust opening as this may cause an electric shock, fire, or damage the heater.
WARNING: FIRE HAZARDHeater has hot and arcing or sparking parts inside. Do not use near combustible materials or flammable gases or sources of heat. DO NOT USE in areas where gasoline, paint or flammable materials are used or stored. Keep combustible materials such as furniture, pillows, bedding, papers, clothes and curtains at least 3 feet (0.9 m) from the front of the heater and keep them away from the sides and rear. To prevent a possible fire, do not block air intakes or exhaust in any manner. Do not use on soft surfaces, like a bed, where openings may become blocked. Do not place the heater near a bed because objects such as pillows or blankets can fall off the bed and be ignited by the heater. Do not insert or allow foreign objects to enter any ventilation or exhaust opening as this may cause an electric shock, fire, or damage the heater.
SAVE THESE INSTRUCTIONS!
IMPORTANT SAFETY INSTRUCTIONS
![]() WARNING: ELECTRICAL SHOCK HAZARDDo not use with damaged cord or plug. Use with adequate electrical system that is up to code. The supply cord has a polarized plug. As a safety feature this plug will fit in a polarized outlet only one way. To prevent electric shock, match wide blade of plug to wide slot, fully insert plug. If the plug does not fit contact a qualified electrician. Never use an extension cord. DO NOT attempt to defeat this safety feature. Do not operate any heater with a damaged cord or plug or after heater malfunctions, has been dropped or damaged in any manner. Do not operate heater with a broken heating element or ceramic cone or any visual imperfections. For all repairs contact a qualified service dealer.Do not operate heater with its ventilation obstructed.
WARNING: ELECTRICAL SHOCK HAZARDDo not use with damaged cord or plug. Use with adequate electrical system that is up to code. The supply cord has a polarized plug. As a safety feature this plug will fit in a polarized outlet only one way. To prevent electric shock, match wide blade of plug to wide slot, fully insert plug. If the plug does not fit contact a qualified electrician. Never use an extension cord. DO NOT attempt to defeat this safety feature. Do not operate any heater with a damaged cord or plug or after heater malfunctions, has been dropped or damaged in any manner. Do not operate heater with a broken heating element or ceramic cone or any visual imperfections. For all repairs contact a qualified service dealer.Do not operate heater with its ventilation obstructed.
PET OWNERS NOTE
SAVE THESE INSTRUCTIONS!
PARTS AND FEATURES
It is important to know your heater’s parts and features to ensure its proper and safe use. Review these before using your heater.7 FIN OIL FILLED HEATERFig. 1
 Intertek
OPERATING INSTRUCTIONS
ASSEMBLY INSTRUCTIONSBefore initial use some assembly is required. Attach casters to heater body using components provided as shown in Fig. 2.
- Turn the heater (A) upside down. Remove the wing nut (E) from the straight tip of each U-bolt (B). Hook one U-bolt under the heater base between the heater control box and the next fin.
- Align a pedal (D) with the U-bolt tips. Insert the bent tip through one of the pedal bolt holes. Insert the straight tip through the other hole. Use the removed wing nut to secure the straight tip to the pedal.
- Hook the other U-bolt under the heater base between the last two fins. Attach pedal in same manner as described in previous step.
- Remove the nuts (C) preassembled to the casters (F). Insert the caster stems through the caster holes in the pedals. Use the removed nuts to secure the casters to the pedals. Turn the heater upright.

HEATER OPERATIONAlways operate the heater in the upright position following all instructions and recommendations listed in this manual.HEATER LOCATIONPlace the heater in the area of the room that is coldest.HEATER CONNECTIONPlug heater directly into 120 volt A.C. 60 Hz outlet. Be sure the plug fits tightly in outlet. A loose connection may cause overheating and damage to the plug or heater.NOTE: To prevent overloading a circuit, do not plug the heater into a circuit that is servicing other electrical needs.HEATER STARTUP1. To start the heater, press one or both power switches (Fig. 3) from the Off to the Low or Med heat mode positions. When both switches are pressed the heater will operate in High heat mode.
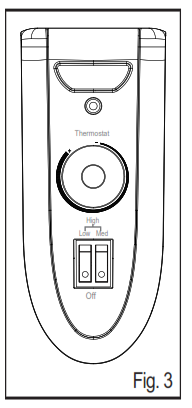 2. Turn the Thermostat control counterclockwise as far as it will go to the maximum (+) position.
POWER LEVEL SWITCHESLow switch = Low heat mode (600 watts)Med switch = Medium heat mode (900 watts)Low + Med switch = High heat mode (1500 watts)
OPERATING INSTRUCTIONS
SETTING THERMOSTATAfter heater has been turned on and the area has reached the desired temperature, slowly rotate the Thermostat Control counterclockwise until the heater shuts off (you should hear a faint “click”). By leaving the thermostat at this setting the heater will automatically maintain this area temperature. To maintain a lower temperature, rotate the control further counterclockwise toward the minimum (-) position. To maintain a higher temperature, rotate the control clockwise toward the maximum (+) position.IMPORTANT SAFETY FEATURESThe power indicator light, located in the Power Switch, lights when the heater is switched on to tell you that the heater has power. The heater is equipped with an automatic overheat protection device located inside the body of the heater. If the heater is covered, or if the heater gets too hot for any reason, the automatic overheat protection device will turn the heater off. The unit must be reset to resume operation. To reset the unit, turn both power switches to “O” (Off) and unplug the heater. Wait for 10 minutes for the heater to cool down. Plug the heater back in and restart. To prevent further automatic shut-off, locate the heater far enough away from a wall or other object to allow for sufficient airflow. Always place the heater on a smooth level surface. The heater is also equipped with a safety tip-over switch to turn power off to the heater when the heater tips over. To resume heater functions simply stand heater upright. With tip over protection, the heater will only operate when placed upright on a level surface.
CARE AND MAINTENANCE
CLEANING![]() CAUTION: Before cleaning the heater be sure to disconnect power cord and allow the heater to cool completely.
CAUTION: Before cleaning the heater be sure to disconnect power cord and allow the heater to cool completely.
The heater should be cleaned at least once a year to maintain proper performance. Clean the outside surface with a damp cloth. Allow heater to dry completely before use. Do not use harsh chemical or abrasive cleaners.WARNING: To prevent personal injury or heater malfunction, NEVER immerse the heater in water.
![]() CAUTION: Do not operate the heater without the grill in place. Do not use the heater if it has malfunctioned or become damaged in any way.
CAUTION: Do not operate the heater without the grill in place. Do not use the heater if it has malfunctioned or become damaged in any way.
REPAIRDo not attempt to open the heater to clean or otherwise service the inside.STORAGE AND MOVEMENT– Keep original carton for long-term storage of the heater.– Unplug and wrap the cord around the cord storage plate when heater is not in use to avoid damage to cord and plug.– To roll the heater on its casters, place two or three fingertips beneath the top edge of the Pull Handle (Fig. 1) and your thumb on top of the handle. Pull the heater forward. The plastic handle won’t become hot during heater use as will the metal fins and metal portion of the control box.CAUTION: DO NOT pull on cord to roll the heater from one location to another. DO NOT place hands on heater fins to roll heater unless heater is completely cooled down after use.
Life Smart Oil Filled Radiator Heater SH37 User Manual – Life Smart Oil Filled Radiator Heater SH37 User Manual –
[xyz-ips snippet=”download-snippet”]