
LIFE WALKER UPWalker Lite Walking 

Safety Warnings
TO ENSURE YOUR SAFETY IN USING THE UPWALKER® LITE, THE FOLLOWING SAFETY INFORMATION AND ALL INSTRUCTIONS MUST BE FOLLOWED
- DO NOT use this product without first reading and understanding the instructions contained in this booklet.
- DO NOT exceed 300lb (136kg) weight limit.
- User assistance is recommended for customers with fall risk.
- DO NOT use the UPWalker Lite if there is apparent damage or if any parts are missing.
- Care should be taken to ensure that height adjustment locks, handles, brakes or any other functional or moving parts are in good working order before operation.
- Periodically check engagement of seat rail in frame and armrest height adjustments to make sure they are secure.
- Periodically check all screws and fasteners, and retighten if necessary.
- DO NOT ride the UPWalker Lite when seated or when standing with all your weight on the armrests; do not lean disproportionately on one of the armrests.
- DO NOT use on stairs, escalators, moving sidewalks, or uneven surfaces.
- DO NOT go up or down inclines greater than 15% or diagonally across inclines greater than 5%.
- Be careful to avoid pinching your fingers while raising and lowering the armrests and opening and closing the UPWalker Lite frame.
- ALL WHEELS must be in contact with the floor at ALL TIMES to ensure the UPWalker Lite is properly balanced
FAILURE TO FOLLOW THESE INSTRUCTIONS CAN LEAD TO SERIOUS INJURY OR DEATH. FOR SAFETY AND WARRANTY COMPLIANCE, THE UPWALKER LITE IS ONLY TO BE USED BY A CONSUMER IN A MANNER FOR INTENDED USE AS A MOBILITY ASSISTANCE DEVICE. MISUSE OF THE UPWALKER LITE MAY VOID WARRANTY
UPWalker Lite Product Features
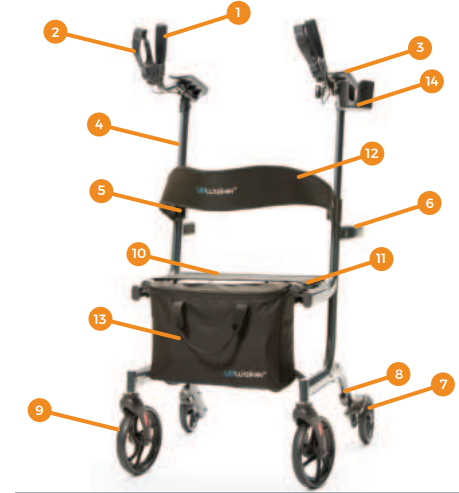
- Handgrip
- Parking/hand brake
- Armrest pad
- Height adjustment tube
- Height adjustment lock
- Sit-to-stand handles
- Rear wheel
- Brake adjustment knob
- Front wheel
- Seat
- Seat rail
- Backrest
- Personal item bag
- Beverage holder
Opening the UPWalker Lite
Place the UPWalker Lite on all four wheels on a level floor (Figure 1). Standing behind the unit, hold each sit-to-stand assist handle and move outward in opposite directions to open frame (Figure 2).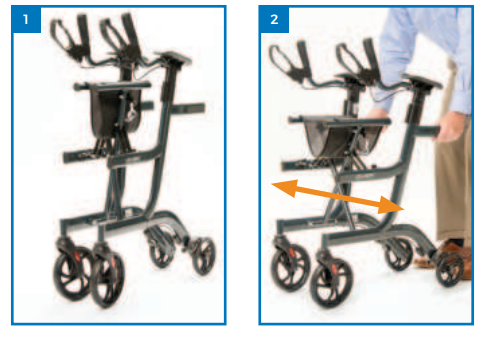
Complete the process by pushing downward on the seat until the seat rails sit securely on the frame (Figure 3).
Armrest Height Adjustment
Push in the upper portion of the light gray height adjustment tab (Figure 4) and, while keeping the tab depressed with one hand, use your other hand centered over the armrest pad to raise or lower the armrest to the desired height (Figure 5). When the armrest is at the desired height, release the height adjustment tab to lock the armrest in place. You will hear a “click” when the tab is engaged.
The armrests should be set at a height that is high enough that you feel support under your forearms when standing upright inside the UPWalker Lite but not so high as to cause your shoulders to “hunch.” Set the armrests at the same height and put equal weight on each forearm while using.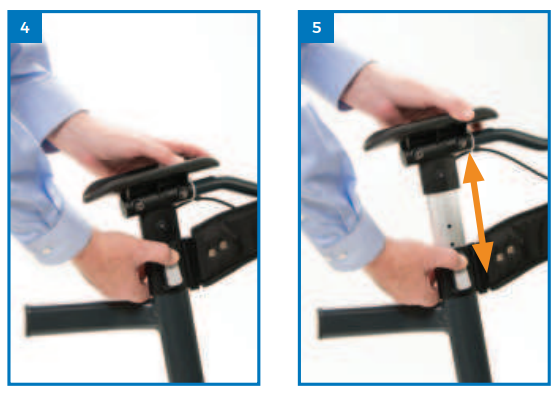
Attaching / Removing the Personal Item Bag
The personal item bag has plastic clips which go over the seat rail extension on the front end of the walker (located at front end of the seat). With the UPWalker logo side of the bag facing toward the front, slide the clips over the right and left seat rail extensions (Figures 6-7).
Attaching / Removing the Backrest
With the logo side of the backrest upright and facing the front of the UPWalker Lite, slide the T-slot on the end of the backrest onto the respective mating T-ridge on the front of the frame under the armrests (Figure 8). Repeat for the other end of the backrest. Check to confirm that the T-slots and T-ridges are fully engaged on both ends of the backrest. Backrest may be left on the UPWalker Lite or removed when not in use (Figure 9).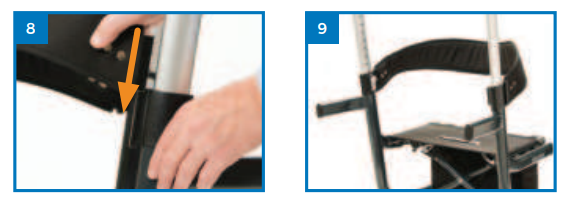
Attaching / Removing the Beverage Holder
The beverage holder can be attached to either one of the handgrip tubes.First, unscrew the knob on U-shaped tube clamp and remove the beverage holder from the U-clamp. Then slide “U” over handgrip tube close to armrest pad with hole on bottom and flat side of “U” facing inward. Make sure rubber sleeve remains inside the “U” (Figure 10). Slide the bolt on beverage holder through the hole on “U” with beverage holder positioned on the outside and the knob on the inside of the UPWalker (Figure 11). Note that the “U” and holder have a matching positioning key to rotate and lock the holder at the desired angle. Additional adjustments can be made to the positioning of the beverage holder by moving the “U” on the handgrip tube.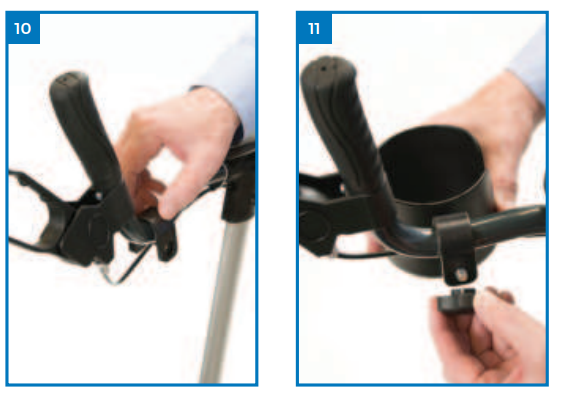
Using Brakes / Parking Brakes
To apply the brakes while walking with the UPWalker Lite, pull both brake handles evenly toward you (Figure 12).To set the parking brakes, while using one hand to hold the handgrip use the other hand to push the brake handle forward until it clicks in locked position (Figure 13).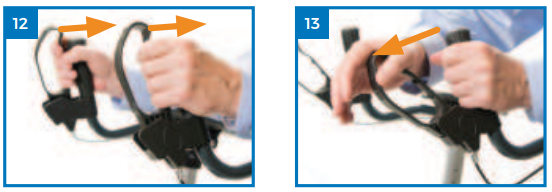
Adjusting Brakes
Basic Adjustments:
To tighten the brakes if too loose, locate the gray screw knob under the frame near the rear wheel (Figure 14). Press the knob downwards and turn to the left (counterclockwise) a half rotation at a time until desired tightness is reached. To loosen the brakes if too tight, press the gray screw knob downwards and turn to the right (clockwise) until desired tightness is reached (Figure 15). Always ensure the parking brake is disengaged when adjusting brakes.
Adjusting Brakes (contd.)
Advanced Adjustments:If this adjustment does not achieve the desired braking strength, use the adjustment option on the brake handle end of the brake cable (Figure 16). If the brakes are too loose, use your fingers or pliers to turn the barrel adjuster nut counterclockwise a half rotation at a time until the brake functions as expected. Then turn the larger locking nut clockwise using fingers or pliers until it presses tightly against the housing to prevent the barrel adjuster nutfrom loosening. If the brakes are too tight, use your fingers or pliers to turn the larger locking nut counterclockwise until loosened. Then use fingers or pliers to turn barrel adjuster nut clockwise a half at a time until the brake functions as expected. Then turn the locking nut clockwise until it presses tightly against the housing to prevent the barrel adjuster nut from loosening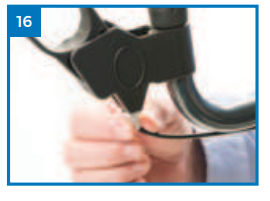
Resetting the Brakes:
If you cannot achieve the desired adjustment by means of the above, you may use an Allen wrench to reset the brake using the brake cable set screw and nut attached to the brake cable near each rear wheel (Figure 17). First loosen the set screw by turning it counterclockwise with the Allen wrench. Once loosened, pull the brake cable through the nut to tighten the brake, or push the brake cable into the nut to loosen the brake. After achieving desired cable length, tighten the set screw by turning clockwise. You may have to repeat adjustment a few times to get it right.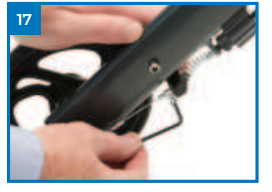
Sitting and Using Sit-to-Stand Handles
To sit on the seat, set the parking brakes with the UPWalker Lite positioned on a level surface. Sit with legs facing the rear using the sit-to-stand handles for assistance and backrest for support. You may sit with the armrests in either a raised or lowered position depending on your preference. To stand up from the UPWalker Lite, bend forward to where your nose is over your toes and push down (not backward) on the sitto-stand assist handles (Figure 18). Use the sit-to-stand handles as well when rising up from a chair into the UPWalker (Figure 19). Always have the parking brake engaged when sitting down or standing up from or into the UPWalker.
Folding and Transporting
Folding your UPWalker Lite for storage or transport: Lower the armrests to the lowest setting. Lift the seat up by the gray seat lift handle and allow the UPWalker to fold in (Figure 20). Do not lean on or put weight on the seat, armrest or frame while attempting to close the UPWalker Lite. Stand the UPWalker on all four wheels to roll or stow. Removal of the personal item bag and backrest before folding is optional.
Warranty Information
LifeWalker Mobility Products stands firmly behind our commitment to provide premium quality products. Our standard warranties represent our confidence in the materials and workmanship of your new UPWalker Lite. The frame is warrantied to be free from defects in material and workmanship, under NORMAL use, for the lifetime of the original consumer purchaser when purchased from LifeWalker Mobility Products or an authorized LifeWalker Mobility Products dealer. Accessories and non-durable components such as wheels, brakes, seat, handgrips, and armrests, which are susceptible to normal wear and tear and subject to periodic replacement, are warrantied for six (6) months. During these warranty periods, our warranties cover all parts, labor and shipping for repairing the UPWalker. Our warranties expire on their respective anniversaries and immediately upon any sale or transfer of ownership or use of the product to another person.Our warranties do not cover the following:
- A product modified or repaired without prior written authorization from
- LifeWalker Mobility Products or an authorized LifeWalker dealer.
- Routine brake adjustments.
- Problems arising from:
- User negligence.
- Any failure to adhere to UPWalker user and maintenance instructions.
- Any abuse or misuse of the product for purposes other than those specified in the UPWalker User Guide
Customer Support
For customer support on the purchase, use, maintenance and repair of your UPWalker Lite, please contact LifeWalker Customer Service at: (877) 488-0822 or [email protected]When contacting us, please have available the following information:
- The date of your purchase and form of payment.
- The product serial number.
- A description of the defect or problem requiring service.DO NOT return any products to LifeWalker Mobility Products without our prior authorization. If you purchased your UPWalker Lite from an authorized LifeWalker Mobility Products dealer, please contact that dealer. If you do not receive satisfactory service from the dealer, please call LifeWalker Mobility Products.
References
[xyz-ips snippet=”download-snippet”]