
LifeFitness HXD-ALLLX-101 Row HX Trainer
Installation Guide
Corporate Headquarters
Columbia Centre III, 9525 Bryn Mawr Avenue, Rosemont, Illinois 60018 • U.S.A.847.288.3300 • FAX: 847.288.3703Service phone number: 800.351.3737 (toll-free within U.S.A., Canada)Global Website: www.lifefitness.com
International Offices
AMERICASNorth AmericaLife Fitness, LLCColumbia Centre III9525 Bryn Mawr AvenueRosemont, IL 60018 U.S.A.Telephone: (847) 288 3300Service Email: [email protected]Sales/Marketing Email: [email protected]
United KingdomLife Fitness UK LTDQueen AdelaideEly, Cambs, CB7 4UBTelephone: General Office (+44)1353.666017Customer Support (+44) 1353.665507Service Email: [email protected]Sales/Marketing Email: [email protected]
All Other EMEA Countries and Distributor Business EMEA*Bijdorpplein 25-312992 LB BarendrechtTHE NETHERLANDSTelephone: (+31) 180 646 644Service Email:[email protected]
User and Service Documents Link
https://www.lftechsupport.com/web/document-library/documentsAdditional information is available online using the link above
Safety
Safety Instructions
![]() WARNING: Heart rate monitoring systems may be inaccurate. Over exercising may result in serious injury or death. If you feel faint, stop exercising immediately.
WARNING: Heart rate monitoring systems may be inaccurate. Over exercising may result in serious injury or death. If you feel faint, stop exercising immediately.
![]() WARNING: Do not insert fingers into tank!
WARNING: Do not insert fingers into tank!
![]() WARNING: Never operate this rower without feet properly secured in Foot straps, or without the sliding portion of the Slider Footplate locked into position!
WARNING: Never operate this rower without feet properly secured in Foot straps, or without the sliding portion of the Slider Footplate locked into position!
![]() CAUTION: Do not fill past the calibration mark as indicated on the tank level sticker or water spillage can occur.
CAUTION: Do not fill past the calibration mark as indicated on the tank level sticker or water spillage can occur.
![]() CAUTION: The rower can stand vertically for storage. Please allow the unit to sit for 5 minutes before standing it up for storage. Please follow the instructions given in the Basic Operation section of this manual.
CAUTION: The rower can stand vertically for storage. Please allow the unit to sit for 5 minutes before standing it up for storage. Please follow the instructions given in the Basic Operation section of this manual.
![]() CAUTION: After rowing exercise, please allow unit to sit for 5 minutes before standing up
CAUTION: After rowing exercise, please allow unit to sit for 5 minutes before standing up
- Before using this product, it is essential to read this ENTIRE operation manual and ALL instructions. This product is intended for use solely in the manner described in this manual.
- UNDERSTANDING EACH AND EVERY WARNING TO THE FULLEST IS IMPORTANT. IF ANY OF THESE WARNINGS ARE UNCLEAR, CONTACT LIFE FITNESS CUSTOMER SERVICE IMMEDIATELY AT .
- This equipment is categorized as class HC per EN ISO 20957-1. As such this equipment is only intended for home use only. It is not intended for commercial, institutional and/or studio facilities. Contact Life Fitness with any questions regarding this classification.
- It is recommended that all users of LIFE FITNESS exercise equipment be informed of the following information prior to use.
- As with any piece of fitness equipment, consult a physician before beginning your exercise program.
- Please be aware that any fitness regiment, before being undertaken, is best preceded by a physical checkup from a certified physician.
- Injuries to health may result from incorrect or excessive training.
- Stop the machine immediately if any signs of excessive wearing are present on the belts, pulleys and bungee cords. Do not use unit until said parts are repaired or replaced.
- Do not allow children under 14 years of age unattended access to the machine.
- Please keep hands away from moving parts, as indicated by the warning label on the mainframe of your machine.
- If any of the adjustment devices are left projecting, they could interfere with the user’s movement.
- Do not store in freezing conditions with water in the tank as it can expand and crack the components.
- This fitness equipment is not intended for use by persons (including children) with reduced physical, sensory or mental capabilities, or lack of experience and knowledge, unless they have been given supervision or instruction concerning use of the equipment by a person responsible for their safety.
- Place on a stable, flat surface in a horizontal position during use for maximum stability.
- Check all belts, pulleys and bungee cords regularly for signs of wear, and replace if needed.
- Check regularly and follow all instructions for maintenance as specified in this manual.
- Replace immediately any defective parts and do not operate unit until all repairs are complete.
- Do not use any equipment in any way other than designed or intended by the manufacturer. It is imperative that Life Fitness equipment is used properly to avoid injury.
- Injuries may result if exercising improperly or excessively. It is recommended that all individuals consult a physician prior to commencing an exercise program. If at any time during exercise you feel faint, dizzy or experience pain, STOP EXERCISING and consult your physician.
- Keep body parts (hands, feet, hair, etc.), clothing and jewelry away from moving parts to avoid injury.
- Follow instructions provided in this manual for correct foot position and basic rowing techniques.
- For more detailed rowing techniques, please refer to our International website http://www.lifefitness.com.
- This equipment is not intended for use by children. Keep children under the age of 14 away from the machine.
- DO NOT use or permit use of any equipment that is damaged and/or has worn or broken parts. For all Life Fitness equipment use only replacement parts supplied by Life Fitness.
- Cables and belts pose an extreme liability if used when frayed. Always replace any cable or belt at first sign of wear (consult Life Fitness if uncertain).
- MAINTAIN LABELS AND NAME PLATES – Do not remove labels for any reason. They contain important information. If unreadable or missing, contact Life Fitness for a replacement.
- EQUIPMENT MAINTENANCE – Preventative maintenance is the key to smooth operating equipment as well as to keep your liability to a minimum. Equipment needs to be inspected at regular intervals.
- Ensure that any person(s) making adjustments or performing maintenance or repair of any kind is qualified to do so.
- DO NOT ATTEMPT TO USE OR REPAIR ANY ACCESSORY APPROVED FOR USE WITH THE LIFE FITNESS EQUIPMENT WHICH APPEARS TO BE DAMAGED OR WORN.
- It is the purchaser’s sole responsibility to properly instruct its end users and supervising personnel as to the proper operating procedures of all LIFE FITNESS equipment.
- Do not allow users to wear loose fitting clothing or jewelry while using equipment. It is also recommended to have users secure long hair back and up to avoid contact with moving parts.
- All bystanders must stay clear of all users, moving parts and attached accessories and components while machine is in operation.
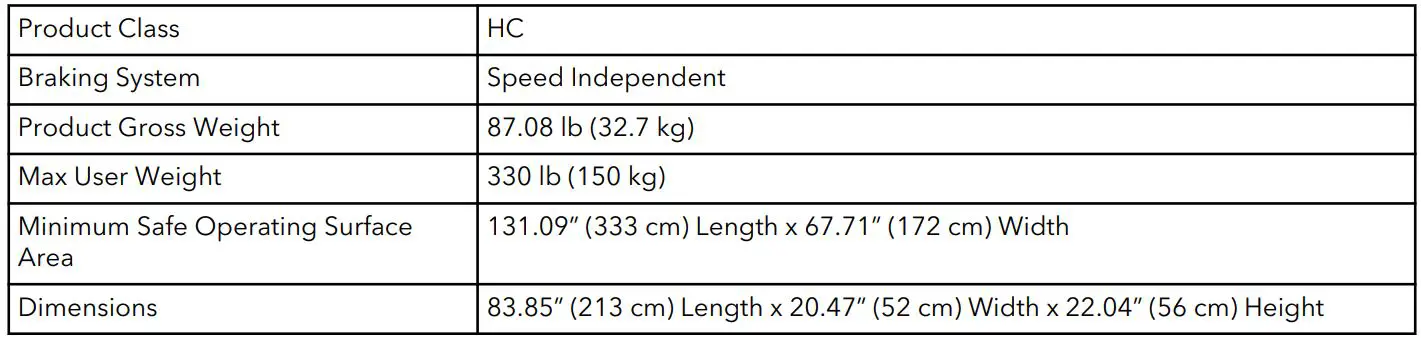
Specifications – Row HX Trainer
Row HX Trainer is not suitable for therapeutic purposes.
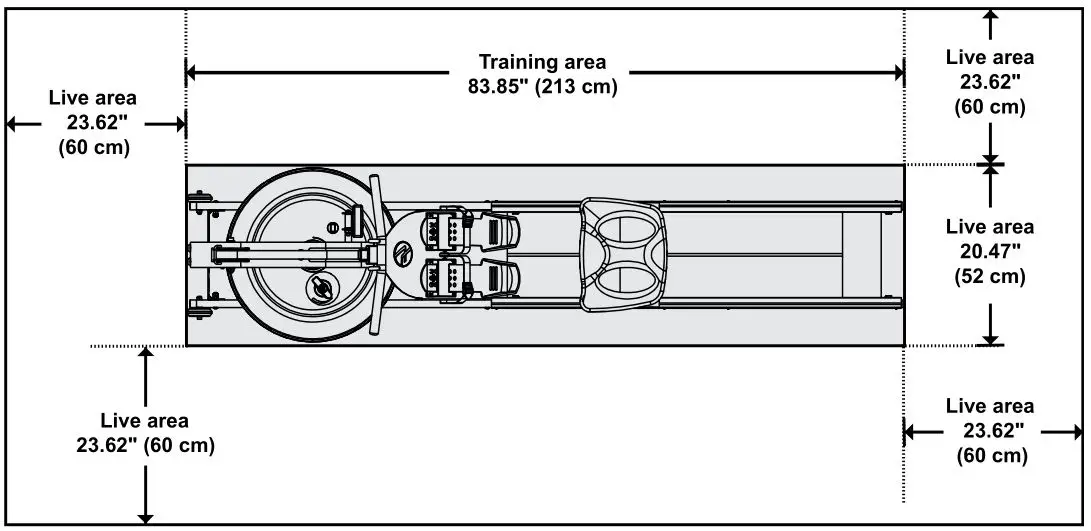
The live area shall be not less than 23.62” (60 cm) greater than the training area in the directions from which the equipment is accessed. The live area must also include the area for emergency dismount.
Live area and Training area
Assembly
Contents

Assembly Procedure
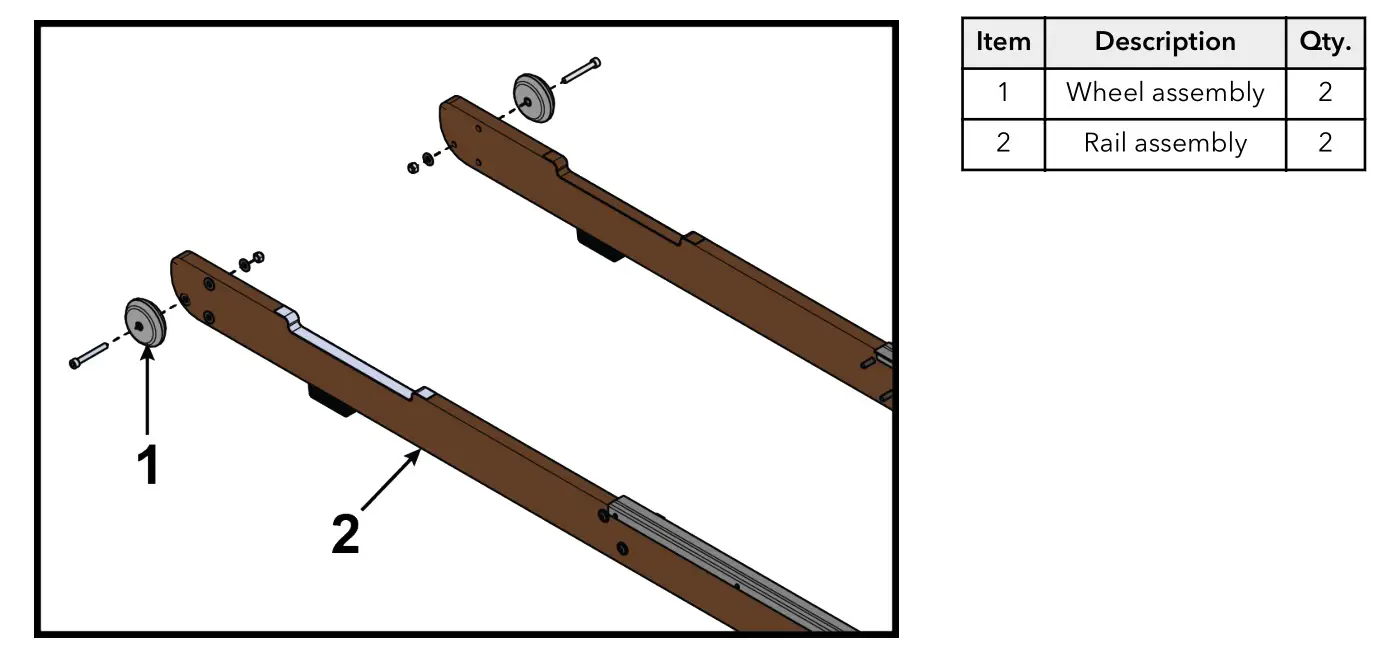
1. Install wheel assembly to rail assembly using a 6 mm Allen wrench and a 13 mm open end wrench. Tighten to 4.3 ft. lbs. (5.8 Nm).
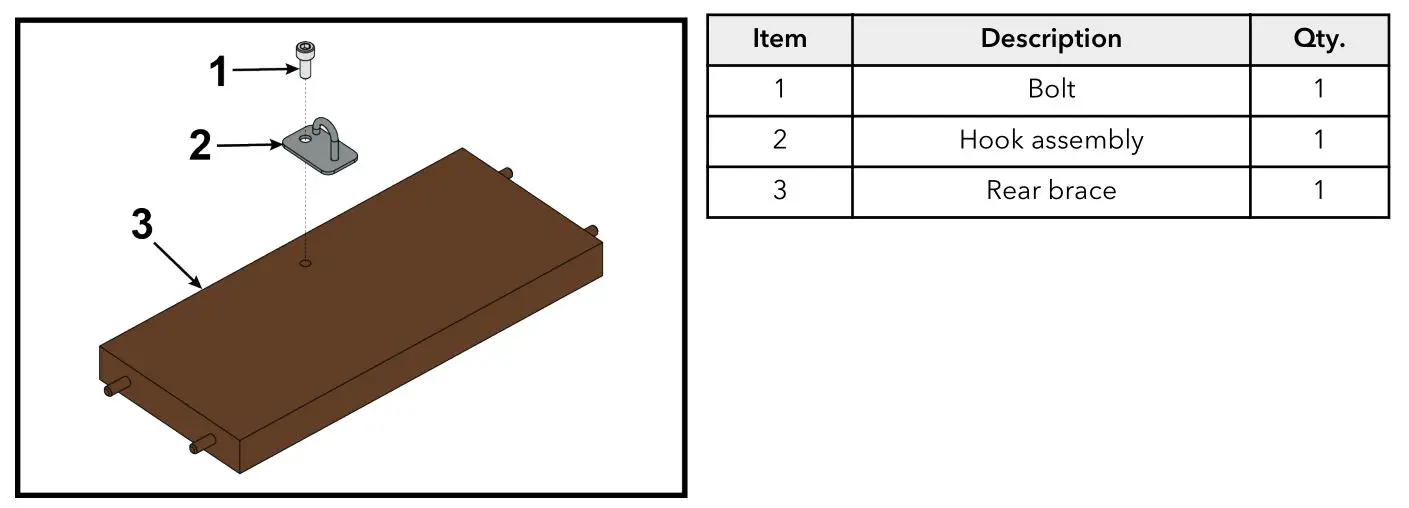
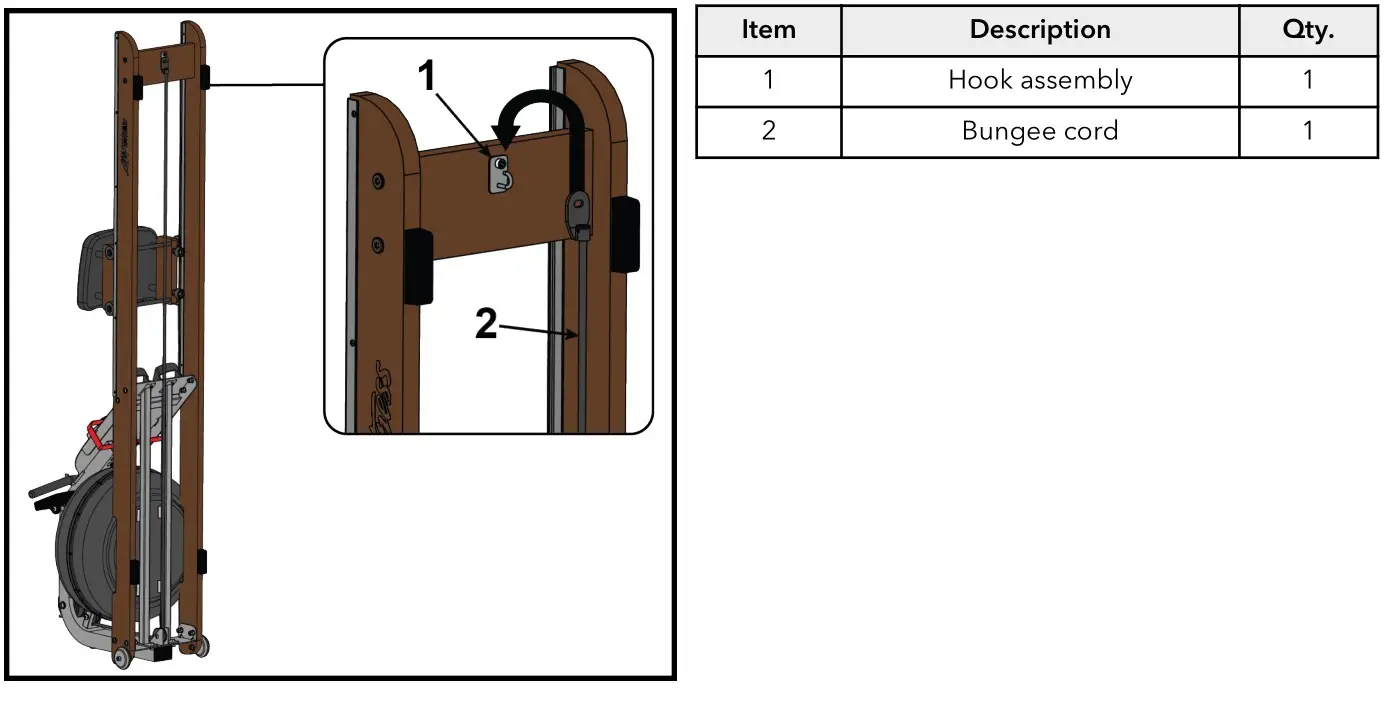
2. Install hook assembly to rear brace using a 5 mm Allen wrench. Tighten to 5 ft. lbs. (6.8 Nm).
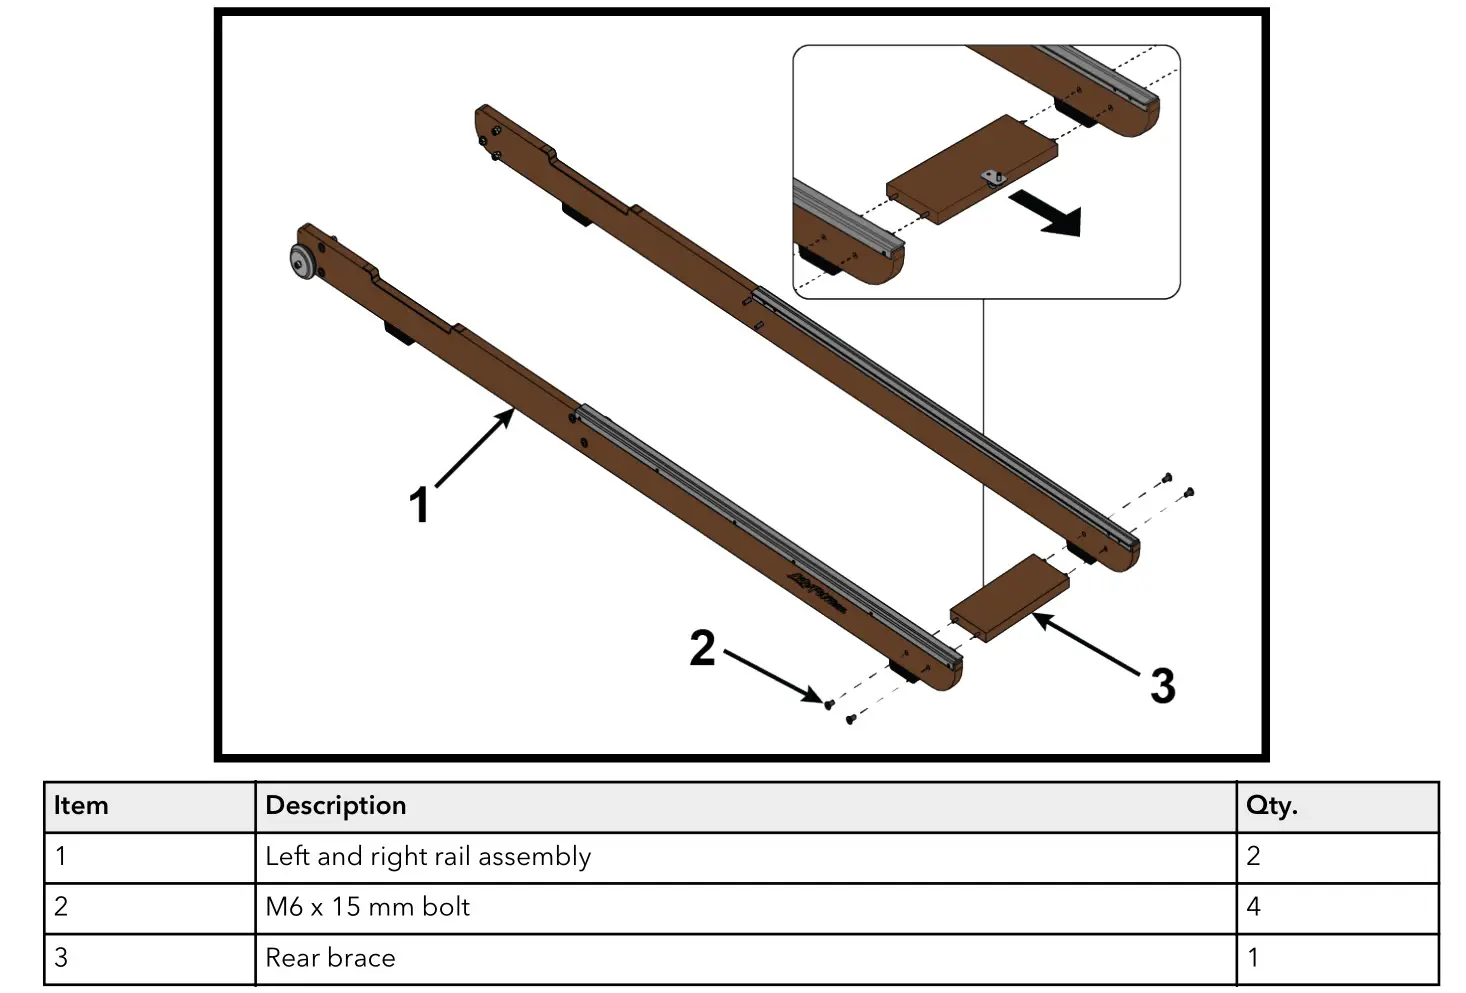
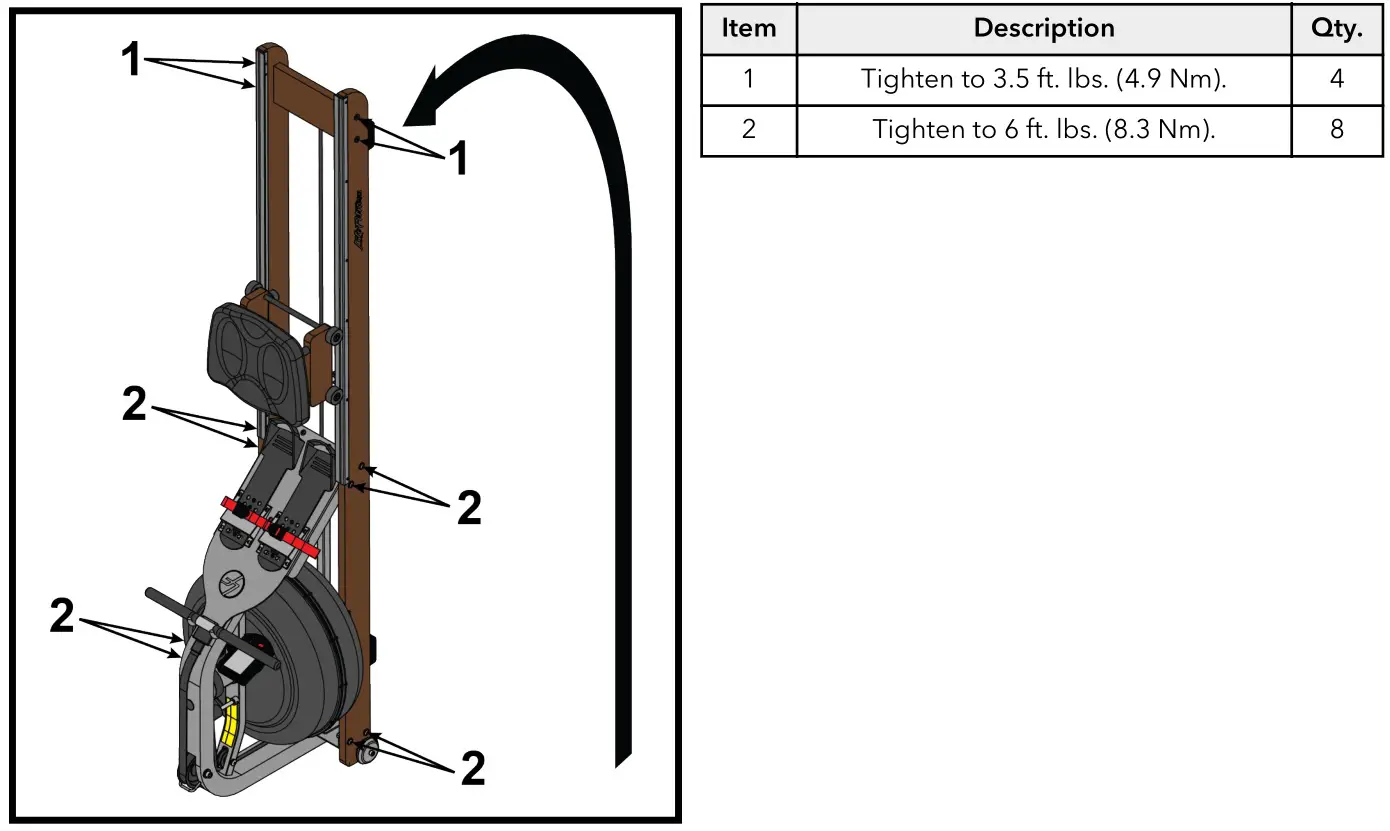
3. Install left and right rail assembly to rear brace with four M6 x 15 mm bolts, using a 5 mm Allen wrench.
NOTE: Do not fully tighten bolts at this time.
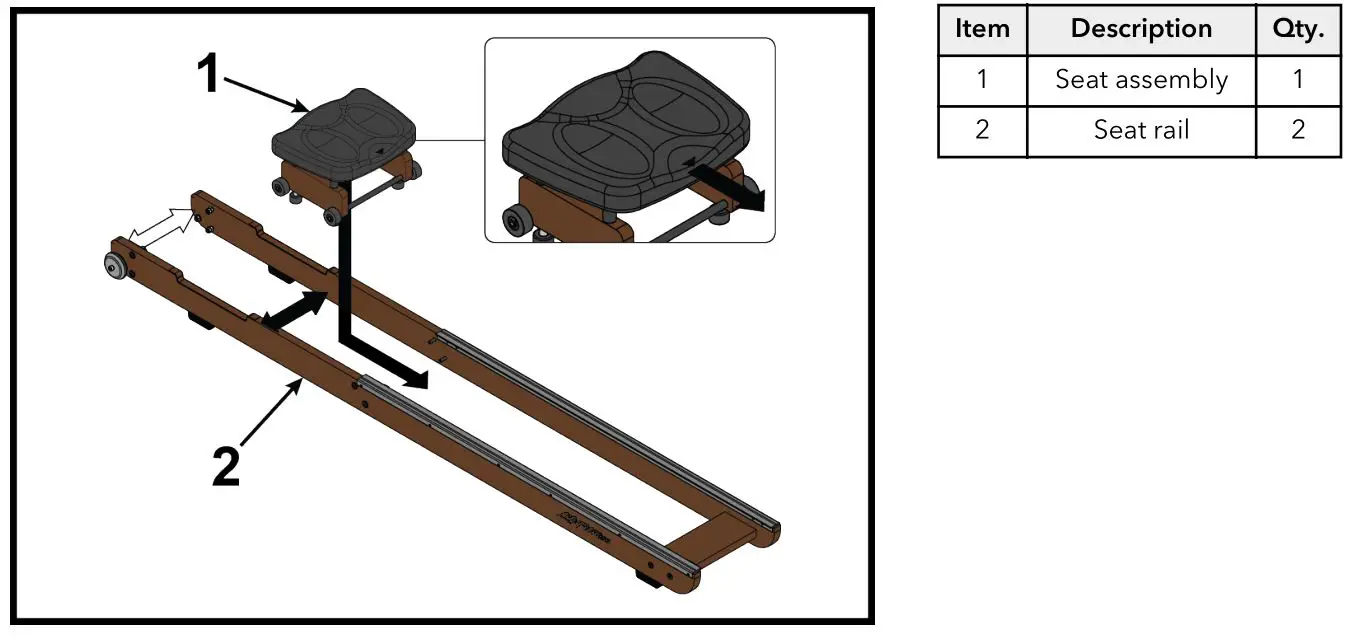
4. Spread the seat rail assemblies apart and slide the seat assembly onto the seat rails.
5. Place the main assembly into position on seat rail assembly.
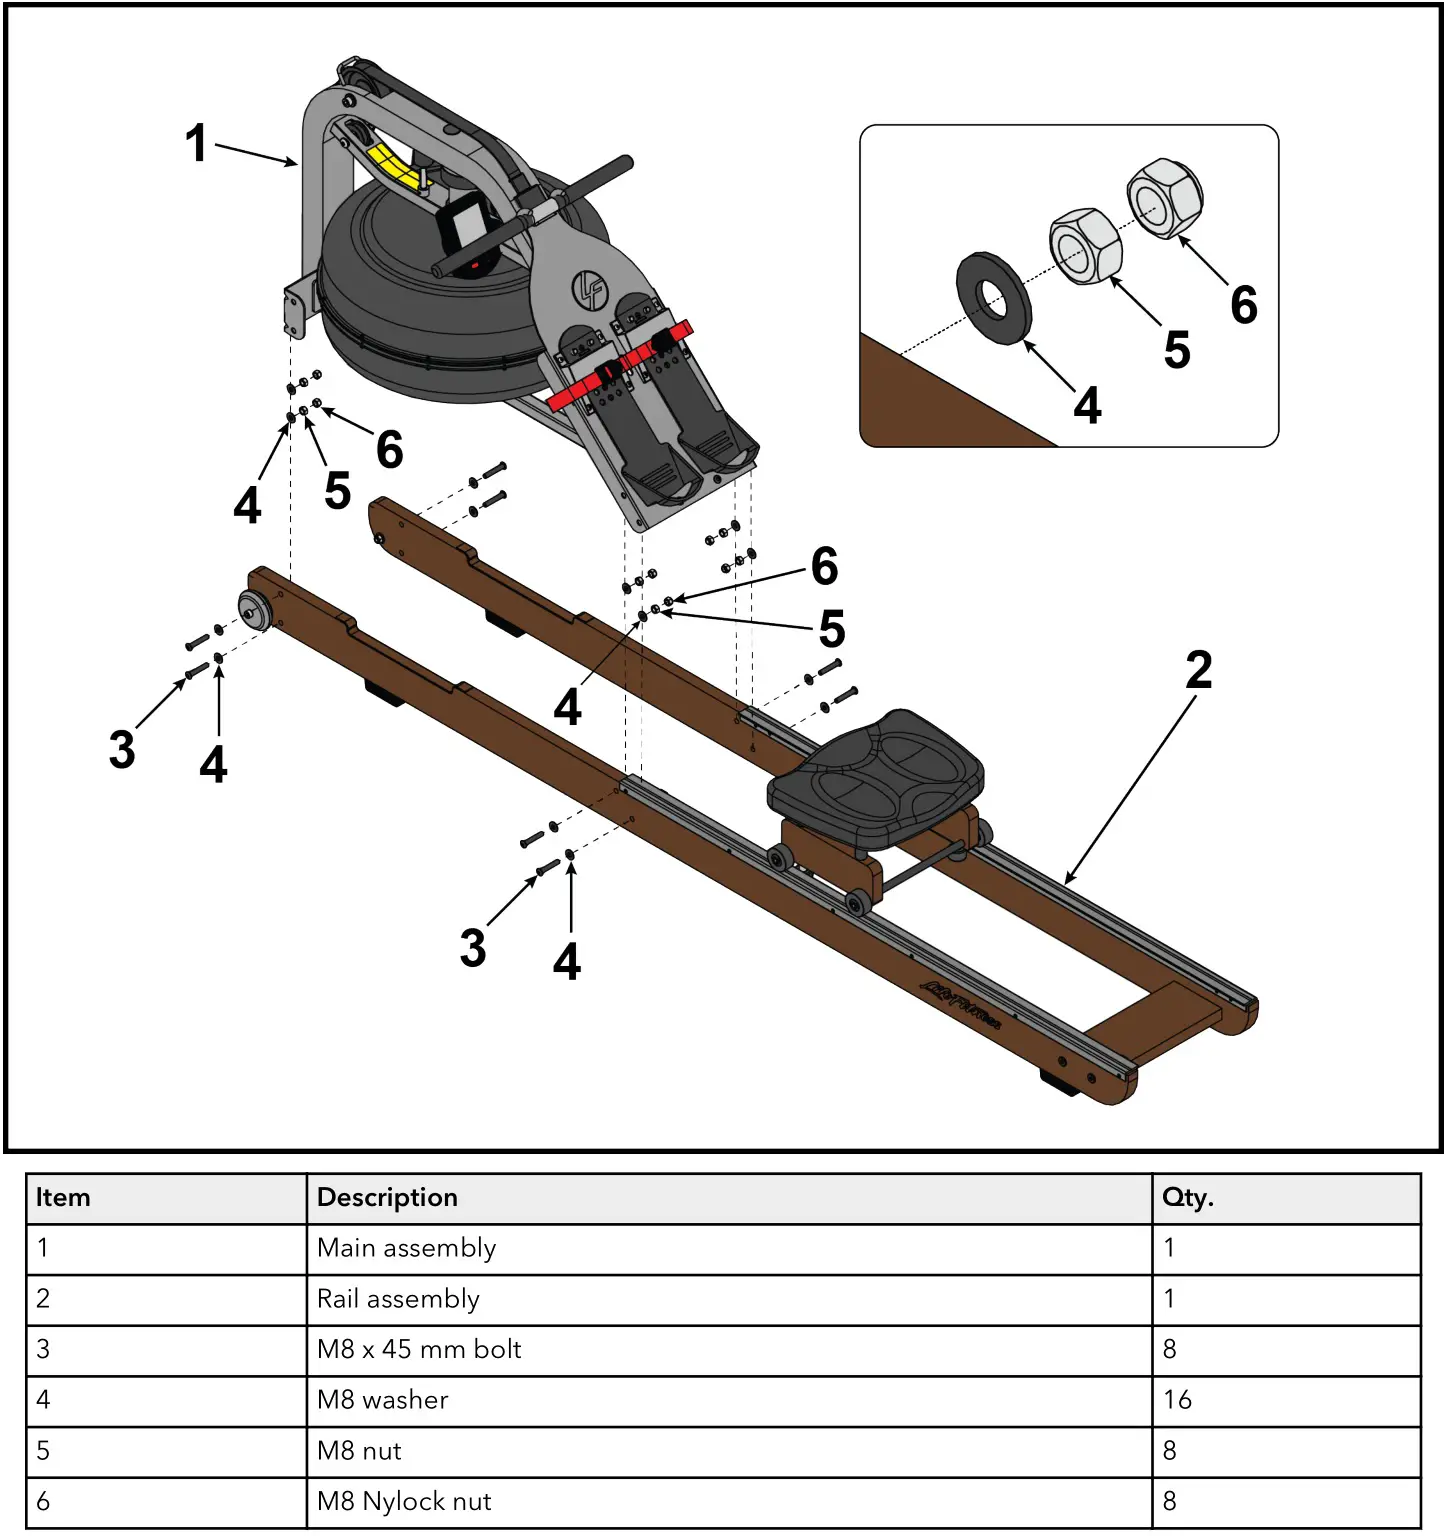
6. Install eight M8 x 45 mm bolts, sixteen M8 washers, eight M8 nuts, and eight M8 Nylock nuts, using a 6 mm Allen wrench and 13 mm open end wrench.NOTE: Do not fully tighten bolts at this time.NOTE: Nylock Nuts MUST be outside the standard Nut and Washer to properly secure assembly
7. Stand up rower vertically and tighten all hardware.
8. Hook bungee cord onto hook assembly.
9. Return rower to horizontal position.10. Fill tank with water before using. See
Tank Filling
Tools required:
- Siphon, included with rower
- Bucket, 5 gallons (19 liters)
- Water
- Drop cloth
NOTE: Where water quality is known to be poor, we recommend the use of distilled water
![]() CAUTION: Use a drop cloth under the tank when filling to avoid staining floor or carpet.
CAUTION: Use a drop cloth under the tank when filling to avoid staining floor or carpet.
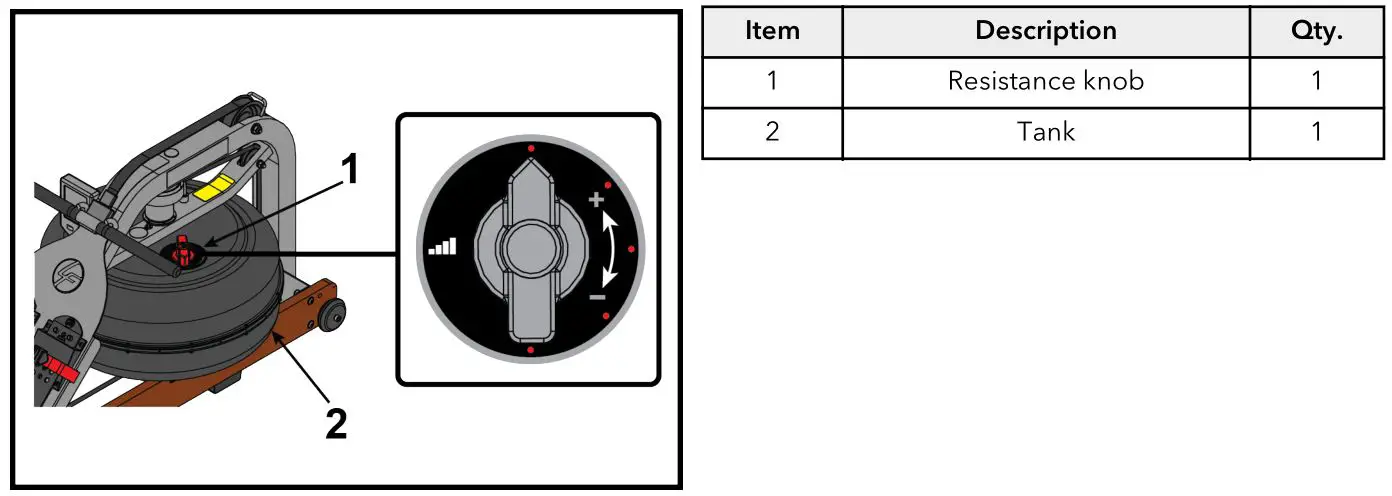
1. Turn resistance knob counter-clockwise to maximum position.
2. Remove cap from tank.
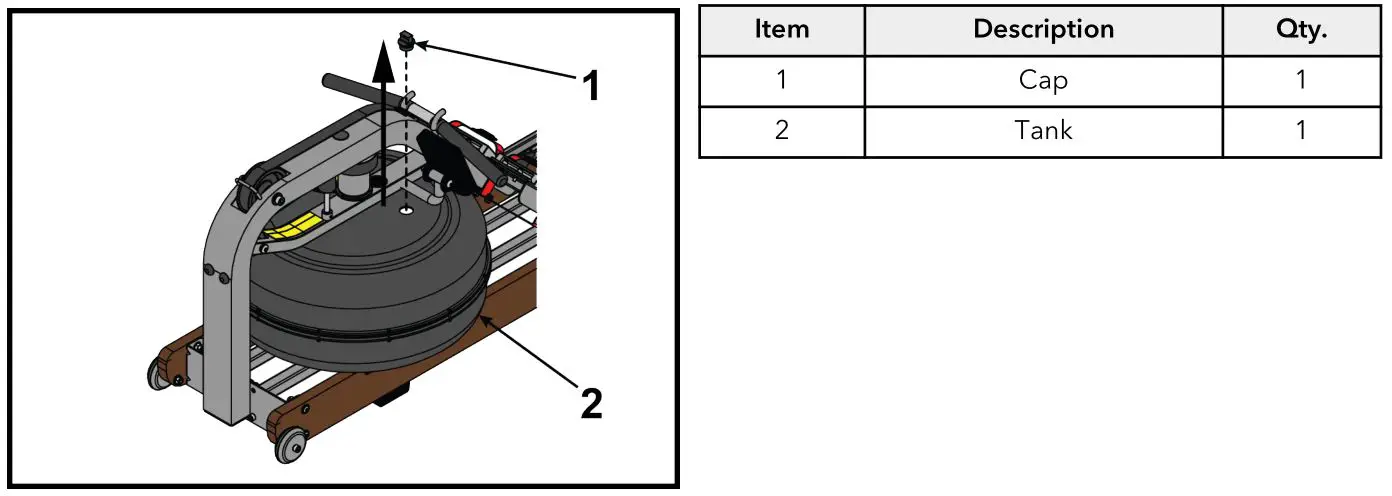
![]() WARNING: Do not insert fingers into tank!
WARNING: Do not insert fingers into tank!
3. Fill bucket with 4.5 gallons (17 liters) of water.
4. Place siphon into bucket and siphon hose into tank.

5. Pump 4.5 Gallons (17 Liters) of water into tank
NOTE: The siphon valve must be closed to allow siphoning action to occur.NOTE: Do not fill past max fill line on side of tank.TIP: Placing the bucket in an elevated position will allow the siphon to continually pump water into the tank.NOTE: Opening the siphon valve will stop the pumping action. Use this feature to avoid water spillage when nearing filling completion.
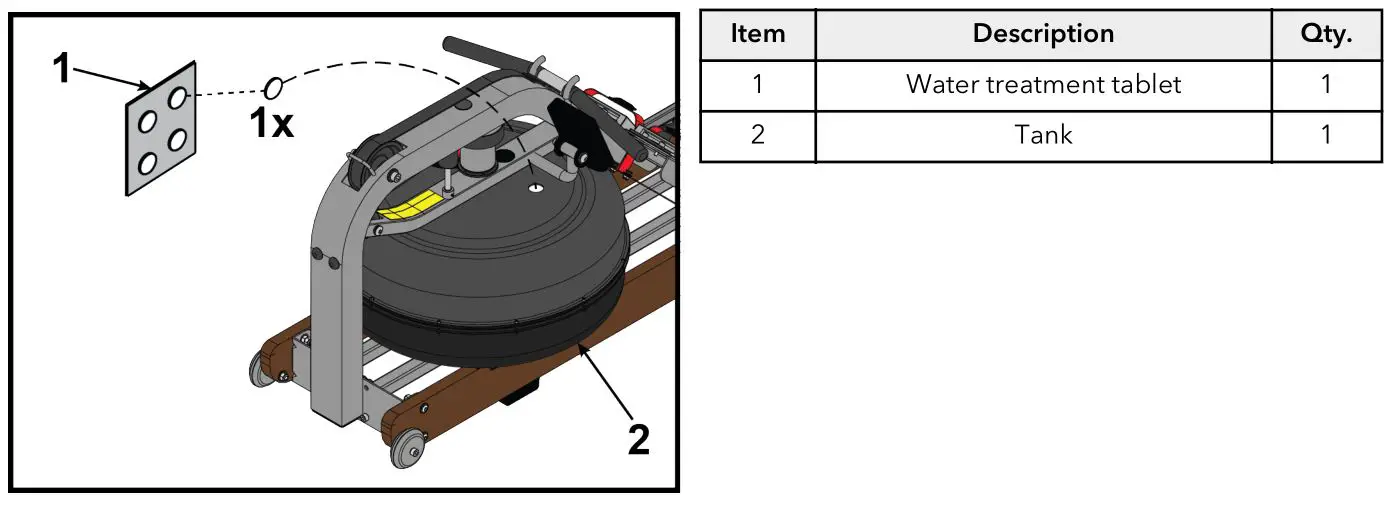
6. Drop one water treatment tablet into tank. Add a water treatment tablet every six months.
7. Install cap to tank.

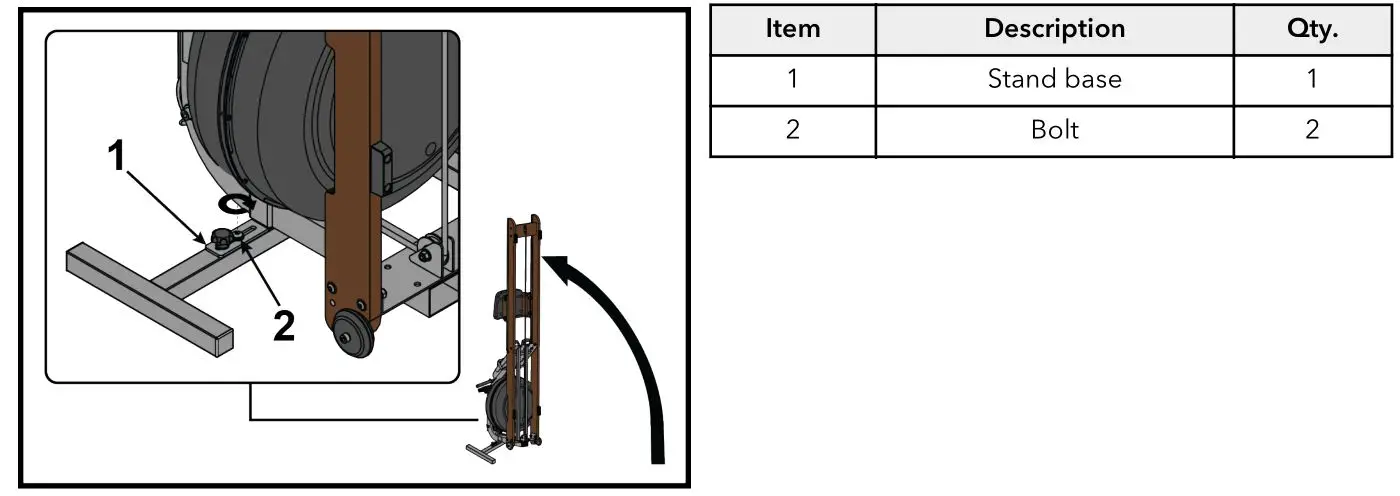
Optional Stand Instructions
1. Install the Z brackets, bolts, and knobs onto the stand base by hand.

2. Install the stand base onto the frame as shown. Tighten knob by hand to secure stand base to rower.

3. Stand rower up vertically.
 report this ad
4. Tighten bolts to stand base using an 8 mm Allen wrench. Tighten to 13 ft.-lbs. (17.6 Nm).
References
Fitness & Exercise Equipment for Your Facility or Home | Life Fitness
📧[email protected]
📧[email protected]
📧[email protected]
📧[email protected]
📧[email protected]
📧[email protected]
📧[email protected]
Life Fitness Technical Support – Documents & Software
📧[email protected]
📧[email protected]
📧[email protected]
📧[email protected]
📧[email protected]
📧[email protected]
📧[email protected]
📧[email protected]
📧[email protected]
📧[email protected]
📧[email protected]
[xyz-ips snippet=”download-snippet”]