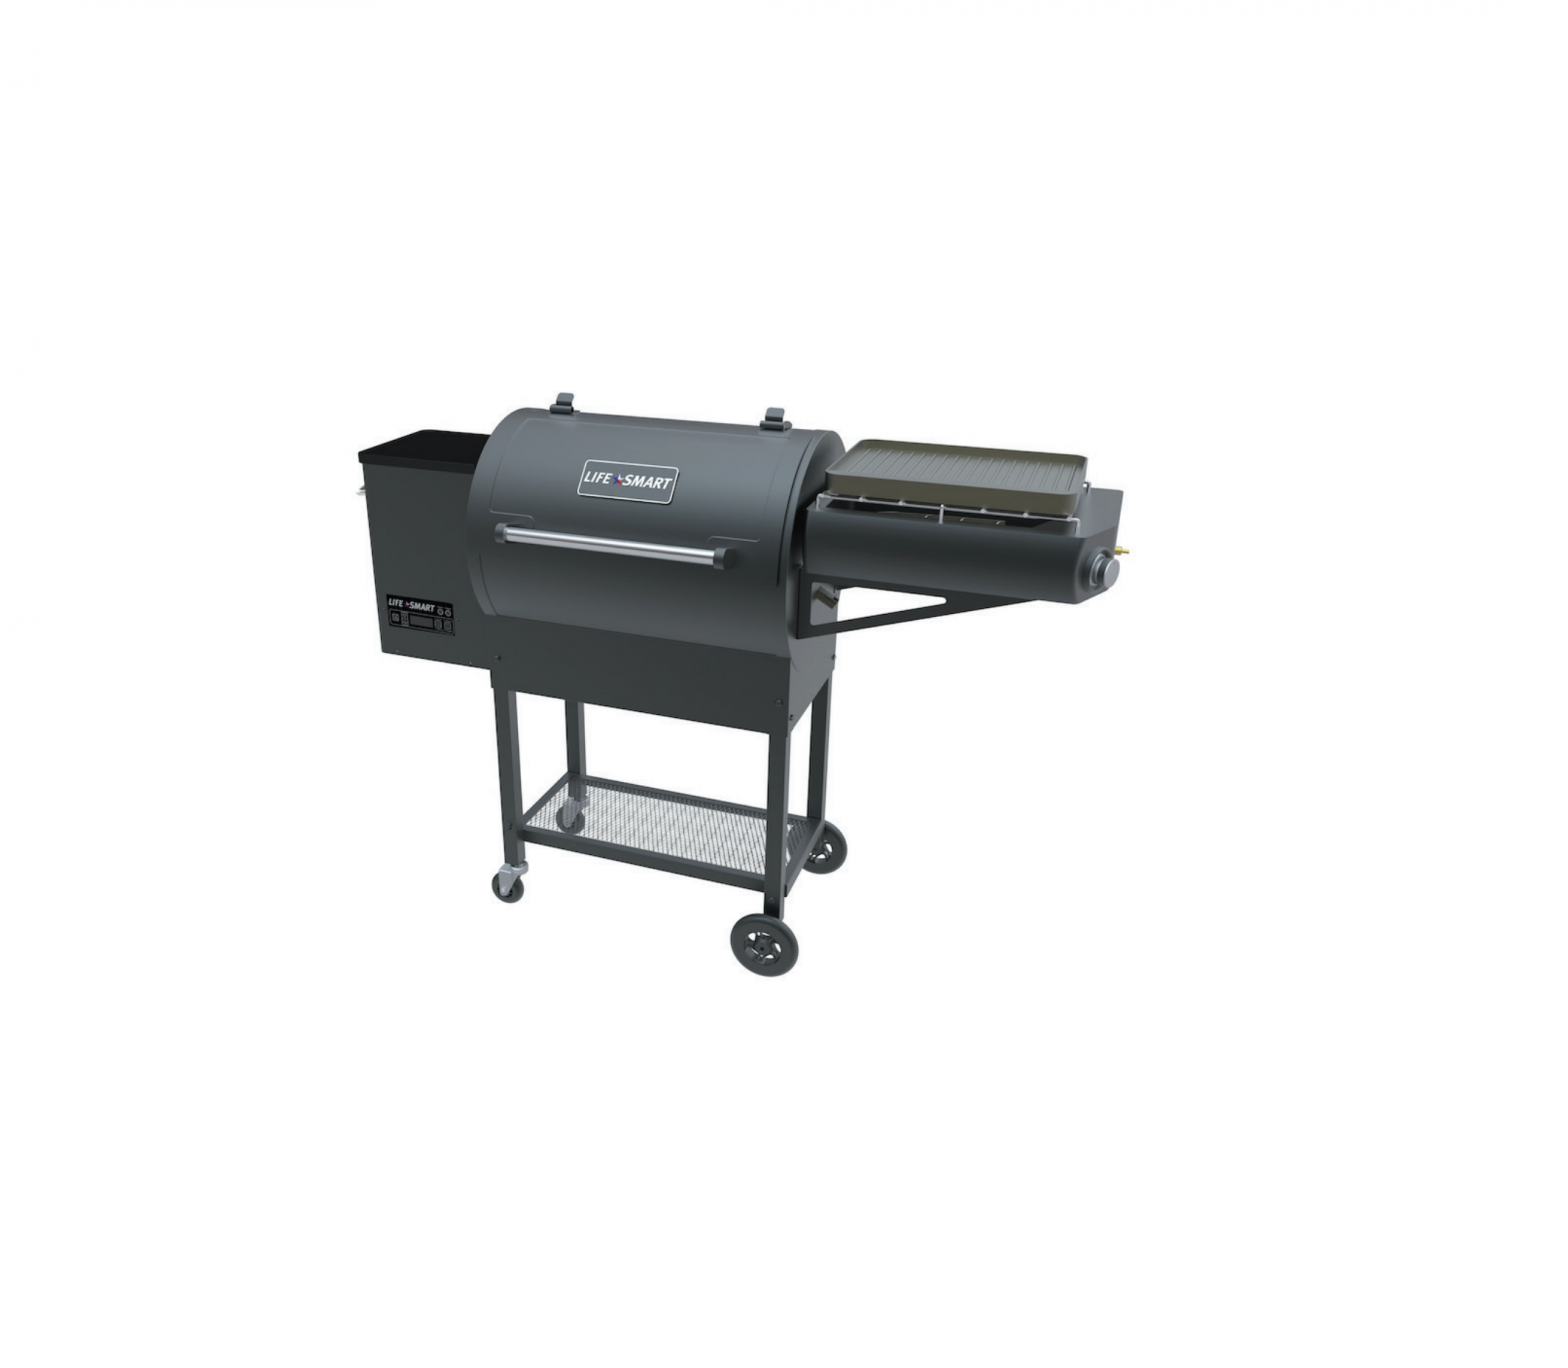
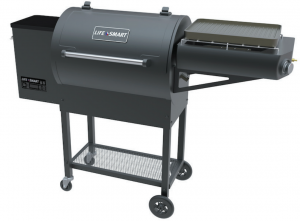
Lifesmart Combo Pellet Smoker Grill And Griddle
ATTACH YOUR RECEIPT HERPurchase Date ____________Serial Number (located on back of unit) __________________
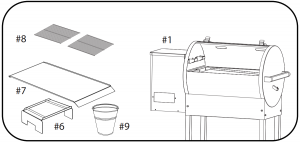
PACKAGE CONTENTS
SCS-P760 – Pellet Grill
SG160- Griddle Attachment
| PART | DESCRIPTION |
QUANTITY |
|
1 |
Assembled Body |
1 |
|
2 |
Front Grill Caster Wheel Legs |
2 |
|
3 |
Hopper Base Large Legs |
2 |
|
4 |
Bottom Shelf |
1 |
|
5 |
Grill Door Handle |
1 |
|
6 |
Flame Deflector |
1 |
|
7 |
Drip Pan |
1 |
|
8 |
Cooking Grates |
2 |
|
9 |
Drip Bucket |
1 |
|
10 |
Temperature Probe |
1 |
|
11 |
Hardware Packet |
1 |
|
A |
SG160 – Griddle Body |
1 |
|
B |
Griddle Bracket Assembly |
2 |
|
C |
Hardware Screws |
4 |
 SAFETY INFORMATION
Please read this entire manual before installation and use of the pellet fuel-burning appliance . Failure to follow these instructions could result in property damage, bodily injury or even death .
IMPORTANT SAFETY INSTRUCTIONS
![]() WARNING: FOR OUTDOOR USE ONLY! Do not use in any enclosed area. Use only on level non-combustible surfaces away from overhanging easements .
WARNING: FOR OUTDOOR USE ONLY! Do not use in any enclosed area. Use only on level non-combustible surfaces away from overhanging easements .
- Do not touch hot surfaces . Use handles or knobs .
- To protect against electrical shock, do not immerse cord, plugs, or controller in water or any other liquid .
- Close supervision is necessary when any appliance is used by or near children.
- Unplug from outlet when not in use and before cleaning . Allow to cool before putting on or taking off parts .
- Do not operate any appliance with a damaged cord or plug or after the appliance malfunctions or has been damaged in any manner .
- The use of accessory attachments not recommended by the appliance manufacturer may cause injuries .
- Do not let cord hang over edge of table or counter, or touch hot surfaces.
- Extreme caution must be used when moving an appliance containing hot oil or other hot liquids .
- Do not use appliance for other than intended use .
- Use only with GFI (Ground Fault Interrupter) protected circuit .
- To prevent smoker from being splashed or falling into water, do not use smoker within 10 feet of a pool, pond or other body of water .
- Keep smoker and electric controller dry and out of rain at all times .
- Unplug smoker when not in use and before moving .
- Never remove grounding plug or use with an adapter to two prongs .
- Keep electric plugs off ground and dry .
- Do not use water or other liquid spray to clean product without first unplugging electric controller and removing heating element .
- Fuel, such as charcoal briquettes, is not to be used with appliance .
- Use only on properly grounded outlet .
- Leave a minimum of 60” circumference between grill, decks, houses or any combustible materials .
- Occasionally, your appliance should be checked for fire pot obstructions to make sure proper air flow is maintained . See cleaning instructions in this manual for correct procedures .
- Use heat-resistant barbecue mitts or gloves when operating this unit . Long handled, non-plastic utensils are also recommended .
- Do not touch cooking chamber or attempt to move your appliance while operating or while the grill is hot . Make sure the fire is completely out and that the grill is completely cool before transporting .
- Before covering your grill, make sure that the grill has cooled completely .
- Never put your hand in the pellet hopper or attempt to service any grill part while it is plugged in
FOR OUTDOOR USE ONLYDO NOT STORE OR USE COMBUSTIBLE MATERIALS IN OR NEAR THIS APPLIANCE TO PREVENT INJURY NEVER MOVE THE GRILL WHILE HO, UPRIGHT OR WITHOUT ASSISTANCE NEVER STORE ANY GRILL IN A SMALL SPACE OR TRANSPORT IN A VEHICLE UNLESS COMPLETELY COOL AND VERIFIED THAT THE FLAME IS EXTINGUISHED LEAVE A MINIMUM OF 60” CIRCUMFERENCE BETWEEN GRILL, DECKS, HOUSES OR ANY COMBUSTIBLE MATERIALS
USE ON LEVEL GROUND AWAY FROM OVERHANGING ROOFS OR EAVES
SAVE THESE INSTRUCTIONS
SPECIFICATIONS
Temperature Controls
- Automatic lighting feature
- Automatic shutdown feature
- 180ºF to 500ºF in 5º increments
- Proprietary PID algorithm maintains temperature precisely
- Single meat probe
- FULL settings
Exterior Specifications
- Steel cooking chamber
- Steel coated lid
- Probe port hole
- Steel hopper lid
- 15 lb Hopper
- Fail-proof lid stops
- Spill-proof drip bucket hook
- Aluminum handles
- Rollerblade style wheels
- Locking caster wheels
- Bottom shelf
Interior Specifications
- 350 sq. in . Cooking area and tall enough for turkeys or large roasts
- 250 sq. in . Cooking area with optional second shelf
- Enamel powder coated steel cooking grate
- Steel fire pot
- Steel heat deflector
- Steel drip pan
- Stainless-Steel ignition system
Construction Specifications
- 3 exhaust vent holes and digitally controlled blower fan
- Steel hardware
- High temperature RTV caulk
- Rubber grommets at all wire through holes to prevent chaffing
- Modular construction allows for individual component replacement
- Vented component access panels for each
Fuel Source
- 100% Natural Hardwood Pellets
Specifications
| Voltage Rating | 120 V (60 Hz) GFCI Outlet |
| Power Consumption | 250W (Ignition) / 50W (During Operation) |
| Unit Size | 12 .9 in. (W) x 20 .1 in. (D) x 17 .4 in. (H) |
| Unit Weight | 80 .00 lbs |
ASSEMBLY INSTRUCTIONS – PELLET GRILL
- Unpack and Prepare for Assembly – Remove all items from inside grill body and lay grill body on its back. For ease of assembly, complete steps 1-5 below before standing grill upright.Note: Flatten the cardboard box out and lay everything on it . This serves as a good working area and it helps prevent the grill from getting scratched or damaged during installation .
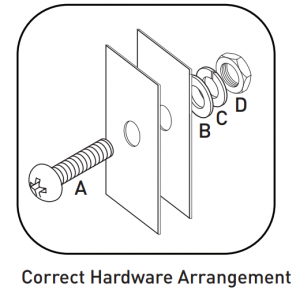
- Attach legs – with fixed wheels (#3) on the right side, with wheels facing outward to the front and back of grill . Attach legs with the rotating casters (#2) on the left side of the grill . Attach all four legs using bolts (A), flat washers (B), lock washers (C) and nuts (D) DO NOT FULLY TIGHTEN HARDWARE All hardware is found in included Hardware Packet (#12) .
- Attach Bottom Shelf – Align shelf (#4) between grill legs and attach using 4 bolts (A), flat washers (B), lock washers (C) and nuts (D). FULLY TIGHTEN HARDWARE.
- Grill Handle Assembly – Attach the handle (#5) to grill lid using the small bolts that are screwed into handle .
- Stand Grill Upright – You will need two people to do this as the grill is very heavy.
- Flame Deflector (#6), Drip Pan (#7) Installation – Open the lid of the grill . Install the Flame Deflector (#6) over the Air Box assembly with the small notches in the flame deflector over the small tabs located at the inside front and rear of the grill body . Install Drip Pan (#7) with the short lip sitting on the left-side drip pan support and the longer lip resting on the right-side lower support . Make sure to leave equal gapping between the Drip Pan and the front and back chamber walls to ensure even heat distribution .BE CAREFUL NOT TO DAMAGE THE TEMPERATURE SENSOR WHILE INSTALLING THE DRIP PANNote: Many customers line their drip pan with aluminum foil for easier clean up. When lining the drip pan, keep the foil inside the drip pan edges and do not wrap around as this restricts airflow .
- Cooking Grates (#8) Installation – Install the Cooking Grates (#8) by resting it flat on the front and back ledges inside chamber . Be careful to avoid the temperature sensor during placement .
- Drip Bucket (#10) Installation – Install the Drip Bucket (#9) by clipping the handle to the integrated hook on grease spout on the right side of the grill and allow it to hang.
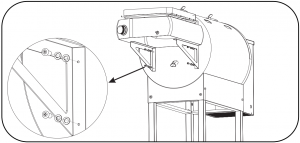
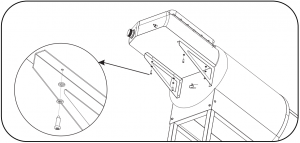
ASSEMBLY INSTRUCTIONS – SG160 GRIDDLE
- To attach the griddle to the pellet grill . Align the mounting brackets to the pre-drilled holes on the pellet body and using the provided screws secure the brackets.
- Secure the griddle to the pellet body by aligning the predrilled holes to the bracket and secure using the provided screws and washers.
TROUBLESHOOTING
|
PROBLEM |
POSSIBLE CAUSE |
CORRECTIVE ACTION |
| Grill will not light / turn on | Power | Make sure power is plugged into working GFCI outlet, and outlet is not tripped.Unplug grill and check for blown fuse; refer to controller schematic on page 20 . |
| Fuse | Replace fuse manually and try again . Call Customer Service if the problem persists | |
| Igniter | Remove cooking grate, flame deflector, and drip pan; visually inspect fire pot and if after 10 minutes:
Then your igniter rod may |
|
| Auger Motor | Remove cooking grate, flame deflector, and drip pan; visually inspect auger turning in the fire pot . (Note: the auger turns very slowly) . If auger is not turning, you may have an obstruction in your hopper . Clean out pellets and try again . If problem persists, your auger motor may need to be | |
| Control Board | UNPLUG GRILL . Check to make sure the fuse is intact and has not blown . Check for any loose wire connections . If any wires have become detached, refer to controller schematic on page 19 . | |
| Grill is smoking excessively/ smoke is discolored | Pellet quality / age | Inspect pellets; ensure that pellets are dry and have not broken down into sawdust.If problem persists, remove pellets from the hopper and clean ash from your fire-pot, replace with fresh dry pellets . |
| Excess ash in fire pot | Check the burn pot for ash and clean as necessary (Its advised to clean fire pot | |
| Blower fan | Unplug grill . Remove access panel; visually inspect blower fan for any obstructions, loose connections, bugs, etc.Remove obstructions . Power grill on . If problem persists, unplug grill . Spin fan manually for several revolutions . Plug grill back in . If problem still persists, your blower fan may need to be | |
| Grill will not heat up to or maintain proper | Pellet quality / age | Inspect pellets; ensure that pellets are dry and have not broken down into sawdust.If problem persists, remove pellets from the hopper and clean ash from your fire-pot, replace with clean dry pellets . |
| Insufficient airflow | Check fire pot for any obstructions/ash | |
| Excess ash in fire pot | Check fire pot for ash and clear as necessary . | |
| Fire continues to go out | Pellet quality / age | Inspect pellets; ensure that pellets are dry and have not broken down into sawdust .
If problem persists, remove pellets from the hopper and clean ash from your fire-pot, replace with clean dry pellets . |
| Hopper obstruction | Unplug grill . Remove pellets from hopper . Clean hopper of any obstructions or build up . | |
| Pellets are not being delivered to fire pot | Hopper obstruction | Unplug grill . Remove pellets from hopper . Clean hopper of any obstructions or build up . |
| Auger failure | Remove cooking grate and flame deflector plate; visually inspect auger turning in the fire pot . (Note: the auger turns very slowly) If auger is not turning, you may have an obstruction in your hopper . Clean out pellets and try again . If problem persists, your auger motor may need to | |
| Flare ups | Excessively greasy food while temperature setting is too high | Cook at 350 degrees or below when cooking excessively fatty foods . |
| Excessive grease/ build up | Excessively greasy food | Cook at 350 degrees or below when cooking excessively fatty foods . |
INITIAL SETUP PROCEDURE
For your first lighting, follow this Initial Setup Procedure .
- Open the main lid and remove the cooking grate, drip pan and flame deflector . Make sure all packing material has been removed .
- Open the pellet hopper lid found on the left side of your grill and check for any foreign objects.
- Plug your Pellet Grill into the nearest 110 Volt-AC GFCI outlet.Note: If your home does not have a GFCI outlet, you should have one installed by an electrician.
- Put no more than 1/2cup of pellets directly into the fire pot to provide fuel to burn while auger tube self-primes.
- Pour pellets into your grills pellet hopper .
- Wash cooking grate with mild soap and water.
- Reinstall the flame deflector, drip pan, cooking grate, and close lid.Note: If you want to line your drip pan with foil for ease of cleanup, we recommend you do this before your initial burn in . When lining drip pan, keep foil inside drip pan edges and do not wrap around as this can restrict airflow.
- Turn on your Pellet Grill by pressing the power button at the left of the panel Set temperature to 400°F by setting the digital control.
- Within a few minutes you will see smoke, and your grill will light .
- Once the temperature is at 400°F, allow it to run for 1hour, this will provide a final cure and remove any residue that may have accumulated during manufacturing and shipping.
After this initial burn, your Pellet Grill is ready for cooking.
TEMPERATURE PROBE
- Plug your temperature probe into the grills controller probe port
- Feed probe through the probe port hole on the left side of grill cooking chamber . Insert probe into thickest portion of meat for most accurate reading.
Unplugging probe and cleaning with damp cloth will prolong the life and accuracy of your probeReinstalling rubber protector over the connection port connection on controller after each cook will prolong the life and quality of your controller.
DO NOT FULLY SUBMERGE PROBE IN WATER OR WASH IN DISHWASHER
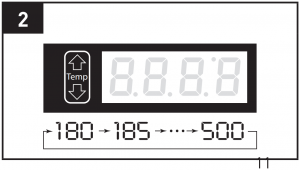
CONTROL PANEL
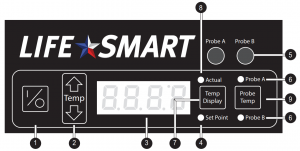
| PART | NAME |
DESCRIPTION |
| 1 | Power ON/OFF | Powers the appliance ON or OFF |
| 2 | Temp UP / DOWN | Increases or decreases the set temperature in 5º increments |
| 3 | Digital Display | Readout of the temperature value |
| 4 | Set Point Indicator Light | Digital display shows set temperature when illuminated |
| 5 | Meat Probe Ports | Plug-in port for meat thermometer probes |
| 6 | Meat Indicator Light | Digital display shows meat temperature when illuminated |
| 7 | Temp Display Button | Toggles between the three temperature readouts Actual / Set Point / Meat |
| 8 | Actual Indicator Light | Digital display shows actual temperature when illuminated |
| 9 | Probe Temp Button | Toggles between the two meat Probes A / or Probe B |
OPERATING INSTRUCTIONS
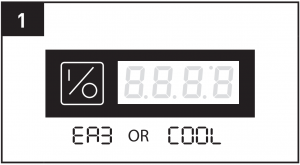
- Press the power button I/O to turn the grill on . The digital display will illuminate and the grill begins startup procedure . If your grill fails to light within 30 minutes of startup, the grill will turn OFF and display ER3 code.Pressing the power button again initiates the shutdown mode.If your grills temperature is below 160ºF the grill will power off.If the temperature is higher than 160ºF the grill will first burn off all the pellets in the fire pot, the digital display will show COOL.
- Adjust the temperature by pressing UP or DOWN on the control panel to reach the desired cooking temperature in 5º increments
TEST MODES AND ADJUSTMENTS
Your grill l is already set up from the factory and ready to grill below are the test modes available and adjustments
- Test Mode – With grill OFF, press and hold the Probe Temp and Temp Down buttons to enter the button test Mode until all digital display and LEDs turn on . Press Probe Temp button it displays “S-1”, press I/O button it displays “S-2”, press Temp Down button it displays “S-3”,press Temp Up button it displays “S-4”, Press Temp Display button it display “S-5”, Each additional press of the Probe Temp button will advance you through below next function test .
- Displaying “AUG” is test mode for your auger motor . You should be able to look in your grills fire pot and see the end of the auger turning very slowly.
- Displaying “IGN” is test mode for your grills ignition system . You should be able to look into grills fire pot and see your igniter begin to glow within a few minutes . DO NOT TOUCH THE IGNITER .
- Displaying “FAN” is test mode for your grills blower fan . You should be able to hear the fan blowing .
- Displaying Actual Grill Temp
- Displaying Actual Meat Probe Temp A
- Displaying Actual Meat Probe Temp B
- Return to OFF state
PERFORMANCE TIPS
PREHEATING
It is important to allow your grill to preheat and achieve your desired cooking temperature before cooking . This allows the entire grill to heat up and quickly return to your desired temperature once your food is introduced.If you do not allow the grill to preheat, you will find that it takes a longer period of time to bring both the grill and the food to your desired cooking temperature.
PELLET INFORMATION
Pellets should be stored in a dry area, as wet pellets will swell and turn back into sawdust . For best results, always use premium hardwood pellets in your grill . The use of grades other than premium hardwood pellets may result in temperature variations, uneven cooking, and poor results.Remember pellets do not contain preservatives and will deteriorate over time.Always Store pellets in a cool dry place.Never load wet pellets into the grillCaution: Heating fuel pellets for home heating pellet stoves have a high content of softwood which can include glue and should NEVER be used for cooking. Always check with the pellet manufacturer to ensure that you are cooking with a premium 100% hardwood pellet.
LID POSITION
Always cook with the lid closed . Use the meat probe to check the meats temperature . A open lid allows heat to escape and sends false temperature information to the digital control . This will also hinder the natural convection air flow needed to produce the wood smoke and flavor . The open lid will also increase your cook time . Remember “If you are looking you are not cooking” .
OTHER TIPS
- Clean your grill regularly to maintain beauty and proper function . It is advised to clean before any long cook.
- Always use grill on a level surface.
- Clean fire pot regularly. This will ensure proper ignition and proper heating
- Not all pellets are created equal, always use dry and fresh pellets .
- Always store pellets in a dry area.
- Get to know your grill, keep good cooking notes . Practice makes Perfect!
- Always allow your meat to rest before serving . Typically the internal temperature can climb 10 degrees after removing from the grill . This will help make your food more flavorful
- Always keep your cooking area clean . Avoid lifting the grill lid
- Wind can cool your grill temperature .
- Always preheat grill to desired temperature before use.
- Wipe off steel surfaces before preheating; dirt and food stains can cook into surface.
- Always check pellet hopper for debris and remove excess pellet dust as needed . (A Shop-Vac is the preferred method)
- Leave at least one inch of clearance between food for even cooks (Crowded foods will take longer to cook)
- Foods cooked on pans or in containers will require more time than foods cooked directly on grate.This also limits the amount of wood smoked flavor .
- Know your food’s internal temp! Use the Temperature Probe
- Use long handled tongs and spatulas for turning meats, do not use plastic Injecting and spritzing are great ways to keep meat from drying out .
- When going low and slow, plan for your meats stall, larger pieces of meat tend to take longer from 160-180ºF degrees . Be patient .Never unplug your grill to turn it off; for proper shutdown procedure see “Power Button”
- If grill is not used for six weeks or more, it is advised to remove all pellets
- When not in use, unplug and cover with cover
TEMPERATURES
Remember, you can’t tell whether meat is safely cooked by looking at it . Any cooked, uncured red meats including pork may be pink even when the meat is done
- Hot foods should be held warmer than 140º F.
- Cold foods should be held below 40º F.
- Perishable food should not be left out for more than 2 hours at room temperature – 1 hour when the temperature is above 90º F.
- Always follow food safety guidelines provided by the USDA .
MAINTENANCE AND CLEANING
![]() WARNING: Before performing any maintenance task, turn off the grill, unplug the unit, and allow it to cool completely .
WARNING: Before performing any maintenance task, turn off the grill, unplug the unit, and allow it to cool completely .
- Clean your fire pot every 3-5 cooks to ensure proper airflow.Use a grill brush to clean your cooking grate after every cook to provide years of trouble free use from them.Note: Make sure that no bristles have shed and remain on cooking grate .
- Cover your drip tray with aluminum foil and change it frequently. This is the simplest way to maintain your drip pan. If you have completed a low and slow cook that has caused the accumulation of grease on your foil, you must change the foil before cooking at high temperatures. Failure to do so will most certainly cause a grease fire in your grill.
- Clean the ash from the interior of your grill, fire pot, and hopper every 5-6 bags of pellets . It helps to leave a thin layer of ash on the bottom of the barrel for insulation. (A Shop-Vac is the ideal tool for this job.) (WARNING always wait at least 12 hours after cooking to remove ash from your grill.)
- Use a mild soap and water to clean the exterior of your grill . AVOID USING CAUSTIC CLEANERS .
- If left in exposed area, keep your grill covered and unplugged when not in use .
- Never let your pellets get wet; they will swell and jam your auger.
- If grill will not be in use for 6 weeks or more, cleaning out pellets from your hopper is recommended .
- For a superior cleaning and shine, clean your grills outside surfaces (when completely cooled)and then use automotive wax, per the directions.
TRANSPORT & STORAGE
Ensure that the unit is cool . Remove the grates, drip pan and flame deflector . Make sure no unburnt fuel remains in the fire pot / air chamber.
STORE COVERED IN A DRY, SAFE PLACE
Never store the grill in a small space or place in a vehicle unless completely cool and fire is verified as extinguished.
Never move the grill while it is still hot . Never move the grill without assistance.
MANUAL START UP
In case of igniter failure, you can start your grill manually .
- Remove the grate, drip pan and flame deflector .
- Clean out fire pot and place no more than 1/2 cup of pellets in the bottom . Add a small amount of solid fuel fire starter, such as those made from sawdust and wax wood shavings.(A paper towel, shredded cardboard, or shredded newspaper can work as a substitute.)Note: If you have a torch lighter, a fire starter is not needed.
- Light the fire starter.
- After the pellets are burning briskly, turn on your grill.If your fire goes out, repeat steps 1-4.
- If your fire stays lit, replace the stainless flame deflector, drip pan and cooking grate and close the lid. Be careful not to touch the fire.
CAUTION: DO NOT USE FLAMMABLE LIQUIDS SUCH AS GASOLINE, GASOLINE-TYPE LANTERN FUEL, KEROSENE, CHARCOAL LIGHTER FLUID, OR SIMILAR LIQUIDS TO START OR FRESHEN-UP THE FIRE! KEEP ALL SUCH LIQUIDS WELL AWAY FROM THE GRILL WHILE IT IS IN USE.
ONE-YEAR LIMITED WARRANTY
The manufacturer warrants this heater against defects in materials and workmanship on functional parts, for a period of 1 year from the original date of purchase . Your sales receipt showing the date of purchase of the product is your proof of purchase . Keep it in a safe place for future reference . This warranty is subject to personal use only, commercial or rental applications will not be covered.
This product is made with the highest quality materials and is warranted to be free from defects in materials and workmanship at the time of purchase . This limited warranty applies to products manufactured or distributed by the manufacturer, are delivered in the continental United States or Canada and extends to the original purchaser, or gift recipient . This warranty becomes valid at the time of purchase and terminates either by the specified time frame listed above and/or owner transfer . Any refunds or monetary compensations must be claimed through the place of purchase (retailer), and not through the manufacturer . Any extended warranties (warranties that cover above and beyond this manufacturer warranty) that are sold through a retailer or third party, are not directly correlated with this products’ limited warranty, and may be redirected to said retailer or third party for coverage.
This warranty extends through the manufacturer of the product, and covers functional parts only. Cosmetics are not covered, unless unequivocally determined it is a workmanship defect . Shipping damage should be addressed with the shipping company, retailer, or place of purchase, not the manufacturer unless the manufacturer was the direct shipper.
The manufacturer’s sole obligation under this warranty shall be limited to furnishing the original purchaser replacement parts for units deemed repairable by the supplier’s warranty department . The purchaser is responsible for insuring any parts shipped or returned, if desired . The purchaser is responsible to prepay any shipping charges (both ways) including, but not limited to taxes and duties . All exchanged parts and products replaced under this warranty will become the property of manufacturer . The manufacturer reserves the right to change manufacturers of replacement parts or products for use, in order to cover any existing warranty.
The purchaser may be asked to provide the supplier with proof of purchase documents (including the date of purchase) if requested . Any evidence of alteration, erasing, or forgery of proof of purchase documents will be just cause to VOID this limited warranty . Products, in which the serial number has been defaced or removed are not eligible for warranty coverage.
This warranty does not apply if the unit has been subject to negligence, fabrication, misuse, abuse, or repairs, alteration by non-manufacturer authorized personnel, inappropriate installations, or any case beyond the control of the manufacturer . Examples of warranty invalidation may also include, but are not limited to:
- Damage to paint or grill caused by corrosion .
- Normal wear/tear/weathering
- Pet/consumer accidents
- Purchases from dealers unauthorized by the manufacturer (Authorization in writing)
The manufacturer takes every precaution to utilize materials that retard rust including the use of high temperature paint where advisable . Even with these safeguards, the protective coatings can be compromised by various substances and conditions beyond our control . High temperatures, excessive humidity, chlorine, industrial fumes, fertilizers, lawn pesticides and salt are some of the substances that can affect paint and metal coatings . For these reasons, the limited warranties DO NOT COVER RUST OR OXIDATION.”
The manufacturer shall not be liable for any loss due to use (or misuse) of the heater or other incidental or consequential costs, expense or damages without irrefutable foundations . Under no circumstances shall the manufacturer or any of its representatives be held liable for injury to any person or damage to any property, however arising . Any implied warranty shall have duration equal of the applicable warranty stated above . Specifications are subject to change without notice or obligation.
This limited warranty gives the original purchaser specific legal rights . Other rights may vary from state to state.
LIFE SMART® is a registered trademark of Supply Chain Sources LLC ., All Rights Reserved.339 N Berry St . Brea, CA 92821

References
[xyz-ips snippet=”download-snippet”]