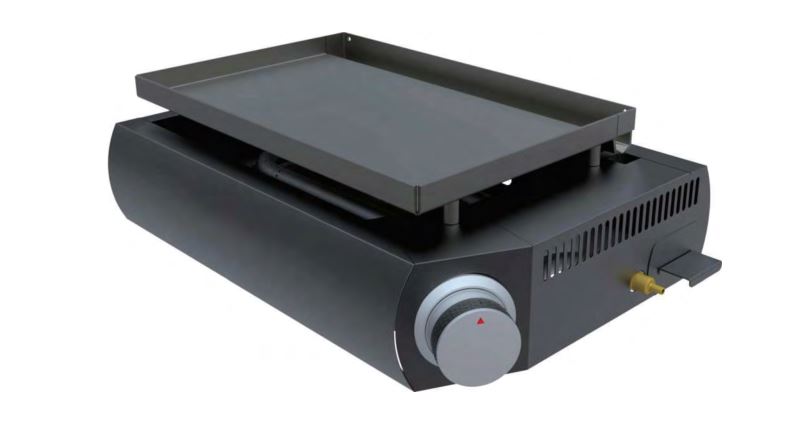
Lifesmart Tabletop Griddle
Owner's Manual

 ATTACH YOUR RECEIPT HEREPurchase Date ____________Serial Number (located on back of unit) __________________
Questions, problems, missing parts? Contact technical support department at 657-341-0362, 8:00 a.m. – 5 p.m., PST, Monday – Friday or visit us on-line at www.lifesmartgrills.com or email us at [email protected]. Please have your model and serial number ready
SAFETY SYMBOLS
The symbols and boxes shown below explain what eachheading means. Read and follow all of the messagesfound throughout the manual.
DANGER: Indicates an imminently hazardous situation which, if not avoided, will result in death or serious injury.
WARNING: Be alert to the possibility of serious bodily injury if the instructions are not followed. Be sure to read and carefully follow all of the messages.
CAUTION: Indicates a potentially hazardous situation which, if not avoided, may result in minor or moderate injury.
CALIFORNIA PROPOSITION 65 WARNINGWARNING: This product contains chemicals known to the State of California to cause cancer and birth defects or other reproductive harm. (California law requires this warning be given to customers in the State of California.) For more information: www.watts.com/prop65
FOR YOUR SAFETY
This instruction manual contains important information necessary for the proper assembly and safe use of the appliance. Read all warnings and instructions before assembling and using the appliance. Follow all warnings and instructions when assembling and using the appliance. Failure to follow these instruction could result in fire or explosion which could cause property damage, personal injury, or death.
![]() DANGER
DANGER
If you smell gas:
- Shut off gas to the appliance.
- Extinguish any open flame.
- Open lid
- If odor continues, keep away from the appliance and immediately call your fire department.
Failure to follow these instructions could result in fire or explosion which could cause property damage, personal injury or death.
![]()
WARNING
Do not store or use gasoline or other flammable liquids or vapors in the vicinity of this or any other appliance.
WARNING:It is the consumer’s responsibility to see that the Griddle is properly assembled, installed, and maintained. Failure to follow the instructions in this manual could result in bodily injury and/or property damage.
PRECAUTIONS:
- Do not operate Griddle any closer than 36 inches from any combustible construction, including walls and ceilings. Never use indoors.
- Do not use this appliance under overhead combustible surfaces.
- If this regulator fails, it must be replaced with the exact model. Please call customer service for a authorized replacement part.
- Perform a visual inspection of the gas path, from the tank connection to the element orifices for any breaks, leaks, cracks or intrusions. Begin at the tank and continue to the gas line connection. Visually inspect the knob mechanism for similar defects. Follow the gas path to the elements. Look for abnormalities or cracks on the element or orifices at the center of the grill box. Please contact customer service with any questions or concerns.
![]()
WARNING
- This appliance shall be used only outdoors, and shall not be used in a building, garage, or any other enclosed area.
- This appliance is not intended to be installed in or on recreational vehicles.
- The use of alcohol, prescription or non-prescription drugs may impair the consumer’s ability to properly assemble or safely operate the appliance.
- In the event of an oil or grease fire do not attempt to extinguish with water. Immediately call the fire department. A Type BC or ABC fire extinguisher may, in some circumstances contain the fire.
- Do not leave the appliance unattended. Keep children and pets away from the appliance at all times.
- This appliance is not intended for and should never be used as a heater.
- This appliance will be hot during and after use. Use insulated oven mitts or gloves for protection from hot surfaces or splatter from cooking liquids.
Call the Griddle Information Center for help and missing parts, assembly questions, and operation problems. Before returning griddle to the store, call: USA 657-341-0362 or email us at [email protected]
![]()
CAUTION
Some parts may contain sharp edges, especially as noted in these instructions. Wear protective gloves if necessary.
![]()
CAUTION
For outdoor residential use only. Do not use for commercial cooking.
Installation Safety Precautions
- Use griddle, as purchased. Griddle installation must conform with local codes, or in the absence of local codes, with either the National Fuel Gas Code, ANSI Z223.1/NFPA 54, Natural Gas and Propane Installation Code, CSA B149.1, or Propane Storage and Hand-ling Code, B149.2, or the Standard for Recreational Vehicles, ANSI A 119.2/NFPA 1192, and CSA Z240 RV Series, Recreational Vehicle Code, as applicable.
- Griddle is not for use in or on recreational vehicles and/or boats.
- Griddle safety certified for use in the United States only. Do not modify for use in any other location. Modification will result in a safety hazard.
- The pressure regulator supplied with the appliance must be used. Replacement pressure regulators must be those specified by the appliance manufacturer.
- Place dust cap on cylinder valve outlet whenever the cylinder is not in use. Only install the type of dust cap on the cylinder valve outlet that is provided with the cylinder valve. Other types of caps or plugs may result in leakage of propane.
Safety Maintenance
- Keep appliance area clear and free from combustible materials, gasoline and other flammable vapors and liquids.
- Do not obstruct the flow of combustion and ventilation air flow.
- Keep the ventilation opening of the cylinder enclosure free and clear from debris.
- Visually check burner flames.
- Clean appliance, including special surfaces, with recommended cleaning agents, if necessary.
- Check and clean burner/venturi tube for insects and insect nests. A clogged tube can lead to a fire beneath the appliance.
USE AND CARE
Safety Tips
- When Griddle is not in use, turn the Griddle off.
- Never move Griddle while in operation or still hot.
- Use long-handled barbecue utensils and oven mitts to avoid burns and splatters.
- Keep unit at least 36” away from walls, buildings, vehicles or other structures when in use.
- Clean Griddle often, preferably after each cookout.
- If you notice grease or other hot material dripping from griddle onto the valve or regulator, turn off gas supply at once. Determine the cause, correct it, then clean and inspect valve, hose and regulator before continuing. Perform a leak test.
- Keep ventilation openings in cylinder enclosure free and clear of debris.
- The regulator may make a humming or whistling noise during operation. This will not affect safety or use of griddle.
- If you have a problem with your griddle refer to the Troubleshooting Section or customer support at 657-341-0362 or email [email protected]
- If the regulator frosts, turn off Griddle and LP bottle valve immediately. This indicates a problem with the LP bottle and it should not be used on any product. Return to supplier.
![]() WARNING
WARNING
Turn controls and gas source or tank OFF when not in use.
![]()
CAUTION
If ignition does NOT occur in 5 seconds, turn the burner controls OFF, wait 5 minutes and repeat the lighting procedure. If the burner does not ignite with the valve open, gas will continue to flow out of the burner and could accidently ignite with risk of injury.
Burner Flame Check
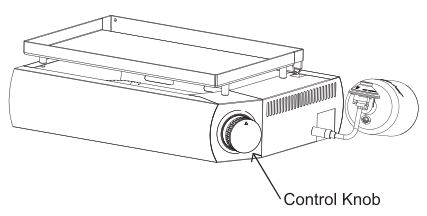
Light burner, rotate knob from high to low. You should see a smaller flame in low position than seen on high. Always check flame prior to each use. If only low flame is seen refer to “Sudden drop or low flame” in the Troubleshooting section on page 10.
Turning Griddle OFF
Turn knob to the OFF position.
Valve Check
Important: To check valve, first push in knob and release, knob should spring back. If knob does not spring back, replace valve assembly before using the 17” Griddle. Turn knob to low position then turn back to OFF position. Valve should turn smoothly.
General Griddle Cleaning
- Do not mistake brown or black accumulation of grease and smoke for paint. Do not apply a caustic griddle/oven cleaner to painted surfaces.
- Plastic parts: Wash with warm soapy water and wipe dry. Do not use Citrisol, abrasive cleaners, degreasers or a concentrated oven cleaner on plastic parts. Damage to and failure of parts can result.
- Painted surfaces: Wash with mild detergent or nonabrasive cleaner and warm soapy water. Wipe dry with a soft nonabrasive cloth.
- Baked-on grease deposits may require the use of an abrasive plastic cleaning pad. Use only in direction of brushed finish to avoid damage. Do not use abrasive pad on areas with graphics.
Storing Your Griddle
- Store in dry location.
- When an LP bottle is connected to Griddle, store outdoors in a well-ventilated space and out of reach of children.
- Store Griddle indoors ONLY if LP bottle is turned off and disconnected, removed from Griddle and stored outdoors.
- When removing Griddle from storage, follow “Cleaning the Burner Assembly” instructions before starting griddle.
Cleaning The Burner Assembly
Follow these instructions to clean and/or replace parts of burner assembly or if you have trouble igniting griddle
- Turn gas OFF at control knob.
- Detach electrode from burner.NOTE: Removal/Detachment method will depend on the burner configuration.
- Carefully lift burner up and away from valve openings. We suggest three ways to clean the burner tubes. Use the one easiest for you. (A) Bend a stiff wire (a light weight coat hanger works well) into a small hook. Run the hook through burner tube several times.(B) Use a narrow bottle brush with a flexible handle (do not use a brass wire brush), run the brush through burner tube several times.(C) Wear eye protection: Use an air hose to force air into the burner tube and out the burner ports. Check each port to make sure air comes out each hole.
- Wire brush entire outer surface of burner to remove food residue and dirt.
- Clean any blocked ports with a stiff wire such as an open paper clip.
- Check burner for damage, due to normal wear and corrosion some holes may become enlarged. If any large cracks or holes are found replace burner.
- Attach electrode to burner.
- Carefully replace burners.
- Attach burners to brackets on firebox.
Food Safety
Food safety is a very important part of enjoying the outdoor cooking experience. To keep food safe from harmful bacteria, follow these four basic steps:
- Clean: Wash hands, utensils, and surfaces with hot soapy water before and after handling raw meat and poultry.
- Separate: Separate raw meats and poultry from ready-to eat foods to avoid cross contamination. Use a clean platter and utensils when removing cooked foods.
- Cook: Cook meat and poultry thoroughly to kill bacteria. Use a thermometer to ensure proper internal food temperatures.
- Chill: Refrigerate prepared foods and leftovers promptly. For more information Visit the Canadian partnership for Consumer Food Safety Education – www.befoodsafe.ca
How To Tell If Meat Is Grilled Thoroughly
- Meat and poultry cooked on a griddle or oven often browns very fast on the outside. Use a meat thermometer to ensure food has reached a safe internal temperature. Cut into food to check for visual signs of being done.
- Whole poultry should reach 165°F/74°C. Juices should run clear and flesh should not be pink.
- Hamburgers made of any ground meat or poultry should reach 160°F/71°C, and be brown in the middle with no pink juices. Beef, veal and lamb steaks, roasts and chops can be cooked to 145°F/63°C. All cuts of pork should reach 160°F/71°C.
- NEVER partially grill meat or poultry and finish cooking later. Cook food completely to destroy harmful bacteria.
- When reheating takeout foods or fully cooked meats like hot dogs, grill to 165°F/64°C , or until steaming hot.
ASSEMBLY AND LIGHTING INSTRUCTIONS
![]()
WARNING
The manufacturer has made every effort to eliminate any sharp edges. However, you should handle all components with care to avoid accidental injury.
Please read all instructions thoroughly before proceeding. Find a large, clean area in which to assemble your Griddle. Please refer to the assembly diagram as necessary.
NOTICE: Make sure all the plastic protection and packaging is removed before assembling
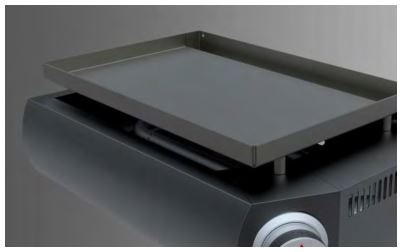
PARTS LIST
(4) Adjustable Height FeetMain BodyOil Drip TrayRegulator
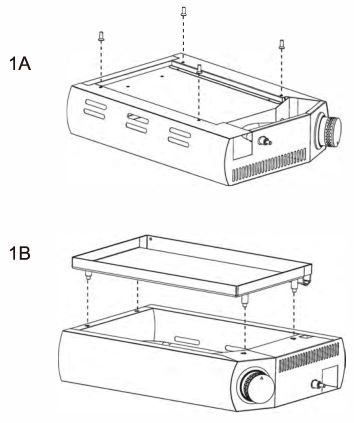
STEP 1
Remove the four adjustable height feet and regulator from the packaging and place on a flat soft surface upside down. Attach the four adjustable height legs to the bottom of the grill. Flip the griddle over and align the the griddle pan to the body.
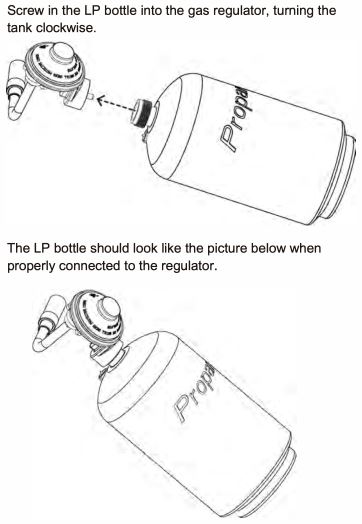
Make sure to only use a 3.8 x 7.8inch, 16.4oz Propane bottle for direct assembly. For larger propane tanks use bulk tank adapter hose. The LP bottle to be used must be constructed and marked in accordance with the specifications for LP bottles, U.S. Department of Transportation (DOT} or the Standard for Cylinders, Spheres and Tubes for the Transportation of Dangerous Goods, CAN/CSA-B339.
The LP bottle must be disconnected when the griddle is not in use. Only cylinders marked “propane” may be used. The LP bottle must be positioned for vapor withdrawal.
- Do not store a spare LP gas cylinder under or near this appliance;
- Never fill the cylinder beyond 80 percent full.
If the instructions in 1) and 2) are not followed exactly, a fire causing death or serious injury may occur.
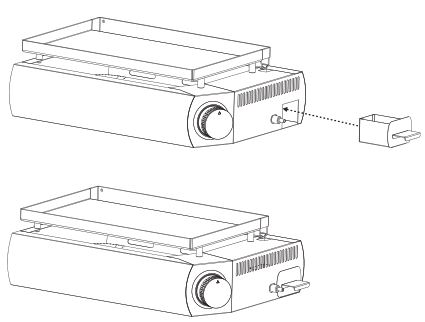
STEP 2
STEP4
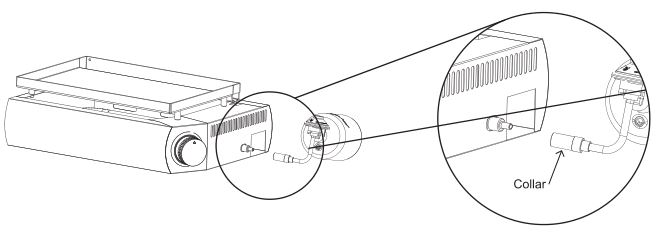
Insert the gas regulator and tank into the gas line of the griddle. Turn the collar of the gas regulator clockwise to secure it to the gas line.
CUSTOMER NOTICE: To perform a leak test of your gas connections, mix a 50/50 solution of soap and water and brush around regulator and other gas connections. If growing bubbles appear, there is a leak. Re-tighten connections. If leaks cannot be stopped do not try to repair. Call for replacement parts at 657-341-0362.
STEP 5
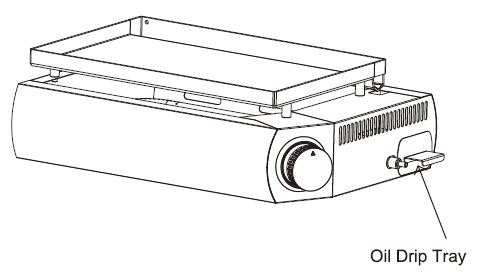
Attached the oil drip tray on the back of the griddle.
Lighting the Griddle
Do not lean over the griddle while lighting. Read instructions before lighting.
- Read all instructions before lighting.
- Push the control knob in to start gas flowing.
- Turn the control knob counter-clockwise to activate the starter.
- Adjust the temperature to desired level.
- If ignition does not occur, turn gas off by turning the knob clockwise and repeat lighting instructions.
Match Lighting Instructions
Do not lean over the Griddle while lighting. Make sure there are no gas leaks.
- Ensure the control knob is in the “OFF” position.
- Remove the griddle top.
- Light an 11 “long match, then place the match on the right or left side of the burner.
- Push in and turn the control knob to the HIGH position. Be sure burner lights and stays lit.
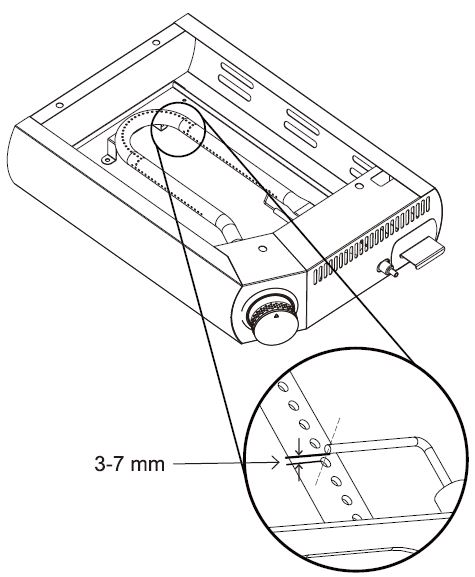
Ignition Needle PlacementThe ignition needle should be 3-7 millimeters from the burner tube to create the proper spark. The ignition needle should not touch the burner tube.
Oil Drip Tray
Check the oil drip tray often and clean out after each use.
Disconnecting the LP BottleMake sure your griddle is off and cool. Disconnect the regulator from the gas line by unscrewing the collar, then unscrew the LP bottle from the regulator.
CARE, MAINTENANCE, & TROUBLESHOOTING
Regularly clean your Griddle between uses and especially after extended periods of storage. Ensure that the Griddle and its components are sufficiently cool before cleaning. Never handle hot parts with unprotected hands.
In order to extend and maintain the life and condition of your Griddle, we strongly recommend that the unit be covered when left outside for any length of time, especially during the winter months.
Fittings and Storage
Annual checking and tightening of metal fittings is recommended. Store the Griddle in a cool dry place. Cover the burners with aluminum foil in order to prevent insects or other debris from collecting in the burner holes. If the Griddle is to be stored indoors, the gas bottle must be disconnected and left outside. The gas bottle should always be stored outside, out of reach of children, and in a dry, well ventilated area away from any sources of heat or ignition.
Troubleshooting

WARRANTY
ONE-YEAR LIMITED WARRANTY
The manufacturer warrants this heater against defects in materials and workmanship on functional parts, for a period of 1 year from the original date of purchase. Your sales receipt showing the date of purchase of the product is your proof of purchase. Keep it in a safe place for future reference. This warranty is subject to personal use only, commercial or rental applications will not be covered.
This product is made with the highest quality materials and is warranted to be free from defects in materials and workmanship at the time of purchase. This limited warranty applies to products manufactured or distributed by the manufacturer, are delivered in the continental United States or Canada and extends to the original purchaser, or gift recipient. This warranty becomes valid at the time of purchase and terminates either by the specified time frame listed above and/or owner transfer. Any refunds or monetary compensations must be claimed through the place of purchase (retailer), and not through the manufacturer. Any extended warranties (warranties that cover above and beyond this manufacturer warranty) that are sold through a retailer or third party, are not directly correlated with this products’ limited warranty, and may be redirected to said retailer or third party for coverage.
This warranty extends through the manufacturer of the product, and covers functional parts only. Cosmetics are not covered, unless unequivocally determined it is a workmanship defect. Shipping damage should be addressed with the shipping company, retailer, or place of purchase, not the manufacturer unless the manufacturer was the direct shipper.
The manufacturer’s sole obligation under this warranty shall be limited to furnishing the original purchaser replacement parts for units deemed repairable by the supplier’s warranty department. The purchaser is responsible for insuring any parts shipped or returned, if desired. The purchaser is responsible to prepay any shipping charges (both ways) including, but not limited to taxes and duties. All exchanged parts and products replaced under this warranty will become the property of manufacturer. The manufacturer reserves the right to change manufacturers of replacement parts or products for use, in order to cover any existing warranty.
The purchaser may be asked to provide the supplier with proof of purchase documents (including the date of purchase) if requested. Any evidence of alteration, erasing, or forgery of proof of purchase documents will be just cause to VOID this limited warranty. Products, in which the serial number has been defaced or removed are not eligible for warranty coverage.
This warranty does not apply if the unit has been subject to negligence, fabrication, misuse, abuse, or repairs, alteration by non-manufacturer authorized personnel, inappropriate installations, or any case beyond the control of the manufacturer. Examples of warranty invalidation may also include, but are not limited to:
- All warranty coverage excludes paint loss, discoloration or surface rusting, which are either expendable parts that can wear out from normal use within the warranty period, or are conditions that can be the result of normal use, accident or improper maintenance.
- Purchases from dealers unauthorized by the manufacturer (Authorization in writing)
The manufacturer shall not be liable for any loss due to use (or misuse) of the heater or other incidental or consequential costs, expense or damages without irrefutable foundations. Under no circumstances shall the manufacturer or any of its representatives be held liable for injury to any person or damage to any property, however arising. Any implied warranty shall have duration equal of the applicable warranty stated above. Specifications are subject to change without notice or obligation.
This limited warranty gives the original purchaser specific legal rights. Other rights may vary from state to state.
CUSTOMER SERVICE
Our Customer Service staff is here to help you!
For questions regarding your product, or if you need replacement parts, contact us at:
We’re pleased to help you with any questions concerning replacement parts or your warranty. Our customer service staff can be reached Monday through Friday from 9:00 am to 5:00 pm Pacific Standard Time. If all operators are busy or you call after hours, you may leave a message and your call will be returned or send an email.
GRIDDLE SEASONING
What is SeasoningSeasoning is a process by which oil is baked into metal to create a stick resistant surface and protect against oxidization.
Griddles come with a thin layer of soy oil on them to protect against rust during shipping. You can wash this off with warm soapy water prior to your initial seasoning.
What oil should I use?Some oils are better than others for seasoning. We recommend Flax seed oil for your initial seasoning since it creates a very durable bond, however, any of the following oils can be used.
Flax seed oilExtra Virgin Olive OilVegetable OilSoy Oil
Initial Griddle Seasoning:
The basic idea behind your initial seasoning is to coat your griddle with oil and heat the oil above its smoke point to polymerize the oil and create a bond with the griddle top. You will end up with a black, stick resistant surface that is easy to clean.
- Apply small amount of oil to the surface of the griddle top and spread it around with a cloth or paper towel (use tongs or metal spatula to hold the cloth or paper towel).
- Turn your griddle on medium-high heat
- Heat the oil until it reaches its smoke point and let it continue to heat on the griddle top until it stops smoking. Your griddle top will start to discolor. This is good.
- Let your griddle cool a little. Repeat steps 1 through 3 a few times until you have a black surface on your griddle.
Cleaning and Maintaining your GriddleTo clean the griddle after each use, scrape gently with a metal spatula or scraper and wipe down the griddle surface with a cloth or paper towel. For tough food residue, pour water onto the hot griddle surface and let it boil the residue off.
After you are done using your griddle you should apply a very thin coat of oil to maintain your seasoning bond and protect it from rust. If rust or scaling (chipped seasoning) occur, rub it off with steel wool or low grain sandpaper and re-season the surface. Store your griddle in a cool, dry place.
What a well seasoned Griddle should look likeYour well seasoned griddle should be shiny black and have a natural non-stick cooking surface. The more you cook with and season your griddle top, the more black, stick resistant and shiny it will become.
References
[xyz-ips snippet=”download-snippet”]