LIFESPAN Walkingpad Pro Treadmill
Owner's Manual

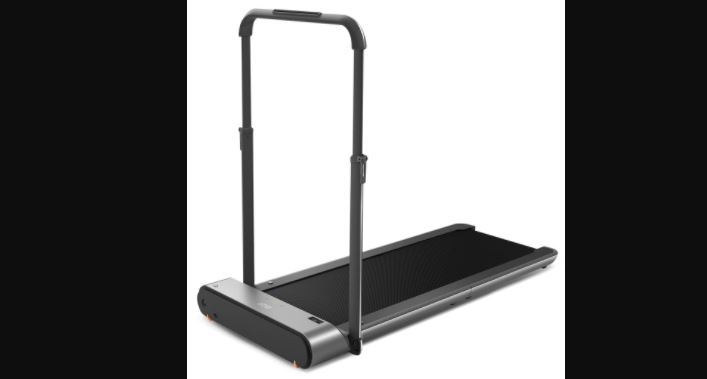
![]() Product may vary slightly from the item pictured due to model upgrades
Product may vary slightly from the item pictured due to model upgrades
Read all instructions carefully before using this product. Retain this owner’s manual for future reference.
NOTE: This manual may be subject to updates or changes. Up to date manuals are available through our website at www.lifespanfitness.com.au
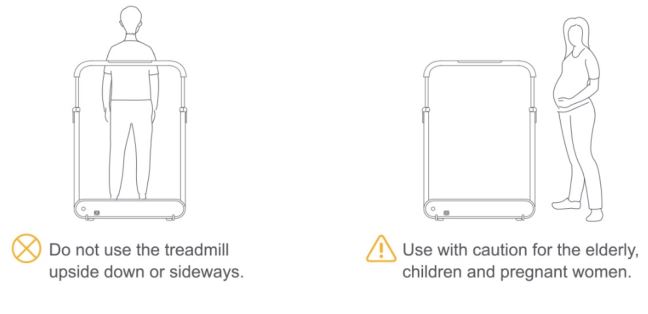
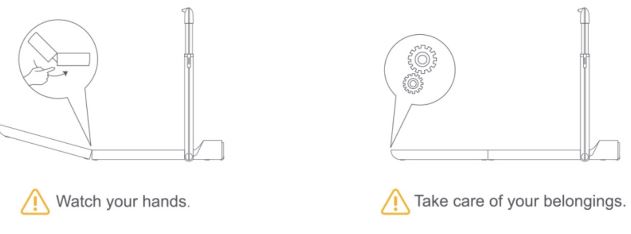
1. IMPORTANT SAFETY INSTRUCTIONS
WARNING – Read all instructions before using this treadmill.
It is important your treadmill receives regular maintenance to prolong its useful life. Failing to regularly maintain your treadmill may void your warranty.
The treadmill is intended for household use only.
Danger - To reduce the risk of electric shock disconnect your treadmill from the electrical outlet prior to cleaning and/or service work.
DO NOT USE AN EXTENSION CORD: DO NOT ATTEMPT TO DISABLE THE GROUNDED PLUG BY USING IMPROPER ADAPTERS OR IN ANY WAY MODIFY THE CORD SET.
- Install the treadmill on a flat level surface with access to a 220-240 volt (50/60Hz), grounded outlet.
- Do not operate treadmill on deeply padded, plush or shag carpet. Damage to both carpet and treadmill may result.
- Keep hands away from all moving parts.
- Never operate the treadmill if it has a damaged power cord or plug. When damaged, these must be replaced by the manufacturer, its service agent or similarly qualified persons in order to avoid a hazard.
- Keep the cord away from heated surfaces. · Never drop or insert any object into any openings.
- The treadmill is intended for in-home use only and is not suitable for commercial environments.
- Loose-fitting clothing or jewellery that could become an entanglement hazard should not be worn.
- All fixings should be checked before the equipment is used.
- Do not use outdoors.
- All product manual relating to the use of the equipment should be retained for future reference.
- To disconnect, turn all controls to the off position, then remove plug from outlet.
- Recommended operating temperature: 5-40°C
2. IMPORTANT ELECTRICAL INFORMATION
WARNING!
- Route the power cord away from any moving part of the treadmill including the elevation mechanism and transport wheels.
- NEVER remove any cover without first disconnecting AC power.
- NEVER expose this treadmill to rain or moisture. This treadmill is not designed for use outdoors, near a pool, or in any other high humidity environment.
- This is a high-power item; please do not share the same outlet with other high-power machines such as, fridges, air conditioning etc. Please choose an outlet exclusively for the machine and make sure the fuse is 10A.
3. SAFETY INSTRUCTIONS


4. PARTS & ACCESSORIES
Please check if the items inside the packaging box are complete & intact. In case of any missing breakage, please contact seller.

Main Body

5. OPERATION GUIDE
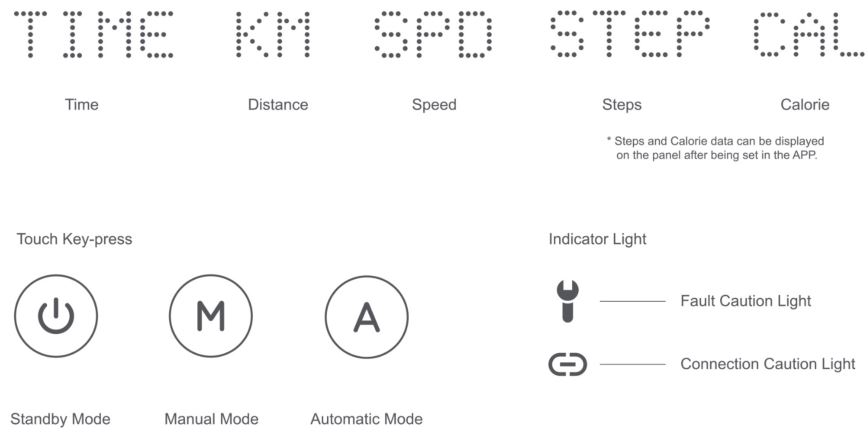
1. Display:
2. Remote Control:

3. Functions:
1. Mode Description
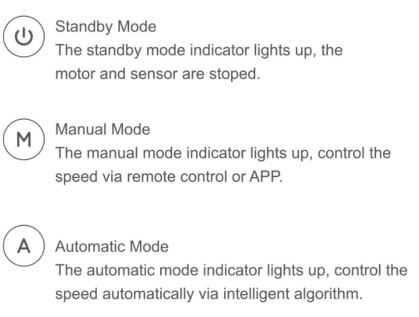
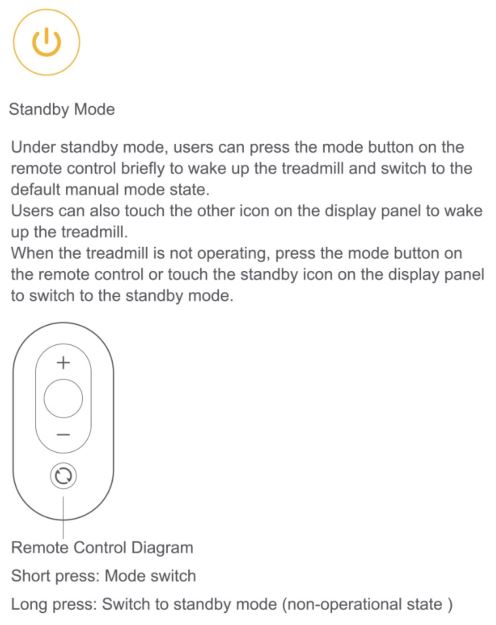
2. Standby Mode Control Description
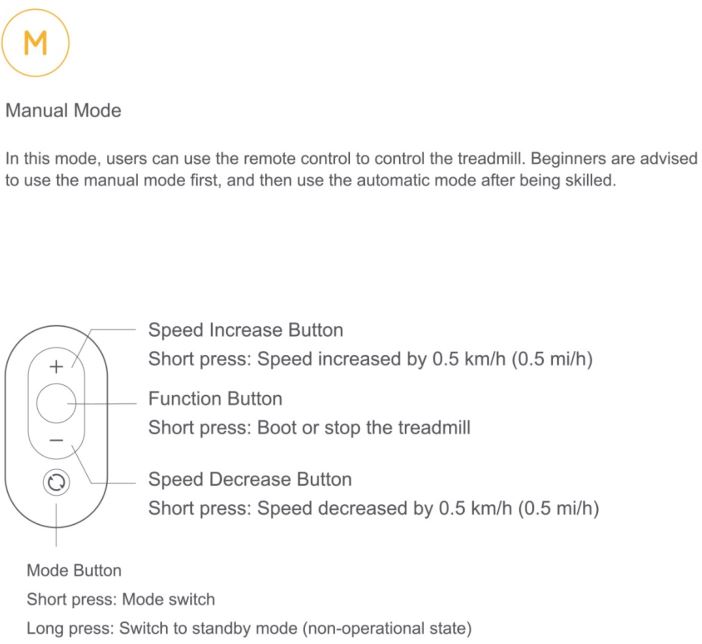
3. Manual Mode Control Description(primary mode)
4. Automatic Control Mode Description
This mode is difficult to control and can be used completely without the remote control. It is advised to use this mode after proficiency.
Use the remote control to start and stop, and the mode switch button is effective under this mode.
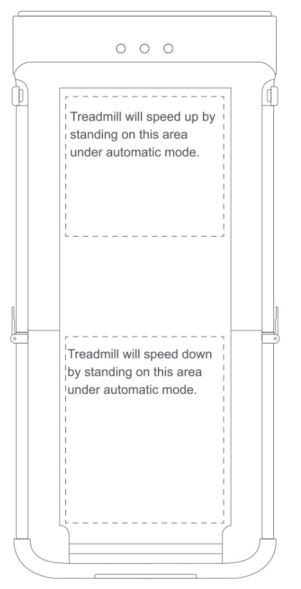
Note: The automatic control mode can only available under walking mode.
5. Remote Control Paring Instructions
If the remote control does not respond or you have replaced the remote control, you need to re-pair.
Pairing method: Restart the machine and press the mode button on the remote control for 5 seconds.
6. Connection Caution Light
Not connected to APP: FlickerConnected to APP: Off
7. Fault Caution Light
E01: Software overcurrentE02: Hardware overcurrentE03: 1PM Module OverheatingE04: Low-voltage ProtectionE05: Overvoltage ProtectionE06: Motor phase loss protectionE07: Motor block rotation protectionE08: Sensor faultE09: Motor unable to startE12: Motor overcurrent protectionE13: Overloading protectionE14: Hall signal lossE15: Communication fault
4. Operation:
- When moving, make sure that all of the locking devices of handrail are locked and fixed. Please put treadmill in a flat and firm ground, instead of the soft cushion or thick carpets.

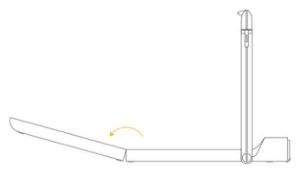
- Loose the handrail locking device, lift the handrail to a vertical angle, Tighten the two locking devices on both sides of handrail.
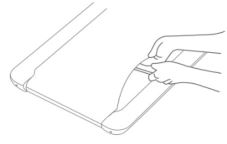
- Unfold the treadmill, adjust the walking belt to the center position, slowly unfold it and assist in pressing it down to make it completely flat, or rotate the bottom foot cushion for leveling.
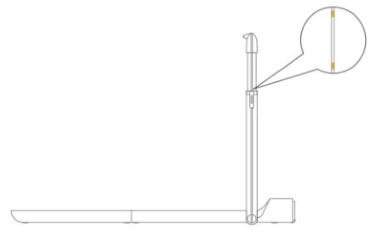
- Adjust the handrail quick mounting device to a suitable he ight, and then lock the device. Marks in yellow on handrail are the maximum and minimum adjustable positions.
- Install emergency stop switch, Connect power supply, and turn on power switch .
- Download “KS Fit” APP from Apple Store or Google Play Store and complete installation.
- Open APP , follow the guide to add and bind the treadmill, then ready to use the treadmill.


6. MAINTENANCE
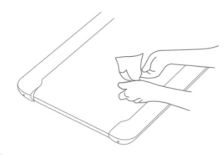
- Clean the treadmill
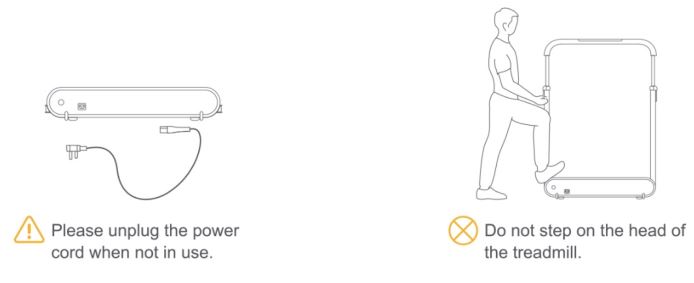
- Disconnect all power before cleaning the treadmill.
- Add a little mild detergent to the 100% cotton cloth. Do not spray the detergent directly on the walking belt or use acidic and corrosive detergent.
- Do not wipe under the walking belt
- After a period of exercise, dust and stains may appear on the rear floor. This is normal and just wipe.
- Walking Belt Slipping and Correction
- Start the treadmill and run at a speed of 3 km/h (2 mi/h) .
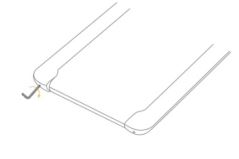
- Walking belt to the left: Turn the left adjusting hole screw clockwise by 1/4 turn.
- Walking belt to the right: Turn the right adjusting hole screw clockwise by 1/4 turn.
- Walking belt slipping: Turn the left and right adjusting screws clockwise for 1/2 turn at the same time.
- After each adjustment, it needs to run for a period of time (1-2 minutes) to observe the correction. Please adjust again if necessary.
- Walking belt lubrication
- Power off the treadmill and unplug the power line.
- Lift the edge of the walking belt and smear the inner surface with silicone oil.
- Start the treadmill to run at a speed of 3 km/h (2 mi/h) for 10-20 seconds.
- 5-10ml of silicone oil is required for each lubrication. Excessive silicone oil may cause slipping and affect normal use.
- Lubricate your walking belt every three months.
![]() The battery contained in this appliance must be removed for or disposal.
The battery contained in this appliance must be removed for or disposal.
When replacing the battery, use only original battery, available from our online parts shop.
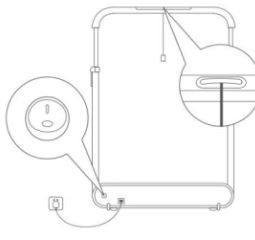
The battery compartment is located on the underside of the appliance. Open the compartment by removing the screw in the cover using a suitable screwdriver, and then press the lower end of the locking catch on the connectors. In that way, both sides of the connection can be separated by pulling them apart.
When inserting a new battery, push together the two connectors and ensure that the catch locks over the stop.
Never dispose of old battery in domestic garbage, but only through the proper public collection points. This also applies to the battery of defective appliances.
 Devices marked with this symbol must be disposed of separately from your household waste, as they contain valuable materials which can be recycled. Proper disposal protects the environment and human health. Your local authority or retailer can provide information on the matter.
7. EXERCISE GUIDE
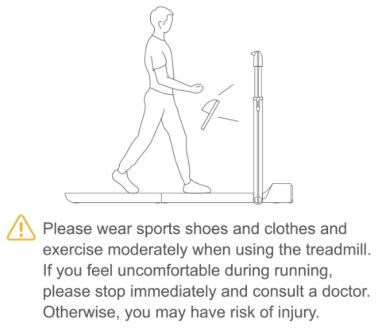
PLEASE NOTE: Before beginning any exercise program, consult your physician. This is important especially if you are over the age of 45 or individuals with pre-existing health problems.
The pulse sensors are not medical devices. Various factors, including the user’s movement, may affect the accuracy of heart rate readings. The pulse sensors are intended only as an exercise aid in determining heart rate trends in general.
Exercising is great way to control your weight, improving your fitness and reduce the effect of aging and stress.
The key to success is to make exercise a regular and enjoyable part of your everyday life.
The condition of your heart and lungs and how efficient they are in delivering oxygen via your blood to your muscles is an important factor to your fitness. Your muscles use this oxygen to provide enough energy for daily activity. This is called aerobic activity. When you are fit, your heart will not have to work so hard. It will pump a lot fewer times per minute, reducing the wear and tear of your heart.
So as you can see, the fitter you are, the healthier and greater you will feel.
Warm-up
Start each workout with 5 to 10 minutes of stretching and some light exercises. A proper warm-up increases your body temperature, heart rate and circulation in preparation for exercise. Ease into your exercise.
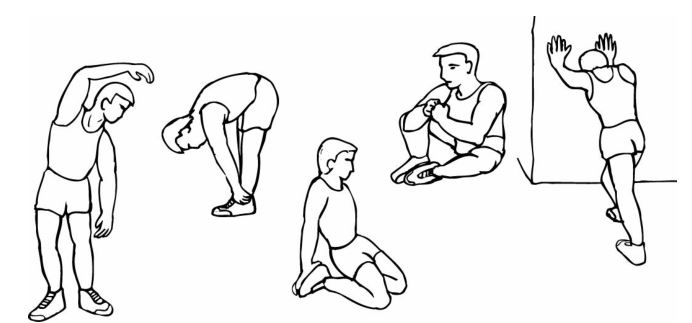
After warming up, increase the intensity to your desired exercise program. Be sure to maintain your intensity for maximum performance. Breathe regularly and deeply as you exercise.
Cool DownFinish each workout with a light jog or walk for at least 1 minute. Then complete 5 to 10 minutes of stretching to cool down. This will increase the flexibility of your muscles and will help prevent post-exercise problems.
Workout Guidelines
TARGET ZONE
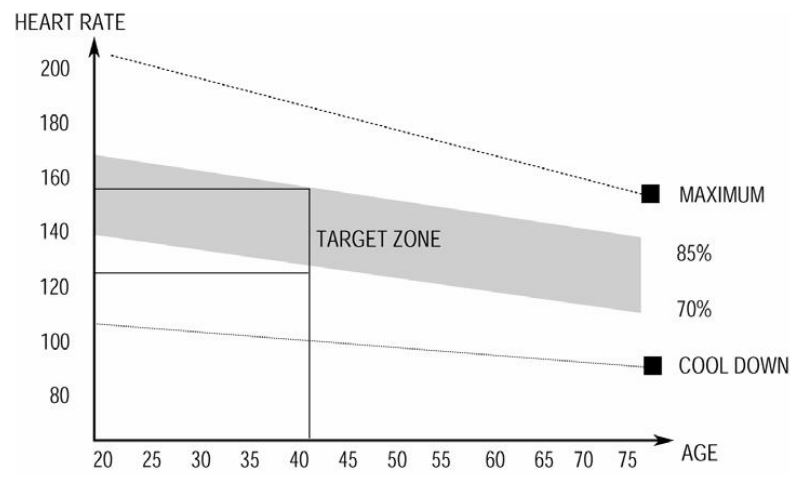
This is how your pulse should behave during general fitness exercise. Remember to warm up and cool down for a few minutes.
The most important factor here is the amount of effort you put in. The harder and longer you work, the more calories you will burn.
8. MAINTENANCE INSTRUCTIONS
- Clean the walking machine
- Turn off the machine and unplug the power cord.
- Add several drops of detergent on cotton rag or towel. Don’t pour the detergent on the belt directly, and don’t use acid or corrosive cleaners.
- Wipe off dust and stains on the frame, front panel and belt. Do not wipe backside of the belt.
- After using for a period, dust and stains may appear on the back part, that is normal situation, and just clean them up.
- Adjust the belt
- Press and hold both Mode Switch Button and Acceleration Button on the remote control over 3 seconds.
- Front panel shows “CALI” and the speed is 4 km/hr ( 2.5 mi/hr ).
- If belt deviates to the left: Turn the left adjusting screw for a half-circle clockwise.
- If belt deviates to the right: Turn the right adjusting screw for a half-circle clockwise.
- If belt is slipping: Turn both left and right adjusting screw for a half-circle clockwise at same time.
- Keep the machine running for 1-2 minutes and check whether it needs to readjust.
- Lubricate the Belt
- Turn off the machine and unplug the power cord.
- Lift up the belt and apply silicone oil on the backside of the belt.
- Turn on the machine again
- Keep the machine running under 4 km/hr ( 2.5 mi/hr ) for 10-20 20 seconds.
- Only apply 5 ml – 10 ml lubricant oil each time, too much lubricant oil makes the belt become slipping.
- Apply for silicone oil once every 3 months.


9. WARRANTY
AUSTRALIAN CONSUMER LAW
Many of our products come with a guarantee or warranty from the manufacturer. In addition, they come with guarantees that cannot be excluded under the Australian Consumer Law. You are entitled to a replacement or refund for a major failure and compensation for any other reasonably foreseeable loss or damage.
You are entitled to have the goods repaired or replaced if the goods fail to be of acceptable quality and the failure does not amount to a major failure. Full details of your consumer rights may be found at www.consumerlaw.gov.au
Please visit our website to view our full warranty terms and conditions: http://www.lifespanfitness.com.au/warranty-repairs
Warranty and Support:
Please email us at [email protected] for all warranty or support issues.
For all warranty or support related enquiries, an email must be sent before contacting us via other means.
References
[xyz-ips snippet=”download-snippet”]