
LiftMaster 827LM MyQ Remote Control LED Light Instruction Manual
WARNING
To reduce the risk of SEVERE INJURY or DEATH:
- This portable luminaire has a polarized plug (one blade is wider than the other) as a feature to reduce the risk of electric shock.
- This plug will fit in a polarized outlet ONLY one way. If the plug does not fit fully in the outlet, reverse the plug. If it still does not fit, contact a qualified electrician.
- DO NOT alter the plug.
- Light is intended for indoor ceiling or wall mount applications ONLY.
![]() WARNING: This product can expose you to chemicals including lead, which are known to the State of California to cause cancer or birth defects or other reproductive harm. For more information go to www.P65Warnings.ca.gov
WARNING: This product can expose you to chemicals including lead, which are known to the State of California to cause cancer or birth defects or other reproductive harm. For more information go to www.P65Warnings.ca.gov
Programming
PROGRAM A DOOR OPENER/OPERATOR TO THE MyQ REMOTE LED LIGHT
- Press the LEARN button on the light until the green LED comes ON.
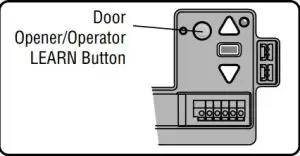
- Press the LEARN button on the door opener/operator. ORPress the LEARN button on the door control* twice. OROn the Smart Control Panel® 880LM or 880LMW, go to Menu > Program > MyQ Device.
- The code has been programmed when the remote light blinks once.* If using the light with an 8500/8500C opener and 888LM door control, contact technical support at support.LiftMaster.com.
PROGRAM A SECURITY+ 2.0® REMOTE CONTROL TO THE MyQ REMOTE LED LIGHT
- Press the LEARN button on the light until the green LED comes ON.
- Press the button on the remote control that you wish to operate the light.
- The code has been programmed when the remote light blinks once.To program the light with other accessories, refer to the manual for your accessory.
ADD THE MyQ REMOTE LED LIGHT TO MyQ ACCOUNT
- Press the LEARN button on the light until the green LED comes ON.
- Login to the MyQ app and add the MyQ Remote LED Light.
TO ERASE ALL PROGRAMMING FROM THE MyQ REMOTE LED LIGHT
- Press and hold the LEARN button until the green LED turns off (6-10 seconds). All programming is now erased.
Installation
The My0 Remote LED Light is designed to plug directly into a standard 120V outlet. Select an appropriate location on the ceiling or wall to mount the light within 6 feet (1.83 m) of an electrical outlet so that the cord and light are away from moving parts.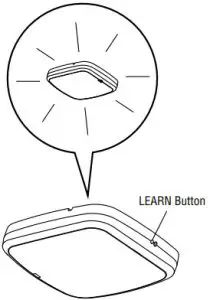


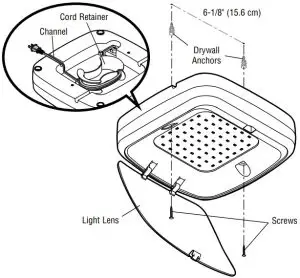 NOTE: If installing light on drywall and a ceiling joist cannot be located, use drywall anchors provided. No pilot hole is required for drywall anchors.
- Drill pilot holes 6-1/8″ (15.6 cm) apart if mounting to joist. OR Screw in drywall anchors 6-1/8″ (15.6 cm) apart if mounting to drywall.
- Determine the length of power cord needed to reach the nearest outlet. Wind any excess cord around cord retainer on the top side of the light base. Route the cord through the channel so the light mounts flush.
- Open the light lens.
- Mount the light with the screws provided.
- Close the light lens.
- Plug in the light to the outlet. NOTE: The LED light is very bright and will blink while programming. DO NOT stare at the light while on a ladder.
Maintenance
- Unplug the light before cleaning.
- Use a lightly dampened cloth for cleaning.
- DO NOT use liquid cleaners on the light lens.Operation of this equipment is subject to the following two conditions: (1) This equipment or device may not cause harmful interference, and (2) This equipment or device must accept any interference, including that which may cause undesired operation.
 report this ad
NOTICE: This device complies with Part 15 of the FCC rules and Industry Canada’s license-exempt RSSs. Operation is subject to the following two conditions: (1) this device may not cause harmful interference, and (2) this device must accept any interference received, including interference that may cause undesired operation.Any changes or modifications not expressly approved by the party responsible for compliance could void the user’s authority to operate the equipment.This device must be installed to ensure a minimum 20 cm (8 in.) distance is maintained between users/bystanders and device. This device has been tested and found to comply with the limits for a Class B digital device, pursuant to part 15 of the FCC rules and Industry Canada ICES standard. These limits are designed to provide reasonable protection against harmful interference in a residential installation. This equipment generates uses and can radiate radio frequency energy and, if not installed and used in accordance with the instructions, may cause harmful interference to radio communications. However, there is no guarantee that interference will not occur in a particular installation. If this equipment does cause harmful interference to radio or television reception, which can be determined by turning the equipment off and on, the user is encouraged to try to correct the interference by one or more of the following measures:
- Reorient or relocate the receiving antenna.
- Increase the separation between the equipment and receiver.
- Connect the equipment into an outlet on a circuit different from that to which the receiver is connected.
- Consult the dealer or an experienced radio/TV technician for help.
[xyz-ips snippet=”download-snippet”]