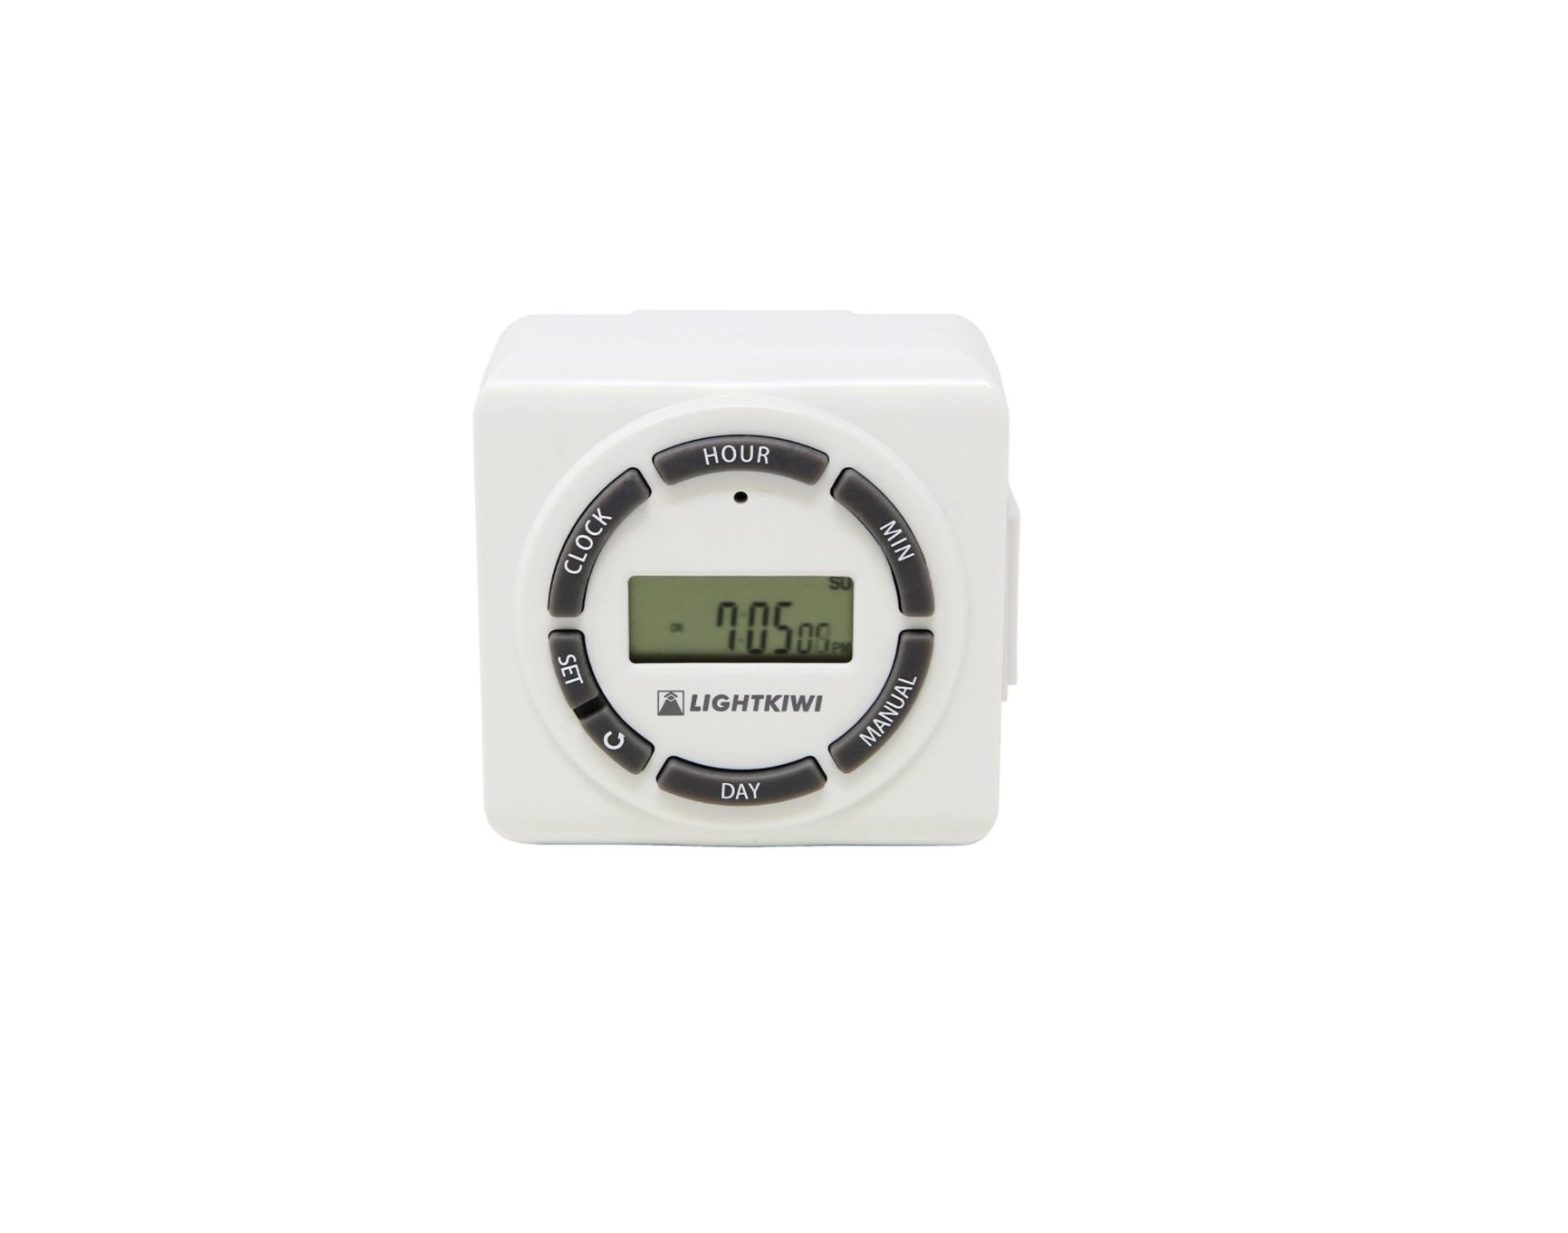
LIGHTKIWI H5576 Digital Programmable Timer User Manual

Initial Setting (Reset):
- If the time screen is completely blank, it will need to be plugged into outlet before programming can begin. If the screen is displaying numbers, it can be programmed and plugged into the outlet afterwards.
- Before programming, all settings should be reset. The reset button is located just below the “HOUR” button and is identified by “R”. Use a paper clip or a ballpoint pen to press the reset button for reset. See Figure 1

Current Time Setting:
- Keep the “CLOCK” button pressed the entire setting operation.
- Press the “HOUR” button to set the hours.
- Press the “MIN” button to set the minutes.
- Press the “DAY” button to select the correct day of the week.
- Release the “clock” button. The lime will now be set.
Ratings120VAC 60Hz120VAC 60Hz 15A 1800W General Purpose120VAC 60Hz 600W Tungsten125VAC 60Hz 1/2HP
Programming the On/Off Times:
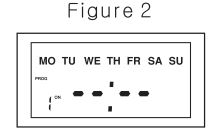
- Press the “SET” button once. Figure 2should be appear.
- “1 ON–:–” Should be the first setting. There are a total of20 ON/OFF settings. Figure 2

- Press the “HOUR” and “MIN” buttons to set ON lime.
- Press the “DAY” button to select the day(s) that this setting is relevant.
- Press the “SET” button to save and proceed to the “1 OFF–:–” screen. See Figure 3
- Repeat steps 1 through 5 to set ON/OFF times. Pressing the “SET” button again will take you through the other 19 ON/OFF settings.

IMPORTANT: The digital timer MUST be in the “AUTO ON” or “AUTO OFF” mode to operates as programmed. See the” Switching Mode Indication” section for detail.
Multiple Weekday Switching Groups:
Apart from individual week days, pressing the “DAY” button also selects multiple day combinations such as:
- MO, TU, WE, TH, FR, SA, SU
- MO
- TU
- WE
- TH
- FR
- SA
- SU
- MO, TU, WE, TH, FR
- SA, SU
- MO, TU, WE, TH, FR, SA
- MO, WE, FR
- TU, TH, SA
- MO, TU, WE
- TH, FR, SA
After selecting a particular day combination, the ON/OFF selection will be in effect on the day configuration selected from above.
- Press the “SET” button to select the ON/OFF setting that needs to be changed.
- Press the”↺” button to reset the current ON/OFF setting (seen in Figure 4)without having to scroll through all the hours.

Switching Mode Indication:
The actual mode is shown in the display as “ON”, “AUTO ON”, “OFF”, or “AUTO OFF” together with the time of day. Press the “MANUAL” button to adjust to the desired setting. This can be used to override the timer as explained in the “Manual Override Option” section.
Manual Override Option:
The manual override button can be used to switch the timer ON or OFF. Repeated pressing of the MANUAL button will make the display scroll from ON to AUTO ON to OFF to AUTO OFF.

ON= It will ignore the programmed settings and the timer is switch on permanently.AUTO ON= The digital timer will stay on until the next programmed off time and operates as programmed settings.OFF= It will ignore the programmed settings and the timer is switched off permanently.AUTO OFF= The digital timer will stay off until the next programmed on time and operates as programmed settings.
Tips for temporarily overriding the current program:
– To override program and turn on the timer outlet when it is off:Press MANUAL until AUTO ON shows on screen. The timer will stay on until the next scheduled off time.– To override program and turn off the timer outlet when it is on:Press MANUAL until AUTO OFF shows on screen. The timer will stay OFF until the next scheduled on time.
Programming Countdown Feature:
- Press the “SET” button repeatedly until the “CTD” icon appears on the display. This will appear after the ON/OFF program; refer to Figure 5
- Press the “HOUR”, “MIN” buttons to set amount of lime desired for the device to be on before turning off.
- Press the “CLOCK” button to store the setting and return to the main display.

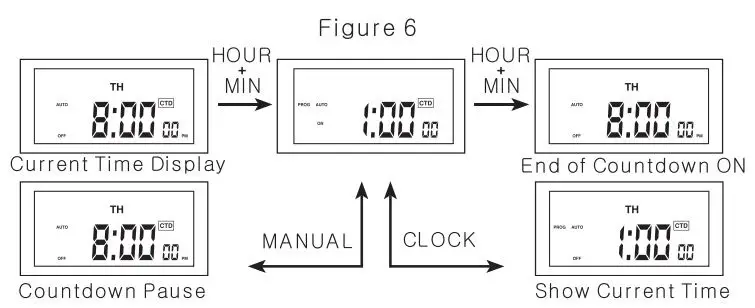
Activating the Countdown Feature:
- Press the “HOUR” and “MIN” button simultaneously to activate the countdown feature. Refer to Figure 6 for more details.
- Other Features of the Countdown.a Press the “MANUAL” button to pause or countdown only if on the countdown display.b. Press the “CLOCK” button to switch between the clock and countdown display.c. In countdown mode, press “HOUR” and “MIN” button simultaneously to deactivate the countdown. In pause mode, press “HOUR” and “MIN” button simultaneously to restart the countdown.
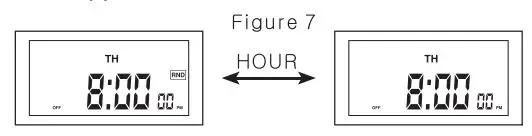
Random ON/OFF Setting:
Random is a feature that will randomize your current setting either+ or -30 minutes giving your home lived in appearance to deter intruders.
- Press and hold the “HOUR” button for 3 seconds to activate the random feature. The display will show the “RND” icon. See Figure 7.
- Press and hold the “HOUR” button for 3 seconds to deactivate the random feature. The “RND” icon will disappear from the screen.
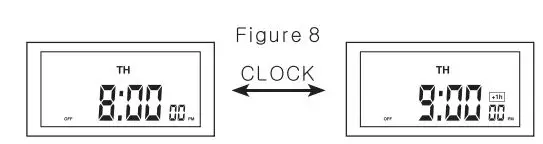
Daylight Saving Time(DST):
Press and hold the “CLOCK” button 3 seconds to advance the current time 1 hour, “+1 h” icon will appear on the display. Press and hold the “CLOCK” button 3 seconds again to decrease the lime by 1 hour and I he “+1h” icon will disappear. Refer to Figure 8
Power Back Up Feature:
In the event of a power failure, the timer will retain its settings for an estimated 3 months assuming the power back up is fully charged.
Caution:– Risk of electric shock. Do not use this adapter on extension cords or on receptacles where the ground tap cannot be connected.– Avoid high humidity. high temperature and high magnetic field.– Keep device out of the reach of children.– Do not plug this timer into another timer switch.– Do not touch the device with wet hands.– Do not insert needles or any other metal objects into mains outlet.– Do not connect the device which may exceed the performance limits of the timer.– Do not open the timer. Repairs must be performed by authorized service personnel only.
[xyz-ips snippet=”download-snippet”]