
Lindberg and Sons Automatic Watch User Manual and Warranty Information

Valued customer,Thank you for choosing a Lindberg & Sons watch. In this manual you will find all instructions for an optimal use and maintenance of your product.
The Lindberg & Sons collection is synonymous of classical design in combination with high quality material for producing unique products.
We wish you a lot of pleasure with your Lindberg & Sons watch.
Notes for automatic watches
Some models dispose a supplementary manual hand winding in order to wind the rotor up manually. This might be useful after long period of not using the watch. Therefore, keep the crown at its original position and turn it about 20 times anti-clockwise until you notice a stronger resistance while rotation. In general, it is recommendable to store automatic watches in watchwinders, instead of using the anual hand winding regularly. The movement of the wrist is simulated by the rotation of the watchwinder in order to rest the spring of the watch movement.
Water resistance
You will find the indication of water resistance on the back of your watch. The case is checked with special testing device to ensure the water resistance for a certain water pressure. The indicated water resistance of your watch refers to the date of delivery. The water resistance does not remain constant since the sealing is subject to a natural wear and tear process. Therefore, it is advisable to have the watch regularly checked by a watchmaker regarding its water resistance. Please never open the case by yourself. Watchcases shall only be opened by authorized experts. Please find further details for water resistance in the overview below:
| Indication on case back |
Splashwater |
Direct contact to water | Swimming |
Diving |
| Water resistant |
No |
No |
No |
No |
| 3 ATM |
Yes |
No | No |
No |
| 5 ATM |
Yes |
Yes | No |
No |
| 10 ATM |
Yes |
Yes | No |
No |
| 20 ATM |
Yes |
Yes | Yes |
Yes |
Care instructions
Please protect your watch from destructive agents. Please avoid any contact with lotions, perfumes and sprays, since these liquids damage the surface of the product. We recommend you to put off your product before taking a shower. Avoid shocks or jolts.We recommend you to keep your watch always in the original packing while travelling in order to protect it from dust and scratches.
Manual
(Please identify your watch by comparing it to the illustrations).
Simple TimeTo set the time:
- PULL out crown to B position.
- TURN crown either way to correct time.
- PUSH in crown to A position.


Date/Day & DateTo set the time:
- PULL out Crown to C position.
- TURN Crown either way to correct time.
- PUSH in Crown to A position.

To set the calendar / date:
- PULL out Crown to B position.
- TURN Crown away from you to correct date.
- TURN Crown towards you to correct the day.
- PUSH in crown to A position.NOTE: The date changes automatically every 24 hours.
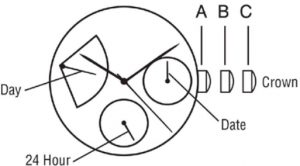
Date/24 Hour

To set the time:
- PULL out Crown to C position.
- TURN Crown either way to correct time.
- PUSH in Crown to A position.
To set the 24 hour indicator:
- PULL out Crown to B position.
- TURN Crown counter-clockwise to correct time.
- PUSH in Crown to A position.
To set the date:
- PULL out Crown to B position.
- TURN Crown clockwise to correct date.
- PUSH in Crown to A position.
Day/Date/24 Hour I
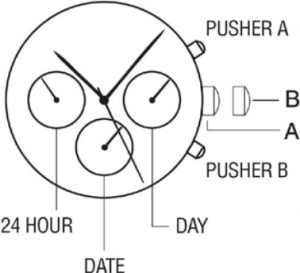
To set time:
- PULL out crown to “B” position.
- TURN crown either way to correct time.
- PUSH in crown to “A” position
To set date:
- Push Pusher “B” to correct date.
To set day:
- Push Pusher “A” to correct day.
DO NOT reset Date between 9:00 p.m. & 4:00 a.m. This may result in damaging the inner workings of the watch.Note: the date changes automatically every 24 hours.
Day/Date/24 Hour II

To set time:
- PULL out crown to C position.
- TURN crown either way to correct time.
- PUSH in crown to A position.
To set date:NOTE the date changes automatically every 24 hours.
- PULL out crown to B position.
- TURN crown clockwise to correct date.
- PUSH in crown to A position.
To set day:
- PULL out crown to C position.
- Advance time 24 hours to change the day.
- PUSH in crown to A position.NOTE: 24 hour indicator can change only when setting the time.
To set month:Push month setting button until the small hand of month is set to the correct month.
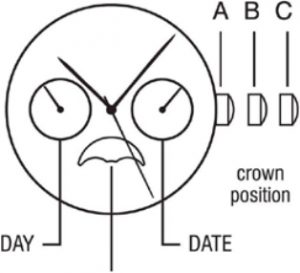
Day/Date/24 Hour III
To set the time:
- PULL out Crown to C position.
- TURN Crown clockwise/counter-clockwise to correct time.
- PUSH in Crown to A position.
To set the date:
- PULL out Crown to B position.
- TURN Crown counter-clockwise to correct date.
- PUSH in Crown to A position.
To set the day:
- PULL out Crown to C position.
- Advance time 24 hours to change the day.
- PUSH in Crown to A position.Note: 24 Hour indicator changes automatically when time is adjusted.
Day/Date/A.M./P.M./Sun/Moon
To set the time:
- PULL out Crown to C position.
- TURN Crown clockwise to correct time. Day / am / pm moon will also change.
- PUSH in Crown to A position.NOTE: Remember to set time for am or pm (sun or moon)
To set the date:
- PULL out Crown to B position.
- TURN Crown clockwise to correct date.
- PUSH in crown to A position.
To set the day:
- PULL out Crown to C position.
- Advance time 24 hours to change the day.
- PUSH in Crown to A position.
TWO-EYE CHRONOGRAPH WITH DATE

Crown position “A” , “B” & “C”.Pushers “A” (top) & “B” (bottom).12 o’clock eye “1 minute up to maxinum 60 minute”.6 o’clock eye “second”.
This chronograph watch has 3 functions:TIME, CALENDAR, STOPWATCH.
To set the time:
- PULL crown to “C” position.
- TURN crown either way to correct time.
- PUSH crown in to “A” position, small second hand begins to run.
To set the calendar:
- PULL out crown to “B” position.
- TURN crown clockwise to correct date.
- PUSH in crown to “A” position.NOTE: The date changes automatically every 24 hours.
STOPWATCHThe stopwatch is capable of measuring:1/1 second elapsed up to maxinum of 60 minute (top eye).BEFORE USING THE STOP WATCH, reset the stopwatch hands to the “60” and “0” positions.
To reset stopwatch hands:
- PULL crown to position “C”.
- PRESS pusher “A” intermittently until the chronograph second hand is reset to “0”.
Standard stopwatch measurement:
- PRESS pusher “A” to start timing.
- PRESS pusher “A” to stop timing.
- PRESS pusher “B” to reset.
Accumulated elapsed time measurement:
- PRESS Pusher “A” to start timing.
- PRESS Pusher “A” to stop timing.
- PRESS pusher “A” to restart timing.
Three-Eye CHRONOGRAPH WITH & WITHOUT DATE

Crown position “A”, “B” & “C”.Pushers “A” (top) & “B” (bottom) 12 o’clock eye “1/10 seconds elapsed” 9 o’clock eye “minutes elapsed” 6 o’clock eye “seconds elapsed”.
This chronograph watch has 3 functions:TIME, CALENDAR, STOPWATCH
To set the time:
- PULL Crown to “C” position.
- TURN Crown either way to correct time.
- PUSH Crown into “A” position.
To set the calendar:
- PULL out Crown to “B” position.
- TURN Crown clockwise to correct date.
- PUSH in Crown to “A” position.NOTE: The date changes automatically every 24 hours.
STOPWATCH
The stopwatch is capable of measuring:1/10 seconds elapsed up to one second (top eye).Minutes elapsed up to one hour (middle eye).Seconds elapsed up to one minute (bottom eye)BEFORE USING THE STOP WATCH, reset the stopwatch hands to the “60” and “0” positions.
To reset stopwatch hands:
- PULL Crown to position “C”.
- PRESS Pusher “A” intermittently until the top eye hand is reset to “0”.
- PRESS Pusher “B” intermittently until the middle and top eye hands is reset to “60”.NOTE: PRESSING and HOLDING either Pusher “A” or “B” will cause the hands to continue to move until the pusher is released.
If the stopwatch hands move improperly:
- PULL out the Crown to “B” position.
- PRESS Pushers “A” & “B” simultaneously for 3 seconds.
- RELEASE Pushers, stopwatch hands will move 180 degrees.
- PUSH Crown in to “A” position.
Standard stopwatch measurement:
- PRESS Pusher “A” to start timing.
- PRESS Pusher “A” to stop timing.
- PRESS Pusher “B” to reset.
Timing 2 competitors:
- PRESS Pusher “A” to start timing.
- PRESS Pusher “B” to stop timing.
- PRESS Pusher “A” to stop timing of second event.
- PRESS Pusher “B” to view time of second event.
- PRESS Pusher “B” to reset.
Split time:
- PRESS Pusher “A” to start timing.
- PRESS Pusher “B” to stop split.
- PRESS Pusher “B” to begin again.
- PRESS Pusher “A” to stop.
- PRESS Pusher “B” to reset.
Three-Eye Chronograph with or without Date Window

NOTE: Crown position “1”, “2” & “3”NOTE: Pushers “A” (top) & “B” (bottom)NOTE: Left eye “minute totalizer”NOTE: Right eye “small second”NOTE: Centre eye “date indicator”This chronograph watch has 3 functions: TIME, CALENDAR, STOPWATCH
To set the time:
- PULL Crown to position “3” .
- TURN Crown either way to correct time.
- PUSH Crown to position “1” .
To set the calendar:
- PULL Crown to position “2” .
- TURN Crown clockwise to correct the date.
- PUSH in Crown to position “1” .
Stopwatch is capable of measuring:
- Minutes elapsed up to 30 minutes (left eye).
- Chronograph hand 1/5 secondBEFORE USING THE STOPWATCH, reset the stopwatch hands to the“60” position by mean of pusher “B”. If stopwatch Hands move improperly, reset the hands as follow:
To reset stopwatch hands:
- PRESS Pusher “A” & “B”.
- PRESS Pusher “B” intermittently until the left eye hand is reset to “0”.
- PRESS Pusher “A” intermittently until the chronograph hand reset to “60”.
- PRESS Pusher “A” & “B”.NOTE: PRESSING and HOLDING either Pusher “A” or “B” will cause the hands to continue to move until the pusher is released.
Standard stopwatch measurement:
- PRESS Pusher “A” to start timing.
- PRESS Pusher “A” to stop timing.
- PRESS Pusher “B” to reset.
Accumulated elapsed time measurement:
- PRESS Pusher “A” to start timing.
- PRESS Pusher “A” to stop timing.
- PRESS Pusher “A” to restart timing.
- PRESS Pusher “A” to stop 2nd timing.
- PRESS Pusher “B” to reset.
Split time measurement:
- PRESS Pusher “A” to start timing.
- PRESS Pusher “B” to split.
- PRESS Pusher “B” to begin again.
- PRESS Pusher “A” to stop.
- PRESS Pusher “B” to reset.
Timing 2 competitors:
- PRESS Pusher “A” to start timing of first event.
- PRESS Pusher “B” to stop timing of first event. Stopwatch continues to run internally.
- PRESS Pusher “A” to stop timing of second event.
- PRESS Pusher “B” to view time of second event.
- PRESS Pusher “B” to reset.
International Warranty
Warranty: 24 months from date of purchase for all faults arising from material or manufacturing defects. Excluded: damage from careless handling and repairs by unqualified persons, damage from normal use. The warranty is valid only in combination with the receipt from an authorized seller.
Reference:
Vendor:
Date of purchase:
web site: www.lindberg-sons.com.
Lindberg and Sons Automatic Watch User Manual and Warranty Information – Lindberg and Sons Automatic Watch User Manual and Warranty Information –
[xyz-ips snippet=”download-snippet”]