![]()
USER GUIDEAX3200DUAL-BAND GIGABITWiFi 6 ROUTERModel E8450
Product Overview
Front
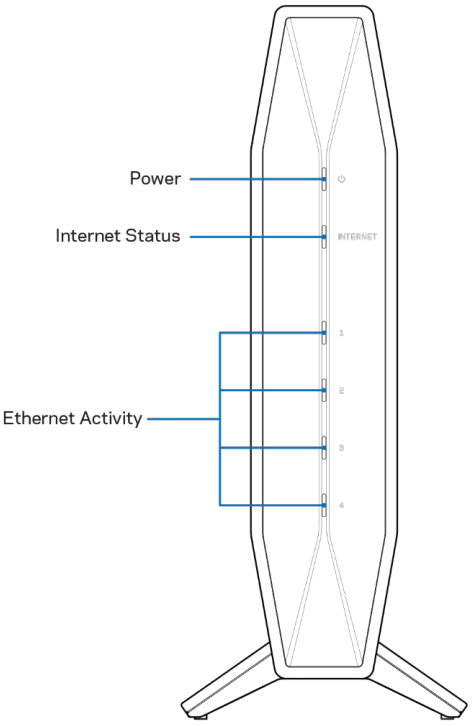
Power light-Blinks blue while the router is starting up and during WPS pairing. Blinks yellow if WPS pairing failsInternet status light—Is solid blue when connected to the internet and solid yellow when not connected. Is solid yellow when properly connected to the modem, but not getting an internet signal.Blinks yellow if no ethernet cable is plugged into the Internet port when setting up as a traditional router or as the parent node of an EasyMesh Wi-Fi system.Ethernet activity lights-Each light will be solid blue if an ethernet cable is connected to the corresponding port. They will blink blue if there is activity on the port.
Back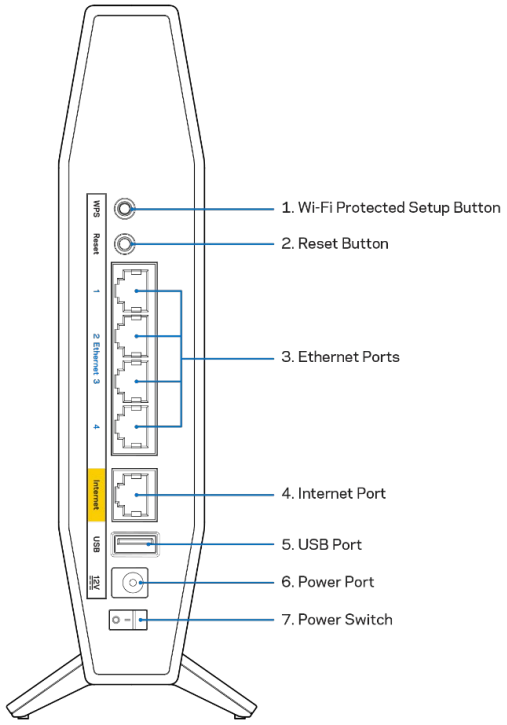
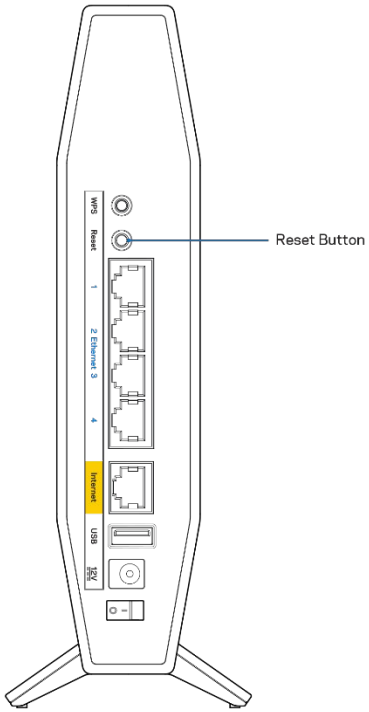
Wi-Fi Protected Setup™ (WPS) button (1)—– Press to easily configure wireless security on Wi-Fi Protected Setup-enabled network devices. The power light on the front of the router will blink blue while WPS pairing is active.Reset button (2)—Press and hold until the power LED starts flashing to reset the router to factory settings.Ethernet ports (3)—— Connect Ethernet cables (also called network or internet cables) to this gigabit ethernet (10/100/1000) ports and to other wired devices on your network. The ethernet activity lights on the front of the router will be blue when a cable is connected to an ethernet port. If you plan to use this router as the parent node in an EasyMesh Wi-Fi system, you can add child nodes wirelessly or create wired connections using these ports.Internet port (4)—— Connect an Ethernet cable to this port and to your modem. The internet status light on the front of the router will be blue only when the router is connected to a modem that is connected to the internet. If you plan to use this router as a child node in your EasyMesh system, you can add it wirelessly or use this port to wire it to an ethernet port on the parent node that has already been set up.Note—— Go to the Basic Wireless Settings section for details on how to add a child node to an EasyMesh system – wirelessly or wired.USB 2.0 port (5)—– Connect and share a USB drive on your network.Power port (6)—— Connect the included AC power adapter to this port.Power switch (7) —– Press | (ON) to turn on the router.
Setting Up: Basics
Where to find more help In addition to this user guide, you can find help at Linksys.com/support/E8450(documentation, downloads, FAQs, technical support, live chat, forums)Note—Licenses and notices for third-party software used in this product may be viewed onhttp://support.linksys.com/en-us/license. Please contact http://support.linksys.com/enus/gplcodecenter for questions or GPL source code requests.How to install your routerIf you’re setting up this router as a traditional router or as the parent node for EasyMesh Wi-Fi, follow these steps
- If replacing an existing router, disconnect that router first.
- Plugin the router to a power source. Make sure the power switch is in the | (ON) position.
- Connect your new router to your modem or modem router.
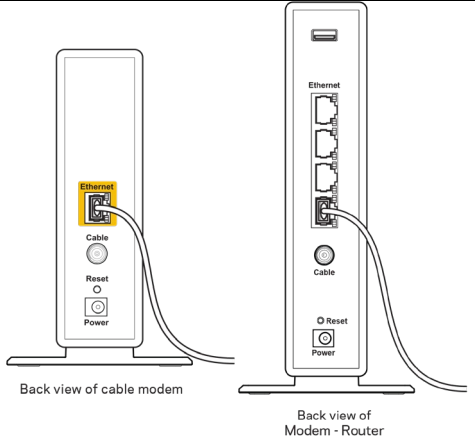
A Modem OR
B Modem-Router Plug one end of the included ethernet cable into the yellow Internet port on your new router. If you have a modem, plug the other end into the Ethernet (LAN) port on the modem. Plug one end of the included ethernet cable to the yellowInternet port on your new router. If you have a modem router, plug the other end into any available port. Note—Wait until the power light on the front panel of the router stops blinking and is solid blue before moving to Step 4.
- Connect to the network name shown in the Quick Start Guide that came with your router. (You can change the network name and password later.) Select the option to automatically connect to this network in the future. If you need help connecting to the network refer to your device documentation on the provided CD.Note—You will not have internet access until the router setup is complete.
- Enter http://myrouter.local in a web browser. Follow the on-screen instructions to complete the setup.

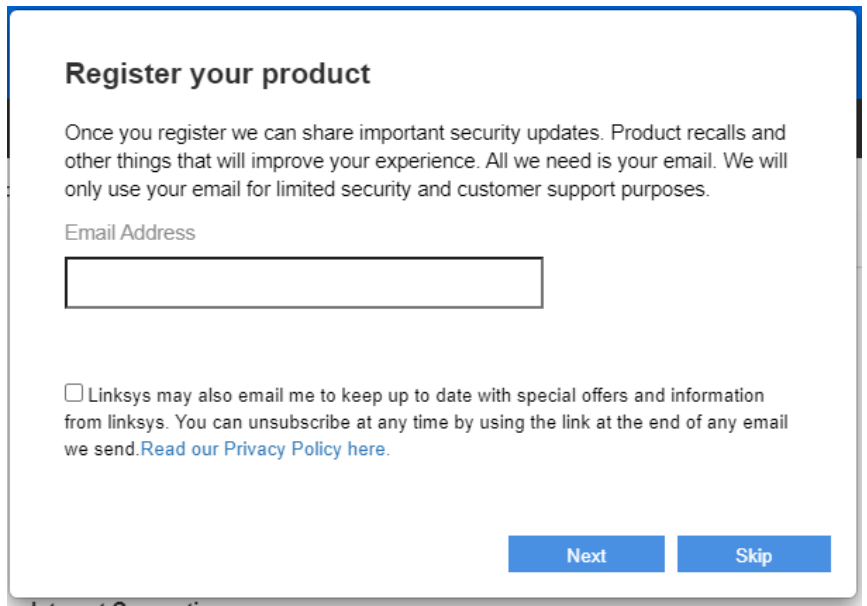
You also can enter 192.168.1.1 in a browser to start setup. If you are using a modem router (gateway) and the modem router uses 192.168.1.x subnet already,you might need to enter the IP address 10.0.1.1. Note—If none of those options take you to the setup wizard, go to www.linksys.com/support/setupIP for more help.6. Once you are finished with the setup, please be sure to register your router so we can keep you informed of security updates, product recalls, and other things that will improve your experience.

 Note – Your router becomes a parent node once you complete the setup. You can change to a traditional Wi-Fi setup by turning off EasyMesh Parent Node on the Basic Wireless Settings screen of the router’s settings.If you’re adding this router to your existing E8450 EasyMesh Wi-Fi, follow these steps.Note—If you have used this router before, reset it to factory default settings before adding it to your EasyMesh Wi-Fi. You can do this in the Administration tab of the router’s settings or by pressing and holding the reset button on the back of the router for 10 seconds.
- Using a computer or mobile device, connect to your parent router (the one connected to your modem) wirelessly or with an ethernet cable
- Visit my router.local in a web browser to log in to the parent router’s settingso You also can enter 192.168.1.1 in a browser to access the parent router’s settingsNote-If neither of those options take you to the parent router’s settings login screen, go to www.linksys.com/support/setupIP for more help.
- Enter the parent router password. (Default is “admin”.)
- Go to Wi-Fi > Basic Wireless Settings and click on Add a new nodeNote—“EasyMesh Parent Node” must be enabled on your parent router setting before you click the “Add a new node” button.
- Follow the prompts to add the node to your existing EasyMesh Wi-Fi network.Note—If you are adding this router to a parent node from another manufacturer, please refer to the manufacturer’s instructions. This router can’t be added to a Linksys Velop or Max-Stream mesh Wi-Fi system.
Advanced Configuration
How to open the browser-based utilityTo access some advanced settings, you need to open the browser-based utility. Make sure you are connected to the router, open a web browser and enter http://myrouter.local in a web browser or go to the IP address 192.168.1.1. If you are using a modem-router (gateway) and the modem-router uses 192.168.1.x subnet already, you might need to enter the IP address 10.0.1.1.Note—If none of those options takes you to router settings, go to www.linksys.com/support/setupIP for more help.The router will prompt you for a password.
If you changed the password during setup, enter the new password. Click LOGIN. If you didn’t change the password or skipped setup altogether, the default password is ‘‘admin’’.
Basic Router SettingsThis screen allows you to change the router’s basic configuration.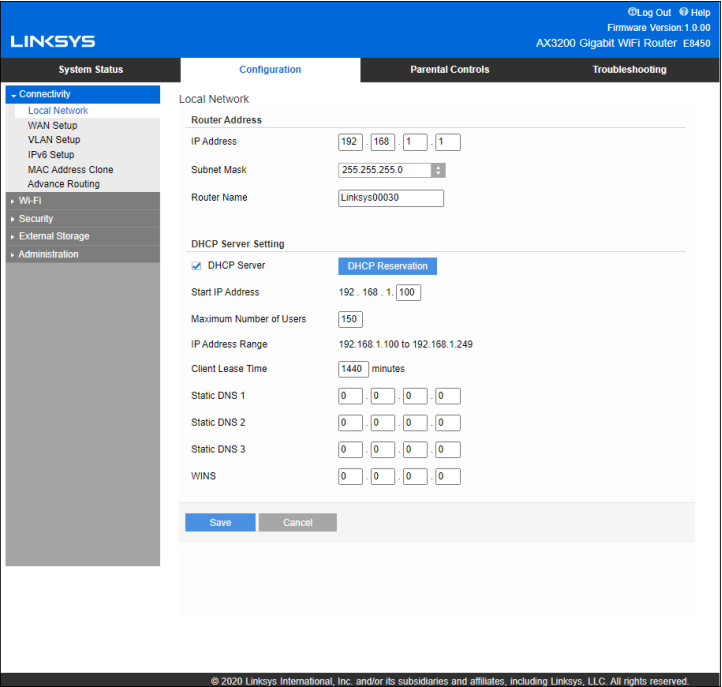 LanguageSelect your language—To change language, select one from the drop-down menu. The language of the browser-based utility will change within five seconds.
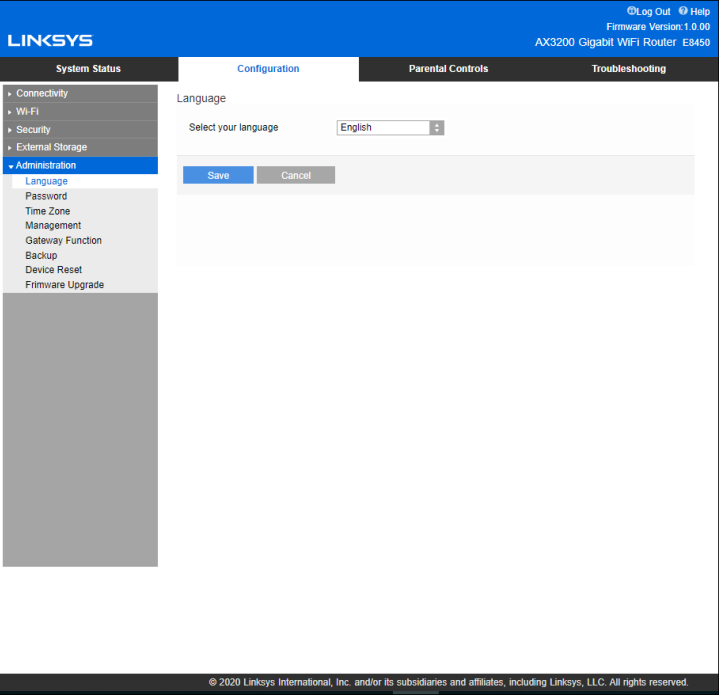 Internet Setup
The Internet Setup section configures the router to your internet connection. This information can be provided by your Internet Service Provider (ISP).Internet Connection Type—Select the type of internet connection your ISP provides from the dropdown menu.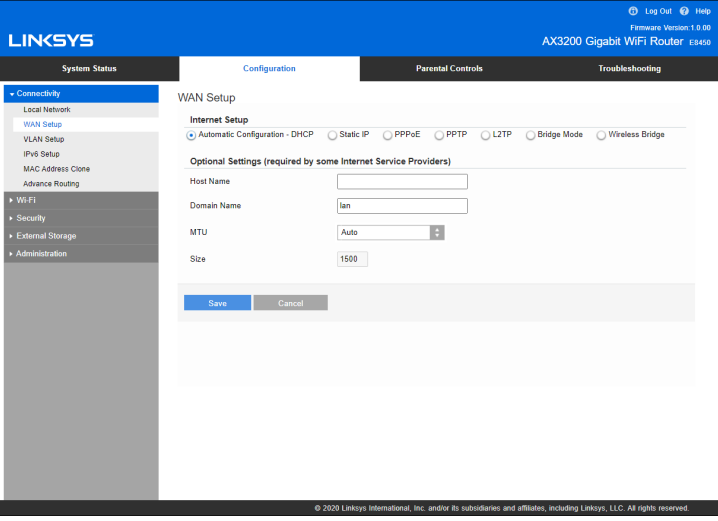
- Automatic Configuration – DHCP (default)Keep the default only if your ISP supports DHCP or if you connect using a dynamic IP address. (This option usually applies to cable connections.)
- Static IPSelect if you are required to use a fixed IP address to connect to the internet.
- PPPoESelect if you have a DSL connection and your ISP uses Point-to-Point Protocol over Ethernet (PPPoE).
- PPTPPoint-to-Point Tunneling Protocol (PPTP) is a service that generally applies to connections in Europe. If your PPTP connection supports DHCP or a dynamic IP address, select Obtain an IP Address Automatically. If you are required to use a fixed IP address to connect to the internet, select Specify an IP Address and configure the options that appear.
- L2TPLayer 2 Tunneling Protocol (L2TP) is a service that generally applies to connections in Israel.Note—Connect on Demand or Keep Alive are options when choosing PPPoE, PPTP, and L2TP. They let you choose whether the router connects to the internet only as needed (useful if your ISP charges for connect time), or if the router should always be connected. Select theappropriate option.
- Bridge ModeBridge Mode disables all router capabilities and turns the router into an access point. The router will cease to act as a DHCP server and its built-in firewall, as well as the NAT features, will no longer be in effect.
- Wireless BridgeA wireless bridge wirelessly connects to your main router and can share the internet connection with devices connected to the bridge’s Ethernet ports.
Basic Wi-Fi Settings

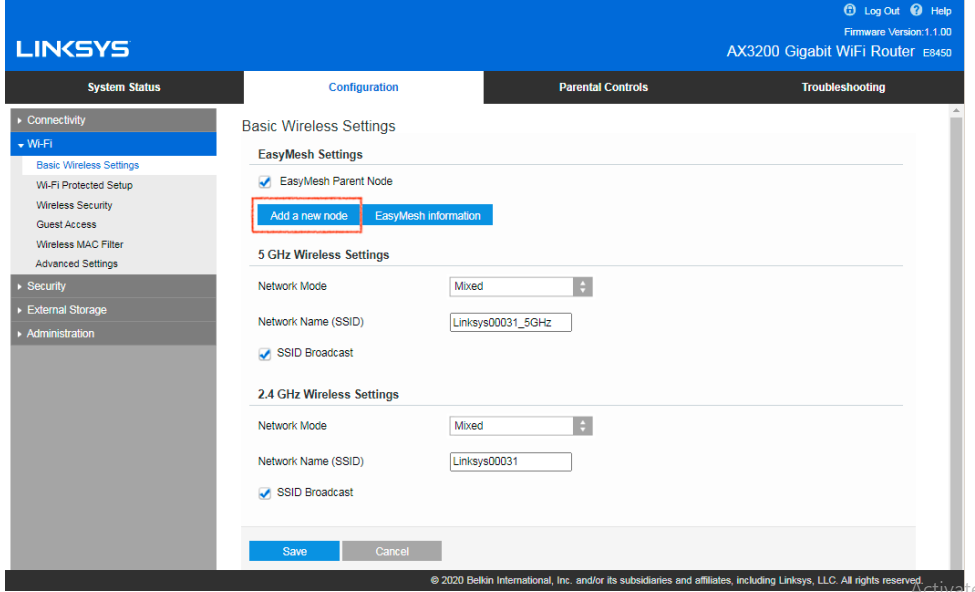
EasyMesh SettingsIf one router isn’t providing whole-home Wi-Fi coverage, you can turn on the EasyMesh feature and add more E8450 routers to your network. Once the feature is turned on by checking the box for EasyMesh Parent Node, the router connected to your modem becomes the parent node in your mesh network. Add child nodes by clicking ‘‘Add a new node.’’ Then, press the WPS button on your child node for 3 seconds. Connecting a child node should take between 70~80 seconds in most cases. You can check the progress on the parent node’s setting screen.Once the child node is added, click Mesh information to see the node and the devices connected to them for the entire mesh network.If a child node fails to join your network, move the child node closer to the parent node. Follow the prompts on the parent node’s settings screen to try again.Once you add a child node wirelessly, you can connect it with an ethernet cable to ensure a consistent signal. This is called wired backhaul. Make sure the cable comes from one of the ports labeledEthernet on the parent node and into the port labeled Internet on the child node.You can turn off Easy Mesh Parent Mode at any time and use the parent node as a traditional router. Any child nodes will be disconnected from your Wi-Fi.Note—You can’t add an E8450 router to an EasyMesh system if the router has already been set up. If you have used the router before, reset it to factory settings. Press and hold the reset button on the back of the router for 10 seconds or reset it in the Administration tab of the router’s settings.If you don’t see the EasyMesh option in your router settings, make sure to upgrade to the latest firmware. The firmware version needs to be 1.1.00 or above to support EasyMesh.If a child node is too far away from another working node, the power light on the front of the child node will be solid yellow. Move the child node closer to a working node until the child node’s power light is solid blue. If your child node power light blinks yellow, it means the child node lost connection to a working node. Check the closest node first. If the closest node is running normally, move the child node closer to it. If that doesn’t work, reset the new child node and try to add it to your mesh system again.Control all settings in your EasyMesh network through the parent node. Changes apply to all child nodes.5GHz Network Mode—– Select the wireless standards your network will support.
- Mixed (default)Keep the default if you have Wireless-A, Wireless-N, Wireless-AC, or Wireless-AX devices in your network.
- Wireless-AC MixedSelect if you have Wireless-A, Wireless-N, or Wireless-AC devices in your network.
- Wireless-A OnlySelect if you have only Wireless-A devices.
- Wireless-N OnlySelect if you have only Wireless-N devices.
- DisabledSelect if you have no Wireless-A, Wireless-N, Wireless-AC, and Wireless-AX (5 GHz) devices in your network. 5GHz radio will be off after you choose this option.Note—If you are not sure which model to select, keep the default, Mixed.
2.4GHz Network Mode—– Select the wireless standards your network will support.
- Mixed (default)Keep the default if you have Wireless-B, Wireless-G, Wireless-N 2.4GHz devices in yournetwork.
- Wireless-B/G OnlySelect if you have Wireless-B, Wireless-G devices in your network.
- Wireless-B OnlySelect if you have only Wireless-B devices.
- Wireless-G OnlySelect if you have only Wireless-G devices.
- Wireless-N OnlySelect if you have only Wireless-N 2.4G devices.
- DisabledSelect if you have no Wireless-B, Wireless-G, and Wireless-N (2.4 GHz) devices in your network. 2.4GHz radio will be off after you choose this option.Note—If you are not sure which model to select, keep the default, Mixed.
Network Name (SSID)The Service Set Identifier (SSID) is a name used by devices to connect to a wireless network. SSIDs are case-sensitive and must not exceed 32 characters. The default SSIDs for the 2.4 GHz and 5 GHz networks are LinksysXXXXX and LinksysXXXXX_5GHz, respectively. The Xs represent the last fivedigits of the router’s serial number, which can be found on the bottom of the router. If you changed the SSID, both bands have the new SSIDs. You may give them different names through the browser-based utility.Note—If you restore the router’s factory default settings (by pressing the Reset button or using the Configuration > Administration > Device Reset screen), the Network Name will return to its default value. Change the Network Name back to its original name, or you will have to reconnect all devices on your wireless network to the new network name. Channel Width Keep the default, Auto (20 MHz or 40 MHz) for best performance in a 2.4 GHz network usingWireless-B, Wireless-G, and Wireless-N (2.4 GHz) devices. For a channel width of 20 MHz, select 20MHz only. For the best performance in a 5 GHz network, keep the default Auto (20, 40 or 80 MHz).ChannelSelect the channel from the drop-down list. Keep the default, Auto, if you are not sure which channel to select.SSID BroadcastKeep the default, Enabled, to broadcast the router’s SSID. When wireless clients survey the local area for wireless networks to associate with they will detect the SSID broadcast by the router. Attempting to hide your Wi-Fi name does not make your Wi-Fi more secure. Anyone truly interested in accessing your network can find it even if you turn off this feature. If you still do not want to broadcast the router’s SSID, select Disabled.
Wireless Security
The router offers the following wireless security options:WPA2/WPA3 Mixed Personal, WAP2 Personal, WPA2 Enterprise, WPA3 Personal, WPA3 Enterprise (WPA stands for Wi-Fi Protected Access.)WPA3 is the strongest security option.
Security Option SettingsWPA2 Personal If you select WPA2 Personal, each device in your wireless network MUST use WPA2 Personal and the same passphrase.

If you are not sure whether a device supports WPA2 or WPA3 Personal, select WPA2/WPA3 Mixed Personal option in Security Mode.Passphrase—– Enter a passphrase of 8-63 characters. This is the Wi-Fi password that provides access to the network. It can be the same as entered in setup.
DisabledIf you choose to disable wireless security, you will be informed that wireless security is disabled when you first attempt to access the internet. You will be given the option to enable wireless security or confirm that you understand the risks but still wish to proceed without wireless security.

Troubleshooting
You can find more help from our award-winning customer support at Linksys.com/support/E8450.Your router was not successfully set upIf you could not complete setup in the browser-based interface, you can try the following:
- Press and hold the Reset button on your router with a paperclip or pin until the power light on the front of the router turns off and starts blinking (about 10 seconds). Type 192.168.1.1 in a browser to try setup again.
- If you are using a modem-router (gateway) and the modem-router is using the IP address 192.168.1.x, you might need to enter the IP address 10.0.1.1.Note—If none of those options take you to the setup wizard, go to www.linksys.com/support/setupIP for more help.
- Temporarily disable your computer’s firewall (see the security software’s instructions for help). Install the router again.
- If you have another computer, use that computer to install the router.
Your Internet cable is not plugged in messageIf you get a “Your Internet cable is not plugged in” message when trying to set up your router:
- Make sure that an ethernet or internet cable (or a cable like the one supplied with your router) is securely connected to the yellow Internet port on the back of the router and to the appropriate port on your modem. This port on the modem is usually labeled Ethernet.
- Make sure that your modem is connected to power and is turned on.
If your internet service is cable, verify that the cablemodem’s CABLE port is connected to the coaxial cableprovided by your ISP. If your internet service is DSL, make sure that the DSL phone line is connected to the modem’s DSL port. - If your computer was previously connected to your modem with a USB cable, disconnect the USB cable.
- Install the router again.


Cannot access your router messageTo access your router, you must be connected to your own network. If you currently have wireless internet access, the problem may be that you have accidentally connected to a different wireless network.To fix the problem on Windows computers, do the following*:
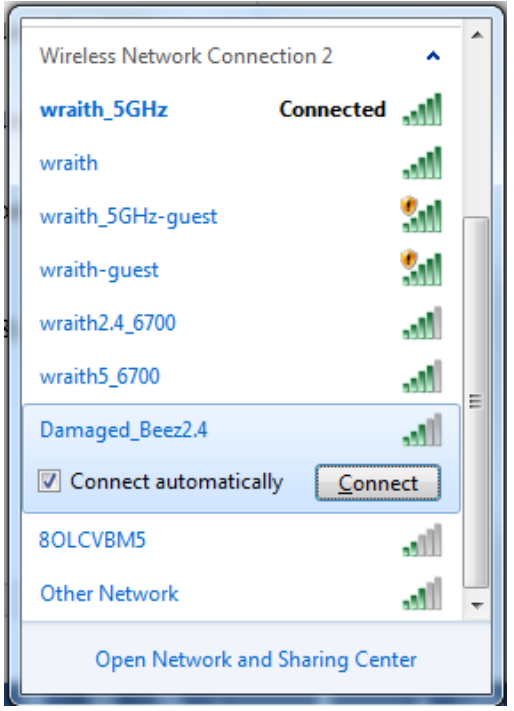
- On your Windows desktop, click on the wireless icon in the system tray. A list of available networks will appear.
- Click your own network name. Click Connect. In the example below, the computer was connected to another wireless network named wraith_5GHz. The wireless network name of the Linksys E series router, Damaged_Beez2.4 in this example, is shown selected.
- If you are prompted to enter a network security key, type your password (security key) into the network security key field. Click OK.
- Your computer will connect to the network, and you should be able to access the router.
*Depending on your version of Windows, there could be some differences in wording or icons in these steps.To fix the problem on Mac computers, do the following:
- In the menu bar across the top of the screen, click the Wi-Fi icon. A list of wireless networks will appear.
- In the example below, the computer was connected to another wireless network named wraith_5GHz. The wireless network name of the Linksys E series router, Damaged_Beez2.4 in this example, is shown selected.
- Click the wireless network name of your Linksys E series router (Damaged_Beez2.4 in the example).
- Type your wireless network password (Security Key) into the Password field. Click OK.

After setup
The internet appears to be unavailableIf the internet has difficulty communicating with your router, the problem may appear as a “Cannot find [internet address]” message in your web browser. If you know that the internet address is correct, and if you’ve tried several valid internet addresses with the same result, the message could mean that there’s a problem with your ISP or modem communicating with your router.Try the following:
- Make sure that the network and power cables are securely connected.
- Make sure that the power outlet that your router is connected to has power.
- Reboot your router.
- Contact your ISP and ask about outages in your area.
The most common method of troubleshooting your router is to turn it off, then back on again. Your router can then reload its custom settings, and other devices (such as the modem) will be able to rediscover the router and communicate with it. This process is called rebooting.To restart your router using the power cord, do the following:
- Disconnect the power cord from the router and the modem.
- Wait 10 seconds and reconnect the power cord to the modem. Make sure it has power.
- Wait until the modem’s online indicator has stopped blinking (about two minutes). Reconnect the power cord to the router.
- Wait until the blue Power and Internet lights on the front of the router are solid. This takes about two minutes. Then, connect to the internet from a computer.
Specifications
Linksys E8450
| Model Name | AX3200 Dual-Band Gigabit WiFi 6 Router |
| Model Number | E8450 |
| Switch Port Speed | 10/100/1000Mbps (Gigabit Ethernet) |
| Radio Frequency | 2.4 GHz and 5 GHz |
| # of Antennas | 4 |
| Ports | Ethernet (1-4), Internet, Power, USB 2.0 |
| Buttons | Wi-Fi Protected Setup, Reset, Power Switch |
| LEDs | Power, Internet, Ethernet (1-4) |
| UPnP | Supported |
| Security Features | WPA2 Personal, WPA3 Personal, WPA2/WPA3 Mixed Personal, WPA2 Enterprise, and WPA3 Enterprise |
| Security Key Bits | Up to 192-bit encryption |
| Storage File System Support | FAT, FAT32, NTFS, HFS+ |
Environmental
| Dimensions | 156mm (L) x 77.11mm (W) x 220mm (H) |
| Unit Weight | 638g |
| Power | 12V/2A |
| Certifications | FCC, IC, CE, Wi-Fi (IEEE 802.11 a/b/g/n/ac) |
| Operating Temperature | 32° to 104°F (0° to 40°C) |
| Storage Temperature | -4° to 140°F (-20° to 60°C) |
| Operating Humidity | 10% to 80% relative humidity, non-condensing |
| Storage Humidity | 5% to 90% non-condensing |
Notes:For regulatory, warranty, and safety information, see the CD that came with your router or go to Linksys.com/support/E8450.Specifications are subject to change without notice.Maximum performance derived from IEEE Standard 802.11 specifications. Actual performance can vary, including lower wireless network capacity, data throughput rate, range, and coverage. Performance depends on many factors, conditions, and variables, including distance from the accesspoint, the volume of network traffic, building materials and construction, operating system used, a mix of wireless products used, interference, and other adverse conditions.
LINKSYS and many product names and logos are trademarks of the Belkin group of companies. Third-party trademarks mentioned are the property of their respective owners. Licenses and notices for third-party software used in this product may be viewed here: http://support.linksys.com/enus/license. Please contact http://support.linksys.com/en-us/gplcodecenter for questions or GPL source code requests.© 2021 Linksys Holdings, Inc. and/or its affiliates. All rights reserved.
References
[xyz-ips snippet=”download-snippet”]